
Engraving a cutting board is a simple, rewarding DIY project that yields a functional, personalized piece for your kitchen or a thoughtful handmade gift for loved ones. Unlike paint or vinyl designs that peel after a few washes, engraved patterns are carved directly into the wood, so they last for years with proper care. This guide covers everything from choosing the right materials to sealing your finished board for long-lasting results, with pro tips to help even total beginners avoid common mistakes.
Why Engrave a Cutting Board?
Engraved cutting boards are far more durable than surface-level customization: in practice, a well-sealed engraved board can withstand hundreds of hand washes without fading, while painted or stick-on designs often peel after 10–15 uses. They’re perfect for personalized housewarming or wedding gifts, custom branding for small food vendors, or adding a unique touch to your own kitchen decor. For crafters looking to sell handmade goods, engraved boards also carry a higher perceived value than plain, unmodified stock.
Choosing the Right Cutting Board for Engraving
The best boards for engraving are solid hardwood or bamboo with a smooth, even surface. End-grain boards are ideal for detailed work, as their dense, uniform surface holds fine lines and small text cleanly, while edge-grain boards work well for simpler designs and monograms. Avoid plastic, composite, or resin-coated boards, as they melt or scorch under heat from engraving tools, and skip softwoods like pine, which have a loose grain that tears easily during carving. For beginners, a 12×18 inch maple or walnut board is a perfect size to practice on: it’s large enough for most designs but not unwieldy to handle. A stable board is also critical to avoid warping during the process, so prioritize proper board stability before you start.
Selecting Your Engraving Method
There are three main engraving methods to choose from, each with unique pros and cons for different skill levels and project goals:
Wood Burning (Pyrography)
The most accessible option for beginners, pyrography pens cost $15–$50 and require no special software. They work by heating a metal tip to burn designs into the wood surface, and are ideal for rustic, hand-drawn motifs, simple text, and small decorative patterns. The main downside is that they require steady hand control to avoid uneven, blotchy lines.
Laser Engraving
Best for precision and repeat work, hobbyist laser engravers start at $200, with commercial models costing $1000+. They use focused light to etch crisp, consistent designs, and can handle intricate patterns, small text, and large batches of boards in minutes. The tradeoff is a higher upfront cost and the need for proper ventilation to manage wood dust and fumes.
Hand Carving
For a truly rustic, 3D effect, hand carving uses small chisels or gouges to physically remove wood for the design. This method requires no power and creates deep, tactile engravings, but has a steep learning curve and is time-intensive, making it best for experienced DIYers.
Tools and Materials You’ll Need
Essential
- Solid wood or bamboo cutting board (smooth, uncoated surface)
- Engraving tool of your choice (pyrography pen, laser engraver, or small carving gouge)
- Fine-grit sandpaper (120, 220, and 320 grit)
- Lint-free cloth
- Food-safe sealant (mineral oil, beeswax blend, or FDA-approved wood finish)
- Safety gear: safety glasses, N95 dust mask, well-ventilated workspace
Optional
- Stencils or carbon transfer paper for tracing designs
- Painter's tape to hold stencils in place
- Free design software like Inkscape for laser engraving projects
- Polishing compound for a high-shine finish on engraved areas
- Small craft brush for cleaning debris from deep engravings If you’re engraving a well-loved used board, remove existing surface discoloration first: for general stains, follow removing existing discoloration, and for stubborn fruit stains, use the tips in tackling fruit-based discoloration.
Step-by-Step Engraving Guide
Step 1: Plan and Transfer Your Design
Start by sketching your design on paper first to work out spacing and sizing. For pyrography or hand carving, transfer the design to the board using carbon transfer paper or by tracing a pencil sketch directly onto the wood. For laser engraving, upload your vector design to the machine’s software and use built-in alignment tools to position it correctly. A common beginner mistake is skipping the test transfer: always do a quick test on a scrap piece of the same wood first to make sure the design lines up and looks as expected.
Step 2: Prep the Cutting Board
Wipe the board down with a dry lint-free cloth to remove any dust or debris. If the board has a rough surface or factory finish, lightly sand the entire engraving area with 220-grit sandpaper to create a smooth, even base. For boards with existing sealant, sand lightly to remove the top layer so your engraving tool can make clean contact with the wood. Make sure the board is completely dry and free of moisture before moving to the next step: even small amounts of water will cause uneven burning or warping when using heat-based tools.
Step 3: Set Up Your Engraving Tool
For pyrography: Plug in the tool and let it heat up for 3–5 minutes. Test the temperature on a scrap piece of the same wood: if it leaves a light, even brown mark, the temperature is correct; if it scorches dark black, lower the heat setting. For laser engravers: adjust power and speed settings based on your wood type (maple requires lower power than walnut, for example) and do a test pass on a scrap piece to avoid over-engraving. Always set up your workspace with proper ventilation: wood dust and fumes from engraving can be irritating if inhaled, so work near an open window or use a fan with a HEPA filter. Follow OSHA woodworking safety standards for proper ventilation and personal protective equipment use.
Step 4: Engrave Your Design
Work slowly and steadily, following your transferred lines exactly. For pyrography, hold the pen at a 45-degree angle and use light, even pressure—pressing too hard will burn through the wood and create uneven, dark blotches. For laser engravers, let the machine complete its full pass before moving the board to avoid misalignment. For hand carving, use a shallow V-gouge for clean lines and a U-gouge for subtle shading. If you make a small mistake, you can lightly sand the area and re-sketch the design, or for laser, run a second pass at a lower power to fix light spots.
Step 5: Sand and Refine the Engraving
Once you’ve finished engraving, use 320-grit sandpaper to smooth any rough edges around the design, especially if you used pyrography or hand carving. Use a small craft brush or a soft-bristled cleaning brush (like those recommended in gentle board cleaning) to remove all wood dust and debris from the engraving crevices. Wipe the entire board down with a dry cloth to ensure no dust remains before sealing.
Step 6: Seal the Engraved Board
Sealing is a critical step that many beginners skip: it protects the engraving from moisture, food stains, and wear, while also enhancing the contrast of the design to make it pop. Apply a thin, even coat of food-safe mineral oil or beeswax sealant with a lint-free cloth, rubbing it into the engraved crevices as well as the rest of the board. Let it absorb for 30 minutes, then wipe off any excess sealant with a clean cloth. Let the board cure for 24 hours before using it for food, and apply a second coat for extra durability if you plan to use the board frequently. Always use sealants approved for food contact, per FDA food-safe material guidelines to avoid any health risks.
Step 7: Final Inspection and Use
After the sealant cures, run your fingers over the engraving to check for any rough spots or missed areas. Lightly sand any rough edges if needed, and apply a small amount of polishing compound for a high-shine finish on the engraved area if desired. Your engraved board is now ready for use: it’s safe for cutting all types of food, and the design will last for years with proper care. For long-term maintenance, follow the guidance in long-term board care to keep your board in top condition.
Pro Tips for Stunning, Professional-Looking Results
- Practice on a scrap piece of the same wood type first to get a feel for your tool’s settings and pressure.
- For pyrography, place painter's tape over your stencil to prevent the pen tip from snagging the paper and creating uneven lines.
- For laser engraving, use vector files instead of raster images for crisp, clean lines that won’t pixelate at small sizes.
- Use sans-serif fonts for text engravings, as their simple, uniform lines are far easier to carve cleanly than serif fonts with small flourishes.
- For a pop of color, fill deep engravings with food-safe wood stain or epoxy after sanding, before applying the final sealant coat.
- An engraved cutting board makes a beautiful addition to a custom kitchen space, fitting perfectly into streamlined kitchen styling for a cohesive, personalized look.
- Regular upkeep of your engraving tool will extend its lifespan and ensure consistent results: clean pyrography tips with a damp cloth when cool to remove carbon buildup, and calibrate your laser engraver monthly per the manufacturer’s instructions. For more guidance on maintaining kitchen tools, check out tool maintenance best practices.
Common Mistakes to Avoid
- Pressing too hard with pyrography or hand carving tools: this burns through the wood, creates uneven lines, and can even damage the tool tip. Use light, steady pressure instead.
- Skipping the test pass on scrap wood: this is the #1 cause of ruined boards, as you won’t know if your tool settings are correct until it’s too late.
- Engraving on wet or damp wood: moisture causes the wood to warp and creates uneven, blotchy burns when using heat-based tools. Always let your board dry completely before starting.
- Using non-food-safe sealant: this is a health hazard for boards that will be used for food preparation. Always verify that your sealant is approved for direct food contact.
- Rushing the engraving process: shaky, fast movements lead to messy, unprofessional results. Take your time, especially when working on detailed designs.
- Forgetting safety gear: wood chips, dust, and laser debris can cause eye injury or respiratory irritation. Always wear safety glasses and a dust mask while engraving.
Frequently Asked Questions
What tools do I need to engrave a cutting board?
For beginners, a basic pyrography (wood burning) pen is the most affordable and accessible option, costing as little as $15. For more precise, repeat work, a hobbyist laser engraver works well, while hand carving tools are best for experienced DIYers looking for a 3D, rustic effect.
Which wood is best for engraving cutting boards?
Hardwoods like maple, walnut, and cherry hold fine engraving details best, while bamboo is a durable, budget-friendly option that engraves cleanly. Avoid softwoods like pine, which have a loose grain that tears easily during engraving, and plastic or composite boards, which melt under heat.
Can I engrave a used cutting board?
Yes, as long as you thoroughly clean and sand the surface first. Remove any existing stains or food residue, sand the engraving area with 220-grit sandpaper to create a smooth base, and make sure the board is completely dry before engraving.
How long does an engraved cutting board last?
With proper sealing and care, an engraved cutting board will last for decades. The engraved design will not fade or peel, even with regular hand washing, as long as you avoid putting it in the dishwasher or cutting extremely hard foods like frozen items or bones directly on the engraved surface.
Can I engrave a plastic cutting board?
It’s not recommended. Most plastic cutting boards are made of polyethylene or polypropylene, which melt or scorch under the heat of pyrography tools or laser engravers, releasing harmful fumes. Stick to solid wood or bamboo boards for safe, clean engraving.
Do I need to sand the board before engraving?
Yes, even new boards often have a slight factory finish or rough spots that can cause uneven engraving. Lightly sanding the entire engraving area with 220-grit sandpaper creates a smooth, even surface that helps your tool make clean, consistent marks.
Conclusion
Engraving a cutting board is a simple, low-cost project that yields a functional, personalized item you’ll use for years, or a heartfelt gift that feels far more valuable than store-bought alternatives. While it may seem intimidating at first, following these steps and practicing on scrap wood first will help you avoid common mistakes and get stunning results every time. Whether you’re making a custom board for your own kitchen or fulfilling orders for a small food business, the process is accessible to crafters of all skill levels. Ready to get started? Gather your tools, pick a simple design, and create your first engraved cutting board today.
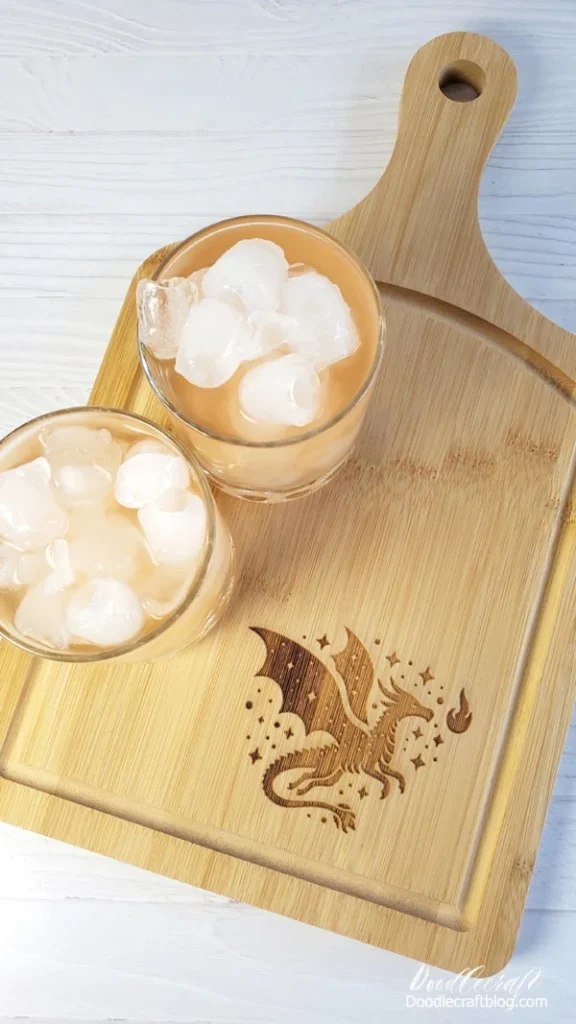
 A sealed engraved cutting board makes a personalized, lasting gift.
Credit: www.doodlecraftblog.com
A sealed engraved cutting board makes a personalized, lasting gift.
Credit: www.doodlecraftblog.com
 Laser engravers produce crisp, precise designs ideal for intricate patterns and text.
Credit: www.laserpecker.net
Laser engravers produce crisp, precise designs ideal for intricate patterns and text.
Credit: www.laserpecker.net
Frequently Asked Questions
What tools do I need to engrave a cutting board?
For beginners, a basic pyrography (wood burning) pen is the most affordable and accessible option, with entry-level models starting at $15. For precise, repeat work or intricate designs, a hobbyist laser engraver is a better fit, while hand carving tools are best for experienced DIYers seeking a tactile, 3D effect. No matter which tool you select, always pair it with safety glasses and a dust mask to protect yourself from wood dust and fumes.
Which wood is best for engraving cutting boards?
Hardwoods like maple, walnut, and cherry hold fine engraving details best, with their dense, uniform grain creating clean, crisp lines. Bamboo is a durable, budget-friendly alternative that engraves just as cleanly for simpler designs. Avoid softwoods like pine, which have a loose, porous grain that tears easily during carving or burning, and skip plastic or composite boards entirely, as they melt under heat from engraving tools and release harmful fumes.
Can I engrave a used cutting board?
Yes, as long as you properly prep the surface first. Start by thoroughly cleaning the board to remove all food residue and stains, then sand the entire engraving area with 220-grit sandpaper to create a smooth, even base and remove any old sealant. Make sure the board is completely dry before starting your engraving, as leftover moisture will cause uneven burning or warping when using heat-based tools.
How long does an engraved cutting board last?
With proper sealing and routine care, an engraved cutting board will last for decades, with the design remaining crisp and intact even after years of regular use. The engraving will not fade or peel, even with frequent hand washing, as long as you avoid placing the board in the dishwasher or cutting extremely hard items like frozen foods or bones directly on the engraved surface. Reapply a food-safe sealant every 3 to 6 months to keep the wood and engraving protected from moisture and wear.
Can I engrave a plastic cutting board?
It is not recommended. Most plastic cutting boards are made of polyethylene or polypropylene, which melt or scorch under the heat of pyrography tools or laser engravers, releasing toxic fumes. Stick to solid wood or bamboo boards for safe, clean engraving that will hold up to regular food prep use.
Do I need to sand the board before engraving?
Yes, even brand-new boards often have a subtle factory finish or minor rough spots that can cause uneven, blotchy engraving. Lightly sanding the entire engraving area with 220-grit sandpaper creates a smooth, consistent surface that helps your tool make clean, uniform marks. If your board has an existing sealant, sand lightly to remove the top layer so your engraving tool can make direct contact with the raw wood for the best results.
Conclusion
Engraving a cutting board is a simple, low-cost project that yields a functional, personalized item you’ll use for years, or a heartfelt gift that feels far more valuable than store-bought alternatives. While it may seem intimidating at first, following these steps and practicing on scrap wood first will help you avoid common mistakes and get stunning results every time. Whether you’re making a custom board for your own kitchen or fulfilling orders for a small food business, the process is accessible to crafters of all skill levels. Ready to get started? Gather your tools, pick a simple design, and create your first engraved cutting board today.

Hi, I’m Daniel Brooks—a food lover and kitchen gear enthusiast. I enjoy testing cookware, utensils, and gadgets to see what really works in everyday cooking. At PlugChef.com, I share honest reviews, comparisons, and simple guides to help you choose the best tools for a safer, smarter, and more enjoyable kitchen.
Related posts:
 Pull Down Under Cabinet Spice Rack: Maximize Your Space
 How to Organize T Shirts on a Shelf: Expert Tips
 Navy Bean And Ham Recipes: Delicious Comfort Food Ideas
 Cherry Pistachio Chocolate Ice Cream: Irresistible Summer Delight
 How to Freeze Bacon Strips: Easy Tips for Freshness & Flavor
Iced Coffee With French Press: Ultimate Guide for Bold Refreshment
How to Freeze Bacon Strips: Easy Tips for Freshness & Flavor
Iced Coffee With French Press: Ultimate Guide for Bold Refreshment

