Under Counter Kitchen Lights LED: Transform Your Space with Dimmable Elegance
LED under‑cabinet lighting has moved beyond a simple convenience to become a core element of modern kitchen design. By delivering focused, adjustable illumination exactly where food preparation happens, these fixtures improve safety, boost productivity, and add a subtle layer of style that can shift from bright work‑light to soft ambience with a dimmer or smart control. The following guide walks through the reasons to choose LED, the specifications that matter most, popular product families (illustrated with the original images), and practical steps for installation and upkeep—all updated for 2026 best practices.
Why Choose LED Under‑Cabinet Lighting
LED technology dominates under‑cabinet fixtures because it combines high efficacy with long life and minimal heat output. A typical 12‑inch LED bar draws 2–4 watts yet delivers 200–300 lumens, enough to eliminate shadows on countertops without raising the kitchen’s temperature. Compared with older halogen or fluorescent strips, LEDs last 25 000–50 000 hours, reducing replacement frequency and waste. Their solid‑state construction also makes them resistant to vibration—a benefit in busy kitchens where doors slam and pots clang.
From a design perspective, the low profile of LED strips or puck lights lets them sit flush beneath cabinets, preserving clean lines. Dimmable drivers and color‑tunable chips enable homeowners to match lighting to tasks: a crisp 5000 K daylight for chopping vegetables, a warm 2700 K glow for evening entertaining, or any point in between. Many models now integrate motion sensors, hand‑wave activation, or voice‑control compatibility, adding convenience without extra wiring.
Key Features to Consider
Brightness and Lumens
Look for a lumen output that matches your countertop depth and the ambience you want. For general prep, aim for 250–350 lumens per linear foot; for detailed tasks like pastry work, 400 lumens or more provides extra clarity. Manufacturers usually list lumens per fixture; divide by the fixture length to get a per‑foot figure.
Color Temperature
Measured in Kelvin (K), color temperature influences both visibility and mood.
- 2700 K–3000 K: Warm white, reminiscent of incandescent bulbs; ideal for creating a cozy atmosphere.
- 3500 K–4000 K: Neutral white, balances clarity and comfort; a common choice for all‑purpose kitchens.
- 5000 K–6500 K: Daylight white, offers the highest contrast for fine Detail work.
Some fixtures provide adjustable color tuning, letting you shift the tone via remote or app.
Dimmability
A smooth dimming curve (typically 10 %–100 %) prevents flicker and lets you set precise light levels. Look for products that mention “ PWM‑free ” or “ analog dimming ” if you are sensitive to strobing. Compatibility with standard 0‑10 V dimmers, DALI, or proprietary remotes should match your existing control system.
Power Source
- Plug‑in: Simplest installation; requires a nearby receptacle.
- Hardwired: Provides a clean look with no visible cords; may need an electrician for new circuits.
- Rechargeable/battery‑operated: Offers portability and eliminates wiring, but demands periodic charging (usually every 2–4 weeks depending on use).
- USB‑rechargeable: Combines the convenience of a plug with the flexibility of a movable fixture.
Control Options
- Remote control: Handy for adjusting brightness or color from a distance.
- Motion sensor: Activates light when movement is detected, saving energy in infrequently used zones.
- Hand‑wave or touch: Useful when hands are full or dirty.
- Voice/app: Integration with Alexa, Google Assistant, or proprietary apps enables scheduling and scene setting.
Installation Type
- Adhesive backing: Quick stick‑on for lightweight strips; ensure the surface is clean and dry.
- Magnetic mounts: Allow repositioning without tools; work best on steel cabinets or with supplied metal plates.
- Screw‑mounted clips: Provide the most secure hold for heavier bars or hardwired units.
Popular Product Types (Illustrated)
Plug‑in LED Bars

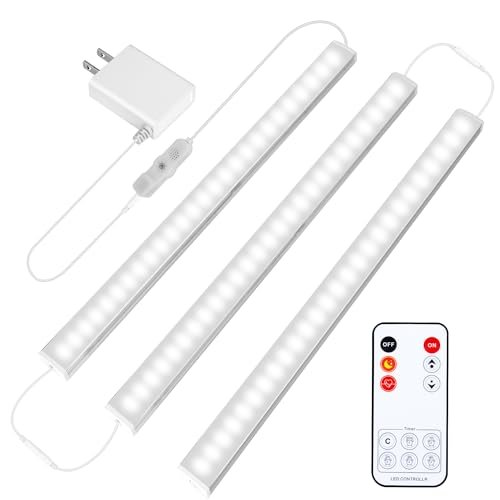
The Maylit set offers three 12‑inch bars with a daylight white 6000 K output and a built‑in dimmer, ideal for renters who want a tool‑free upgrade.
Flexible LED Strips with Remote

DAYBETTER’s six‑piece kit provides a 9.8‑foot run of adjustable white light (2700 K–6500 K) plus a remote for on‑the‑fly color shifts.
Rechargeable Motion‑Sensor Lights

Each MCGOR unit runs on an internal battery, features a PIR motion sensor, and offers five dimming levels via a magnetic base.
Hand‑Wave Activated Lights

MYPLUS adds a gesture sensor that toggles the 4000 K natural‑white light without touching a switch, plus plug‑and‑play simplicity.
Slim Dimmable with Memory

This ultra‑slim (0.22 in) bar remembers the last brightness level, delivers a crisp 6000 K output, and fits tight recesses.
Hardwired Multi‑Color Bars

UltraPro’s hardwired fixture lets you switch among warm white (2700 K), neutral (4000 K), and daylight (5000 K) while maintaining a smooth dimming curve.
Smart RGB Kit with Voice Control
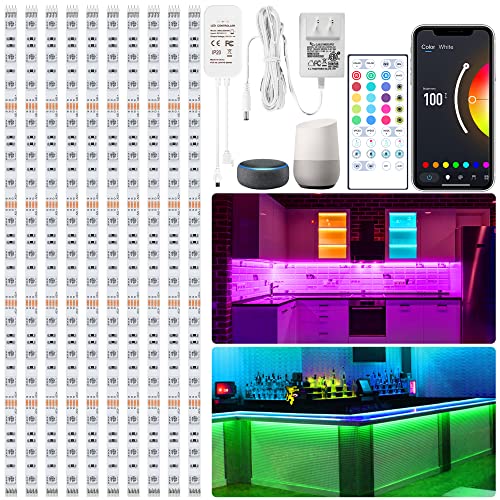
Ten individually addressable LEDs support millions of colors, sync to music, and respond to Alexa or Google Assistant commands.
Warm White Flexible Strip

Lafulit’s 13‑foot roll provides a consistent 2700 K warm glow, perfect for creating an inviting ambience over long counter runs.
USB Rechargeable Motion Sensor

Each DiDiSky unit packs a 2200 mAh battery, a PIR sensor, and magnetic mounting for easy repositioning.
Multi‑Color Motion‑Sensor Light

Gritin combines 84 LEDs with three selectable color temperatures, five brightness steps, and motion activation for versatile, hands‑free lighting.
Installation Guide
- Plan the layout – Measure the length of each cabinet run and decide whether you need a single continuous strip or multiple puck lights. Mark the mounting points with a pencil.
- Prepare the surface – Clean the underside of the cabinet with isopropyl alcohol to remove grease; let dry completely. This ensures adhesive backing or magnetic plates hold securely.
- Mount the fixtures –
- For adhesive strips, peel the liner and press firmly, holding for 30 seconds.
- For magnetic bases, attach the supplied steel plate to the cabinet (screws or adhesive) then snap the light onto it.
- For hardwired units, run the appropriate gauge cable to a junction box, connect line, neutral, and ground per local code, then secure the fixture with mounting brackets.
- Connect power – Plug‑in models simply reach the nearest outlet. Rechargeable units should be placed in their charging dock after installation. Hardwired fixtures need the circuit breaker switched off during wiring.
- Test and adjust – Turn on the light, verify even illumination, and set your preferred brightness or color temperature using the supplied remote, app, or wall dimmer.
- Secure loose cables – Use cable clips or zip ties to keep cords tidy and away from heat sources.
Tip: If you are installing multiple zones, consider a single‑point power distributor (a low‑voltage driver with several outputs) to reduce wall wart clutter.
Maintenance & Longevity
- Cleaning – Wipe the diffuser with a microfiber cloth lightly dampened with water; avoid abrasive cleaners that can scratch the lens.
- Checking connections – Every six months, inspect plug‑in connectors for looseness and ensure rechargeable contacts are free of corrosion.
- Battery care – For rechargeable models, store at ~50 % charge if the light will sit unused for more than a month; this extends cell life.
- Firmware updates – Smart RGB kits occasionally receive app updates that improve compatibility or add features; keep the companion app current.
- Thermal management – Although LEDs run cool, ensure the fixture is not trapped in an airtight space; a small gap allows convective cooling and protects the driver electronics.
Under normal kitchen use, quality LED under‑cabinet lights retain >80 % of their initial lumen output after 25 000 hours, translating to many years of service before noticeable dimming.
Frequently Asked Questions
How do under‑cabinet LEDs improve kitchen safety?
By eliminating shadows on the work surface, they reduce the chance of cuts or slips while chopping, mixing, or reading recipes. The instant‑on nature of LEDs means there’s no warm‑up delay when you reach for a utensil.
Can I mix different color temperatures in the same kitchen?
Yes. Many designers use a cooler 5000 K light over the prep zone for task clarity and a warmer 2700 K strip above the dining island or breakfast bar to create a welcoming feel. Just keep the transition gradual to avoid stark contrasts.
Are motion‑sensor lights reliable in a busy kitchen?
Modern PIR sensors have adjustable sensitivity and timeout settings, allowing you to tailor activation to foot traffic. Place the sensor where it detects arm movement rather than just door swings to avoid false triggers.
What is the typical payback period for LED under‑cabinet lighting?
Assuming a 4‑watt LED bar runs three hours daily, annual electricity use is about 4.4 kWh. At an average US rate of $0.15/kWh, that’s roughly $0.66 per year. Compared with a 20‑watt halogen bar (≈$3.30/year), the LED saves ~ $2.60 annually, paying back a $20 fixture in under eight years—plus the added benefit of longer lifespan and lower heat.
Do I need an electrician for hardwired models?
If you are comfortable working with household wiring and local codes permit DIY low‑voltage work, you can install a hardwired LED driver yourself. However, any connection to the mains (120 V/240 V) should be performed or inspected by a licensed electrician to ensure safety.
Conclusion
Under‑cabinet LED lighting delivers a blend of practicality and atmosphere that few other kitchen upgrades can match. By selecting the right brightness, color temperature, dimming method, and power source for your workflow, you gain clearer task light, adaptable ambiance, and long‑term energy savings. Whether you opt for a simple plug‑in bar, a flexible strip with remote control, or a smart RGB kit that syncs to your favorite playlist, the investment pays off in both daily comfort and home value.
Ready to elevate your kitchen? Explore the options above and choose the solution that fits your space, style, and cooking habits.
If you found this guide helpful, deepen your kitchen safety and preparedness routine by adding a compact emergency kit to your under-sink drawer, where it’s accessible but out of the way. For a more comprehensive approach to home safety, consider stocking up on first aid kit refill supplies to keep existing kits current. If your household has outdoor spaces or frequent travelers, a lightweight backpacking first aid kit ensures you’re covered on the go. For those who prioritize vintage aesthetics, a vintage military first aid kit adds character while remaining functional. Finally, ensure your vehicle is compliant with regulations by checking the DOT vehicle first aid kit requirements before your next road trip.

Hi, I’m Daniel Brooks—a food lover and kitchen gear enthusiast. I enjoy testing cookware, utensils, and gadgets to see what really works in everyday cooking. At PlugChef.com, I share honest reviews, comparisons, and simple guides to help you choose the best tools for a safer, smarter, and more enjoyable kitchen.
Similar Posts