Must Have Bread Baking Tools: Transform Your Kitchen into a Bakery Heaven
Bread baking blends simple ingredients with precise technique, and the right tools turn guesswork into confidence. Whether you’re mixing your first sourdough starter or shaping artisan loaves for a weekend crowd, having purpose‑built equipment streamlines each step, improves consistency, and makes the process more enjoyable. This guide covers the essential tools every home baker should consider, how to choose materials that suit your workflow, and practical tips for maintenance and safety.
Core Tools for Every Baker
A well‑equipped bread‑making station starts with a few fundamentals: something to hold and shape rising dough, implements for mixing and handling sticky batter, a way to score loaves for controlled expansion, and surfaces that prevent sticking while promoting even heat. Below we break down each category, highlight key features, and note trade‑offs so you can pick what fits your kitchen and budget.
Proofing Baskets (Bannetons)
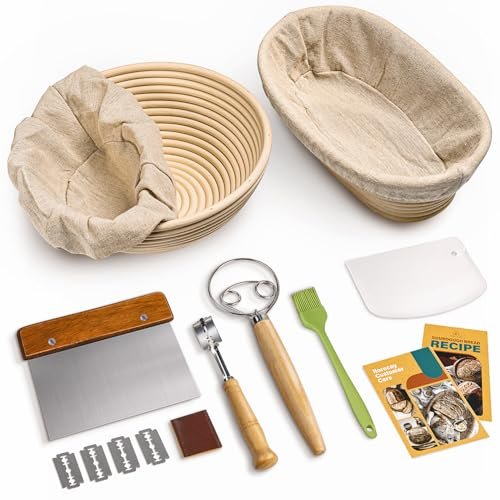
Proofing baskets give dough its shape during the final rise, wicking moisture from the surface to create that coveted crisp crust. Traditional bannetons are made from rattan or cane, which breathes and leaves a subtle spiral pattern on the loaf. Modern versions may include a linen liner for easier release.
- Shape options – Round baskets produce boule‑style loaves; oval baskets suit bâtards or pan‑style breads.
- Size guide – A 9‑inch round basket holds roughly 500 g of dough; a 10‑inch oval accommodates up to 750 g for larger loaves.
- Care – After each use, tap out excess flour, let the basket air‑dry completely, and store in a dry place. Occasional light brushing with a food‑safe oil prevents mold.
 RORECAY banneton set with round and oval proofing baskets
 Superbaking round banneton proofing basket for sourdough dough shaping
 Banneton proofing basket set with round and oval baskets plus lame
Dough Whisks and Bench Scrapers
Mixing dough by hand can over‑develop gluten, leading to dense bread. A dough whisk’s stiff wires cut through flour and water without overworking the mixture, while a bench scraper (or dough cutter) helps portion, fold, and transfer sticky dough with minimal mess.
- Whisk material – Stainless steel resists corrosion and is dishwasher safe; silicone‑coated wires reduce sticking.
- Scraper design – A flexible plastic or metal blade with a comfortable handle lets you scrape bowls clean and divide dough evenly.
- Technique – Use the whisk to incorporate liquid until just combined, then switch to the scraper for folding and bulk fermentation.
 Vedalio sourdough baking kit with jar, scraper, brush and proofing basket
Bread Lame (Scoring Tool)
Scoring creates a weak point in the dough’s surface, directing expansion during oven spring and preventing random bursts. A lame holds a razor‑sharp blade at a consistent angle, allowing clean cuts for decorative patterns or functional vents.
- Blade types – Single‑edge blades are replaceable; double‑edge models offer longer life but require careful handling.
- Handle – Wooden or acrylic handles provide grip; some include a leather sheath for safety.
- Technique – Hold the lame at a 30‑45° angle, make swift, confident cuts ¼‑½ inch deep, and clean the blade after each use.
 Saint Germain bread lame with six blades and leather protective cover
Silicone Baking Mats
A silicone mat replaces parchment paper, offering a reusable, non‑stick surface that withstands temperatures up to 480 °F (250 °C). Integrated measurement grids help with dough portioning and shaping, while the mat’s conductivity promotes even browning.
- Thickness matters – Extra‑thick mats (≈2 mm) reduce hot spots and last longer under frequent use.
- Cleaning – Wash with warm soapy water or place on the top rack of a dishwasher; avoid abrasive pads that can damage the surface.
- Size selection – A 26 × 16 inch mat fits most half‑sheet pans; smaller 12 × 16‑inch versions work for quarter‑sheet trays.
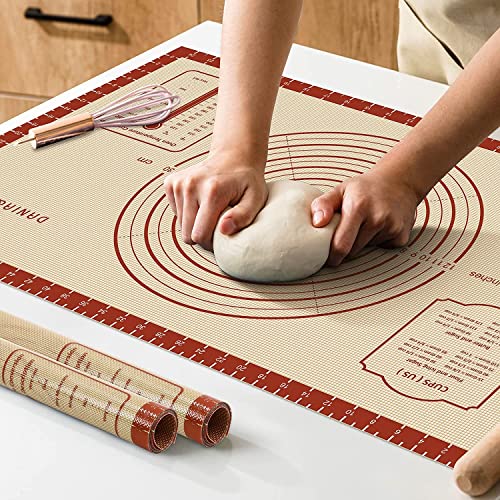 Extra thick silicone baking mat with measurement grid for precise dough work
Spurtles and Jar Spatulas
Long‑handled spurtles excel at mixing sourdough starters, reaching the bottom of jars, and scraping every bit of fermented culture without damaging the container. Their gentle wooden (or silicone) heads prevent scratching glass or ceramic vessels.
- Material choice – Wood offers a classic feel and is safe for acidic starters; silicone is heat‑resistant and easier to sanitize.
- Length – Handles between 10‑12 inches provide leverage for deep jars while remaining maneuverable.
- Maintenance – Hand‑wash wooden spurtles and oil them periodically to prevent drying; silicone can go in the dishwasher.
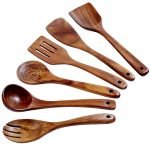
 Pair of wooden spurtles with long handles for mixing and jar scraping
Bread Sling (for Dutch Oven Transfer)
Moving a proofed loaf into a pre‑heated Dutch oven can be tricky, especially when the pot is hot. A silicone bread sling with extended handles lets you lift and lower the dough safely, minimizing the risk of burns or torn loaves.
- Non‑stick surface – Prevents the dough from sticking during transfer.
- Handle length – Longer stays keep your hands clear of the oven’s radiant heat.
- Versatility – Works with round or oval loaves and can double as a mat for cooling.
 Gonsir silicone bread sling with longer handles for safe Dutch oven transfer
Choosing Materials and Maintenance
Selecting tools isn’t just about price; material properties affect durability, hygiene, and baking results.
- Natural fibers (cane, rattan) – Excellent for breathability in bannetons but require diligent drying to avoid mold.
- Food‑grade silicone – Heat stable, flexible, and easy to clean; ideal for mats, slings, and basket liners.
- Stainless steel – Corrosion resistant for whisks, scrapers, and lame blades; maintains sharpness over time.
- Wood – Comfortable to handle and gentle on containers; needs occasional oiling to prevent cracking.
A regular maintenance routine extends tool life: scrape off dough residue, wash with mild detergent, air‑dry completely, and store in a dry cabinet. For wooden items, a light coat of mineral oil every few weeks keeps the grain from splitting.
Budget vs. Professional Options
You don’t need to buy everything at once. Start with a versatile core set and add specialty pieces as your baking expands.
| Budget starter (≈ $30‑$50) | Mid‑range upgrade (≈ $80‑$150) | Professional‑grade (≥ $200) |
|---|---|---|
| Basic 9‑inch round banneton | Set with round + oval baskets | Multiple basket sizes, linen liners |
| Stainless‑steel dough whisk | Whisk with silicone coating | High‑tension wire whisk, replaceable blades |
| Plastic bench scraper | Stainless‑steel scraper with handle | Bench knife with bench‑scale integration |
| Simple silicone mat (no grid) | Measurement‑grid mat, extra thick | Mat with non‑slip backing, temperature sensor |
| Wooden spurtle | Dual‑material spurtle (wood + silicone) | Set of specialty spatulas (offset, bowl scraper) |
| Basic lame with one blade | Lame with 3‑blade pack & sheath | Premium lame with blade storage, ergonomic handle |
As you refine your technique, consider investing in a digital scale (±1 g accuracy) and an instant‑read dough thermometer—tools that boost consistency more than any single baking implement.
Safety and Kitchen Preparedness
Baking involves hot ovens, sharp blades, and heavy pots. Keeping a basic first‑aid kit nearby ensures you can treat minor cuts or burns quickly. For example, a marine first aid basics kit provides essential supplies for kitchen mishaps, while an empty first aid box lets you customize contents to your needs. If you often transport baked goods to events, reviewing vehicle first aid rules helps you stay compliant on the road. For outdoor baking sessions, an angler aid kit offers waterproof supplies, and regularly checking kit refill supplies ensures nothing expires unnoticed.
In addition to a first‑aid kit, observe these safety habits:
- Use oven mitts when handling hot Dutch ovens or baking sheets.
- Keep the lame’s blade sheathed when not in use.
- Place silicone mats on a flat, stable surface to prevent slipping.
- Clean spurtles promptly to avoid dough buildup that could harbor bacteria.
Step‑by‑step Bread Baking Workflow Using These Tools
- Feed & measure starter – Use a wooden spurtle to stir your sourdough jar, then weigh flour and water on a digital scale.
- Mix autolyse – Combine flour and water in a bowl; incorporate with a dough whisk until no dry bits remain.
- Add starter & salt – Mix in the starter, then sprinkle salt; finish mixing with the whisk, then switch to a bench scraper for folding.
- Bulk fermentation – Transfer dough to a lightly oiled container, cover, and let rise at room temperature, performing stretch‑and‑folds with the scraper every 30 minutes.
- Shape & proof – Turn the dough onto a floured surface, shape into a boule or batard, and place seam‑side up in a floured banneton. Cover with a linen liner or plastic wrap and refrigerate overnight.
- Score & bake – Pre‑heat your Dutch oven to 475 °F (245 °C). Invert the dough onto parchment or a silicone mat, score with a lame, then slide the loaf into the pot using a bread sling. Bake covered for 20 minutes, uncover, and bake another 20‑25 minutes until deep golden.
- Cool – Remove the loaf with the sling, place on a wire rack, and let cool at least one hour before slicing.
Following this workflow, each tool has a clear purpose, reducing guesswork and improving loaf consistency.
FAQ
What is a banneton proofing basket?
A banneton (or proofing basket) holds dough during its final rise, wicking moisture to create a firm exterior and leaving a decorative pattern on the crust. Natural cane or rattan versions breathe; some include a removable linen liner for easier release.
How does a dough whisk work?
Its stiff wires cut through flour and water, blending ingredients without overdeveloping gluten. This yields a tender crumb, especially important for high‑hydration sourdough.
Why use a silicone baking mat?
It provides a reusable, non‑stick surface that tolerates high heat, eliminates parchment waste, and often includes measurement grids for precise dough shaping. Mats also promote even browning by distributing heat uniformly.
What is the purpose of a bread lame?
A lame scores the dough’s surface before baking, controlling where the loaf expands during oven spring. Clean cuts prevent random bursting and allow artistic patterns or functional vents.
How do spurtles aid in baking?
Long‑handled spurtles reach the bottom of starter jars, letting you mix and scrape without damaging the container. Their gentle heads (wood or silicone) protect glass or ceramic while providing leverage for thick mixtures.
Conclusion
Equipping your kitchen with the right bread‑baking tools transforms a hobby into a reliable craft. From proofing baskets that shape your loaf to silicone mats that ensure even baking, each piece serves a specific function that saves time, improves results, and adds enjoyment to the process. Start with a core set—banneton, dough whisk, bench scraper, lame, and mat—then expand as your baking ambitions grow. Keep safety in mind by storing a basic first‑aid kit nearby and maintaining your tools with simple cleaning routines. With these essentials at hand, you’ll consistently bake bread that looks professional, tastes incredible, and fills your home with the aroma of fresh‑baked heaven.

Hi, I’m Daniel Brooks—a food lover and kitchen gear enthusiast. I enjoy testing cookware, utensils, and gadgets to see what really works in everyday cooking. At PlugChef.com, I share honest reviews, comparisons, and simple guides to help you choose the best tools for a safer, smarter, and more enjoyable kitchen.
Similar Posts