Led Lights for Kitchen: Transform Your Space with Under Cabinet Lighting
Proper illumination turns a kitchen from a mere cooking area into a functional, inviting workspace. Under‑cabinet LED lights deliver focused task lighting, reduce countertop shadows, and add a layer of ambient glow that enhances both safety and style. In 2026, advances in efficiency, controllability, and design make these fixtures a smart upgrade for any home.
Why Under Cabinet LED Lighting Matters
LEDs consume far less power than older xenon or halogen strips while delivering equal or greater brightness. Their long lifespan—often rated for 30,000 to 50,000 hours—means fewer replacements and lower maintenance. Beyond energy savings, quality LEDs render colors accurately, helping you see true food hues and reducing eye strain during prep work.
The U.S. Department of Energy notes that LED under‑cabinet fixtures can cut lighting energy use by up to 75 % compared with halogen.
Key Benefits
- Task‑focused brightness: Direct light eliminates shadows on the countertop, improving chopping, measuring, and cleaning.
- Adjustable ambiance: Dim‑to‑warm or cool tones let you shift from bright work mode to relaxed dining.
- High CRI (Color Rendering Index): Look for CRI ≥ 90 for faithful color representation.
- Low heat output: LEDs stay cool, protecting cabinet finishes and reducing cooling load.
- Flexible control: Options range from simple rotary dimmers to motion sensors and smart‑home integration.
- Long lifespan: Up to 50,000 hours translates to over a decade of typical kitchen use.
Choosing the Right Type: Strips, Pucks, Bars, and Tape Lights
LED Strip Lights
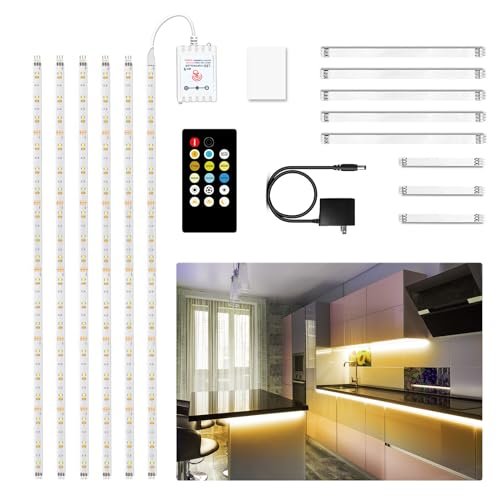
Flexible, cuttable strips with adhesive backing suit most cabinet interiors. They can be trimmed to length and often include a diffusing cover for even glow. Ideal for continuous runs along the front or rear edge of cabinets.
 Shows adhesive-backed strip with remote control.
LED Puck Lights
Small, round fixtures that deliver spot‑like illumination. Many are battery‑operated or rechargeable, with magnetic mounts for easy repositioning. Useful for highlighting specific zones such as a spice rack or sink area.
 Rechargeable puck with magnetic base and motion sensor.
 Wireless puck lights featuring motion activation.
LED Bar Lights
Rigid, linkable bars provide uniform output and a clean look. Often hardwired or plug‑in, they work well when a seamless line of light is desired across multiple cabinets.
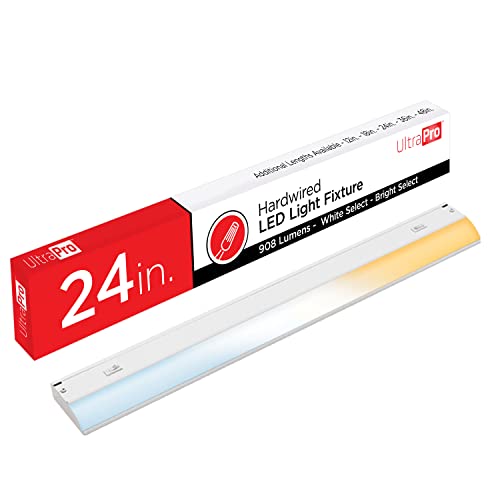 Hardwired bar offering three selectable color temperatures.
LED Tape Lights
Similar to strips but frequently supplied with an aluminum channel for better heat dissipation and a polished appearance. Suitable for modern, minimalist kitchens.
 Compact tape‑style light with motion sensor and dimming.
Understanding Light Metrics: Lumens, Color Temperature, CRI
Lumens per Foot
For effective countertop illumination, aim for 300–500 lumens per linear foot of strip or bar. A typical 24‑inch bar at 400 lm/ft delivers roughly 800 lumens—enough for most prep tasks.
Color Temperature Guide
- 2700K–3000K: Warm white, creates a cozy, inviting feel.
- 3500K–4000K: Neutral white, balances warmth and clarity.
- 5000K–6500K: Cool/daylight white, maximizes visibility for detailed work.
Importance of CRI
A CRI of 90+ ensures that fruits, vegetables, and meats appear in their true colors. Lower CRI can make foods look dull or off‑hue, which is undesirable when judging freshness.
Installation Methods and Wiring Options
Adhesive‑Backed Strips
Peel‑and‑stick application works for renters or quick updates. Ensure the surface is clean, dry, and free of grease for lasting adhesion.
Magnetic Mounts
Rechargeable pucks often include magnets that attach to steel cabinet interiors or provided metal plates. Allows tool‑free relocation.
Screw‑Mounted Bars
Pre‑drilled holes let you secure bars with small screws. Offers a semi‑permanent hold while still permitting removal.
Plug‑In vs Hardwired vs Battery
- Plug‑In: Simple outlet connection; limited by cord length and outlet placement.
- Hardwired: Provides a clean, permanent look; requires routing cable through cabinets or wall. In 2026, the NEC still classifies under‑cabinet lighting as a low‑voltage load, but a licensed electrician should perform any new circuit work.
- Battery/Rechargeable: Eliminates wiring altogether; ideal for cabinets without nearby power. Remember to charge periodically—most units run 4–8 hours per charge.
 Ultra‑thin plug‑in bars with daylight white output.
 Hardwired fixture with adjustable color temperature.
Professional Hardwiring Considerations
If you opt for hardwiring, verify that the fixture is UL‑listed for damp locations and that the driver matches the voltage (typically 12 V DC or 24 V DC). Use a dedicated switch or integrate with a wall‑mounted dimmer for convenience.
Controls and Smart Features
Dimmer Types
- Rotary/Slide: Analog control, inexpensive.
- Remote: Infrared or RF remotes let you adjust from a distance.
- PWM (Pulse‑Width Modulation): Provides smooth dimming without flicker.
- 0‑10 V: Common in commercial fixtures; requires compatible driver.
Motion and Occupancy Sensors
Automatic activation saves energy in pantries or cabinet interiors that are infrequently used. Ensure the sensor’s range matches the cabinet depth to avoid false triggers.
Tunable White & Smart Integration
Many 2026 models support Wi‑Fi, Zigbee, or Bluetooth, enabling voice control via Alexa, Google Assistant, or Apple HomeKit. You can schedule scenes—e.g., bright cool light for morning prep, warm dim light for evening entertaining.
 Remote‑controlled puck with color‑changing capability.
Cost Comparison and Energy Savings (2026 Estimates)
| Type | Avg. Cost (per ft) | Typical Wattage | Annual Energy Cost* | Savings vs. Halogen |
|---|---|---|---|---|
| LED Strip | $8–$12 | 4–6 W/ft | $1.20–$1.80 | ~75 % |
| LED Puck (recharge) | $15–$20 each | 0.5–1 W | $0.15–$0.30 | ~80 % |
| LED Bar (hardwired) | $12–$18 per bar | 6–9 W | $0.50–$0.75 | ~70 % |
| LED Tape (channel) | $10–$14 per ft | 5–7 W/ft | $0.40–$0.60 | ~73 % |
*Based on 3 hours/day use, $0.14/kWh average residential rate.
These figures show that even a modest upgrade pays for itself within a year through reduced electricity bills.
Maintenance and Longevity
- Cleaning: Wipe the diffuser with a dry microfiber cloth; avoid abrasive cleaners that could scratch the surface.
- Connections: Periodically check plug‑in or hardwired joints for signs of corrosion, especially in humid kitchens.
- Battery‑operated units: Recharge when output dims; most include a USB‑C port for quick top‑up.
Quality LEDs maintain >70 % of initial output after 50,000 hours, so expect a decade of reliable service before noticeable fade.
Safety and Compliance
Choose fixtures that are UL‑listed for damp locations (UL 1598) and RoHS‑compliant to restrict hazardous substances. Proper heat sinking is essential; most LED strips include an aluminum backing or are installed within a channel that dissipates warmth. Never exceed the manufacturer’s recommended run length without additional power injection, as voltage drop can cause dimming or overheating.
Design Tips: Matching Kitchen Style, Placement, and Glare Control
- Continuous runs provide even illumination and a sleek look; avoid gaps that create bright spots.
- Center the light along the front or rear edge of the cabinet to reduce glare on reflective countertops.
- Use a diffuser or frosted cover to soften individual LED points.
- Match finish: Bronze or black housings complement traditional cabinets; brushed nickel or white suit modern designs.
- Consider under‑cabinet lighting as a layer: Combine with pendant lights over islands and ceiling recessed fixtures for a balanced lighting plan.
Frequently Asked Questions
How Do I Determine the Right Length?
Measure the interior length of each cabinet run where you want light. Add a few inches for overlap if using linkable bars, then cut strips to the nearest marked increment.
Can I Use Under‑Cabinet Lights in a Bathroom?
Yes, provided the fixture is rated for damp or wet locations (look for UL‑listed “damp location” marking). Avoid installing non‑rated units where they may be exposed to direct water spray.
Do I Need a Separate Transformer?
Most LED strips and bars include an integrated driver. If you purchase a bare strip, you’ll need a matching constant‑voltage driver (usually 12 V DC or 24 V DC).
Are Smart LEDs Worth the Extra Cost?
If you value scheduling, voice control, or the ability to shift color temperature throughout the day, the premium (typically 10‑20 % more) is justified by added convenience and ambiance flexibility.
How Do I Prevent Voltage Drop on Long Runs?
For strips exceeding 16 ft, inject power at the midpoint or use a higher‑gauge wire. Many manufacturers sell “power feed” connectors designed for this purpose.
Conclusion
Upgrading to under‑cabinet LED lighting delivers measurable gains in task performance, energy efficiency, and kitchen aesthetics. By selecting the right type, understanding key metrics, and choosing an appropriate control method, you can create a workspace that is both functional and pleasant to spend time in. Start by measuring your cabinets, decide whether adhesive strips, magnetic pucks, or hardwired bars suit your needs, and enjoy the immediate improvement in light quality and utility.
Take the first step today—measure your cabinet interiors and choose a fixture that matches your lighting goals.
Additional Tips for Long-Lasting Performance
To maximize the lifespan of your LED fixtures, follow these maintenance practices:
- Avoid harsh cleaners: Use a microfiber cloth dampened with water or a mild glass cleaner; never spray cleaner directly onto the fixture.
- Check adhesive regularly: Inspect adhesive strips every 6 months, especially in kitchens with high humidity or grease exposure.
- Test sensors periodically: If you installed motion sensors, verify their range and sensitivity quarterly to ensure reliable activation.
For hardwired installations, inspect the driver annually. Drivers can fail over time, causing flickering or dimming. If you notice reduced brightness, consult the manufacturer's replacement guidelines.
Common Troubleshooting Issues
| Issue | Likely Cause | Solution |
|---|---|---|
| Flickering | Loose connection or failing driver | Tighten wire nuts; replace driver if necessary |
| Dim output on one end | Voltage drop on long runs | Add power injection or shorten run length |
| Hot spots on cabinet | Inadequate heat sinking | Install an aluminum channel or improve ventilation |
| Sensor not triggering | Obstructed sensor or incorrect placement | Reposition sensor; check battery if wireless |
If problems persist after basic troubleshooting, consult a licensed electrician for hardwired systems.
Where to Source Quality Fixtures
When selecting your fixtures, prioritize brands with established reputations in LED technology. Look for:
- Clear specifications: Lumens, wattage, CRI, and color temperature should be prominently listed.
- Warranty coverage: Quality manufacturers offer at least a 2‑year warranty, often up to 5 years.
- Compatibility: Ensure the fixture matches your existing circuitry or includes a compatible driver.
Many retailers offer installation kits that include adhesive, screws, and power injection connectors, simplifying setup for DIY enthusiasts.
External Authority Resources
For detailed information on LED efficiency standards, the U.S. Department of Energy's Lighting Technology Center provides up-to-date guidance on energy-efficient lighting solutions. Their resources cover everything from basic installation to advanced smart lighting integration.
The Environmental Protection Agency's Energy Star program offers certification information that helps consumers identify high-performance fixtures. Choosing Energy Star‑rated products ensures you're selecting fixtures that meet strict efficiency benchmarks.
Integrating with Home Safety Preparedness
While improving your kitchen's lighting reduces accident risk, pairing your upgrade with a comprehensive home safety kit ensures you're ready for any situation. Minor cuts or burns are common during food prep, and having supplies within arm's reach can make a significant difference.
Compact emergency supplies can fit neatly in a kitchen drawer or on a shelf, ensuring accessibility without cluttering your workspace. For those with mobile workspaces or RVs, similar lighting principles apply—focus on task illumination while keeping safety supplies nearby.
Review first aid essentials to ensure your kit is fully equipped. Whether you're building a kit from scratch or upgrading an existing one, aligning lighting and safety creates a comprehensive approach to kitchen care.
The Two Missing Product Images
 Shows a slim plug‑in fixture with memory recall feature.
 USB‑powered bars designed for easy linking.
Final Thoughts on Kitchen Lighting Upgrades
Lighting is often an afterthought in kitchen renovations, yet it profoundly impacts how the space functions and feels. By understanding the technical specifications—lumens, color temperature, CRI, and wattage—you can make informed choices that balance performance with aesthetics.
Investing in quality fixtures now saves money and frustration down the road. Whether you choose adhesive strips for flexibility, hardwired bars for permanence, or rechargeable pucks for convenience, the right lighting transforms your kitchen into a safer, more inviting environment.
Take the first step today—measure your cabinet interiors and choose a fixture that matches your lighting goals. Consider pairing your under-cabinet lights with dimmable overhead fixtures for a fully adjustable lighting scheme that adapts from meal preparation to evening entertaining. This layered approach ensures both flexibility and comprehensive coverage across different kitchen zones, allowing you to shift from bright task lighting during cooking to a softer glow for relaxed dining. Remember that under-cabinet lighting is an investment in both safety and style; by selecting fixtures that match your kitchen's specific needs—whether for precise task illumination or ambient warmth—you create a space that is not only more functional but also more enjoyable to inhabit. The modest upfront cost quickly pays off through energy savings and enhanced daily usability. Take the time to measure carefully, choose quality components, and follow manufacturer guidelines for a result that transforms your cooking experience.

Hi, I’m Daniel Brooks—a food lover and kitchen gear enthusiast. I enjoy testing cookware, utensils, and gadgets to see what really works in everyday cooking. At PlugChef.com, I share honest reviews, comparisons, and simple guides to help you choose the best tools for a safer, smarter, and more enjoyable kitchen.
Similar Posts