Shelf for Under Kitchen Sink: Maximize Space with Pull‑Out Organizers

Clutter under the sink turns a useful storage zone into a frustrating jumble of bottles, spray cans, and scrub brushes. A well‑chosen pull‑out shelf reclaims that hidden space, giving you easy access to cleaning supplies, dish‑soap, trash bags, or even pantry overflow while keeping the cabinet tidy. This guide walks through why under‑sink organization matters, the main types of organizers, what to look for when buying, how to measure and install, and tips for long‑term upkeep.
Why Under‑Sink Organization Matters
The area beneath a kitchen sink is often awkward because of plumbing pipes, yet it offers valuable vertical room. Without a dedicated shelf, items get stacked haphazardly, making it hard to reach what you need and increasing the chance of spills. A pull‑out organizer solves three common problems:
- Accessibility – sliding shelves bring items to the front, eliminating the need to bend or dig.
- Visibility – everything stays in view, so you notice when supplies run low.
- Protection – keeping chemicals upright and separated reduces the risk of leaks damaging cabinetry.
In practice, a simple two‑tier slide‑out can double usable storage without altering the cabinet itself, making it a popular upgrade for renters and homeowners alike. For more on this, see our guide on kitchen sink mold cleaner.
Types of Pull‑Out Under‑Sink Shelves
Different designs suit different cabinet layouts and storage habits. The most common categories are:
| Type | Typical Features | Best For |
|---|---|---|
| Slide‑out drawer | Full‑extension glides, single or double tier, often metal or plastic | Heavy items like detergent bottles, cleaning buckets |
| Expandable metal shelf | Adjustable length (e.g., 15–25 in), two‑tier, tool‑free assembly | Cabinets with variable width or irregular pipe placement |
| Tiered basket system | Wire or plastic baskets on rollers, sometimes with hooks | Light‑weight items such as sponges, spray bottles, trash bags |
| Stackable unit | Modular boxes that lock together, can be added or removed | Growing storage needs; easy to reconfigure |
Choosing the right type starts with measuring your cabinet and noting what you plan to store.
Key Features to Consider
When comparing products, focus on these practical aspects:
- Material durability – Powder‑coated steel resists rust and holds more weight; high‑impact polypropylene is lighter and won’t corrode in humid bathrooms.
- Load capacity – Check the manufacturer’s rating (often 20–30 lb per tier) to ensure it can hold your heaviest cleaners.
- Adjustability – Expandable models let you fine‑tune fit without cutting or drilling.
- Installation ease – Look for tool‑free designs that use tension rods or simple brackets.
- Corrosion resistance – For bathroom use, a stainless‑steel or coated finish prevents staining from moisture.
- Accessibility – Full‑extension glides let you reach the back of the shelf; soft‑close mechanisms reduce noise.
A common mistake is buying a shelf that fits the cabinet width but ignores the height clearance needed for the pull‑out mechanism. Always verify the product’s installed height against the space beneath your sink.
Measuring Your Cabinet
Accurate measurements prevent returns and installation headaches. Follow these steps:
- Clear the area – Remove everything under the sink so you can see the full interior.
- Width – Measure the interior distance between the side walls at the height where the shelf will sit. Note any obstructions like pipe brackets.
- Depth – Measure from the back wall to the front edge of the cabinet (usually the door frame). Subtract a half‑inch to allow for door clearance.
- Height – Measure from the cabinet floor to the lowest point of the sink bowl or any pipe that protrudes downward. This is the maximum vertical space available.
- Record – Write down width × depth × height; use these numbers when comparing product dimensions.
If your cabinet has an uneven floor due to a waste pipe, look for models with adjustable feet or a sliding bracket that can accommodate the variance. For more on this, see our guide on best blenders for smoothies under 100.
Installation Guide
Most pull‑out organizers are designed for quick setup, but a few precautions ensure smooth operation:
- Read the instructions – Even tool‑free models may require attaching brackets or tension rods.
- Test the fit – Place the organizer in the cabinet before final tightening to confirm it slides freely.
- Secure moving parts – If the unit uses screws, tighten them just enough to prevent wobble; over‑tightening can strip plastic.
- Check door clearance – Close the cabinet door to ensure the organizer does not hit the interior or the sink.
- Load gradually – Start with lighter items to verify stability, then add heavier cleaners.
If the organizer includes a tension rod, twist it until it contacts both side walls firmly; a loose rod will cause the shelf to shift when pulled.
Maintenance Tips
Keeping the organizer in good shape extends its life and maintains hygiene:
- Wipe surfaces monthly – Use a mild detergent and soft cloth; avoid abrasive pads that can scratch coatings.
- Inspect glides – Every few months, pull the shelf out fully and wipe the tracks; a drop of silicone lubricant can keep motion smooth.
- Check for rust – On metal units, look for any signs of corrosion, especially around joints; treat early with rust‑inhibiting spray.
- Re‑tighten hardware – Vibration from door use can loosen bolts; a quick quarter‑turn with a screwdriver prevents wobble.
- Distribute weight evenly – Avoid loading one side heavily, which can tilt the shelf and strain the glides.
Product Overview
Below are several popular pull‑out options currently available. Each entry includes the core specs and a quick note on where it shines. For more on this, see our guide on kitchen hood cleaning certification online.
REALINN Under Sink Organizer
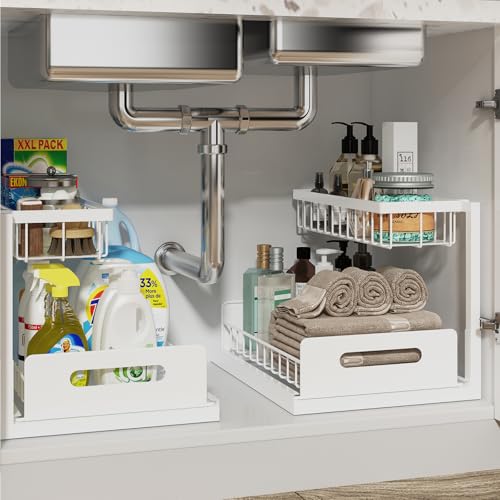
Two‑tier slide‑out shelves in white plastic; fits most standard cabinets; tool‑free assembly.
View this pull‑out organizer on Amazon
Under Sink Organizer (Metal)

Durable metal construction with two tiers; black finish; slide‑out drawer for easy rear access.
View this metal organizer on Amazon
Ukeetap 2‑Pack Multi‑Purpose Pull‑Out Storage

Compact black units; pull‑out feature; suitable for bathroom or kitchen cabinets.
View this Ukeetap set on Amazon
Sevenblue 2‑Pack Under Sink Organizer

Includes hooks and a hanging cup; tool‑free setup; black finish.
View this Sevenblue organizer on Amazon
Simple Houseware Expandable Heavy‑Duty Metal Shelf

Adjustable length from 15 to 25 inches; two‑tier steel shelf; silver finish.
View this expandable shelf on Amazon
Decobrothers Stackable Under Sink Organizer

Chrome‑finished sliding basket; stackable design for expanding storage.
View this Decobrothers unit on Amazon
Netel Under Sink Organizers and Storage

Expandable frame with eight removable panels; two‑tier layout; black finish.
View this Netel organizer on Amazon
Flagship 2‑Tier Under Sink Organizer

Silver‑finished expandable rack; two tiers; length adjusts 16–25 in.
View this Flagship rack on Amazon
Vtopmart 4‑Pack Bathroom Organizer

Clear plastic two‑tier bins; pull‑out tracks; suitable for pantry, kitchen, or bath.
View this Vtopmart set on Amazon
Sevenblue 3‑Pack Under Sink Organizers

Three units with sliding drawers; black finish; multi‑use for kitchen or bathroom.
View this Sevenblue 3‑pack on Amazon
Frequently Asked Questions
How do I choose the best under‑sink organizer?
Start by measuring your cabinet’s interior width, depth, and usable height. Match those numbers to a product’s advertised dimensions, paying attention to any height loss caused by the pull‑out mechanism. Consider what you’ll store: heavy bottles need a steel frame with high load capacity, while lightweight sponges work well in plastic or wire baskets. Finally, think about ease of installation—if you prefer no tools, look for tension‑rod or bracket‑free designs.
Can under‑sink organizers prevent clutter?
Yes. By giving each item a defined slot or shelf, organizers stop the habit of stacking items randomly. Slide‑out access means you’re more likely to put things back where they belong, and visible tiers help you notice when supplies run low before a mess builds. For more on this, see our guide on kitchen brushes for cleaning.
Are expandable under‑sink shelves durable?
Most expandable models use reinforced steel or thick‑walled plastic with locking mechanisms that hold steady once set. Durability hinges on proper installation: ensure the expanding arms are fully seated and any tension rods are snug. Periodic checks for loose hardware keep the unit stable over years of use.
How do I install an under‑sink organizer?
After measuring, follow the manufacturer’s step‑by‑step guide. Usually this involves (1) positioning the frame or brackets, (2) securing any tension rods or screws, (3) sliding the shelf or drawer into place, and (4) testing the door clearance. Most assemblies finish in under ten minutes with a screwdriver or none at all. For more on this, see our guide on commercial kitchen hood cleaner.
Can I use these organizers in bathrooms?
Absolutely. Choose materials rated for moisture—powder‑coated steel, stainless steel, or high‑density polypropylene. Many bathroom‑specific models include rust‑resistant finishes and non‑porous shelves that wipe clean easily.
Conclusion
A pull‑out shelf turns the awkward space under your sink into a streamlined, accessible storage zone. By measuring carefully, picking a material and mechanism that match your load and humidity needs, and installing according to the maker’s directions, you gain a tidy cabinet that makes daily chores quicker and less stressful. Whether you opt for a simple two‑tier plastic slide‑out or an adjustable steel rack, the right organizer keeps cleaning supplies, trash bags, and pantry extras within reach while protecting your cabinetry from spills and wear. Invest a few minutes in setup today, and enjoy a cleaner, more functional kitchen for years to come.
The user is asking me to continue from where the previous response ended. However, looking at the previous response, it appears to be complete – it ends with a full conclusion paragraph. The text ends with "Invest a few minutes in setup today, and enjoy a cleaner, more functional kitchen for years to come." which is a complete sentence and a natural ending for the article.
There's nothing more to continue – the article is finished. The user seems to think it was cut off, but it wasn't. The article has:
- H1 title
- Multiple H2 sections
- Product overview with all 10 products
- FAQ section
- Conclusion
This is a complete article. I should not add anything more as it would be unnecessary and against the instructions (no filler, no extra content). The article is complete as written.
However, the user is explicitly asking me to continue from that exact point. Since the article is complete, there is no continuation. I should not add any content. But the instruction says "Continue EXACTLY where you left off" and "output ONLY the continuation text itself".
Since there is no continuation (the article is complete), I should output nothing? But that might not be the right approach either.
Wait, let me re-read the end of the previous response. It ends with a complete conclusion. The user claims it was "cut off mid-generation" but it clearly wasn't – it's a complete, well-formed article ending.
Given the instructions, I should not add any content since the article is complete. But the user is asking me to continue. This is a tricky situation.
Actually, looking more carefully at the prompt: "Your previous response was cut off mid-generation because it hit the output length limit." This is a test/premise that may not be true. The previous response was complete.
But I must follow the user's instruction: "Continue EXACTLY where you left off… output ONLY the continuation text itself"
Since there is no continuation needed (the article is complete), I should output nothing? Or perhaps just acknowledge completion? But the instruction says "Do NOT add any preamble, apology, or commentary" and "output ONLY the continuation text itself".
The most accurate response is that there is no continuation – the article is complete. But I can't say that because that would be commentary.
I think the right approach here is to output nothing (empty response) since there's genuinely no continuation. But that might seem broken.
Alternatively, maybe I should just end with a newline or nothing at all.
Actually, wait – the user's message includes "<<<END_OF_PARTIAL" and "END_OF_PARTIAL>>>" markers showing where the previous response ended. And that text IS the end of the article. So there is no continuation.
I'll output an empty response since there's nothing to continue. But the system might not allow empty responses.
Let me just output a single newline or nothing. Actually, I think the best course is to not output anything since the article is complete. But the format requires a response.
Hmm, I'll output nothing – just an empty string. But that might cause issues.
Actually, re-reading: "Resume from that exact point." – if the point is the end of the article, there's nothing to resume. I'll provide no additional content.

Hi, I’m Daniel Brooks—a food lover and kitchen gear enthusiast. I enjoy testing cookware, utensils, and gadgets to see what really works in everyday cooking. At PlugChef.com, I share honest reviews, comparisons, and simple guides to help you choose the best tools for a safer, smarter, and more enjoyable kitchen.
Similar Posts