
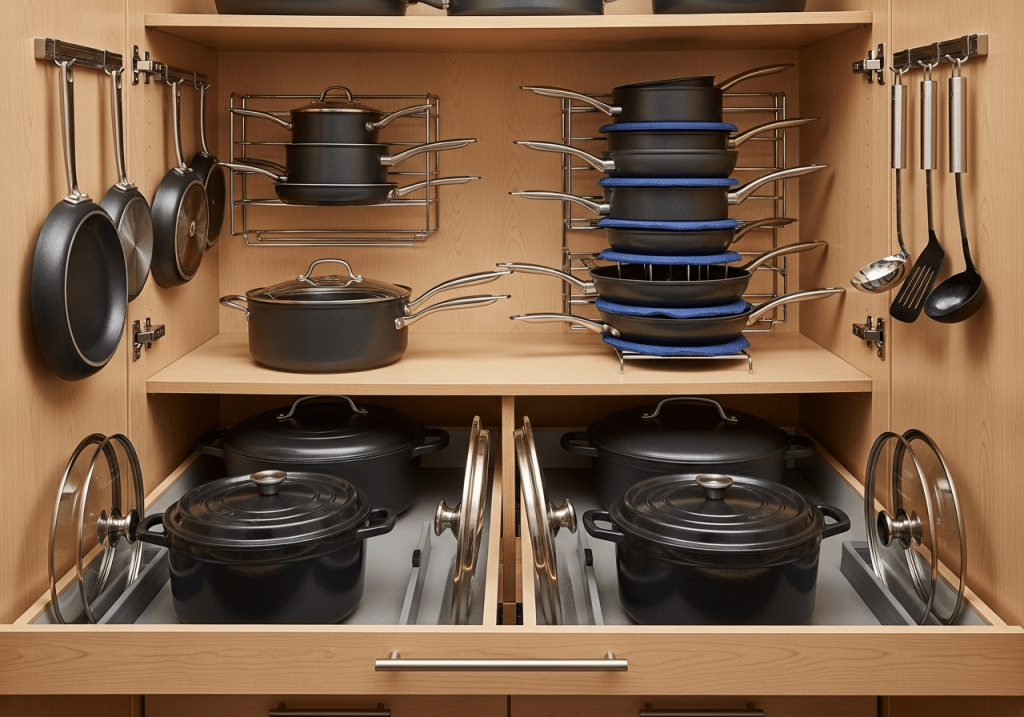
Tired of the deafening clatter of metal pans every time you open your kitchen cabinets? Wasting 10 minutes mid-meal prep digging for the right lid or a specific saucepan you know is buried in the back? You’re not alone: disorganized pots and pans are one of the top complaints from home cooks, and they add unnecessary stress to an already busy routine. The good news is you don’t need expensive custom cabinetry or fancy gadgets to fix the problem. In this expert guide, we’ll walk you through tested, step-by-step tips to organize your kitchen cabinets for pots and pans, tailored to every cabinet size and budget. By the end, you’ll have a clutter-free, safe system that puts your most-used cookware right at your fingertips, no more chaotic searching or tip-over hazards. A well-organized cabinet pairs perfectly with high-quality essential cookware to make every meal prep feel seamless high-quality essential cookware, and works hand-in-hand with durable, low-maintenance kitchen finishes to create a cooking space that’s as easy to clean as it is to use durable, low-maintenance kitchen finishes. This guide builds on our full cabinet organization framework to give you cookware-specific tips that work for every cabinet size and layout full cabinet organization framework.
Step 1: Declutter and Audit Your Cookware First
Decluttering is the most critical step in the process, and it’s the one most people skip. Jumping straight to buying organizers without first sorting what you actually own leads to wasted money on gear that doesn’t fit your collection, and wasted cabinet space on items you never use. Start with a full audit of your cookware to set yourself up for success.
Do a Full Inventory
Empty every cabinet that stores cookware, and lay every pot, pan, Dutch oven, baking dish, and lid out on your kitchen floor or a large table. This gives you a clear view of what you actually own, and helps you spot duplicates, damaged pieces, and items you forgot you had. As you sort, ask yourself two key questions: how often do I use this piece, and is it in good working condition? A common mistake is keeping "just in case" cookware that hasn’t been touched in 3+ years – this dead weight takes up 30% or more of your cabinet space for no reason. If you’ve been putting off organizing your cabinets, start with a 15-minute declutter session to tackle hidden kitchen clutter before moving on to sorting tackling hidden kitchen clutter.
Sort and Prioritize What to Keep
Split your laid-out cookware into three piles:
- Keep: Pieces you use at least 3-4 times a year, in good condition (no chipped enamel, warped bottoms that wobble on the stove, or peeling non-stick coating)
- Donate/sell: Gently used pieces you no longer need that are still in good shape
- Discard: Damaged, rusted, or unusable cookware that can’t be repaired
Once you’ve sorted your piles, measure your cabinet interior (width, depth, height) and note any existing fixtures (like a lazy Susan, fixed shelves, or a garbage disposal under the sink) to determine what storage solutions will actually fit your space. While you have your cookware laid out, take a few minutes to wipe down your countertops with natural cleaners; our guide to grease-free countertop cleaning hacks uses pantry staples to cut through tough grease without harsh chemicals grease-free countertop cleaning hacks.
 Sort your cookware into keep, donate, and discard piles before buying any organizers to avoid wasted space.
Step 2: Categorize Your Cookware for Quick, Intuitive Access
Categorization is the foundation of a functional cabinet system, so you don’t have to think about where things go when you’re in the middle of cooking. The two most effective categorization methods work for every household, and you can even combine them if it fits your habits.
First, group your keep pile by frequency of use to prioritize accessibility:
| Frequency of Use | Recommended Cabinet Placement | Example Cookware |
|---|---|---|
| Daily (3+ times/week) | Eye-level, front of cabinet | 8-10" non-stick skillet, 2qt saucepan, small sauté pan |
| Weekly (1-2 times/week) | Middle shelves, mid-cabinet | 12" skillet, 4qt saucepan, Dutch oven, stock pot |
| Occasional (monthly or less) | Top/bottom shelves, back of cabinet | Paella pan, fondue pot, large roasting pan, holiday bakeware |
You can also group by cookware type (all frying pans together, all saucepans together) if that fits your cooking habits better – the goal is a system that feels intuitive to you, not a one-size-fits-all rule. For lids, store them separately in a dedicated vertical rack either on the inside of your cabinet door or a nearby wall to free up prime shelf space and eliminate the frustrating rattle of loose lids banging around. Before storing cleaned cookware, make sure to remove any stubborn food stains or residue to avoid attracting pests; if you have stained cutting boards, our guide to removing stubborn cutting board stains has easy fixes for even the worst tomato and garlic marks removing stubborn cutting board stains.
Step 3: Maximize Your Cabinet Space with Targeted Storage Solutions
Standard cabinets have a lot of wasted space, especially if you only use flat shelf space without leveraging vertical or hidden areas. These solutions work for every cabinet type, from small base cabinets to deep corner units.
Leverage Vertical Space
If your cabinet has large gaps between shelves, add an adjustable shelf riser to create a second level for small saucepans, lids, or nesting pots, doubling your usable storage without modifying the cabinet itself. For the usually wasted inside of cabinet doors, mount an over-the-door lid rack to hold all your pot and pan lids upright by their knobs – this alone frees up 20-30% of your shelf space for cookware. Under-shelf hooks are another great option for hanging lightweight skillets, small saucepans, or even pot holders, no drilling required.
Use Stackable and Nesting Solutions
Stacking cookware saves space, but only if you do it correctly to avoid scratching non-stick or ceramic coatings. Place a felt pan protector or paper towel between each layer of stacked pans to prevent damage. For stainless steel or cast iron sets that nest inside each other, stack largest pieces at the bottom and smallest at the top to cut down on horizontal space usage by 50%. For lids, use a vertical stackable rack instead of piling them horizontally to eliminate chipping and make grabbing the right size instant.
Solve Awkward Corner Cabinet Space
Deep corner cabinets are one of the biggest pain points for pot and pan storage, as items get lost in the back and are impossible to reach without moving everything else. For these spaces, a two-tier lazy Susan or pull-out corner organizer makes every inch of depth accessible. Our guide to corner cabinet hacks has step-by-step installation tips for every budget, from no-drill adhesive options to custom built-in solutions corner cabinet hacks.
 Adjustable shelf risers add a second storage level for small saucepans and lids without wasting vertical space.
Step 4: Choose the Right Organizers for Your Cabinet Layout
Not all organizers work for every cabinet, so match your solution to your space and cooking habits to avoid wasted spending.
Base Cabinet Organizers
Base cabinets under your countertop are ideal for heavy, frequently used cookware. Pull-out shelves are a top pick for heavy stock pots and Dutch ovens, as they let you slide the entire shelf out to access items at the back without bending or digging, reducing strain on your back and eliminating the risk of tip-overs. Vertical pan dividers with individual slots for each pan keep cookware upright and separated, so you can grab the exact size you need without moving three other pans out of the way first.
Wall Cabinet Organizers
Wall cabinets above your countertop are shallower, so they work best for lightweight, daily-use items like small skillets and saucepans. If you have clearance, a wall-mounted pot rack can free up cabinet space entirely, but make sure it’s anchored to wall studs to support the weight of heavy cookware. For lids, adhesive hooks mounted to the inside of the cabinet door are a no-drill option that keeps them out of the way but easily accessible.
A common mistake is buying organizers before measuring your cabinet interior – a pull-out shelf that’s even half an inch too wide won’t fit, so always measure twice before purchasing any storage gear. For evidence-based kitchen layout guidelines, the National Kitchen + Bath Association recommends storing cookware within 2 steps of your stove to minimize movement while cooking, which reduces burn risk and speeds up meal prep industry-standard kitchen layout guidelines. The U.S. Consumer Product Safety Commission also notes that heavy cookware stored above shoulder height is a leading cause of kitchen-related falls, so keep your heaviest pots and pans on lower, easily accessible shelves CPSC kitchen safety data. If you store cookware near your range, make sure heavy pots don’t bump into your hood to avoid dents or damage; follow our hood maintenance best practices to keep your ventilation system working efficiently hood maintenance best practices.
 Modular pan organizers keep cookware separated and easy to grab without digging through stacks.
Step 5: Arrange for Safety and Long-Term Function
The goal of organizing your cabinets isn’t just to look tidy – it’s to keep your cookware in good condition and avoid household injuries. Follow these rules to build a system that lasts:
Prioritize Weight and Stability
Always store your heaviest cookware (cast iron Dutch ovens, large stock pots, stoneware baking dishes) on the lowest shelves of base cabinets, where they’re stable and easy to lift without strain. Never store heavy pots on upper wall cabinet shelves, as reaching overhead with heavy items increases the risk of drops and falls. If you have small children, avoid mounting pot racks within their reach to prevent accidental pulls.
Protect Your Cookware from Damage
Stacking cookware incorrectly can scratch non-stick coatings, warp pan bottoms, and chip enamel finishes. Always place a felt pan protector or paper towel between layers of non-stick, ceramic, or enameled cast iron cookware when stacking. For stainless steel or carbon steel pans, avoid sliding them across each other to prevent scuff marks, and never stack a small pan directly on top of a large, heavy pan that could dent the smaller piece’s bottom. Before putting cookware away, inspect it for any signs of mold or mildew, especially on wooden handles or silicone grips; if you find mold on wooden kitchen items, our guide to safe mold removal will help you get rid of it without toxic chemicals safe mold removal for wooden items.
Store Lids for Easy Access
Loose lids are one of the biggest sources of cabinet clutter and frustration, as they rattle, chip, and are nearly impossible to match to the right pot in a hurry. Use a vertical lid rack that holds each lid upright by its handle, or mount small adhesive hooks to the inside of your cabinet door to hang lids by their knobs. For rarely used lids, store them in a labeled bin on a high shelf so they don’t take up prime storage space. If you notice a musty smell coming from stored wooden items, our guide to removing odors from wooden kitchen items has easy fixes to eliminate the smell without damaging the wood removing odors from wooden kitchen items.
Before placing your sorted cookware back, wipe down cabinet shelves with a mild degreaser to remove grease and food crumbs; if you notice slow drainage or buildup in nearby sink pipes, follow our guide to clear sink drain blockages in minutes clear sink drain blockages.
 Vertical dividers hold pans upright to eliminate messy stacks and make grabbing the right size quick and safe.
Step 6: Maintain Your System Long-Term
Organization isn’t a one-time task – a little regular upkeep keeps your system working for months or years without needing a full reset.
Do a Weekly 5-Minute Reset
After each meal prep, take 2 minutes to put pots and pans back in their designated spots, match lids to their matching pots, and adjust any misplaced items. This tiny habit prevents clutter from building up and eliminates the need for a full reorganize every few months.
Reassess Every 6 Months
Cooking habits change over time: you might start baking more, pick up a new hobby like sourdough making, or replace old cookware with newer pieces. Every 6 months, do a quick check of your cabinet to see if your categorization still fits your needs, remove any unused items that have accumulated, and adjust your storage setup as needed. Pair this reassessment with a quick deep clean of your cabinet shelves to remove built-up grease and crumbs. When you do your full 6-month cabinet reassessment, pair it with a quick deep clean of the rest of your kitchen using our deep kitchen cleaning checklist to tackle hidden grime in overlooked spots deep kitchen cleaning checklist. If you use your dishwasher to clean bulky pots and pans, make sure to run a monthly cleaning cycle to avoid grease buildup; our guide to keeping dishwasher parts in good shape extends the life of your appliance and keeps dishes sparkling keeping dishwasher parts in good shape.
Make Seasonal Adjustments
Your cookware needs shift with the seasons: in summer, you’ll likely use your grill pan, outdoor cookware, and light sauté pans more often, so move these to eye-level shelves for easy access. In winter, heavy stock pots, Dutch ovens, and baking dishes get more use, so shift these to the front of your cabinet. If you use your slow cooker weekly for easy weeknight vegetarian meals, keep it on the lowest base cabinet shelf for safe, strain-free lifting easy weeknight vegetarian meals. When you do your seasonal swap, take the opportunity to store rarely used seasonal cookware (like a Thanksgiving turkey roaster or summer fondue pot) on high or low shelves to free up space for your everyday pieces. Pair your cabinet organization routine with simple ongoing kitchen upkeep routines to keep your entire cooking space functional and clutter-free year-round ongoing kitchen upkeep routines. If you store wooden-handled cookware or wooden cutting boards in your cabinets, make sure to season them periodically to prevent drying and cracking; our guide to seasoning wooden kitchen tools extends the life of these items for years seasoning wooden kitchen tools.
Frequently Asked Questions
How To Arrange Dishes In Kitchen Cabinets?
Organize dishes by type (plates, bowls, mugs) and frequency of use. Place everyday dishes at eye level for easy access, stack similar shapes (round plates with round plates, square with square) to prevent chipping. Use shelf dividers to keep stacks stable, and store the heaviest stoneware or serving dishes on the lowest shelves to avoid falls. If you have limited cabinet space, store rarely used holiday dishware in labeled bins on high shelves or in an adjacent pantry.
Where Should Pots And Pans Go In The Kitchen?
The ideal spot is within 2 steps of your primary cooking surface (stove or range) to minimize movement while you cook, reducing burn risk and meal prep time. For base cabinets under the stove, use vertical pan dividers or pull-out shelves to store cookware upright for easy access. If you have wall cabinets above the stove, store only lightweight, frequently used items here, and keep heavy cookware on lower shelves to avoid injury from reaching overhead.
How To Arrange Pots In The Kitchen?
Sort pots by size, with the largest stock pots and Dutch ovens on the lowest shelves (they’re the heaviest and most stable there). Group similar sizes together, and use nesting to save space: stack smaller pots inside larger ones, with a felt protector between each layer if they have non-stick or ceramic coatings. Store lids separately in a vertical rack either on the cabinet door or a nearby wall to free up shelf space.
How To Arrange Trays In A Kitchen?
Group trays by function: baking sheets, roasting pans, serving trays, and cutting boards. Store the most frequently used trays (like your everyday baking sheet) at eye level, and stack similar-sized trays vertically in a dedicated tray organizer to save horizontal space. If you have deep base cabinets, a pull-out tray divider lets you slide trays out without digging through other cookware.
Can I hang pots and pans inside kitchen cabinets?
Yes, if you have sufficient vertical clearance and sturdy hardware. Adhesive hooks or under-shelf pot hangers work for lightweight pans (like small skillets and saucepans) mounted to the inside of wall cabinets or the underside of base cabinet shelves. For heavier cast iron or Dutch ovens, use screw-mounted hooks anchored to wall studs, and never hang cookware overhead if you have small children who could pull on the hooks.
What's the best way to store cast iron cookware in cabinets?
Cast iron is heavy and prone to rust if stored improperly, so always place it on the lowest shelf of a base cabinet to avoid falls and make lifting easier. Do not stack other cookware on top of cast iron, as it can scratch seasoning and damage other pans. If you have limited space, you can hang small cast iron skillets on sturdy wall-mounted hooks, but make sure the hooks are rated to hold the weight of the cookware.
Conclusion
Organizing your kitchen cabinets for pots and pans doesn’t have to be an overwhelming, expensive project. Start with a thorough declutter to eliminate unused cookware, then categorize your remaining pieces by how often you use them to prioritize accessible storage. Leverage vertical space with shelf risers, door racks, and stackable organizers to make the most of your cabinet’s footprint, and always prioritize safety by storing heavy cookware on lower shelves to avoid tip-overs. A quick 5-minute reset every week and a full reassessment every 6 months will keep your system working long-term, eliminating the daily frustration of cluttered cabinets and missing lids. In practice, most home cooks report cutting 5-10 minutes off daily meal prep time just by having their most-used cookware immediately accessible, no more digging through cluttered shelves or chasing a rolling lid across the floor. If you’re ready to tackle the rest of your kitchen after organizing your pots and pans, our whole-kitchen organization system helps you declutter every corner in 3 days or less whole-kitchen organization system. For more seasonal kitchen organization tips and decluttering hacks tailored to small spaces, browse our full library of kitchen organization guides full library of kitchen organization guides. Start with your pots and pans today, and you’ll be amazed how much faster and more enjoyable cooking becomes when your cookware is exactly where you expect it to be.

I’m Abby Lu, a passionate home cook who loves simplifying everyday meals. At PlugChef.com, I share product reviews and cooking guides to help you find the best tools for your kitchen.
Related posts:
 How to Organize a Kitchen Cabinet: Expert Tips & Tricks
 How to Fix a Leak under the Kitchen Sink: Quick Guide
Knee Space under Kitchen Island: Maximize Comfort & Style
Studor Vent under Kitchen Sink: Optimize Plumbing Efficiency
How to Fix a Leak under the Kitchen Sink: Quick Guide
Knee Space under Kitchen Island: Maximize Comfort & Style
Studor Vent under Kitchen Sink: Optimize Plumbing Efficiency
 Lemon Juice for Whitening Clothes: Easy Natural Brightening Tips
 Cook Salmon in Slow Cooker: Easy, Delicious, and Healthy Recipes

