
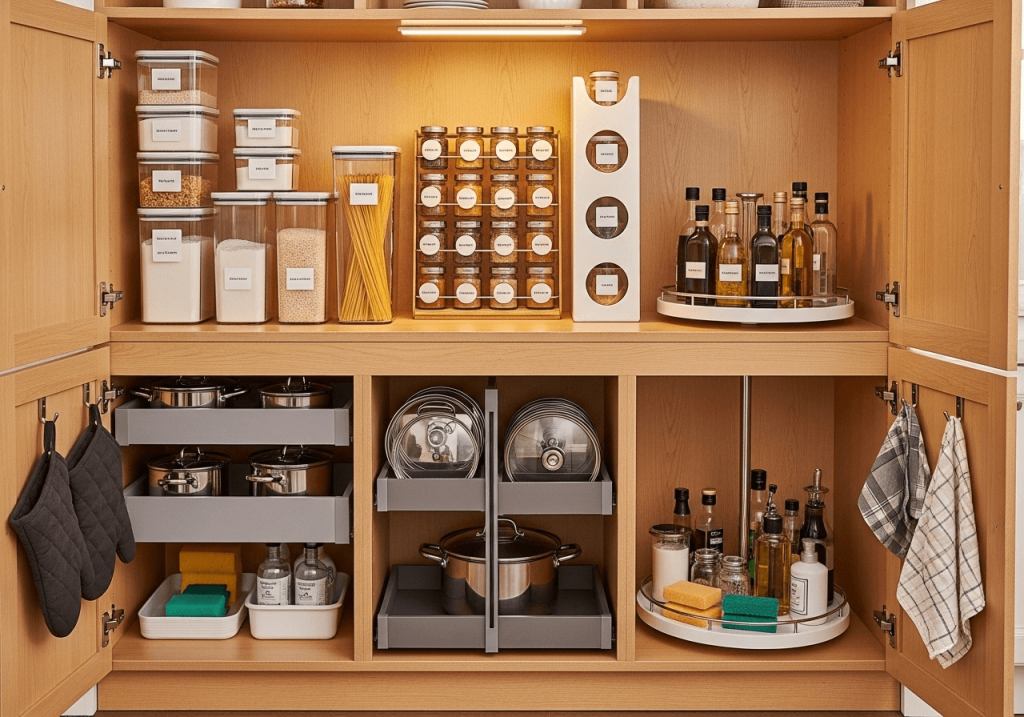
You’ve definitely been there: rummaging through a crowded kitchen cabinet mid-recipe, knocking over a stack of mugs to find a single lid, or discovering a bag of rice expired 18 months ago in the back corner. A disorganized kitchen cabinet doesn’t just waste time – it drives up food waste, makes cooking feel like a chore, and even creates safety hazards from heavy items stored overhead. The good news? Transforming even the messiest cabinet into a streamlined, functional space doesn’t require professional organizers or expensive custom installations. With a few intentional, expert-backed steps, you can build a system that works for your cooking habits, cabinet layout, and household needs. This guide covers everything from pre-organization prep to niche solutions for deep and corner cabinets, plus long-term maintenance tips to keep your space tidy for years to come.
Pre-Organization Prep: Assess, Declutter, and Plan
Skipping this step is the most common reason organization systems fall apart in 2 months or less. Start by emptying your entire cabinet and laying all items out on a counter or floor so you can see exactly what you own. Sort items into three piles:
- Keep: Items you use at least once every 3 months
- Donate: Gently used items you haven’t touched in 6+ months (extra bakeware, duplicate gadgets, etc.)
- Discard: Broken, expired, or stained items that can’t be repurposed
Next, measure your cabinet interior: note depth, width, shelf height, and any awkward corners or uneven shelves. This prevents buying storage tools that don’t fit. Finally, map your cooking habits: if you bake weekly, your flour and mixing bowls need to be at eye level; if you only pull out the slow cooker once a month, it can go on a high shelf.
Sketch a Simple Cabinet Diagram (Optional but Helpful)
Before moving items back in, sketch a rough layout of your cabinet on graph paper, noting shelf heights and the size of the items you plan to store on each shelf. This simple step prevents misjudging space for bulky items like stand mixers or large stockpots, and helps you visualize where each category of item will live.
 Sketching a simple cabinet diagram before organizing prevents misjudging space for bulky items
Core Organization Principles That Work for Every Cabinet
These universal rules apply to upper, lower, deep, and corner cabinets alike, and form the foundation of a system that stays tidy long-term.
1. Sort items by category, then frequency of use
First group like items together: all canned goods, all spices, all pots and pans, all everyday dishware. Within each category, use the "goldilocks zone" (15–60 inches off the floor, no bending or reaching required) for items you use 3+ times a week. Items you use monthly go on high or low shelves, and seasonal items (holiday dishware, summer grilling tools) go in the hardest-to-reach spots. For food items, follow the FIFO (first in, first out) rule: always put new groceries behind older ones, so you use expiring items first and reduce food waste.
2. Maximize vertical space, not just horizontal
Most standard kitchen cabinets are 12–24 inches deep, but most people only use the front 6 inches, leaving the back half as a clutter black hole. Add 2–4 inch tall shelf risers to double the storage on each shelf, perfect for canned goods, spices, or small jars. For cabinets over 18 inches deep, use stackable clear bins with front-facing handles, so you can pull the front bin out to access items in the back without knocking over everything else. You can also use the inside of cabinet doors: install adhesive hooks for measuring cups, pot lids, or small utensils, which frees up 2–3 inches of shelf space per door.
 Tiered risers double vertical storage space in standard 12-inch deep cabinets
3. Prioritize visibility and accessibility
Clear airtight containers are ideal for dry goods (pasta, rice, flour) because you can see inventory at a glance, and airtight seals keep pests and moisture out. Avoid opaque bins for food items, as you’ll forget what’s inside and end up with duplicate purchases. For non-food items (pot lids, bakeware), use labeled baskets or dividers so everyone in the household knows where to return items. Color-coding labels (red for baking, blue for savory cooking) can speed up meal prep, but only use this if it works for your household – no need for overcomplicated systems that you’ll abandon after a week.
 Vertical dividers work for small, narrow cabinets to keep utensils and small gadgets separated
4. Follow safe weight and storage guidelines
Always store heavy items (cast iron skillets, bulk canned goods) on lower shelves, not overhead, to prevent injury if they fall. Don’t overload shelves: most standard cabinet shelves hold 20–30 pounds, so avoid stacking 10 heavy pots on a single shelf. If you have young kids, store cleaning supplies and sharp utensils on a high shelf with a safety lock, or in a locked cabinet separate from food. For science-backed guidance on safe pantry storage temperatures and expiration date best practices, refer to the U.S. Food and Drug Administration food safety guidelines.
Organizing Specific Cabinet Types
Once you’ve mastered the core principles, use these targeted solutions for tricky cabinet layouts.
Deep Kitchen Cabinets
Deep cabinets (18+ inches deep) are notorious for "black hole" storage, where items get lost in the back. The most impactful upgrades are:
- Pull-out shelves or sliding bins: These let you pull the entire contents forward to see everything at once, no reaching required.
- A two-tier lazy Susan for spices, condiments, or small jars: It rotates 360 degrees, so you never have to dig for the item in the back.
- Vertical dividers for tall items (baking sheets, cutting boards): Store them upright instead of laying flat, so they don’t take up the entire depth of the cabinet.
A common mistake here is stacking items horizontally in deep cabinets, which means you only use the front 4 inches and waste the rest of the space.
 Pull-out bins make items at the back of deep cabinets accessible without reaching
Corner Kitchen Cabinets
Corner cabinets are the trickiest, with their awkward L-shape and dead space in the back. The best solutions, ranked by cost and effort:
- A pre-assembled or custom slide-out lazy Susan: Rotates items into view, eliminating the need to reach into the dark back corner.
- A blind corner optimizer: A pull-out shelf that slides out from the back of the cabinet, so you can access items that would otherwise be hidden.
- For renovating homeowners: Corner drawers fit snugly into the awkward space and pull out fully, with built-in dividers for small items like spices or utensils.
Store infrequently used items (holiday serveware, bulk snacks) in the back of the corner, and everyday items (spices, cooking oils) on the front-facing shelves for easy access.
 A two-tier lazy Susan maximizes corner cabinet space that would otherwise go unused
Pots, Pans, and Cookware Cabinets
A disorganized cookware cabinet leads to messy avalanches and scratched non-stick coatings. Start by sorting cookware by type and size: stack pots and pans by size, largest at the bottom, smallest at the top, to prevent scratching. Store lids separately – either in a door-mounted rack, a shallow drawer divider, or a hanging rail on the inside of the cabinet door. For cast iron or non-stick cookware, avoid stacking directly on top of each other; use a felt pad or divider between pieces to protect the coating.
If you have wall space, consider a ceiling-mounted pot rack for your most-used pieces, which frees up 30–40% of cabinet space. If you’re storing cutting boards upright, use a non-slip base to keep them from tipping and scratching adjacent surfaces.
 Grouping cookware by type and size prevents messy avalanches when retrieving items
 Door-mounted lid racks free up shelf space for larger cookware pieces
Food Storage Cabinets (Pantry-Adjacent)
Organizing food in cabinets cuts down on food waste and speeds up meal prep. Start by categorizing food into four groups: dry goods (pasta, rice, flour, cereal), canned goods, snacks and condiments, and spices and seasonings. Use airtight, clear containers for all dry goods: not only do you avoid pest infestations, but you can also see at a glance when you’re running low, which reduces unnecessary grocery trips. For longer-lasting fresh produce, use breathable produce storage bags that extend the life of fruits and veggies by 3–5 days.
Store canned goods by category (beans, tomatoes, sauces) and use a FIFO system so older cans get used first. Spices go in a tiered rack or pull-out bin, as they’re small and easy to lose in a large cabinet. Keep heavier food items (bulk jars of oats, cases of canned goods) on lower shelves to prevent them from falling. Add a small basket for "use first" items: leftover open packages, half-used jars of sauce, etc., so you don’t forget about them. Toss expired items in compostable waste bags to reduce household plastic waste.
 Airtight, labeled containers keep dry goods fresh and reduce food waste from forgotten items
Long-Term Maintenance to Keep Cabinets Organized
Organization isn’t a one-time project – it’s a small habit that pays off every time you cook. Follow these simple rules to keep your cabinets tidy long-term:
- Do a 5-minute weekly tidy: Put items back in their designated spots, wipe down any spills, and toss any expired food you notice.
- Do a full declutter every 3 months: Remove everything, check expiration dates, donate items you haven’t used in 6 months, and adjust your layout if your cooking habits have changed (e.g., if you started baking more, move your flour and mixing bowls to eye level).
- Adjust your system as needed: If you find yourself constantly reaching for an item stored on a high shelf, move it to a lower spot. Your system should work for you, not the other way around.
A common mistake here is setting up a rigid organization system and then being too lazy to adjust it, which leads to clutter building back up in 2 months. Store under-sink cleaning supplies in a labeled bin, paired with a drain cleaner to keep pipes clear of clogs. Wipe down shelves monthly with a soft-bristled brush to remove crumbs and spills before they attract pests.
Frequently Asked Questions
How do I organize kitchen cabinets on a tight budget?
You don’t need expensive custom organizers to get a tidy space. Use repurposed items: old shoeboxes as drawer dividers, mason jars for spice storage, and cardboard shelf risers (covered in contact paper for a clean look) to add vertical space. The only tools worth investing in are airtight food containers, which will save you money long-term by reducing food waste.
How do I organize small kitchen cabinets?
For narrow or shallow cabinets, use slim, stackable bins that fit the exact width of your cabinet, and store items by size: smallest items (spices, seasoning packets) in the front, larger items (canned goods, jars) in the back. Avoid overfilling shelves – leave 1–2 inches of space between items so you can pull them out easily without knocking over adjacent items.
How often should I reorganize my kitchen cabinets?
Do a quick 5-minute tidy weekly, and a full declutter and reorganization every 3–4 months, or whenever your cooking habits change (e.g., after a holiday when you have new kitchen gadgets, or when you start a new diet that requires different food storage). If you notice clutter building back up within a month, adjust your system to make it easier to put items away – for example, add a basket for snack packets so you don’t have to stack them individually.
What should I not store in kitchen cabinets?
Avoid storing heat-sensitive items (like chocolate, olive oil, or certain spices) near the stove, as heat and humidity will cause them to spoil faster. Don’t store heavy items on the top shelf of tall cabinets, as they can fall and cause injury. And never store cleaning supplies or toxic chemicals in the same cabinet as food, to avoid cross-contamination.
Conclusion
Organizing your kitchen cabinets isn’t a one-time chore – it’s a small habit that pays off every time you cook. Start with one cabinet this weekend, and you’ll never have to rummage for a pan mid-recipe again. For more tips to build a functional, low-stress kitchen, explore our guide to designing an organic minimalist kitchen that works with your lifestyle. If you’re ready for a full kitchen refresh, a minimalist layout reduces clutter long-term by limiting countertop storage to only your most-used 10 items.
If you prefer a visual guide to walk you through the process, this step-by-step cabinet organization tutorial demonstrates all the tips covered above. https://www.youtube.com/watch?v=Cu3mFkhdxHg For ongoing upkeep, pair your weekly tidy with routine long-term kitchen care steps to keep all your storage tools and cookware in good shape for years. When wiping down cabinet shelves, use a soft-bristled brush paired with specialized kitchen scrubbing tools to scrape off stuck-on crumbs and spills without scratching wood or laminate surfaces. If you store cleaning supplies under the sink, keep a trusted clog prevention solution on hand to prevent clogs from food debris that falls during cabinet access. To extend the life of fresh produce stored in your food cabinets, swap plastic bags for airflow-friendly produce bags that allow for air circulation, reducing spoilage and cutting down on household waste. For stubborn cabinet spills or grime buildup, a gentle surface cleaning powder works well on most cabinet surfaces when diluted properly, making monthly deep cleans faster.
A well-organized kitchen cabinet isn’t about perfection – it’s about building a system that fits your actual cooking routine, not the aesthetic you saw on social media. Start with one cabinet this weekend, use the tips above to avoid common pitfalls like overbuying storage tools or creating systems that are too complicated to maintain, and adjust as you go. The extra 10 minutes you spend organizing now will save you 30 minutes of rummaging every single week, and make cooking feel like a joy instead of a hassle.
If you run into stubborn stains or grime on your cabinet shelves during the initial declutter, our tips for refreshing worn wood surfaces can help you restore them before you restock your items. For home bakers, adding a dedicated cabinet zone paired with reusable silicone baking tools keeps messy ingredients contained and cuts down on single-use waste during big projects. Once your cabinets are sorted, you might even be inspired to expand your organized routine to other parts of your kitchen: our guide to building a functional minimalist kitchen layout helps you reduce overall clutter by limiting countertop storage to only your most-used essentials. If you love cooking with fresh ingredients, consider starting a small indoor herb garden using simple organic growing methods to keep your most-used seasonings within arm’s reach without taking up cabinet space at all. For long-term upkeep, pairing your weekly cabinet tidy with routine kitchen equipment maintenance ensures your storage tools, shelves, and cookware stay in good shape for years, so you never have to redo a full organization project from scratch.

I’m Abby Lu, a passionate home cook who loves simplifying everyday meals. At PlugChef.com, I share product reviews and cooking guides to help you find the best tools for your kitchen.
Related posts:
 Smart Strategies to Organize a Small Kitchen: Maximize Space
 How to Organize a Corner Kitchen Cupboard: Expert Tips
 How Do You Organize Small Appliances in a Small Kitchen: Expert Tips
 How to Organize Kitchen Cabinets Pots And Pans: Expert Tips
 Frozen Salmon How to Cook: Easy, Delicious & Quick Methods
 Roast Nuts in Air Fryer: Quick, Crispy, and Delicious Snacks

