
Mat board (also called passe-partout in professional framing) is a rigid, acid-free paper product used to create a decorative and protective border between artwork, photos, or crafts and the glass of a frame. It prevents condensation from damaging your pieces, adds visual depth, and ties together the frame and wall decor. Pre-cut mat boards are only available in standard sizes, so custom projects—like framing a child’s artwork, creating a shadow box, or updating an old frame with a new window opening—require cutting your own.
Dedicated mat cutters range from $30 for basic hand-held models to $200+ for professional parallel-bar cutters, which is overkill for one-off projects. The good news is you can achieve clean, professional-looking cuts with common household tools, no specialized equipment required. This guide walks through proven DIY techniques for straight cuts, simple bevels, and custom designs, plus tips to avoid common mistakes that ruin mats.
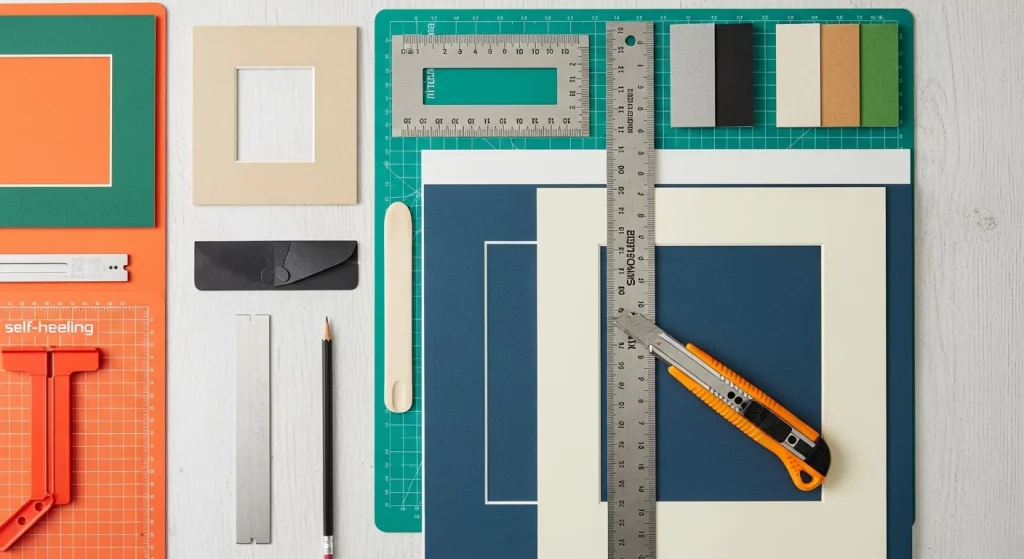
 A sharp craft knife and metal ruler are the core tools for clean, straight DIY mat board cuts.
What Is Mat Board and When Do You Need to Cut It?
Mat board is most often made of 4-ply (standard thickness) or 8-ply (heavy-duty) paper, with a colored surface and a neutral core that shows through when you cut a beveled edge. For long-lasting display, always use acid-free, lignin-free mat board to prevent yellowing and deterioration over time, per University of Minnesota Extension's framing guidelines. You’ll need to cut mat board for a few common scenarios:
- You’re using a pre-made frame that comes with an ill-fitting or damaged mat
- You’re creating a custom window mat to hold a non-standard sized photo or artwork
- You’re building a shadow box or craft project that requires a specific mat size or shape
- You want to create a layered, multi-color mat for a decorative look
Why Skip the Dedicated Mat Cutter for Most Projects?
For casual framers, crafters, or anyone working on a single project, buying a dedicated mat cutter is an unnecessary expense. In practice, DIY cutting methods produce results that are indistinguishable from machine-cut mats for standard home display, as long as you follow proper technique. You likely already own all the tools you need, so you can avoid the upfront cost and storage hassle of a specialized tool you’ll only use once or twice a year. If you frame 10+ projects per year or need perfectly consistent beveled edges for professional work, a dedicated cutter may be worth the investment, but for 90% of hobbyist use cases, DIY is the smarter, more budget-friendly choice. If you’re working on custom framing projects, you can follow specialized guides to refine your technique even further for professional framing results.
Essential Tools for Cutting Mat Board by Hand
You don’t need any specialized equipment to cut mat board cleanly. Gather these tools before you start:
Required Tools
- Sharp utility or craft knife: #18 or #27 blades work best for mat board. Dull blades tear instead of cutting, so replace the blade as soon as you notice it dragging.
- Metal ruler (12 or 24 inch): Avoid plastic rulers, which can slip or get nicked by the blade. A non-slip metal ruler is ideal for small projects.
- Soft lead pencil (2B or HB): Marks are visible enough to follow, but easy to erase later without damaging the mat surface.
- Self-healing cutting mat (9×12 inch or larger): Protects your work surface and extends the life of your knife blade. If you don’t own one, a thick piece of corrugated cardboard works as a substitute—you can source free cardboard from deliveries of large items like 10×10 kitchen cabinets under 1000 for low-budget projects.
- T-square or long straight edge (optional but recommended): Ensures perfectly straight cuts for pieces longer than 12 inches.
Optional Tools
- Fine-grit (220-grit) sanding block: Smooths rough cut edges and refines bevels.
- Painter’s tape: Secures the mat board and ruler to the cutting mat to prevent slipping during cuts.
- Bone folder: Creates crisp creases if you’re making a folded window mat.
Step-by-Step Guide to Clean, Straight Mat Cuts
Follow these steps for crisp, even cuts every time, no experience required.
Step 1: Prepare Your Work Surface
Clear a well-lit, clutter-free area and place your cutting mat on a hard, flat table or desk. Avoid soft surfaces like beds or couches, which shift during cutting and cause uneven edges. If you’re using a cardboard substitute, secure it to the table with small pieces of painter’s tape on the edges to prevent sliding. If you’re working on a wooden work surface, follow proper sanitization and prep guidelines for cutting surfaces to keep it in good condition for future projects. A common mistake for beginners is working on a wobbly surface, which leads to angled cuts even if you follow the ruler exactly.
Step 2: Measure and Mark Your Cut Lines Accurately
First, confirm the dimensions of your frame opening or project needs—standard mat board sizes are 16×20, 20×24, and 11×14, so measure twice before marking to avoid costly errors. Place your metal ruler parallel to the edge of the mat board, and mark your cut line with a soft lead pencil. For window mats, measure the artwork size first, then add 1/8 to 1/4 inch of border on all sides for your preferred look. Mark the line 1/16 inch inside the edge of the ruler so the blade runs directly along the ruler’s edge without slipping. A common mistake here is marking too close to the ruler’s edge, which makes it hard to keep the knife aligned.
Step 3: Make the Initial Score Cut
Press the metal ruler firmly down along the entire length of your marked line, holding it in place with your non-dominant hand to prevent shifting. Hold the utility knife at a 45-degree angle to the mat board, with the blade facing away from the edge of the ruler. Make a light first pass along the entire length of the line to score the surface—don’t try to cut through the full thickness of the board in one go. This initial score creates a groove for subsequent cuts, preventing the board from shifting or chipping. For longer cuts, use a long straight edge or T-square to keep the line perfectly straight, a technique that also works for other DIY projects like installing under counter led lighting kitchen custom fixtures.
Step 4: Cut Through the Full Thickness
After scoring, make 2-3 additional passes along the same line, increasing pressure slightly with each pass until the blade cuts completely through the mat board. For 4-ply mat board, this usually takes 3-4 total passes; for thicker 8-ply board, you may need 5-6 passes. Keep the knife perpendicular to the board to avoid angled cuts. If you feel resistance, don’t force the blade—make another light pass instead, as forcing it can cause the board to tear or the blade to slip and cut your hand. Once the cut is complete, you should be able to lift the excess piece away cleanly. If it doesn’t separate easily, make one more light pass along the cut line to finish the separation. The same multi-pass scoring technique works for sizing materials for custom under kitchen sink cabinet storage ideas, like foam board dividers.
Step 5: Refine and Smooth the Edges
Inspect the cut edge for any rough spots, frayed paper, or small nicks. If you notice any imperfections, use a fine-grit sanding block to lightly sand the edge in a single direction, not back and forth, to avoid creating more rough spots. For a professional-looking beveled edge, hold a craft knife at a 45-degree angle to the edge of the mat board and carefully shave off small layers of material until you get your desired depth, then sand smooth. A common mistake here is sanding too aggressively, which removes too much material and makes the mat board thinner than intended, leading to a loose fit in the frame.
 The full mat cutting workflow from measuring to finished edge, no specialized tools required.
Pro Tips for Professional-Looking Results
These small adjustments will take your DIY mat cuts from amateur to professional with minimal extra effort:
- Always use a sharp blade: Dull blades tear the mat board instead of cutting it, leading to rough, uneven edges. Replace your utility knife blade after every 2-3 projects, or as soon as you notice it dragging instead of cutting smoothly.
- Secure all materials: Use small pieces of painter’s tape to hold the mat board to the cutting mat, and the ruler to the mat board, to prevent slipping during cuts—this is especially helpful for small pieces of mat board that are hard to hold steady.
- Test cuts first: Always practice your cut on a scrap piece of mat board or thick cardboard before cutting your final piece, to get a feel for the pressure needed and adjust your technique.
- Cut slightly outside your marked line for window mats: When cutting the opening for artwork, cut 1/16 inch outside your marked line, then sand the edge smooth, to avoid visible pencil marks inside the mat window.
- Use a square for perfect corners: When cutting a window mat, use a combination square to ensure your corner marks are exactly 90 degrees, preventing a lopsided opening for your artwork.
Advanced DIY Techniques for Custom Mat Designs
Once you’ve mastered straight cuts, try these simple techniques to create custom, professional-looking mats for any project.
Cutting Beveled Edges
The sloped beveled edge on store-bought mats reveals the lighter core of the mat board, making artwork pop and creating a polished, finished look. To cut a bevel by hand, make your straight cut first, then hold a sharp craft knife at a 45-degree angle to the edge of the mat board. Carefully shave off small, thin layers of the edge until you reach your desired bevel depth, then sand smooth with fine-grit sandpaper. This takes practice, so test on scrap mat board first before working on your final piece. For layered mats, use the same acid-free craft adhesive used for best bamboo drawer organizers to adhere multiple mat layers together without yellowing over time.
Creating Layered Mats
Layered mats use two or more mats of different sizes and colors to create a dimensional, custom look for frames. Cut the largest mat first, then the next size down, and so on, adhering them together with acid-free craft glue if desired. This is a popular option for wedding photos, children’s art, and seasonal decor pieces, as it lets you customize the look to match any color scheme.
Cutting Decorative Shapes
For non-rectangular mats (like circles for round frames or custom shapes for craft projects), use a compass or stencil to mark your shape on the mat board. Use a craft knife with a curved blade to carefully cut along the marked line, making multiple light passes to avoid tearing. For simple curves, a standard utility knife works fine, but for tight curves, a curved blade craft knife gives you more control.
Common Mistakes to Avoid
Even small errors can ruin a mat board cut, so watch out for these frequent pitfalls:
- Rushing the cut: Taking your time and making multiple light passes is far better than trying to cut through the board in one go, which leads to uneven edges and splintering.
- Using a dull or damaged blade: A dull blade will tear the mat board, leaving rough edges that are hard to fix. Always use a fresh blade for clean cuts.
- Not securing the ruler: A shifting ruler is the most common cause of crooked cuts. Press the ruler firmly down along the entire length of the cut line before you start cutting, and keep your non-dominant hand pressed to it the entire time you’re cutting. This same principle of securing guiding tools applies to other DIY projects, like installing electrical outlets under kitchen cabinets to ensure aligned, professional results.
- Cutting on a soft surface: A wobbly work surface will cause even the straightest cuts to come out angled. Always use a hard, flat surface with a cutting mat underneath.
- Forgetting to measure twice: It’s easy to mark the wrong dimension, especially for window mats. Double-check your measurements against the frame and artwork before cutting, to avoid wasting mat board.
When to Invest in a Dedicated Mat Cutter
While DIY cutting works for most hobbyist projects, there are a few cases where a dedicated mat cutter is worth the cost. If you frame 10 or more pieces per year, need perfectly consistent beveled edges for professional display, or work with very thick (12-ply or higher) mat board regularly, a parallel-bar mat cutter will save you time and produce more consistent results. For one-off projects, though, the DIY methods outlined above are more than sufficient, and you can even use the same scoring technique for sizing foam board for custom organization projects like our under kitchen sink cabinet storage ideas.
Frequently Asked Questions
Can I cut mat board without a mat cutter?
Yes, you can achieve clean, professional-looking straight cuts and simple bevels using common household tools like a sharp utility knife, metal ruler, and cutting mat. This method is ideal for one-off framing projects, craft work, and customizing pre-made frames, and produces results indistinguishable from machine-cut mats for casual use.
What tools do I need to cut mat board by hand?
For basic straight cuts, you only need a sharp utility knife, metal ruler, pencil, and cutting mat (or thick cardboard as a substitute). For more advanced cuts like bevels or curved shapes, add fine-grit sandpaper, a craft knife with a curved blade, and a compass or stencil to your toolkit.
How do I make perfectly straight cuts on mat board?
The key to straight cuts is securing your ruler firmly to the mat board before cutting, and making multiple light passes with a sharp blade instead of trying to cut through the board in one go. Use a T-square for cuts longer than 12 inches to ensure the line stays perfectly straight.
Is it safe to cut mat board without specialized tools?
Yes, as long as you follow basic safety precautions: always cut away from your body, keep your non-dominant hand behind the path of the blade, and use a cutting mat to protect your work surface. Never force the blade, as this can cause it to slip and lead to cuts. You can also follow mold prevention tips for your cutting tools to keep them in good condition for safe, long-term use. As long as you handle your sharp knife carefully and use a protective cutting mat, there is no elevated risk compared to using a dedicated mat cutter.
Can I cut beveled edges on mat board without a mat cutter?
Yes, you can create a simple beveled edge by holding a craft knife at a 45-degree angle to the edge of the mat board and shaving off small layers of material, then sanding the edge smooth. This takes a bit of practice, so test on scrap mat board first before working on your final piece.
What should I do if my cut edge is rough?
If your cut edge is rough or frayed, lightly sand it with a fine-grit sanding block in a single direction to smooth it out. For very rough edges, you can make one more light pass with a sharp utility knife along the edge to clean it up before sanding. For other DIY projects that require precise material cuts, this same scoring technique works for materials like foam board and thin acrylic for projects like under cabinet led lighting kitchen diffusers.
Conclusion
Cutting mat board without a dedicated mat cutter is a simple, budget-friendly skill that any DIYer can master with a little practice. With just a sharp knife, metal ruler, and cutting mat, you can create custom mats for photos, artwork, and craft projects that look just as good as store-bought options, without the upfront cost of specialized tools. The key to success is taking your time, making multiple light cuts, and securing your materials before you start cutting.
With a little practice, you’ll be able to cut mat board to any size or shape you need for your projects, and you can even season and maintain your wooden work surfaces to keep them in good shape for future DIY tasks. If you’re looking for more affordable DIY home improvement and craft tips to customize your space without breaking the bank, check out our guide to installing kitchen under cabinet led strip lighting for a high-impact, low-cost upgrade that instantly modernizes your kitchen.

Hi, I’m Daniel Brooks—a food lover and kitchen gear enthusiast. I enjoy testing cookware, utensils, and gadgets to see what really works in everyday cooking. At PlugChef.com, I share honest reviews, comparisons, and simple guides to help you choose the best tools for a safer, smarter, and more enjoyable kitchen.
Related posts:
 Eco-Friendly Kitchen Ideas to Reduce Waste and Save Energy
 How to Grow Organic Kitchen Garden: Expert Tips
 Best Eco-Friendly Kitchen Cookware for Healthy Cooking
 How to Cut PCB Circuit Board: Easy Steps for Precise Results
 How Do You Make a Butcher Block Cutting Board: Easy DIY Guide
 Top 10 Best Non-Toxic Cooking Utensils – Safe & Durable Choices for Healthy Homes

