
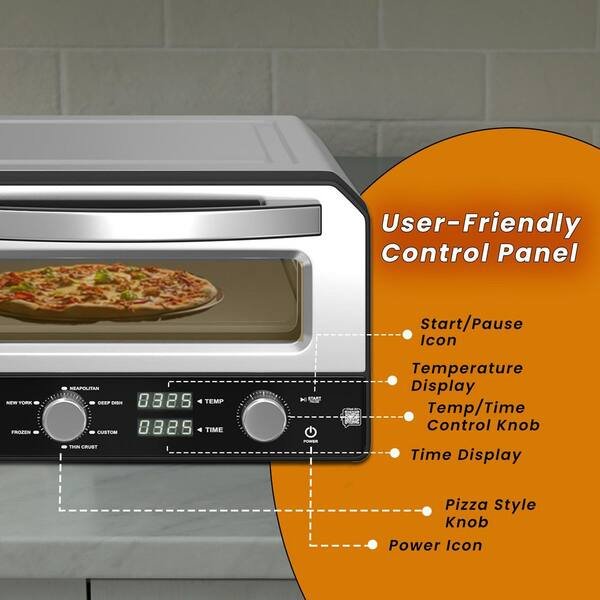
Are you ready to bake the perfect pizza at home but unsure about the right oven temperature and cooking time? Getting these two factors just right can make all the difference between a soggy crust and a crispy, golden masterpiece.
Whether you like thin and crispy or thick and chewy, understanding your pizza oven temp and time is the secret to unlocking amazing flavors every time. Keep reading, and you’ll discover simple tips that will help you create mouthwatering pizzas that impress your family and friends.
Your perfect slice is closer than you think!
Ideal Oven Temperatures
Getting the oven temperature right is key to baking a perfect pizza. The ideal temperature depends on the type of crust and toppings you want. It’s about balancing heat and time to get that perfect texture and flavor.
High Heat For Crispy Crust
Cooking pizza at high temperatures, typically between 450°F and 500°F (230°C to 260°C), helps create a crispy, golden crust. This intense heat quickly cooks the dough, locking in moisture while crisping the outside.
If you want that classic pizzeria crunch, aim for the upper end of this range. But be ready to watch your pizza closely—high heat means faster cooking, often under 10 minutes.
Moderate Heat For Even Cooking
Moderate oven temperatures, around 375°F to 425°F (190°C to 220°C), work well for thicker crusts or pizzas loaded with toppings. This heat allows the dough to cook evenly without burning the edges.
At this temperature, your pizza will take a bit longer—between 12 to 20 minutes. It’s a great choice if you want a chewy crust and fully melted toppings without rushing.
Adjusting Temperature For Different Oven Types
Your oven type affects how heat distributes, so adjust temperatures accordingly. Conventional ovens often have hot spots, so rotating the pizza halfway helps cook it evenly.
In contrast, wood-fired ovens reach temperatures as high as 900°F (480°C) and cook pizzas in just 1 to 2 minutes. Electric ovens usually max out around 500°F, requiring longer bake times.
Have you tried using a pizza stone or steel? These tools retain heat and create a crispy base, letting you bake at slightly lower temperatures without sacrificing crust quality.

Credit: www.amazon.com
Cooking Times For Pizza
Understanding the right cooking times for your pizza is key to achieving that perfect crust and melty cheese. Every pizza style demands a different approach to time and temperature. Knowing how long to cook your pizza can save you from a soggy base or burnt edges.
Thin Crust Timing
Thin crust pizzas cook quickly because of their slender base. Typically, they need about 6 to 8 minutes in a pizza oven heated between 450°F and 500°F. You’ll want to watch closely—thin crust can go from perfectly crisp to burnt in seconds.
In my experience, rotating the pizza halfway through cooking helps even out the heat. Have you noticed how thin crusts brown unevenly if left untouched? Small adjustments like this can make a big difference.
Thick Crust Timing
Thick crust pizzas take longer to cook due to their dense dough. Expect cooking times from 12 to 15 minutes at a slightly lower temperature, around 425°F to 450°F. This slower cook allows the dough to bake through without burning the toppings.
One trick I use is tenting the pizza with foil if the crust isn’t cooking fast enough but the toppings are browning too quickly. Do you ever check the underside of your pizza mid-way? That’s often the best sign of doneness.
Factors That Affect Cooking Time
- Oven Temperature:Higher temps speed up cooking but can risk burning.
- Dough Hydration:Wetter dough takes longer to cook fully.
- Toppings:Heavy toppings like sausage or extra cheese increase cooking time.
- Oven Type:Wood-fired ovens cook faster than electric ones due to intense radiant heat.
Have you ever wondered why your pizza cooks perfectly one day and undercooked the next? These small variables often explain it. Adjusting your timing based on these factors ensures consistent results every time.
Types Of Pizza Ovens
Pizza ovens come in various types, each offering unique benefits. The choice of oven impacts the flavor and texture of your pizza. Let’s explore the different types.
Wood-fired Ovens
Wood-fired ovens are traditional and offer authentic flavors. They reach high temperatures quickly, usually around 800°F. The wood smoke infuses the pizza, enhancing its taste. These ovens are ideal for Neapolitan-style pizzas.
Electric Ovens
Electric ovens are convenient and widely used in homes. They provide consistent heat and are easy to control. Temperatures range from 400°F to 500°F. Perfect for beginners and those with limited space.
Gas Ovens
Gas ovens offer precise temperature control and heat evenly. They are energy-efficient and reach up to 600°F. Suitable for both commercial and home use, gas ovens are versatile and reliable.
Portable Pizza Ovens
Portable pizza ovens are compact and easy to transport. They can be wood, gas, or electric-powered. Great for outdoor gatherings or small spaces. They heat up quickly and cook pizzas in minutes.
Tips For Perfect Pizza Texture
Achieving the perfect pizza texture is all about controlling heat and timing, but there’s more to it than just setting your oven. Small adjustments in how you prepare your dough, and the tools you use, can make a huge difference in the crust’s crispness and chewiness. Let’s look at some practical tips that will help you create a pizza with a texture that keeps you coming back for more.
Preheating The Oven
Preheating your oven thoroughly is essential. Aim to heat it to the highest temperature it can reach, usually between 475°F and 500°F (245°C-260°C).
Allow at least 30 minutes for the oven to stabilize at this temperature. This ensures the pizza cooks evenly and the crust crisps up properly.
Have you ever noticed a soggy crust? Often, it’s because the oven wasn’t hot enough at the start.
Using A Pizza Stone Or Steel
A pizza stone or steel creates a hot surface that mimics a traditional brick oven floor. It absorbs and retains heat, giving your crust a perfect crisp without burning.
Place the stone or steel in the oven while it preheats to get it really hot. This step helps cook the bottom of your pizza quickly and evenly.
If you don’t have one, try using an inverted baking sheet, but remember it won’t retain heat as well.
Proper Dough Preparation
The dough’s hydration and fermentation impact texture significantly. A dough with about 60-65% water content typically yields a soft and airy crust.
Let your dough rise slowly in the fridge for at least 24 hours to develop flavor and structure. This slow fermentation also affects how the crust cooks and feels.
Before stretching, bring the dough to room temperature. Cold dough resists stretching and can tear, affecting your pizza’s texture.
Common Mistakes To Avoid
Many home cooks make mistakes that affect pizza quality. Avoiding these errors improves taste and texture. Understanding oven temperature and timing is key. Mistakes often cause soggy crusts or burnt toppings. Pay attention to common pitfalls below.
Overloading Toppings
Too many toppings weigh down the dough. It makes the pizza soggy and unevenly cooked. Heavy toppings stop heat from reaching the base. Stick to a few toppings for best results. Balance flavors without piling too much on.
Incorrect Oven Temperature
Low temperature leads to undercooked pizza and dull crust. High temperature can burn toppings before the dough cooks. Most pizza ovens work well between 450°F and 500°F. Use an oven thermometer for accuracy. Proper heat ensures a crispy crust and melted cheese.
Ignoring Rest Time After Baking
Cutting pizza immediately causes toppings to slide off. Resting pizza for 2 to 3 minutes lets cheese set. The crust firms up and flavors deepen. Patience improves texture and eating experience. Always give your pizza a short rest before serving.

Credit: www.amazon.com
Enhancing Flavor And Crispiness
Enhancing the flavor and crispiness of your pizza starts with understanding how temperature and timing affect every ingredient. The way your dough reacts in a hot oven can make or break the crust’s texture and taste. Small tweaks in what you use and how you bake can turn an ordinary pie into a mouthwatering experience.
Choosing The Right Flour
The type of flour you choose impacts both flavor and crunch. High-protein flours like bread flour develop more gluten, giving your crust a chewy, crispy texture. Using all-purpose flour can work but expect a softer bite.
Try mixing flours to find your ideal balance. A blend of bread flour and a bit of whole wheat adds depth without sacrificing crispiness. Have you tested different flours to see how your oven responds?
Using Olive Oil And Seasonings
Adding olive oil to your dough or brushing it on before baking enhances flavor and helps create a golden crust. Olive oil also locks in moisture, preventing the crust from drying out during high-heat cooking.
Sprinkle seasonings like garlic powder, oregano, or chili flakes on the crust edges for an extra flavor kick. These simple additions make your pizza stand out without complicating the process.
Baking Techniques For Golden Brown Crust
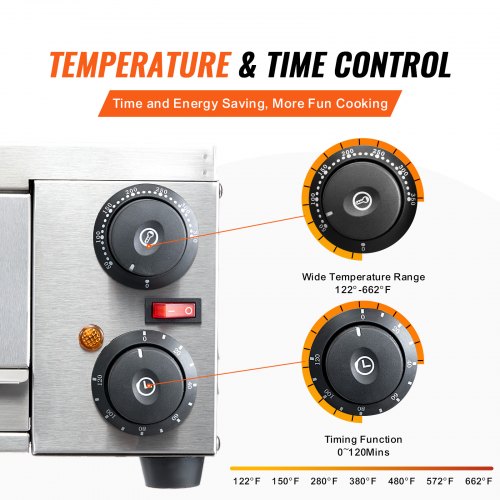
Temperature control is key. Aim for a pizza oven temperature around 700-900°F (370-480°C) for that perfect balance of crispy exterior and chewy interior. At these temps, cook time usually ranges from 90 seconds to 3 minutes.
Use a pizza stone or steel to evenly distribute heat and absorb moisture, which crisps the bottom crust. Also, try rotating the pizza halfway through baking to get uniform browning.
Have you noticed how quickly your crust changes in those final moments? Watching it closely allows you to pull the pie just as it reaches that irresistible golden color.
Credit: www.vevor.com
Frequently Asked Questions
What Is The Ideal Temperature For A Pizza Oven?
The ideal pizza oven temperature is between 700°F and 900°F. This range cooks pizza quickly, creating a crispy crust and perfectly melted toppings.
How Long Should I Cook Pizza In A Wood-fired Oven?
In a wood-fired oven, pizza cooks in 90 seconds to 3 minutes. High heat ensures a crispy base and bubbly cheese.
Can I Bake Pizza At Home Oven Temperatures?
Yes, home ovens work best at 475°F to 500°F. Bake pizza for 10-15 minutes for a crispy crust and well-cooked toppings.
How Does Oven Temperature Affect Pizza Cooking Time?
Higher temperatures reduce cooking time and create a crispy crust. Lower temperatures require longer baking, resulting in a softer crust.
Conclusion
Perfect pizza needs the right oven temperature and time. Too hot or too long can burn your crust. Too low or too short, and the dough stays raw. Aim for a balanced heat to get a crispy outside and soft inside.
Watch your pizza closely as it cooks. Every oven is different, so test and adjust. Practice helps you find your ideal settings. Enjoy baking and sharing delicious homemade pizza with family and friends. Simple steps lead to great results. Keep experimenting and have fun!

Hi, I’m Daniel Brooks—a food lover and kitchen gear enthusiast. I enjoy testing cookware, utensils, and gadgets to see what really works in everyday cooking. At PlugChef.com, I share honest reviews, comparisons, and simple guides to help you choose the best tools for a safer, smarter, and more enjoyable kitchen.
Related posts:
 What Type of Cooking Utensils are Safe: Expert Picks
 What Innovations Could Blenders Make: Unleashing Future Tech
 Smart Strategies to Organize a Small Kitchen: Maximize Space
 How to Organize a Kitchen Cabinet: Expert Tips & Tricks
 How to Organize Kitchen Drawers: Expert Tips and Tricks
 How to Organize a Corner Kitchen Cupboard: Expert Tips

