
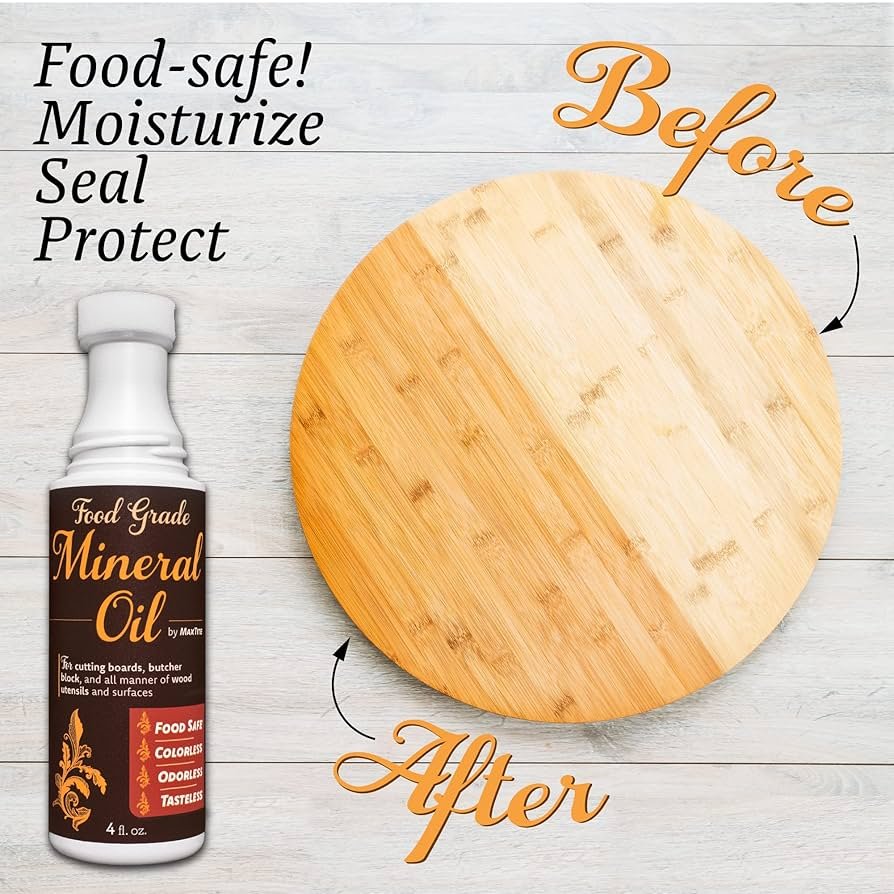
A high-quality wooden cutting board is one of the most versatile, long-lasting tools in any home kitchen—if you care for it properly. Neglect, however, leads to dry, cracked wood, deep stains, warped edges, and even bacterial growth that can compromise food safety. Mineral oil is the gold standard for cutting board care: it’s food-safe, inert, inexpensive, and easy to apply with the right technique. This ultimate guide covers every step of oiling your cutting board, from prepping the surface to troubleshooting common issues, so you can keep your board in peak condition for decades.
Why Food-Grade Mineral Oil Is the Best Choice for Wooden Cutting Boards
Unlike plant-based cooking oils (olive, coconut, vegetable) that oxidize and go rancid over time, leaving off-flavors and attracting bacteria, mineral oil is a highly refined, inert petroleum product that does not spoil. It is FDA-approved for direct food contact, odorless, tasteless, and safe for all wood types including hard maple, bamboo, teak, walnut, and butcher block.
When applied, mineral oil penetrates porous wood fibers to displace trapped moisture, which is the primary cause of swelling, cracking, and splitting. It also creates a thin, water-resistant barrier that repels food pigments and juices, reducing stain absorption. Unlike darker conditioning oils (such as walnut or tung oil), mineral oil does not significantly darken light-toned wood, making it ideal for boards where you want to preserve the original grain color. In practice, it is the most low-maintenance, foolproof option for both new and well-used boards.
Supplies You’ll Need for Oiling
Proper prep and the right supplies make the oiling process fast and effective. Avoid improvisation: using the wrong products can damage your board or compromise food safety.
| Supply | Purpose | Pro Tip |
|---|---|---|
| Food-grade (USP) mineral oil | Penetrates wood fibers to seal, moisturize, and protect against water damage | Avoid industrial mineral oil or scented variants, which may contain unsafe additives |
| Lint-free microfiber cloth | Spreads oil evenly without scratching the wood surface | Designate a separate cloth for cutting board care to avoid cross-contamination with other cleaning tasks |
| Paper towels or dry rag | Wipes off excess surface oil to prevent stickiness | Use white paper towels to easily spot any remaining oil residue |
| Optional: 220-grit sandpaper | Smooths rough spots, scratches, or splinters before oiling | Sand with the grain to avoid creating new surface damage |
Before you start, deep clean your board to remove existing food residue, stains, or bacteria. If your board has stuck-on debris, scrub it with a soft brush and mild dish soap, then rinse thoroughly. For stubborn surface stains, use a deep clean stubborn surface stains paste of coarse salt and lemon, or a diluted vinegar solution (1 part white vinegar to 3 parts water) to disinfect. If your board has lingering odors from strong ingredients like garlic or fish, use an eliminate lingering food odors baking soda and citrus scrub before rinsing. Most importantly, dry the board completely with a clean towel, then let it air dry for 1–2 hours to ensure no moisture is trapped under the oil—trapped water will cause mold and warping.
Step-by-Step Guide to Oiling Your Cutting Board
Follow these steps exactly for even, long-lasting protection. Most boards only need 1–2 coats for regular maintenance; new or heavily dried boards may require 3–4 initial coats.
Step 1: Apply the First Coat of Oil
Pour a generous, even layer of food-grade mineral oil directly onto the dry board surface. For a standard 12×18 inch cutting board, you’ll need roughly 2–3 tablespoons of oil—enough to coat the entire surface without puddling excessively. A common mistake is using too little oil, which leads to uneven penetration and dry spots. If you have a large butcher block board, work in sections to ensure full coverage. If your board is new (you crafting a custom wooden board yourself), it will be far more porous than a well-used board, so you may need 3–4 initial coats to fully saturate the wood.
Step 2: Work the Oil Into the Wood
Use your lint-free cloth to rub the oil into the wood in small, circular motions, applying even pressure. Pay special attention to end grains, cut edges, and any existing cracks or scratches—these areas absorb more oil and are most prone to drying. Don’t skip the edges, as they’re often the first place to split. If you notice dry spots absorbing oil instantly, add a small extra amount to those areas. For boards with deep grooves or knife marks, you can use a soft-bristled brush to work oil into the crevices.
Step 3: Let the Oil Absorb Fully
Leave the board in a well-ventilated, dust-free area for at least 30 minutes to 1 hour for the first coat. For boards that are very dry or have visible cracking, leave it overnight for maximum penetration. A common mistake here is wiping off the oil too early—if the wood still looks dull or feels slightly damp to the touch, it hasn’t absorbed enough. For new boards, repeat steps 1 and 2 2–3 times, letting each coat absorb fully before adding the next, until the wood stops absorbing oil quickly (that means it’s fully saturated).
Step 4: Wipe Off All Excess Oil
After the absorption period, use a clean, dry paper towel or rag to wipe off every trace of surface oil. This is critical: leftover surface oil will stay sticky, attract dust and debris, and can even become a breeding ground for bacteria. The board should feel completely dry to the touch, with no oily residue. If you notice sticky spots, wipe them again with a small amount of warm, soapy water, then dry thoroughly.
Step 5: Cure and Test
Let the board air dry for another 2–4 hours before using it for food prep. To test if it’s properly oiled, sprinkle a few drops of water on the surface: if the water beads up instead of soaking in, the oil barrier is working. If the water soaks in immediately, you need to add another coat.
How Often Should You Oil Your Cutting Board?
Oiling frequency depends on how often you use your board and your local climate. If you use your board daily for chopping, slicing, and prepping moist ingredients (like tomatoes, citrus, raw meat), you’ll need to oil it every 2–3 weeks. If you use it only occasionally for dry ingredients (like bread, herbs), once every 4–6 weeks is sufficient.
Environmental factors also play a role: if you live in a dry climate with low humidity, or store your board near a heat source (like an oven or dishwasher), you’ll need to oil more often. If you live in a humid climate, you may need to oil less frequently, but always watch for signs of dryness. Regular oiling is a core part of routine kitchen maintenance that extends the life of all your cooking tools.
5 Clear Signs Your Board Needs Immediate Oiling
It’s easy to forget routine care, but these visible signs mean it’s time to oil your board right away:
- Dull, faded wood color: Freshly oiled wood has a rich, warm tone. When it starts to look gray, washed out, or chalky, the wood fibers are dried out and no longer sealed.
- Visible cracks, splits, or warping: Dry wood shrinks, leading to cracks along the grain or warped edges that don’t lie flat on your counter.
- Water soaks in instead of beading: This is the easiest at-home test: if you sprinkle water on the board and it disappears into the wood within a few seconds, the protective oil barrier is gone.
- Stains that won’t lift: If you’ve tried cleaning stains and they remain, the porous dry wood is absorbing food pigments deeply.
- Rough, splintery surface: Dried wood fibers lift, creating rough spots that can damage knives and harbor bacteria.
If you notice mold growth or soft, rotting spots on your board, do not oil it immediately—oil will seal mold spores under the surface, worsening the problem. Follow our guide to addressing mold on wooden boards to deep clean and sanitize the board first, or replace it if the damage is structural.
Common Mineral Oil Mistakes to Avoid
Even experienced home cooks make these errors that can damage their boards:
- Using non-food-grade mineral oil: Industrial mineral oil sold for machinery contains additives and contaminants that are not safe for food contact. Always look for USP-grade or explicitly labeled "food-safe" mineral oil.
- Using plant-based cooking oils: Olive oil, coconut oil, and vegetable oil go rancid over time, leaving off-flavors and encouraging bacterial growth. They also don’t penetrate wood as effectively as mineral oil.
- Oiling a damp board: Trapped moisture under the oil will cause mold, warping, and delamination. Always dry your board completely with a towel, then let it air dry for 1–2 hours before oiling.
- Over-oiling: Applying too much oil, or not wiping off excess, leads to a sticky surface that attracts dust and debris. Wipe off all surface oil after each coat.
- Oiling a board with active mold or deep rot: If your board has mold growth or soft, rotting spots, oiling will only seal the problem in. Deep clean and sanitize first, or replace the board if the damage is severe.
- Using abrasive cleaners before oiling: Scouring pads and harsh chemicals damage the wood surface, creating rough spots that absorb more oil and wear down faster. Use only mild soap and soft brushes for cleaning.
Cutting Board Care Tips Between Oiling Sessions
Oiling is just one part of extending your board’s life. Follow these daily habits to reduce wear and tear:
- Clean properly after each use: Wash with warm, mild dish soap and a soft sponge, never soak the board in water (soaking causes swelling and cracking). For raw meat, sanitize with a diluted bleach solution (1 tablespoon bleach per gallon of water) or vinegar, then rinse and dry immediately. Follow USDA food safety guidelines for kitchen tools to avoid cross-contamination when prepping raw proteins.
- Dry thoroughly: Always stand your board upright to air dry, never let it sit flat while wet, which traps moisture against the surface. Avoid storing it in damp areas like under the sink.
- Use both sides: Alternating sides when chopping prevents one side from wearing down faster and developing deep grooves.
- Avoid heat and direct sunlight: High heat from dishwashers, stovetops, or sunny windowsills dry out wood and cause warping. Never put wooden boards in the dishwasher.
- Choose durable wood for custom builds: If you’re crafting a durable custom board, opt for tight-grained hardwoods like hard maple or teak, which resist drying and staining far longer than soft, porous woods.
Frequently Asked Questions
Can I use mineral oil on bamboo cutting boards?
Yes, mineral oil is safe and effective for bamboo, which is a highly porous grass material. Bamboo boards tend to dry out faster than hardwood boards, so you may need to oil them every 2 weeks with regular use.
Is mineral oil safe for boards used for raw meat?
Yes, as long as you use food-grade, USP mineral oil. Always sanitize the board with hot, soapy water or a diluted disinfectant after cutting raw meat, then dry thoroughly before oiling.
How do I know if my mineral oil is food-safe?
Look for labels that say "USP-grade", "pharmaceutical-grade", or "FDA-approved for food contact". Avoid products labeled "industrial mineral oil" or "mineral oil for machinery", as these contain unsafe additives.
Can I mix mineral oil with beeswax for extra protection?
Yes, many cutting board conditioners blend mineral oil with beeswax to create a harder, more water-resistant finish. This is a great option for boards that see heavy use or are stored in humid environments. The beeswax adds extra protection without affecting the food safety of the mineral oil base.
What’s the difference between mineral oil and mineral spirits?
Mineral spirits are a solvent used for cleaning wood finishes and paint, and are not food-safe. Always double-check the product label to ensure you are buying food-grade mineral oil, not mineral spirits.
Conclusion
Oiling your cutting board takes less than 15 minutes, but it adds decades to its usable life, saves you money on replacements, and keeps your food prep safe and sanitary. By following the steps in this guide and avoiding common mistakes, you’ll never have to deal with a cracked, stained, or warped board again. If you’re looking to build a board that’s built to last, check out our guide to building a heirloom-quality cutting board for tips on selecting wood, joinery, and initial finishing.
 A small amount of food-grade mineral oil is all you need for a standard cutting board coat.
Image source: www.amazon.com
A small amount of food-grade mineral oil is all you need for a standard cutting board coat.
Image source: www.amazon.com
 Properly oiled wood repels water, preventing stains and cracking over time.
Image source: www.oldyankeecuttingboards.com
Properly oiled wood repels water, preventing stains and cracking over time.
Image source: www.oldyankeecuttingboards.com
How Often Should You Oil Your Cutting Board?
Oiling frequency depends on how often you use your board and your local climate. If you use your board daily for chopping, slicing, and prepping moist ingredients (like tomatoes, citrus, raw meat), you’ll need to oil it every 2–3 weeks. If you use it only occasionally for dry ingredients (like bread, herbs), once every 4–6 weeks is sufficient. Environmental factors also play a role: if you live in a dry climate with low humidity, or store your board near a heat source (like an oven or dishwasher), you’ll need to oil more often. If you live in a humid climate, you may need to oil less frequently, but always watch for signs of dryness. Regular oiling is a core part of routine kitchen upkeep that extends the life of all your cooking tools.
5 Clear Signs Your Board Needs Immediate Oiling
It’s easy to forget routine care, but these visible signs mean it’s time to oil your board right away:
- Dull, faded wood color: Freshly oiled wood has a rich, warm tone. When it starts to look gray, washed out, or chalky, the wood fibers are dried out and no longer sealed.
- Visible cracks, splits, or warping: Dry wood shrinks, leading to cracks along the grain or warped edges that don’t lie flat on your counter.
- Water soaks in instead of beading: This is the easiest at-home test: if you sprinkle water on the board and it disappears into the wood within a few seconds, the protective oil barrier is gone.
- Stains that won’t lift: If you’ve tried removing set-in stains and they remain, the porous dry wood is absorbing food pigments deeply.
- Rough, splintery surface: Dried wood fibers lift, creating rough spots that can damage knives and harbor bacteria. If you notice mold growth or soft, rotting spots on your board, do not oil it immediately—oil will seal mold spores under the surface, worsening the problem. Follow our guide to treating mold on wooden boards to deep clean and sanitize the board first, or replace it if the damage is structural.
Common Mineral Oil Mistakes to Avoid
Even experienced home cooks make these errors that can damage their boards:
- Using non-food-grade mineral oil: Industrial mineral oil sold for machinery contains additives and contaminants that are not safe for food contact. Always look for USP-grade or explicitly labeled "food-safe" mineral oil.
- Using plant-based cooking oils: Olive oil, coconut oil, and vegetable oil go rancid over time, leaving off-flavors and encouraging bacterial growth. They also don’t penetrate wood as effectively as mineral oil.
- Oiling a damp board: Trapped moisture under the oil will cause mold, warping, and delamination. Always dry your board completely with a towel, then let it air dry for 1–2 hours before oiling.
- Over-oiling: Applying too much oil, or not wiping off excess, leads to a sticky surface that attracts dust and debris. Wipe off all surface oil after each coat.
- Oiling a board with active mold or deep rot: If your board has mold growth or soft, rotting spots, oiling will only seal the problem in. Deep clean and sanitize first, or replace the board if the damage is severe.
- Using abrasive cleaners before oiling: Scouring pads and harsh chemicals damage the wood surface, creating rough spots that absorb more oil and wear down faster. Use only mild soap and soft brushes for cleaning.
Cutting Board Care Tips Between Oiling Sessions
Oiling is just one part of extending your board’s life. Follow these daily habits to reduce wear and tear:
- Clean properly after each use: Wash with warm, mild dish soap and a soft sponge, never soak the board in water (soaking causes swelling and cracking). For raw meat, sanitize with a diluted bleach solution (1 tablespoon bleach per gallon of water) or vinegar, then rinse and dry immediately. Follow USDA food safety guidelines for kitchen tools to avoid cross-contamination when prepping raw proteins.
- Dry thoroughly: Always stand your board upright to air dry, never let it sit flat while wet, which traps moisture against the surface. Avoid storing it in damp areas like under the sink.
- Use both sides: Alternating sides when chopping prevents one side from wearing down faster and developing deep grooves.
- Avoid heat and direct sunlight: High heat from dishwashers, stovetops, or sunny windowsills dry out wood and cause warping. Never put wooden boards in the dishwasher.
- Choose durable wood for custom builds: If you’re crafting a long-lasting custom board, opt for tight-grained hardwoods like hard maple or teak, which resist drying and staining far longer than soft, porous woods.
Frequently Asked Questions
Can I use mineral oil on bamboo cutting boards?
Yes, mineral oil is safe and effective for bamboo, which is a highly porous grass material. Bamboo boards tend to dry out faster than hardwood boards, so you may need to oil them every 2 weeks with regular use.
Is mineral oil safe for boards used for raw meat?
Yes, as long as you use food-grade, USP mineral oil. Always sanitize the board with hot, soapy water or a diluted disinfectant after cutting raw meat, then dry thoroughly before oiling.
How do I know if my mineral oil is food-safe?
Look for labels that say "USP-grade", "pharmaceutical-grade", or "FDA-approved for food contact". Avoid products labeled "industrial mineral oil" or "mineral oil for machinery", as these contain unsafe additives.
Can I mix mineral oil with beeswax for extra protection?
Yes, many cutting board conditioners blend mineral oil with beeswax to create a harder, more water-resistant finish. This is a great option for boards that see heavy use or are stored in humid environments. The beeswax adds extra protection without affecting the food safety of the mineral oil base.
What’s the difference between mineral oil and mineral spirits?
Mineral spirits are a solvent used for cleaning wood finishes and paint, and are not food-safe. Always double-check the product label to ensure you are buying food-grade mineral oil, not mineral spirits.
Conclusion
Oiling your cutting board takes less than 15 minutes, but it adds decades to its usable life, saves you money on replacements, and keeps your food prep safe and sanitary. By following the steps in this guide and avoiding common mistakes, you’ll never have to deal with a cracked, stained, or warped board again. If you’re looking to build a board that’s built to last, check out our guide to building an heirloom-quality cutting board for tips on selecting wood, joinery, and initial finishing. For more kitchen maintenance guides to keep your cooking space running smoothly, browse our full blog collection for expert tips on everything from drain care to cookware maintenance.

I’m Abby Lu, a passionate home cook who loves simplifying everyday meals. At PlugChef.com, I share product reviews and cooking guides to help you find the best tools for your kitchen.
Related posts:
 Rubber Mat for Kitchen Sink: Essential Protection Tool
 Vintage Spice Rack With Glass Bottles: Timeless Kitchen Charm
 How to Microwave Steam Asparagus: Quick & Easy Perfect Results
 How to Soak Grill Grates: Easy Tips for a Sparkling Clean Grill
 What is a Dry Rub: Ultimate Guide to Flavorful BBQ Seasoning
 Can You Freeze Homemade Gravy: Easy Tips to Preserve Flavor

