

There’s nothing worse than biting into a homemade thin crust pizza only to be met with a chewy, doughy base or a soggy, limp crust that folds under the weight of your toppings. If you’ve struggled to recreate the crispy, crackly thin crust of your favorite neighborhood pizzeria at home, this guide is for you. We’ll walk you through every step of making perfect thin pizza dough, from selecting the right flour to mastering high-heat baking, with exact measurements, pro tips from years of home pizza making, and fixes for every common mishap. No fancy equipment required—just a standard home oven and a few simple ingredients to get that signature crisp, chewy bite every time.
Why This Thin Crust Recipe Outperforms Standard Versions
Most thin crust recipes fail because they use unbalanced hydration, insufficient fermentation, or low baking temperatures that steam the dough instead of crisping it. This recipe uses a precise 65% hydration ratio, which is wet enough to create a tender crumb but dry enough to crisp up easily in a home oven. We also recommend a minimum 1-hour room temperature proof (or 12-72 hour cold ferment for deeper flavor) to build gluten structure without toughness, and a baking temperature of 500°F (260°C) to trigger the Maillard reaction for golden, crunchy edges. Unlike recipes that call for specialized equipment like pizza steels or wood-fired ovens, this version works perfectly on a standard baking sheet or preheated pizza stone, making it accessible for every home baker.
Choosing the Right Flour for Crispy Thin Crust
Flour is the foundation of your thin crust, and its protein content directly impacts the dough’s elasticity, crispness, and ability to hold up to toppings. The right flour will stretch thin without tearing, while the wrong choice will lead to a crumbly, chewy, or soggy base.
Flour Type Comparison
| Flour Type | Protein Content | Best For | Pros | Cons |
|---|---|---|---|---|
| All-Purpose | 10-12% | Casual home pizza, soft thin crust | Easy to find, affordable, tender crumb | Less structural support, can tear when stretching very thin |
| Bread Flour | 12-14% | Standard thin crust, New York-style | Strong gluten network, elastic, holds up to high heat | Slightly chewier texture than all-purpose |
| High-Gluten | 14%+ | Professional-style thin crust, cracker crust | Maximum crispness, stretches paper-thin without tearing | Harder to find in standard grocery stores, requires slightly longer kneading |
| 00 Flour | 11-12% | Neapolitan-style thin crust, blistered edges | Fine texture, soft chew, authentic Italian flavor | Lower gluten development, can be too soft for heavy toppings |
Bread flour is the best all-around choice for most home bakers: its 12-14% protein content aligns with USDA wheat quality standards for high-gluten varieties ideal for pizza dough, as it builds a strong gluten network that stretches thin without tearing USDA wheat quality standards. If you can’t find high-gluten flour, bread flour works perfectly, and all-purpose flour is an acceptable substitute for a softer, more tender crust. Avoid cake or pastry flour, which has too little protein to hold the dough together.
 Freshly mixed dough after the initial knead, ready for proofing
Credit: nourishedbynic.com
Freshly mixed dough after the initial knead, ready for proofing
Credit: nourishedbynic.com
Core Ingredients & Their Exact Roles
Each ingredient in this recipe serves a specific purpose, and small adjustments to ratios can drastically change your crust’s texture and flavor. We use precise measurements by weight for consistency, but we’ve included volume equivalents for casual bakers.
Yeast
We use instant yeast for this recipe because it mixes directly into the flour with no need for proofing, cutting down on prep time. One 7g packet (2 ¼ tsp) of instant yeast is enough for 500g of flour. If you only have active dry yeast, use 25% more (just under 3 tsp) and proof it in the warm water for 5 minutes before mixing with the other ingredients. Fresh yeast works for a more traditional, yeasty flavor, but you’ll need 25g (roughly 1 oz) for the same amount of flour, and it must be stored in the refrigerator and used within 2 weeks.
Water
Water temperature is critical for yeast activation: use water that feels warm to the touch, around 105°F (40°C). Water hotter than 115°F (46°C) will kill the yeast, while water colder than 95°F (35°C) will slow fermentation and lead to a dense, tough crust. We recommend using a kitchen thermometer for accuracy, especially if your kitchen is particularly cold or hot. The 325ml (1 ⅓ cups) of water in this recipe creates a 65% hydration ratio, which is ideal for thin crisp crust.
Salt & Sugar
Fine sea salt does more than add flavor: it slows yeast activity to prevent overproofing, and strengthens gluten to make the dough easier to stretch. We use 10g (2 tsp) of salt per 500g of flour, which is a 2% salt ratio, the standard for pizza dough. Granulated sugar (5g, 1 tsp per 500g flour) feeds the yeast to encourage a steady rise, and promotes Maillard browning for a golden crust. If you prefer a less sweet crust, you can omit the sugar, but your crust may be paler and have a slightly denser texture.
Olive Oil
Extra virgin olive oil adds subtle richness and inhibits gluten formation slightly, creating a tender, crisp crust instead of a chewy one. It also prevents the dough from sticking to your work surface and peel. If you don’t have olive oil, you can substitute with a neutral oil like canola, but extra virgin adds the best flavor.
Step-by-Step Thin Pizza Dough Recipe (No Special Equipment Required)
This recipe makes two 12-inch thin crusts, perfect for a family meal or meal prep. All measurements are by weight for accuracy, but volume equivalents are included for convenience.
Ingredients
- 500g (4 cups) bread flour, plus extra for dusting
- 325ml (1 ⅓ cups) warm water (105°F / 40°C)
- 7g (2 ¼ tsp) instant yeast
- 10g (2 tsp) fine sea salt
- 5g (1 tsp) granulated sugar
- 30ml (2 tbsp) extra virgin olive oil, plus extra for greasing the bowl
- Optional: 1 tsp diastatic malt powder for extra browning (great if your oven runs cool)
Instructions
- Mix the dry ingredients: In a large bowl, whisk together the flour, yeast, salt, sugar, and diastatic malt powder (if using) until evenly combined.
- Add wet ingredients: Pour in the warm water and olive oil, stirring with a wooden spoon until a shaggy dough forms and no dry flour remains.
- Knead the dough: Turn the dough out onto a lightly floured work surface. Knead by hand for 5-7 minutes, folding the dough over itself and pressing with the heel of your hand, until it is smooth, elastic, and springs back when poked. In practice, most home bakers over-knead thin crust dough by 2-3 minutes, leading to a tough, chewy base instead of the crisp texture you want. If the dough feels too sticky, sprinkle with a tiny amount of flour, but avoid adding too much, as this will make the crust dense.
- First proof: Lightly grease a large bowl with olive oil, add the dough, and turn to coat it evenly. Cover with a damp kitchen towel or plastic wrap, and let proof in a warm, draft-free spot for 1 hour, or until doubled in size. For deeper flavor, you can cold ferment the dough in the refrigerator for 12-72 hours; just bring it to room temperature for 30 minutes before shaping.
- Portion the dough: Turn the proofed dough out onto a work surface and divide it into two equal 250g portions. Shape each portion into a tight ball, then cover with a damp towel and let rest for 15 minutes. This rest period relaxes the gluten, making the dough much easier to stretch without tearing.
- Shape and top: Follow the shaping tips below to stretch the dough to your desired thickness, add your favorite toppings, and bake immediately.
Shaping Thin Crust Without Tears or Thick Spots
Shaping thin crust dough requires a gentle touch to avoid tearing and ensure even thickness for consistent cooking. Follow these steps for perfect, uniform crust every time.
Stretching vs. Rolling
Hand-stretching is the preferred method for traditional thin crust, as it preserves small air pockets in the dough that create a light, airy texture with a crisp exterior. To stretch by hand: start by pressing the center of the dough ball with your fingertips, leaving a ½-inch rim if you want a raised cornicione (crust edge). Working from the center outwards, use your fingers to stretch the dough until it is your desired thickness, rotating it 90 degrees every few stretches to keep it even. If you prefer a uniform, ultra-thin cracker crust, a rolling pin works well. Use a French rolling pin for more control, and roll from the center outwards, rotating the dough 90 degrees after every few rolls to avoid thin spots. A common mistake is rolling the dough directly on a floured surface, which can incorporate too much flour and make the crust tough; instead, roll the dough between two sheets of parchment paper dusted with semolina flour to prevent sticking.
Avoiding Dough Tears
Thin dough is prone to tearing if it is stretched when cold or pulled too aggressively. Always let the rested dough come to room temperature before shaping, and work on a lightly floured surface dusted with semolina or cornmeal to reduce sticking. If a small tear appears, patch it with a tiny scrap of dough and press gently to seal. For an extra no-fail hack, stretch the dough directly on a sheet of parchment paper—you can slide the parchment and dough directly onto your preheated baking surface, no peel required.
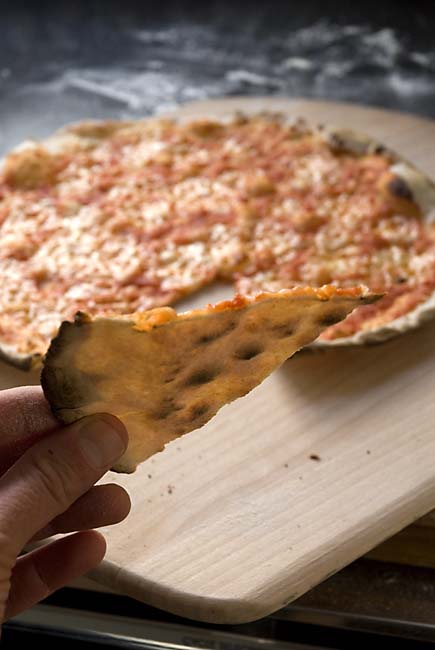 Ultra-thin cracker-style crust stretched to uniform thickness, ready for toppings
Credit: artisanbreadinfive.com
Ultra-thin cracker-style crust stretched to uniform thickness, ready for toppings
Credit: artisanbreadinfive.com
Baking for Maximum Crispiness (No Commercial Oven Needed)
The difference between a soggy, chewy crust and a perfectly crisp, golden one comes down to heat and baking surface. Follow these tips to get restaurant-quality results from your home oven.
Oven Temperature & Preheat Time
Set your oven to 500°F (260°C), or the highest setting your oven allows. If you have a convection setting, use it—circulated hot air will crisp the crust even faster. Preheating is non-negotiable: if you’re using a pizza stone or steel, place it in the oven while it preheats for at least 45 minutes to ensure it is fully heated through. A cold baking surface will steam the dough instead of crisping it, leading to a soft, limp base. If you don’t have a pizza stone or steel, invert a heavy, rimmed baking sheet and preheat it for 30 minutes for almost identical results.
Baking Time & Technique
Slide your shaped and topped pizza directly onto the preheated stone/steel (or onto the inverted baking sheet) and bake for 8-10 minutes, until the crust is golden brown and the cheese is bubbly and slightly browned in spots. Rotate the pizza 180 degrees halfway through baking to ensure even cooking and avoid hot spots. For extra crisp edges, brush the outer rim of the crust with a tiny bit of olive oil before baking, or broil for the last 30 seconds of cooking (watch closely to avoid burning). Let the pizza rest for 2 minutes after baking before slicing to let the cheese set and prevent steam from making the crust soggy.
Topping Strategies That Keep Crust Crisp
Thin crust is delicate, and heavy, wet toppings will quickly turn your crisp base into a soggy mess. Follow these rules to balance flavor and texture:
- Keep sauce thin and light: Use no more than ¼ cup of sauce per 12-inch crust, and opt for thick, strained tomato sauce or a white garlic-olive oil base to avoid excess moisture. Spread the sauce in a thin, even layer, leaving a ½-inch border around the edge.
- Use low-moisture cheese: Fresh mozzarella is delicious, but it releases a lot of water when baked. Pat fresh mozzarella slices dry with a paper towel before adding them to the pizza, or use part-skim low-moisture mozzarella for less grease and water.
- Pre-cook wet toppings: Vegetables like mushrooms, zucchini, spinach, and bell peppers release a lot of water when baked. Sauté them for 2-3 minutes before adding to the pizza to remove excess moisture.
- Add delicate toppings after baking: Fresh greens like arugula, basil, and spinach wilt quickly in the oven. Add them after you take the pizza out for a fresh, crisp finish.
- Skip the heavy piles: Limit toppings to 3-4 varieties per pizza to avoid overloading the crust. For a creative twist, shredded savory protein toppings make a flavorful, unexpected alternative to traditional pepperoni or sausage. For a meat-free option, top your crust with roasted vegetables and a sprinkle of parmesan, or serve it alongside hearty vegetarian mains for a full plant-based meal.
Common Troubleshooting & Fixes
Even with a perfect recipe, small mistakes can lead to subpar crust. Here are the most common issues and their exact fixes:
Soggy Crust
Causes: Too much sauce, wet unpatched toppings, oven temperature too low, or baking surface not preheated enough. Fixes: Reduce sauce by 25%, pat all wet toppings dry with a paper towel, pre-bake the crust for 3 minutes before adding toppings, and preheat your baking surface for at least 45 minutes. In practice, pre-baking the crust is the single most effective fix for sogginess, even if you use a lot of toppings.
Tough, Chewy Crust
Causes: Over-kneading, adding too much flour while kneading, shaping cold dough, or using too little water. Fixes: Knead the dough for only 5-7 minutes, measure flour precisely instead of adding extra by hand, let the dough rest for 15 minutes after portioning before shaping, and add 1 tbsp of warm water to the dough if it feels stiff or crumbly.
Crust That’s Crisp on the Edges but Soft in the Middle
Causes: Oven temperature too low, baking surface not fully preheated, or too many toppings weighing down the center. Fixes: Increase your oven temperature to 525°F (274°C) if it allows, preheat your baking surface for 45 minutes instead of 30, and reduce your topping quantity by 20%. You can also move the pizza to the lower oven rack for the last 2 minutes of baking to crisp the bottom.
Overbaked or Burnt Crust
Causes: Oven temperature too high, pizza placed too close to the broiler, or baking time too long. Fixes: Lower your oven temperature by 25°F and bake for 2-3 minutes longer, place the pizza on the middle rack instead of the top rack, and set a timer to check the pizza 2 minutes before the suggested bake time.
Pro Tips for Restaurant-Quality Crisp at Home
These small, tested tricks will take your thin crust from good to great:
- Cold ferment the dough for 24-72 hours in the refrigerator for deeper, more complex flavor and a crispier texture. The slow fermentation breaks down gluten for a tender bite.
- Dust your pizza peel or parchment paper with semolina flour instead of regular flour to prevent sticking and add a subtle crunch to the bottom of the crust.
- If you’re meal prepping, portioned dough balls can be frozen for up to 3 months, making this a great option for make-ahead freezer meals and quick weeknight dinners.
- For an ultra-crisp bottom, preheat a cast iron skillet in the oven for 20 minutes, then place the shaped dough directly in the hot skillet before adding toppings and baking.
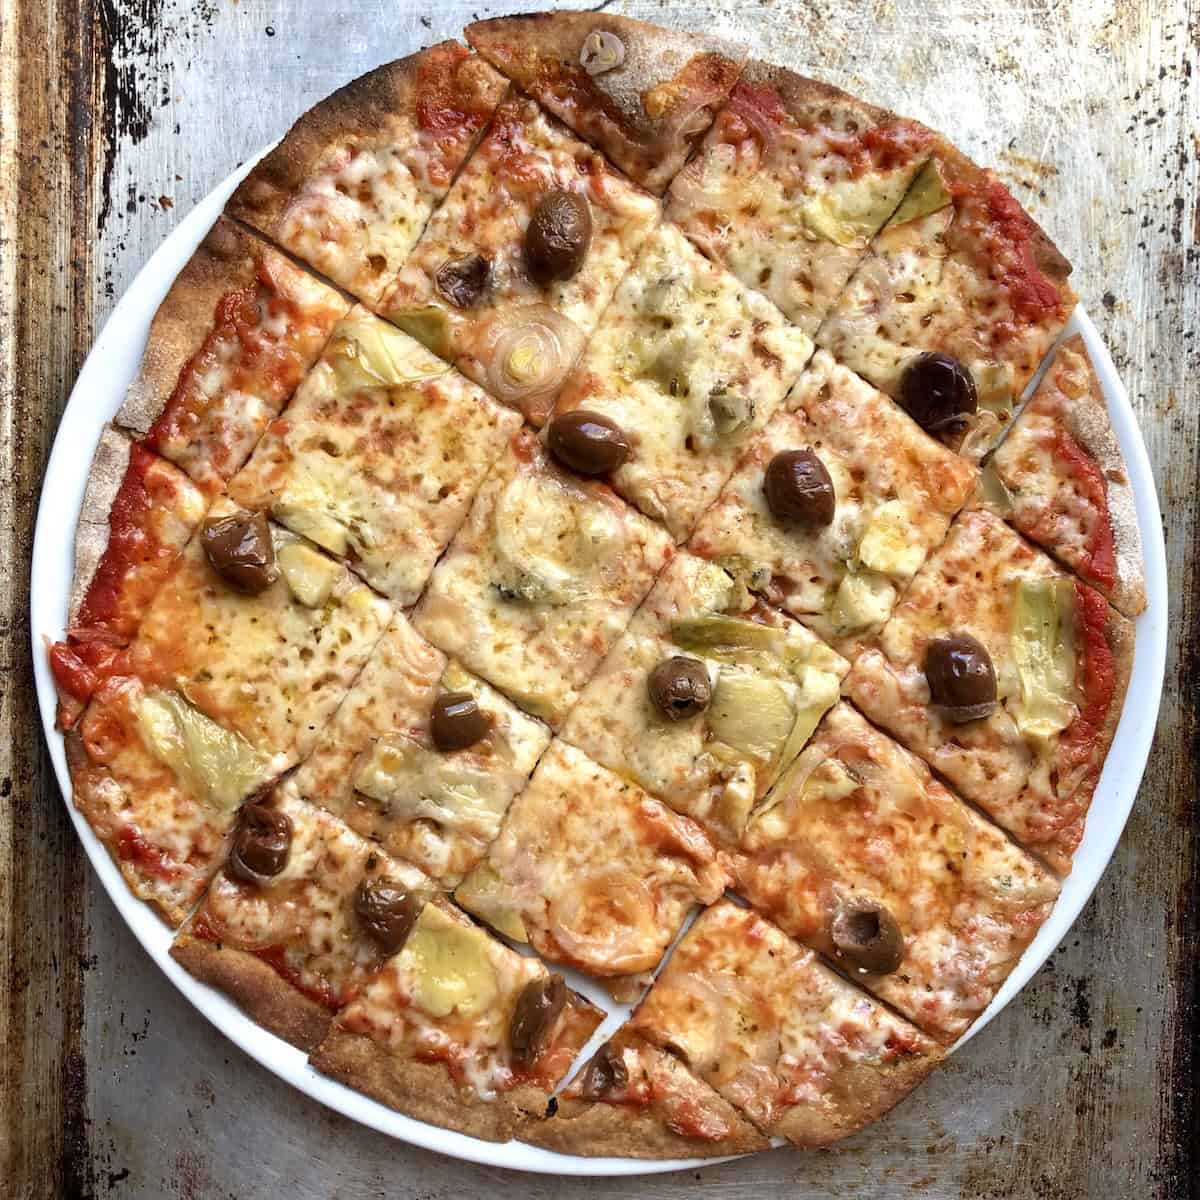 Baked thin crust pizza with fresh toppings, sliced and ready to serve
Credit: bitingatthebits.com
Baked thin crust pizza with fresh toppings, sliced and ready to serve
Credit: bitingatthebits.com
Frequently Asked Questions
What hydration percentage is best for thin pizza dough?
A 60-65% hydration ratio (water weight divided by flour weight) is ideal for thin crisp crust. Lower hydration leads to tough, crackly dough that’s hard to stretch, while higher hydration creates a soggy, limp base that won’t crisp up in the oven.
Can I make thin pizza dough without a stand mixer?
Absolutely. This recipe comes together easily by hand with just a wooden spoon and a clean work surface. Hand-mixing also gives you more control over gluten development, which is key for a tender, crisp crust. When proofing dough at room temperature, follow FDA safe food handling guidance to avoid bacterial growth, especially in warm kitchen environments FDA safe food handling for home bakers.
How do I prevent my thin crust from getting soggy after baking?
The two most common causes of sogginess are excess moisture from toppings and a baking surface that isn’t hot enough. Pat all wet toppings dry with a paper towel before adding them, pre-bake the crust for 3 minutes before adding sauce and cheese, and always preheat your pizza stone or steel for at least 45 minutes before baking.
Can I freeze thin pizza dough for later use?
Yes. Portion the dough into 250g balls, coat lightly with oil, and freeze in an airtight bag for up to 3 months. Thaw frozen dough in the refrigerator overnight before bringing it to room temperature and shaping.
Is high-gluten flour required for thin crust?
No. While high-gluten flour delivers the crispest, most structural crust, bread flour (12-14% protein) works perfectly for most home bakers and is far easier to find in standard grocery stores. All-purpose flour is also acceptable for a softer, more tender thin crust.
Conclusion
Perfect thin pizza crust isn’t just a base for toppings—it’s the star of the slice, with a crisp, golden exterior and a tender, chewy interior that balances heavy sauces and bold toppings without getting soggy. This recipe eliminates the guesswork with exact measurements, tested techniques, and fixes for every common issue, so you can get restaurant-quality results from your home kitchen every time. Whether you’re hosting a pizza night, meal prepping for the week, or just craving a quick, customizable meal, this dough comes together in under 2 hours (or overnight for deeper flavor) with ingredients you already have on hand. Ready to level up your pizza game? Pair your freshly baked pie with a side of quick weeknight side dishes and a round of refreshing drink pairings for a complete, crowd-pleasing meal. For more creative pizza topping ideas, crust variations, and weeknight dinner inspiration, browse our full recipe archive.

Hi, I’m Daniel Brooks—a food lover and kitchen gear enthusiast. I enjoy testing cookware, utensils, and gadgets to see what really works in everyday cooking. At PlugChef.com, I share honest reviews, comparisons, and simple guides to help you choose the best tools for a safer, smarter, and more enjoyable kitchen.
Related posts:
 Wall Mounted Dish Drying Rack: Space-Saving Kitchen Solution
 How to Decorate With Wicker Baskets: Chic Home Ideas
 Kitchen Cabinet Organizers for Plates: Maximize Space
 What in Loaded Mashed Potatoes: Surprising Ingredients Unveiled
 Butternut Squash Lasagna With Sausage: Irresistible Comfort Feast
 Pull Apart Hawaiian Roll Sliders: Irresistible Party Bites Made Easy

