
Are you tired of waiting forever for your spaghetti to cook? Imagine cutting your cooking time in half while still getting perfectly tender noodles every single time.
Cooking spaghetti in a pressure cooker is a game-changer for anyone who loves quick, delicious meals without the hassle. You’ll discover simple steps to make your spaghetti faster, save energy, and free up your stove for other dishes. Ready to transform your pasta routine?
Keep reading to unlock the secrets of pressure cooker spaghetti!
Choosing The Right Pressure Cooker
Choosing the right pressure cooker is key to cooking perfect spaghetti fast. The right cooker saves time and keeps the pasta from getting mushy. It also fits your kitchen space and cooking needs. Consider the type and size of the cooker before buying.
Types Of Pressure Cookers
Pressure cookers come in two main types: stove-top and electric. Stove-top cookers heat quickly and offer more control over pressure levels. They are often more affordable and last longer with proper care.
Electric pressure cookers are easier to use. They have preset cooking programs and timers. These cookers are safer for beginners. They also keep food warm after cooking, which is helpful for busy schedules.
Size And Capacity Considerations
Pressure cookers vary in size from 3 to 10 liters or more. A smaller cooker is good for singles or couples. Larger families or meal preppers need a bigger pot.
Consider how much spaghetti you cook at once. A 6-liter cooker suits most families well. It fits enough pasta and sauce without crowding. Make sure your cooker fits on your stove or counter comfortably.
Selecting Spaghetti And Ingredients
Choosing the right spaghetti and ingredients is crucial for a delicious pressure cooker meal. The texture and flavor of your dish depend heavily on what you start with. Let’s look at how to pick spaghetti that holds up well and which ingredients will enhance your cooking.
Best Spaghetti Varieties
Not all spaghetti is created equal, especially when pressure cooking. You want a pasta that won’t turn mushy quickly.
- Durum Wheat Spaghetti:This type is firm and holds its shape well under pressure. It’s perfect if you like your pasta al dente.
- Whole Wheat Spaghetti:Offers more fiber and a nuttier flavor. It’s a great healthy choice but requires slightly less cooking time.
- Gluten-Free Spaghetti:Made from rice or corn, ideal if you have dietary restrictions. Watch the cooking time closely as it can overcook faster.
Have you ever bought spaghetti only to find it turns to mush? Trying one of these varieties might save you that disappointment.
Complementary Ingredients
Pressure cooking intensifies flavors, so your ingredients need to be balanced. Choose fresh vegetables, quality proteins, and flavorful liquids.
- Fresh Tomatoes or Tomato Sauce:Adds acidity and sweetness that enhance the pasta’s taste.
- Garlic and Onions:Essential for building a rich base flavor that comes through even after pressure cooking.
- Olive Oil or Butter:Helps to coat the spaghetti and prevent sticking.
- Herbs like Basil or Oregano:These elevate your dish without overpowering it.
- Proteins:Ground beef, sausage, or even beans add substance and make the meal more filling.
Think about how the ingredients you select will interact under pressure. Would adding delicate herbs early in cooking lose their flavor? Timing and choice matter here.
Preparing Spaghetti For Pressure Cooking
Break spaghetti into smaller pieces to fit inside the pressure cooker easily. Add enough water to cover the pasta for even cooking. Stir gently to prevent sticking before sealing the lid.
Cooking spaghetti in a pressure cooker can be a fast and simple process. Preparing the spaghetti correctly ensures perfect results every time. This section guides you through the essential steps to get your spaghetti ready for pressure cooking. With a few tips, you can make your spaghetti taste delicious and cook evenly.Breaking Or Whole Strands
Decide whether to break the spaghetti or leave it whole. Breaking the spaghetti makes it fit easily in the pressure cooker. Whole strands can be cooked by bending them in a circular pattern. Both methods work well, depending on your preference.Soaking Tips
Consider soaking spaghetti for a few minutes before cooking. Soaking helps the strands soften slightly, reducing cooking time. Use warm water to soak the spaghetti for about 10 minutes. This step can help the pasta absorb flavors better during cooking.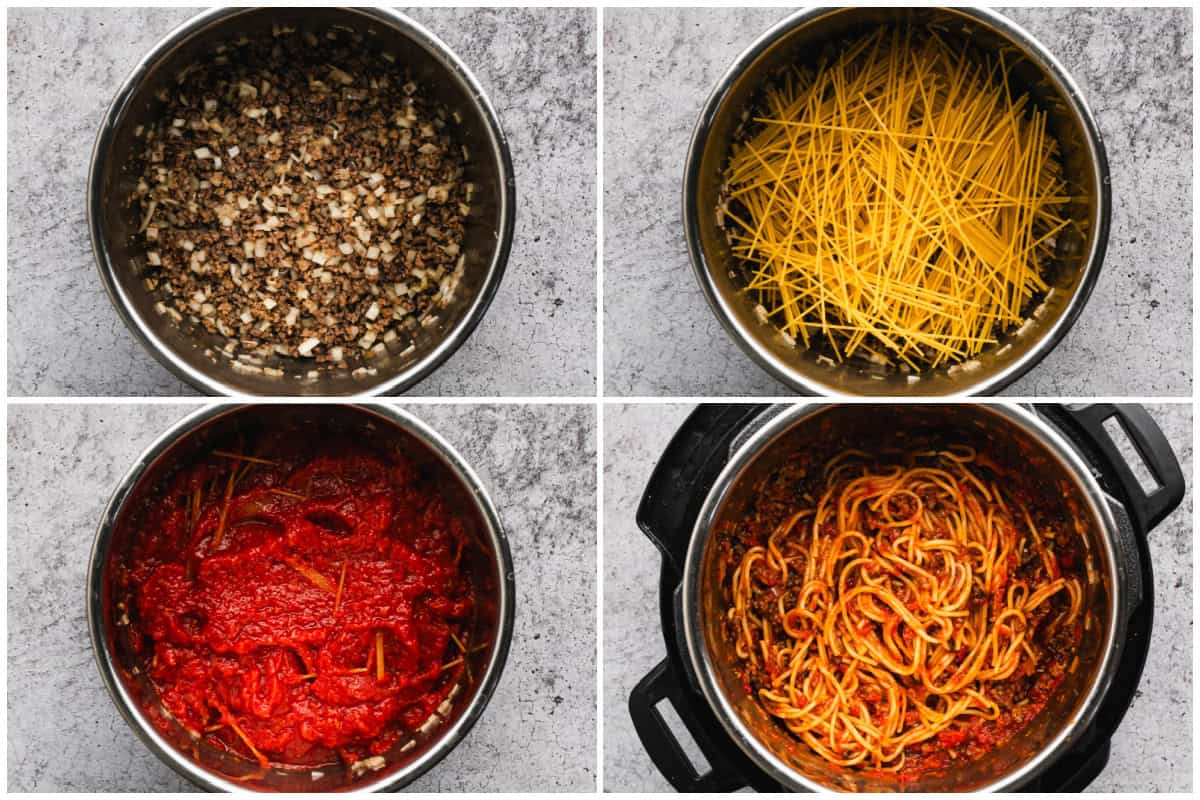
Credit: tastesbetterfromscratch.com
Cooking Process Steps
Cooking spaghetti in a pressure cooker saves time and effort. The process is simple and fast. Follow these steps to get perfect pasta every time. Understanding water ratio, pressure settings, and release methods helps achieve the best texture and taste.
Water To Pasta Ratio
Use enough water to cover the pasta fully. A common ratio is 4 cups of water for every 8 ounces of spaghetti. Too little water can cause pasta to stick and burn. Too much water will dilute the flavor and take longer to cook. Stir the pasta after adding water to prevent clumping.
Pressure And Cooking Time
Set the pressure cooker to high pressure. Cooking time depends on the pasta type and thickness. For regular spaghetti, cook for 4 to 5 minutes. Thicker or whole wheat pasta may need 6 to 7 minutes. Avoid overcooking to keep pasta firm. Quick cooking preserves flavor and texture well.
Natural Vs. Quick Release
Natural release lets pressure drop slowly. It helps pasta finish cooking evenly. Wait 5 to 10 minutes before opening the lid. Quick release releases pressure immediately. Use this method to stop cooking fast. It prevents mushy pasta but may cause splatter. Choose based on your texture preference and safety.
Flavor Enhancements
Enhancing the flavor of spaghetti cooked in a pressure cooker makes the dish more delicious and satisfying. The pressure cooker locks in flavors, making every bite rich and tasty. Simple additions can boost the taste and texture without extra cooking time.
Adding Sauces And Spices
Sauces bring moisture and deep flavor to spaghetti in the pressure cooker. Tomato sauce, marinara, or creamy alfredo work well. Adding spices enhances the overall taste. Use garlic powder, basil, oregano, or red pepper flakes for a flavor punch.
- Pour sauce directly over the pasta before cooking
- Sprinkle dried herbs and spices evenly
- Mix well to blend flavors
These additions create a rich base that the pressure cooker intensifies. The result is spaghetti that tastes like it slow-cooked for hours.
Incorporating Proteins And Vegetables
Adding proteins like ground beef, chicken, or sausage makes the meal hearty. Vegetables such as bell peppers, mushrooms, or spinach add nutrition and color.
- Brown proteins before pressure cooking for better texture
- Chop vegetables into bite-sized pieces
- Layer ingredients evenly for even cooking
The pressure cooker cooks everything together, blending flavors perfectly. Proteins soak up sauces, and vegetables become tender yet flavorful. This creates a balanced and tasty spaghetti dish in less time.
Common Mistakes To Avoid
Cooking spaghetti in a pressure cooker is a fantastic way to save time, but it comes with its own set of challenges. Avoiding common mistakes can make a huge difference in your final dish. Let’s look at some key pitfalls you should watch out for to get perfectly cooked spaghetti every time.
Overcooking Pasta
Pressure cookers work fast, so it’s easy to overcook spaghetti if you’re not careful. Unlike boiling, pasta continues to cook during the natural pressure release, which can turn your noodles mushy.
Try setting the timer for less than you think. For example, if you usually boil spaghetti for 8 minutes, pressure cook it for just 4 minutes. This way, the residual heat finishes the job without ruining the texture.
Insufficient Liquid
Pressure cookers need enough liquid to create steam and build pressure. Using too little water can cause the cooker to burn your food or stop cooking altogether.
Make sure you add at least 1 to 1.5 cups of water or broth, depending on your cooker’s size. Don’t just guess—check your manual or measure carefully. Too little liquid is a common mistake that can ruin your meal and your cooker.
Ignoring Pressure Limits
Each pressure cooker has limits on how much food and liquid you can safely add. Overfilling can block the pressure valve or cause uneven cooking.
Pay attention to the maximum fill line inside your cooker. If you’re cooking a big batch of spaghetti, cook in smaller portions rather than stuffing the pot. Have you ever wondered why your pressure cooker whistles or struggles? It might be because you ignored these limits.
Cleaning And Maintenance Tips
Keeping your pressure cooker clean and well-maintained is key to making perfect spaghetti every time. Neglecting this can lead to lingering odors, tough stains, or even damage that reduces the cooker’s efficiency. Let’s dive into some practical tips to keep your cooker in top shape.
Post-cooking Cleanup
After cooking spaghetti, start by unplugging and letting the cooker cool down completely. Avoid rushing to clean while it’s still hot; this prevents warping or burns.
Remove the inner pot and soak it in warm, soapy water for a few minutes. Use a soft sponge to gently scrub away any stuck pasta bits or sauce residues.
- Check the sealing ring for any food particles or discoloration. Wipe it with a damp cloth and let it dry thoroughly.
- Clean the lid carefully, paying attention to the steam vent and valves. Use a small brush or toothpick to clear any blockages.
- Never immerse the cooker’s base in water. Instead, wipe it down with a damp cloth to remove spills.
Have you ever noticed a strange smell after cooking? This usually means leftover food stuck in the sealing ring or valves. Regular cleaning here prevents that unpleasant surprise.
Extending Cooker Lifespan
Proper maintenance can add years to your pressure cooker’s life. Start by storing it with the lid upside down on the pot or separately. This prevents the sealing ring from getting compressed and losing elasticity.
Replace the sealing ring every 12-18 months, or sooner if it shows cracks or stiffness. A worn-out ring can cause pressure leaks, affecting cooking performance.
Lubricate the sealing ring lightly with vegetable oil to keep it supple. Avoid using harsh chemicals or abrasive materials on any part of the cooker.
- Inspect the steam release valve regularly to ensure it moves freely. A stuck valve can be dangerous and reduce efficiency.
- Follow the manufacturer’s instructions for deep cleaning cycles or part replacements.
Think about how often you clean and check your cooker. Could a little extra care today save you from unexpected repairs tomorrow?
Credit: www.simplyhappyfoodie.com
Recipe Variations
Cooking spaghetti in a pressure cooker offers many recipe variations. These variations make meals simple, quick, and full of flavor. You can create dishes that suit different tastes and dietary needs. Experimenting with ingredients keeps spaghetti exciting and fresh.
One-pot Spaghetti Meals
One-pot spaghetti meals save time and reduce cleanup. You cook pasta, sauce, and other ingredients together. This method locks in flavors and creates a rich taste.
- Add diced tomatoes, garlic, and onions for a classic sauce.
- Include bell peppers, mushrooms, and spinach for extra veggies.
- Use broth or water as the cooking liquid to keep pasta moist.
- Finish with cheese or herbs for added flavor.
Vegetarian And Meat Options
Pressure cooker spaghetti works well with both vegetarian and meat recipes. Choose your protein based on preference or availability.
- For vegetarian dishes, use beans, lentils, or tofu for protein.
- Add vegetables like zucchini, carrots, and peas for nutrition.
- For meat lovers, try ground beef, sausage, or chicken pieces.
- Brown meat before cooking to enhance flavor.
- Mix sauces like marinara or Alfredo depending on taste.

Credit: comfortcooks.com
Frequently Asked Questions
How Long To Cook Spaghetti In A Pressure Cooker?
Cook spaghetti under high pressure for 4-6 minutes. Adjust time based on pasta thickness. Quick release pressure carefully after cooking.
Can You Cook Spaghetti Without Boiling Water First?
Yes, add pasta, water, and sauce directly. Pressure cooker cooks spaghetti evenly without pre-boiling. Saves time and retains flavor.
How Much Water Is Needed For Pressure Cooker Spaghetti?
Use enough water to cover pasta completely, about 2 cups per 8 ounces. Avoid excess water to prevent sogginess.
Is Pressure Cooker Spaghetti Softer Than Stovetop Pasta?
Pressure cooker pasta cooks faster and can be softer. Monitor cooking time to avoid mushy texture. Adjust time for preferred firmness.
Conclusion
Cooking spaghetti in a pressure cooker saves time and effort. It cooks pasta evenly and quickly. You get tender spaghetti without watching the pot. This method uses less water and energy, too. Just follow simple steps for the best results.
Try it next time you want a fast meal. Enjoy delicious spaghetti without any hassle. Easy, quick, and tasty—what more could you want?

Hi, I’m Daniel Brooks—a food lover and kitchen gear enthusiast. I enjoy testing cookware, utensils, and gadgets to see what really works in everyday cooking. At PlugChef.com, I share honest reviews, comparisons, and simple guides to help you choose the best tools for a safer, smarter, and more enjoyable kitchen.
Related posts:
 What Type of Cooking Utensils are Safe: Expert Picks
 What Innovations Could Blenders Make: Unleashing Future Tech
 Smart Strategies to Organize a Small Kitchen: Maximize Space
 How to Organize a Kitchen Cabinet: Expert Tips & Tricks
 How to Organize Kitchen Drawers: Expert Tips and Tricks
 How to Organize a Corner Kitchen Cupboard: Expert Tips

