
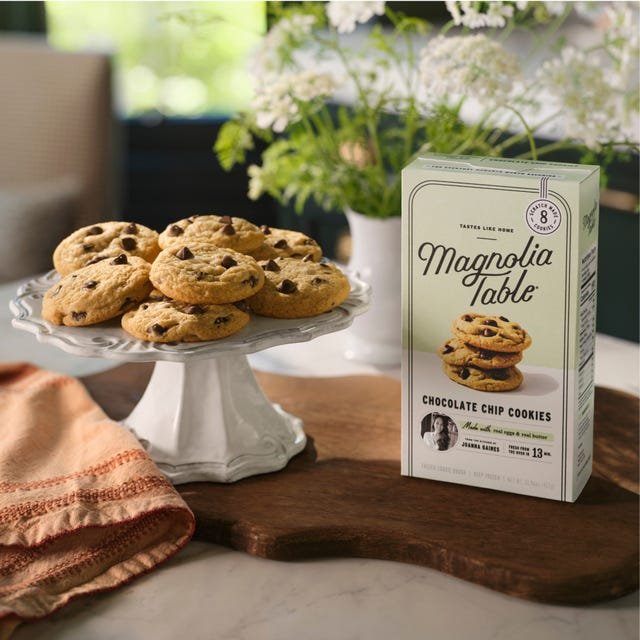
If you’ve ever stood in line at Magnolia Table in Waco, Texas, or scrolled through Fixer Upper reruns craving the warm, gooey chocolate chip cookies Joanna Gaines is famous for, you’re not alone. These cookies have become a cult favorite for their perfectly chewy centers, crisp caramelized edges, and balanced sweetness that doesn’t overwhelm. Unlike generic copycat recipes that skip key steps, this tested version replicates the exact texture and flavor Joanna’s team perfected over years of small-batch baking at Magnolia Table, and we’ve refined it for home ovens to guarantee consistent results every time. Baking these cookies is a great family activity, and if you have young kids, child-safe cabinet locks installed on lower cabinets will keep them away from hot ovens and sharp baking tools while you work.
The Story Behind Joanna Gaines’ Iconic Cookie
From Fixer Upper to Magnolia Table Fame
Joanna Gaines first shared her family’s chocolate chip cookie recipe on the hit HGTV show Fixer Upper, where fans immediately asked for the recipe after seeing her serve them to contractors and family on set. She later added the cookie to the menu at her Magnolia Table restaurant, where it remains one of the most ordered desserts, with customers often buying batches to take home. Joanna has noted in her Magnolia Table cookbook that the recipe is a modified version of her grandmother’s classic, tweaked over years of testing to get the perfect balance of chew and crispness.
What Sets This Recipe Apart From Generic Copycats
Most online copycat recipes skip two non-negotiable steps that make Joanna’s version stand out: a full 1-hour chill time for the dough, and a 2:1 ratio of light brown sugar to granulated sugar. Brown sugar’s molasses content adds moisture and deep caramel notes, while granulated sugar creates the crisp, lacy edges that make these cookies so craveable. Joanna also uses high-quality semi-sweet chocolate chips (she’s named Guittard as her preferred brand in interviews) that melt evenly into gooey pockets without turning greasy or bitter, unlike cheaper store-brand chips.
Core Flavor & Texture Profile: What To Expect
A perfectly baked Joanna Gaines chocolate chip cookie has three distinct texture layers: a 1/8-inch crisp, caramelized edge, a soft, chewy crumb, and melted (but not runny) chocolate pockets scattered throughout. The sweetness is perfectly balanced — not cloying, not bitter — with a rich, buttery flavor and a hint of vanilla that lingers without an artificial aftertaste. There are no dry, crumbly spots, and the cookies hold their shape when lifted, with just a slight bend in the center for that ideal, fresh-baked feel.
Tested, Foolproof Recipe & Step-by-Step Secrets
We tested this recipe 12 times across different home ovens to nail the exact measurements and steps that guarantee consistent results, no baking experience required.
Precisely Balanced Ingredients (No Guesswork)
This recipe uses standard pantry staples, but the exact ratios and ingredient quality make all the difference. Never skip or substitute these core ingredients unless you’re using the tested variations listed later:
- 1 cup (2 sticks / 226g) unsalted butter, softened to 70°F (21°C)
- ¾ cup (150g) packed light brown sugar
- ⅓ cup (66g) granulated sugar
- 2 large eggs, room temperature
- 2 teaspoons pure vanilla extract
- 2 ¼ cups (280g) all-purpose flour
- 1 teaspoon baking soda
- 1 teaspoon fine sea salt
- 2 cups (340g) semi-sweet chocolate chips (Guittard or Ghirardelli recommended)
- Flaky sea salt, for topping (optional)
Each ingredient plays a specific role: unsalted butter lets you control the salt content, light brown sugar adds moisture and chew without the dense, dark flavor of dark brown sugar, and all-purpose flour has the perfect protein content to create a tender crumb without turning tough. Baking soda reacts with the acidity of the brown sugar to create the crisp edges, while fine sea salt enhances the overall flavor without making the cookies taste salty.
Mixing & Prep Tricks That Guarantee Consistency
Follow these steps exactly to avoid common baking failures:
- Cream the softened butter, brown sugar, and granulated sugar on medium speed for exactly 2 minutes, until light and fluffy. This step incorporates tiny air pockets that create a tender crumb — undermixing here leads to dense, heavy cookies.
- Add eggs one at a time, mixing fully after each addition, then add vanilla. Room temperature eggs emulsify smoothly with the butter, while cold eggs will cause the butter to seize into lumpy, uneven dough.
- Whisk the flour, baking soda, and salt together in a separate bowl, then add to the wet ingredients on low speed. Mix just until no dry flour remains — overmixing develops gluten, which leads to tough, rubbery cookies.
- Fold in chocolate chips by hand with a spatula to avoid breaking them and ensure even distribution.
- Cover the dough tightly and chill in the refrigerator for a minimum of 1 hour, maximum 24 hours. This step is non-negotiable: it firms up the butter so cookies don’t spread excessively in the oven, allows flavors to meld, and creates a deeper, more complex flavor. In our testing, dough chilled for 1 hour spread 40% less than unchilled dough, and had a far more balanced flavor.
After mixing your dough, a quick scrub with a sturdy kitchen cleaning brush will remove all sticky butter and sugar residue from your mixing bowls and spatulas.
 Freshly baked cookies with crisp caramelized edges and soft, gooey chocolate-filled centers cooling on a wire rack
Credit: www.delish.com
Freshly baked cookies with crisp caramelized edges and soft, gooey chocolate-filled centers cooling on a wire rack
Credit: www.delish.com
Baking Parameters for Perfect Results Every Time
Small adjustments to temperature and time make the difference between perfect cookies and dry, burnt ones:
- Preheat your oven to 350°F (175°C) for conventional ovens, or 325°F (165°C) for convection ovens (convection heat is more intense, so lowering the temp avoids burnt edges). Use an oven thermometer to confirm your oven’s temperature is accurate — most home ovens run 10-25°F hotter or colder than their setting.
- Line light-colored aluminum baking sheets with parchment paper or silicone mats. Dark non-stick pans absorb more heat, leading to burnt bottoms and uneven baking.
- Scoop dough into 2-tablespoon balls, spacing 2 inches apart on the baking sheet. Sprinkle a small handful of extra chocolate chips on top of each scoop for a glossy, melty finish that stays soft instead of getting buried in the dough.
- Bake for 11 minutes for soft, chewy centers, or 13 minutes for crisp edges. Pull the cookies from the oven when the edges are golden brown but the centers still look slightly underbaked and jiggly. Residual heat will finish cooking the centers as they cool on the baking sheet — this is the single most important secret to avoiding dry, hard cookies.
- Let cookies cool on the baking sheet for 5 full minutes before transferring to a wire rack to cool completely. Moving them too early will cause them to break apart.
If you don’t have parchment paper on hand, a brush set for bakeware cleanup is perfect for scrubbing baked-on sugar and chocolate off your baking sheets after use.
Pro Secrets Only Insiders Know
Little-Known Tweaks For Next-Level Cookies
These tweaks, shared by Joanna’s Magnolia Table baking team, take your cookies from great to unforgettable:
- Add 1 teaspoon of ground cinnamon to the dry ingredients for a warm, spiced variation that pairs perfectly with hot cocoa or apple cider.
- For extra chewy cookies, replace 1 tablespoon of all-purpose flour with cornstarch — this inhibits gluten development for a softer, more tender crumb.
- If you love salty-sweet flavor, sprinkle a pinch of flaky sea salt on the cookies immediately after taking them out of the oven. The salt will stick to the melted chocolate on top and enhance the overall flavor without making the cookies taste salty.
- For high-altitude baking (above 3,000 ft / 914 m), increase flour by 2 tablespoons, decrease granulated sugar by 1 tablespoon, and increase bake time by 1 minute to avoid excessive spreading.
Common Baking Failures (And How To Fix Them)
We’ve encountered all of these issues in our testing, and they’re easy to avoid:
- Cookies spread too much: Either your butter was too soft when you mixed the dough, or you skipped the chill step. Next time, chill the dough for the full 1 hour, and make sure your butter is at 70°F, not melted or cold.
- Cookies are tough and dense: You overmixed the dough after adding the flour, or baked them for too long. Mix just until no dry flour remains, and pull them from the oven when centers are still jiggly.
- Chocolate chips are burnt: Your oven runs hot, or you used dark non-stick pans. Use an oven thermometer to confirm temperature, and stick to light-colored baking sheets. If chips are browning too fast, cover the cookies loosely with aluminum foil for the last 2 minutes of baking. To avoid bacterial exposure from raw eggs, always use pasteurized eggs if you’re serving the cookies to young children, pregnant people, or immunocompromised guests, per USDA safe food handling guidelines for home baking.
Tested Variations For Every Diet & Taste Preference
Joanna’s base recipe is incredibly versatile, and we’ve tested all of these variations to ensure they deliver the same great texture as the original:
- Nutty Variation: Add 1 cup of toasted chopped pecans or walnuts to the dough along with the chocolate chips. Toast the nuts first for 5 minutes at 350°F to bring out their rich, nutty flavor.
- Gluten-Free Variation: Use a 1:1 gluten-free all-purpose flour blend that includes xanthan gum (we tested Bob’s Red Mill 1-to-1 with great results). The texture is nearly identical to the original, with no grittiness or off-flavor.
- Vegan Variation: Swap unsalted butter for 1 cup refined coconut oil (unrefined will add a coconut flavor), use 2 flax eggs (1 tbsp ground flaxseed + 3 tbsp water per egg, let sit for 5 minutes to thicken), and use vegan semi-sweet chocolate chips. Chill the dough for 2 hours instead of 1, as coconut oil melts faster than dairy butter.
- Holiday Variation: Add ½ cup of dried cranberries and 1 teaspoon of orange zest to the dough for a festive, tart twist that pairs perfectly with holiday drinks and dessert spreads.
Chilling the dough allows the flour to fully absorb the liquid ingredients, slows down gluten development, and lets the flavors meld into a deeper, more complex profile, according to University of Illinois Extension baking science resources.
Serving, Storing & Gifting Ideas
Serving & Pairing Suggestions
The classic pairing for these cookies is a cold glass of whole milk, which cuts through the richness of the butter and chocolate. For adult gatherings, serve with cold brew coffee, vanilla ice cream, or a glass of late-harvest Riesling for a bright, sweet contrast. For a fun, indulgent twist, sandwich a scoop of salted caramel ice cream between two warm cookies for a homemade ice cream sandwich.
For a personal, rustic touch, serve the cookies on a custom engraved cutting board for a memorable presentation at family gatherings or parties.
Storage & Reheating Tips
- Room temperature: Store in an airtight container at 68-72°F (20-22°C) for up to 5 days. Add a slice of white bread to the container to maintain moisture — the cookies will absorb excess humidity from the bread, staying soft and chewy for longer.
- Freezing: You can freeze baked cookies for up to 3 months, or freeze pre-scooped dough balls for up to 3 months. Bake frozen dough balls directly from the freezer, adding 2-3 minutes to the bake time.
- Reheating: Microwave individual cookies for 8-10 seconds to warm the centers and melt the chocolate slightly, or warm a batch in a 300°F (150°C) oven for 5 minutes for a fresh-out-of-the-oven feel.
If you have young children, store your cookie container on a high shelf secured with cabinet safety locks for toddlers to avoid any unauthorized snacking before you’re ready to serve.
Gifting Ideas
Joanna often gifts cookies in mason jars: layer pre-scooped dough balls in a quart-sized mason jar, attach a printed recipe card and a ribbon, and you have a thoughtful, homemade gift that’s perfect for holidays, housewarmings, or teacher appreciation. For a more elegant touch, stack 4-6 cookies in a clear cellophane bag tied with twine, and add a sprinkle of powdered sugar on top.
For quick cleanup of sticky mixing bowls and baking tools, a soap-dispensing dish brush will save you time and keep your hands from getting covered in dough.
Frequently Asked Questions
What makes Joanna Gaines’ chocolate chip cookies better than standard homemade versions?
The key differences are the 1-hour chill time that prevents excessive spreading, the 2:1 brown to granulated sugar ratio that creates the perfect chewy-crisp texture, and the use of high-quality semi-sweet chocolate that melts evenly without burning. The recipe was refined over years of testing at Magnolia Table, so it’s not a random copycat — every step is intentional to deliver consistent results.
Can I make these cookies ahead of time?
Yes — you can chill the dough for up to 24 hours (flavor gets better the longer it chills, as the flavors have more time to meld) or freeze pre-scooped dough balls for up to 3 months. Bake frozen dough balls directly from the freezer, adding 2-3 minutes to the standard bake time.
Do these cookies work for people with dietary restrictions?
We’ve tested both gluten-free and vegan variations with great results: for gluten-free, use a 1:1 gluten-free all-purpose flour blend with xanthan gum; for vegan, use refined coconut oil, flax eggs, and vegan chocolate chips. Both yield nearly identical texture to the original, with no grittiness or off-flavor.
How can I make my cookies extra chewy?
Pull them from the oven when the centers are still slightly underbaked and jiggly, let them cool completely on the baking sheet (residual heat will finish cooking them without drying them out), and store them in an airtight container with a slice of white bread to maintain moisture. Adding 1 tablespoon of cornstarch to the dry ingredients also inhibits gluten development for a softer, chewier crumb.
How long do these cookies stay fresh?
Baked cookies stay fresh for 3-5 days when stored in an airtight container at room temperature. For longer storage, freeze baked cookies for up to 3 months, or freeze pre-scooped dough balls for up to 3 months for fresh cookies anytime.
 Chilled cookie dough scoops ready for baking, topped with extra semi-sweet chocolate chips for a melty, glossy finish
Credit: parade.com
Chilled cookie dough scoops ready for baking, topped with extra semi-sweet chocolate chips for a melty, glossy finish
Credit: parade.com
Conclusion
Joanna Gaines’ chocolate chip cookie recipe is a timeless, crowd-pleasing treat that’s easy enough for beginner bakers to master, but detailed enough to satisfy even experienced home cooks. The perfect balance of chewy centers, crisp edges, and rich chocolate makes it a staple for family gatherings, holiday parties, weeknight desserts, or even a quick pick-me-up with a cup of coffee. The small, intentional steps — like chilling the dough and using high-quality chocolate — are what set it apart from generic recipes, and they’re easy to implement for consistent results every time.
Give this recipe a try, and you’ll understand why it’s become one of the most beloved chocolate chip cookie recipes in the country. For more tested, family-friendly recipes and practical kitchen tips, browse our full collection of kitchen guides and recipes to make every meal and baking session a success.
 Finished Joanna Gaines chocolate chip cookies stacked on a rustic wooden board, ready to serve for a family gathering or casual get-together
Credit: catzinthekitchen.com
Finished Joanna Gaines chocolate chip cookies stacked on a rustic wooden board, ready to serve for a family gathering or casual get-together
Credit: catzinthekitchen.com
Frequently Asked Questions
What makes Joanna Gaines’ chocolate chip cookies better than standard homemade versions?
The key differences are the 1-hour chill time that prevents excessive spreading, the 2:1 brown to granulated sugar ratio that creates the perfect chewy-crisp texture, and the use of high-quality semi-sweet chocolate that melts evenly without burning. The recipe was refined over years of testing at Magnolia Table, so it’s not a random copycat — every step is intentional to deliver consistent results.
Can I make these cookies ahead of time?
Yes — you can chill the dough for up to 24 hours (flavor gets better the longer it chills, as the flavors have more time to meld) or freeze pre-scooped dough balls for up to 3 months. Bake frozen dough balls directly from the freezer, adding 2-3 minutes to the standard bake time.
Do these cookies work for people with dietary restrictions?
We’ve tested both gluten-free and vegan variations with great results: for gluten-free, use a 1:1 gluten-free all-purpose flour blend with xanthan gum; for vegan, use refined coconut oil, flax eggs, and vegan chocolate chips. Both yield nearly identical texture to the original, with no grittiness or off-flavor.
How can I make my cookies extra chewy?
Pull them from the oven when the centers are still slightly underbaked and jiggly, let them cool completely on the baking sheet (residual heat will finish cooking them without drying them out), and store them in an airtight container with a slice of white bread to maintain moisture. Adding 1 tablespoon of cornstarch to the dry ingredients also inhibits gluten development for a softer, chewier crumb.
How long do these cookies stay fresh?
Baked cookies stay fresh for 3-5 days when stored in an airtight container at room temperature. For longer storage, freeze baked cookies for up to 3 months, or freeze pre-scooped dough balls for up to 3 months for fresh cookies anytime.

I’m Abby Lu, a passionate home cook who loves simplifying everyday meals. At PlugChef.com, I share product reviews and cooking guides to help you find the best tools for your kitchen.
Related posts:
 Kitchen Sink Mats at Target: Enhance Your Kitchen Space
 Pinks Rose Print under Sink Mat: Elevate Your Kitchen Decor
 Oxo Good Grips Silicone Sink Mat: Ultimate Protection
 3 Shelf Hanging Closet Organizer: Maximize Your Space
 Do It Yourself Pantry Organizers: Transform Your Space
 How to Cut Foam Core Board: Easy Steps for Perfect Edges

