
If you’ve ever crouched down to root around the back of a corner kitchen cupboard, only to pull out a half-expired jar of spice you forgot you owned, you’re familiar with the frustration of this often-overlooked storage zone. The awkward L-shaped layout and blind access points of most corner cupboards leave the majority of their storage potential untapped, turning them into a cluttered “junk drawer” for rarely used items instead of a functional storage hub. This guide breaks down actionable, tested strategies to transform that chaotic space into an organized, easy-to-navigate area, no full renovation required, drawing on proven kitchen organization best practices from professional organizers and home cooks alike.
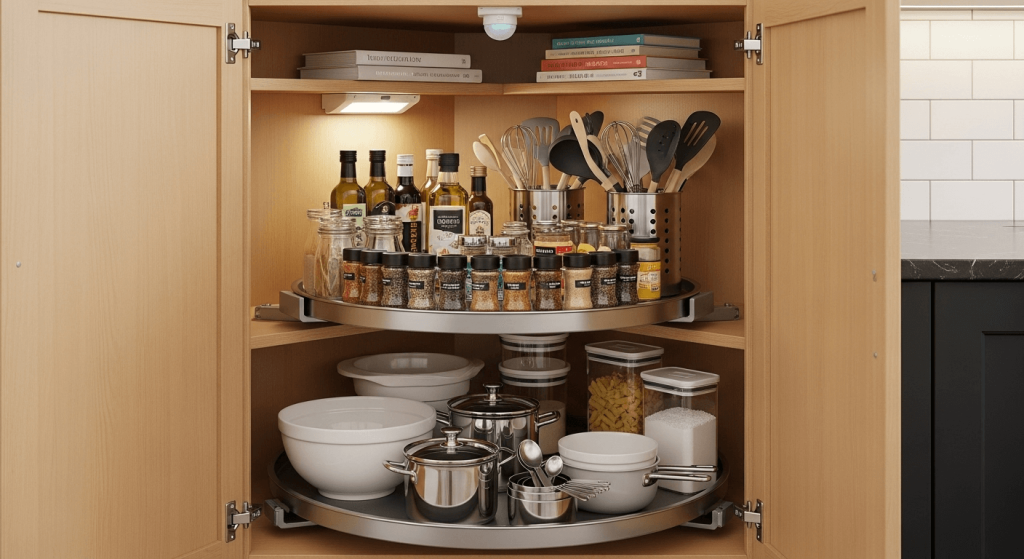
 A standard L-shaped corner cupboard, the most common layout in residential kitchens, featuring a blind access point that makes organization challenging.
Assess Your Current Corner Cupboard Contents First
Before buying any storage solutions, start with a full audit of what’s already in your corner cupboard to avoid wasting money on products that don’t fit your needs. Empty the entire space, then wipe down all shelves and surfaces with a mild, non-toxic kitchen cleaner to remove dust, grease, and food crumbs. Sort every item into three piles: keep (items you use at least once a month), donate/sell (items you haven’t used in 6+ months and are still in good condition), and discard (expired food, broken gadgets, damaged serveware).
Next, measure the interior dimensions of your cupboard (width, depth, height) to ensure any storage solutions you purchase fit properly, per NKBA kitchen storage standards for safe, accessible installation. Note which items you reach for daily (go-to pots and pans, cooking oils, favorite spices) and which are only used occasionally (holiday serveware, specialty appliances) to inform your placement later. This prep step takes 15-30 minutes but will save you hours of frustration down the line by eliminating guesswork.
Solve the Core Blind Corner Access Problem
The biggest pain point of corner cupboards is the “blind” depth: items pushed to the back are almost impossible to see or reach without emptying the entire shelf. The right access solution will depend on what you plan to store in the space:
Lazy Susans for Rotating, Easy-Access Storage
Lazy Susans are the most popular fix for blind corner access, and for good reason: they rotate 360 degrees so you can pull the entire contents of a shelf into view with a single spin. For standard L-shaped corner cupboards, opt for a kidney-shaped model that follows the cabinet’s contour, rather than a round model, to eliminate small gaps between the turntable and cabinet walls that waste storage space. Look for models with non-slip edges to prevent items from sliding off when rotating, and choose a two-tier design for deep cupboards to avoid items being hidden behind each other. For lighter items like spices, condiments, and canned goods, a plastic lazy Susan works perfectly; for heavier cookware, opt for a wood or reinforced plastic model rated for 50+ lbs.
Pull-Out Organizers for Heavy or Bulky Items
If you store heavy pots, pans, small appliances, or bulk food containers in your corner cupboard, a pull-out organizer is a better fit than a lazy Susan, as it distributes weight evenly and avoids the risk of a turntable tipping over under heavy load. There are two main styles to choose from:
- Swing-out organizers: Pivot on a hinge mounted to the cabinet door, swinging out into the room when you open the cupboard. These can hold 50-75 lbs, making them ideal for cast iron skillets, slow cookers, and large bulk containers. They don’t require cabinet floor space for tracks, but are more expensive ($150-$300 per unit) and may require professional installation.
- Sliding pull-out trays: Glide on ball-bearing tracks mounted to the cabinet floor, working like an extra shallow shelf that pulls out fully. These are more affordable ($50-$150 per unit) and easy to DIY install, but have lower weight limits (30-40 lbs) and can jam if overloaded.
Maximize Vertical and Underused Space
Most standard corner cupboards only come with 1-2 fixed shelves, leaving most of their vertical storage potential unused. These solutions help you make the most of every inch:
Tiered Shelf Risers for Extra Storage Layers
Tiered shelf risers sit on top of your existing shelves to create 2-3 additional levels for stackable items. Look for models with non-slip rubber feet to prevent sliding, and adjustable height to fit cabinets of varying depths. They’re perfect for canned goods, spice jars, baking supplies, and small gadgets, and can double the usable storage capacity of a shallow corner shelf. For deep cupboards, use risers with a stepped design so items on the back tier are still visible and accessible.
Over-the-Door Hooks and Tension Rods for Lightweight Items
The inside of your corner cupboard door is almost always unused space, and it’s perfect for storing lightweight items that would otherwise clutter your shelves. Adhesive or screw-in hooks can hold oven mitts, measuring spoons, small utensils, and lightweight mugs; for heavier items like cast iron skillets, opt for heavy-duty screw-in hooks rated for 10+ lbs. Install a tension rod across the width of the cabinet interior to hang pot lids, handmade wooden cutting boards, or small wire baskets for snack packets and tea boxes.
Clear Stackable Bins for Categorized, Visible Storage
Clear stackable bins eliminate the need to rummage through loose items to find what you need, and keep related supplies grouped together for faster access. For food items, choose BPA-free bins with airtight lids to keep dry goods fresh, following USDA food storage safety guidelines to prevent spoilage and cross-contamination. For non-perishable gadgets and serveware, use open-front bins for easy grabbing. Group items by use case: one bin for baking supplies (flour, sugar, measuring cups), one for breakfast staples (oatmeal, cereal, toaster pastries for one-pot vegetarian meals), and one for small appliances. Label each bin with large, easy-to-read text (or a photo of the contents for low-vision household members) so everyone in the household can find what they need without asking. Opt for clear bins to prevent mold growth on stored items from trapped moisture.
 A fully organized corner cupboard using tiered shelf risers, clear labeled bins, and a lazy Susan to maximize storage and accessibility.
Organize Contents by Frequency of Use
How you arrange items in your corner cupboard will make or break its long-term usability. Use this simple three-zone system to prioritize the items you reach for most:
- Eye-level zone (middle shelves, easiest to reach): Store your most frequently used items here: daily cookware, go-to spices, cooking oils, and small appliances you use multiple times a week. If you have a lazy Susan, place these items on the outer edge of the turntable so you can grab them without rotating the entire unit.
- Lower zone (bottom shelf, easy to bend down to): Store heavier items here to avoid putting strain on upper shelves and reduce the risk of items falling when you reach for them. This includes cast iron skillets, slow cookers, bulk food containers, and heavy serveware.
- Upper zone (top shelf, requires a step stool): Store seasonal items (holiday cookie cutters, Halloween serving dishes), bulk backups of non-perishables you only restock every few months, and rarely used specialty gadgets here.
Maintain Your Organized System Long-Term
The biggest mistake homeowners make with corner cupboard organization is setting up a system once and never revisiting it. A few small, consistent habits will keep your space functional for months or years at a time:
- Do a 5-minute weekly tidy: Put items back in their designated spots after each use, toss any expired food, and wipe up spills immediately to avoid sticky residue and pest issues.
- Do a full declutter every 3 months: Remove everything from the cupboard, check expiration dates, donate anything you haven’t used in 6 months, and rearrange your storage if your needs have changed (for example, if you started baking more regularly, move baking supplies to the eye-level zone).
- Never overfill shelves: Leave 10% of empty space in each bin and on each shelf so you can pull items out easily without knocking over adjacent storage or spilling contents.
Pair your cupboard organization with regular kitchen maintenance routines to keep your entire cooking space functional and clutter-free.
Frequently Asked Questions
How do I maximize space in a corner cupboard?
Start by solving blind access with a two-tier kidney-shaped lazy Susan, which follows the cabinet’s L-shaped contour to eliminate hidden dead space. Add tiered shelf risers to create extra levels for stackable items, and use the inside of the cupboard door for hooks to hold lightweight utensils, pot lids, or cutting boards. Avoid overfilling shelves—leave 10% of empty space in each section so you can pull items out without knocking over adjacent storage. For deep corner cupboards, a swing-out pull-out organizer can add an extra 2-3 feet of accessible storage depth.
What are the best tools for organizing cupboards?
The most versatile tools for corner cupboards are kidney-shaped lazy Susans (fitted to your cabinet’s exact dimensions), non-slip tiered shelf risers, and clear stackable bins with airtight lids for food items. For heavy cookware, opt for a swing-out pull-out organizer with a 50+ lb weight limit, rather than sliding trays that can jam under heavy weight. Label makers or pre-printed category labels are also essential for maintaining order, especially in households with multiple cooks.
How can I make my kitchen cupboard more efficient?
Efficiency comes down to intentional placement: store your most frequently used items (daily cookware, go-to spices, cooking oils) at eye level on the lazy Susan’s outer edge, so you can grab them without rotating the entire unit. Keep heavier items on the bottom shelf to avoid tipping, and store seasonal or rarely used items on the top shelf or at the back of pull-out organizers. Pair this with a 5-minute weekly tidy to put items back in their designated spots, and a full declutter every 3 months to remove expired or unused items.
What items should be in a corner cupboard?
Corner cupboards are ideal for items that are used regularly but don’t fit in standard cabinet or drawer storage: this includes pots and pans, baking supplies, small appliances (rice cookers, waffle irons), bulk dry goods, and specialty serveware. Avoid storing fragile items on the top shelf of a corner cupboard, as the awkward reach increases the risk of drops and breakage. If you have limited counter space, store small appliances you use daily (like an air fryer) on the bottom shelf for easy access.
Conclusion
Organizing a corner kitchen cupboard doesn’t require a full renovation or expensive custom carpentry—just a few intentional, tested strategies to work around its awkward layout. By solving blind access with the right organizers, maximizing vertical space with tiered storage, and sorting items by frequency of use, you can turn this often-overlooked space into one of your kitchen’s most functional storage areas. Regular, minimal upkeep will keep your system working long-term, saving you time searching for items and reducing the stress of a cluttered cooking space.
Ready to optimize the rest of your kitchen? Explore our full collection of storage transformation guides to tackle drawers, pantries, and countertops with the same expert-backed approach.

Hi, I’m Daniel Brooks—a food lover and kitchen gear enthusiast. I enjoy testing cookware, utensils, and gadgets to see what really works in everyday cooking. At PlugChef.com, I share honest reviews, comparisons, and simple guides to help you choose the best tools for a safer, smarter, and more enjoyable kitchen.
Related posts:
 How to Organize a Kitchen Cabinet: Expert Tips & Tricks
 Kamenstein 20 Jar Rotating Spice Rack: Organize Effortlessly
 Rubber Sink Mat With Holes: Essential Kitchen Upgrade
 Frozen Salmon How to Cook: Easy, Delicious & Quick Methods
 Roast Nuts in Air Fryer: Quick, Crispy, and Delicious Snacks
 Ground Sausage And Potato Recipes: Quick, Tasty Comfort Meals

