
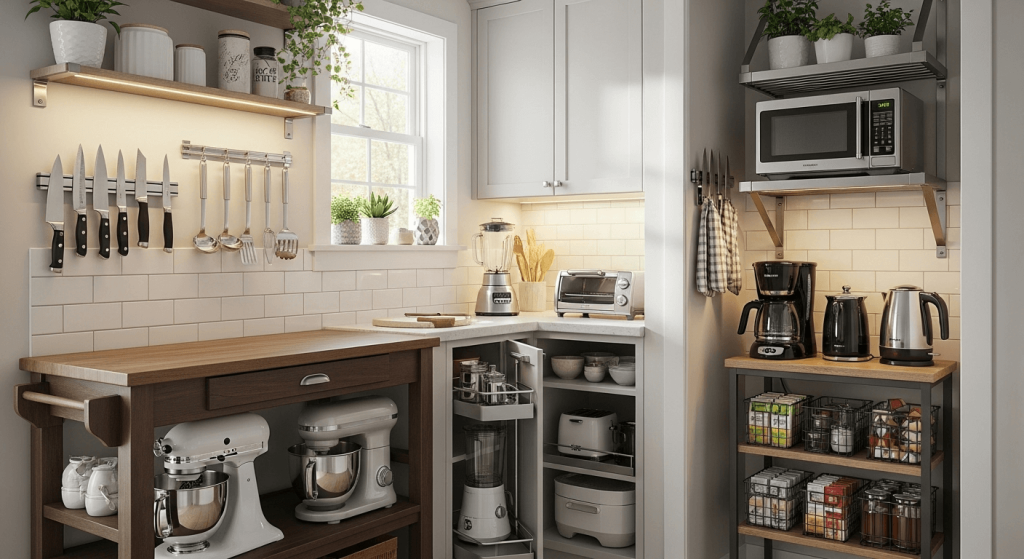
Struggling with countertops buried under blenders, toasters, coffee makers, and a tangle of dangling cords? You’re not alone: small kitchen appliance clutter is one of the most common functional frustrations for homeowners with compact cooking spaces, per National Kitchen + Bath Association (NKBA) industry guidelines. But clutter isn’t just an eyesore – it creates tripping hazards, reduces meal prep efficiency, and can even lead to appliance damage from overcrowding. The good news? With targeted, space-smart strategies, you can transform your cramped kitchen into a functional, clutter-free cooking space without sacrificing the gadgets you love. This guide covers actionable, expert-backed tips to organize small appliances in a small kitchen, from vertical storage hacks to decluttering rules that stick.
Start With an Appliance Audit to Eliminate Unnecessary Clutter
Before you buy any storage gear, the first step to organizing small appliances in a small kitchen is to take stock of what you actually own and use. A common mistake homeowners make is holding onto single-use gadgets (think: electric taco warmers, dedicated egg cookers) that only get pulled out once or twice a year, taking up valuable storage space for no reason. To run an effective audit:
- Pull every small appliance out of cabinets, drawers, and countertops and lay them out in one space.
- Track which items you use over a 2-week period: mark daily, weekly, and rarely used gadgets.
- Donate, sell, or recycle any appliances you haven’t used in 3+ months, or duplicates (e.g., two coffee makers, two blenders).
- Prioritize multi-functional models that replace 2-3 single-use gadgets: for example, a multi-function blender that makes hot soup, smoothies, and nut butters eliminates the need for a separate soup maker and nut grinder multi-function blender models. For a step-by-step walkthrough of this process, this 10-minute decluttering tutorial walks through how to sort kitchen gadgets by use case to cut clutter fast. This step alone will free up 30-50% of your existing storage space for the appliances you actually use regularly.
Maximize Vertical Space With Secure, Weight-Appropriate Storage
Vertical storage is the single most effective way to free up counter and cabinet space in a small kitchen, but it requires careful planning to avoid safety risks. The U.S. Consumer Product Safety Commission (CPSC) warns that improperly mounted shelves and dangling appliance cords are leading causes of kitchen trips, falls, and fires, so prioritize secure installation and cord management from the start CPSC kitchen safety guidelines.
Wall-Mounted Shelves and Racks
Adjustable wall-mounted shelves are ideal for storing lightweight, frequently used appliances like toasters, coffee makers, and electric kettles within arm’s reach of your main prep area. When installing shelves:
- Anchor them directly to wall studs (use a stud finder to locate them) for loads over 15 lbs; for drywall without studs, use heavy-duty toggle bolts rated for the total weight of your appliances.
- Space shelves 12-18 inches apart to accommodate most small appliances, which range from 6 to 12 inches tall.
- Use non-slip shelf liners and dividers to prevent items from sliding off when you reach for them.
For a polished look that blends with your kitchen decor, retro wire racks work well for vintage or specialty small appliances, letting you display them neatly without crowding countertops retro appliance storage.
 Sturdy, stud-anchored wall shelves safely hold lightweight daily-use appliances like toasters and coffee makers to free up counter workspace
Overhead Hanging Storage
For ultra-lightweight appliances you use multiple times a day (hand mixers, immersion blenders, electric can openers), ceiling-mounted pot racks or under-cabinet hooks keep them off counters entirely. Just be sure to hang them at least 12 inches away from stove tops to avoid heat damage, and use adhesive cord clips to secure loose cords to the rack or wall edge to eliminate tripping hazards.
Optimize Hidden Storage in Cabinets and Drawers
For appliances you use weekly but don’t want on your countertops, hidden cabinet and drawer storage keeps them out of sight while remaining easy to access.
Pull-Out and Roll-Out Cabinets
Standard deep cabinets are a waste of space for small appliances, as items get pushed to the back and forgotten. Opt for pull-out or roll-out cabinet shelves, which let you slide the entire shelf forward to grab what you need without rummaging. When stocking these:
- Place heavier appliances (air fryers, slow cookers, stand mixers) on lower pull-out shelves to avoid lifting strain.
- Use non-slip mats to prevent items from sliding when you pull the shelf out.
- Choose adjustable models to accommodate appliances of varying heights. For larger kitchen storage layouts that accommodate both small appliances and cookware, well-designed cabinet storage layouts eliminate the need for extra freestanding furniture in tight spaces cabinet storage layouts.
Lazy Susans for Deep and Corner Cabinets
Tiered lazy Susans are a game-changer for deep cabinets and hard-to-reach corner spaces, where appliances often get lost. Spin the tray to access items in the back without having to empty the entire cabinet. Reserve lazy Susans for appliances you use 1-2 times a week, like food processors, waffle makers, or electric griddles, to keep them accessible but out of the way. For especially tight corner cabinets, custom corner cabinet storage solutions pair with lazy Susans to make the most of every inch of awkward space corner cabinet storage.
Dedicated Drawer Storage for Small Handheld Appliances
For tiny handheld appliances like immersion blenders, electric kettles, milk frothers, and travel mug warmers, custom drawer systems with adjustable dividers keep them organized and out of sight. Add felt liners to the bottom of drawers to prevent scratches on appliance bases, and group items by task (e.g., coffee-related gadgets in one drawer, prep tools in another) to make finding what you need fast custom drawer systems.
 Closed cabinet storage hides rarely used appliances like stand mixers and food processors to maintain a tidy, uncluttered kitchen aesthetic
Image source: homemadelovely.com
Closed cabinet storage hides rarely used appliances like stand mixers and food processors to maintain a tidy, uncluttered kitchen aesthetic
Image source: homemadelovely.com
Choose Space-Saving Appliances to Reduce Clutter at the Source
The easiest way to organize small appliances in a small kitchen is to own fewer, smarter gadgets that fit your space and needs. Before buying any new small appliance:
- Measure your available counter, cabinet, and drawer space to confirm the appliance will fit, including clearance for cords and ventilation.
- Prioritize compact, American-made compact models, which are often built with durable, space-efficient designs that don’t sacrifice performance for size American-made compact models.
- Opt for multi-functional appliances that replace 2+ single-use gadgets: for example, an Instant Pot replaces a slow cooker, rice cooker, and pressure cooker, while a countertop oven with air fry functionality replaces a separate air fryer and toaster oven.
- Avoid single-use specialty gadgets unless you use them at least once a month – they’re the fastest way to clutter up limited storage space.
Strategic Counter Space Zoning for Daily Use Appliances
For the small number of appliances you use daily, strategic counter zoning keeps them accessible without creating clutter. Follow the NKBA’s "prime real estate" rule: the 30-inch radius around your main cooking prep area is reserved only for appliances you use 3+ times a week.
- Group appliances by task to cut down on steps during meal prep: keep your coffee maker, toaster, and electric kettle in a dedicated breakfast zone near the coffee supply storage; group your air fryer, slow cooker, and rice cooker in a cooking zone near the stove; keep your blender, food processor, and immersion blender in a prep zone near your cutting board area.
- For extra counter space when meal prepping or hosting, foldable wall-mounted countertop extensions fold down when not in use, adding 10-15 inches of extra workspace without taking up permanent floor space.
- Over-the-sink cutting boards double as temporary staging areas for small appliances during prep, so you don’t have to clear your main counter entirely to make room for a blender or mixer.
Safety and Maintenance Best Practices
Organizing small appliances isn’t just about tidiness – it’s about preventing accidents and extending the life of your gadgets. Follow these expert-backed rules:
- Never stack heat-producing appliances (toasters, air fryers, slow cookers) directly on top of each other, as trapped heat can create fire hazards. Leave 2-3 inches of clearance between all heat-producing appliances and flammable items like dishcloths, paper towels, or wooden utensil holders.
- Unplug appliances when not in use to reduce fire risk and cut down on standby energy waste.
- Wipe down appliance vents and cords monthly to remove dust and grease buildup, which can reduce efficiency and create fire hazards.
- Never exceed the weight limit of wall shelves or cabinet shelves: if you must store a heavy appliance like a stand mixer on a wall shelf, secure it to the wall with a safety strap to prevent tipping.
Frequently Asked Questions
How do you layout appliances in a small kitchen?
Follow a modified work triangle layout: place your fridge, sink, and stove in a triangular formation to minimize steps between tasks, and position frequently used appliances (coffee maker, kettle, air fryer) within this triangle for easy access. Keep heat-producing appliances at least 12 inches away from flammable items, and leave 36 inches of clearance between countertop edges and opposing walls to maintain safe, functional workflow, per NKBA guidelines.
How do I decide where to put things in my kitchen?
Use the frequency-of-use rule to assign storage locations:
- Daily use appliances (coffee maker, toaster, kettle) go on countertops within arm’s reach of your main prep area.
- Weekly use appliances (blender, food processor, air fryer) go in lower pull-out cabinets or on lower shelves for easy access.
- Monthly or less frequent appliances (holiday-themed gadgets, fondue sets, specialty cookers) go in upper cabinets or the pantry. Group items by task to cut down on search time: keep all breakfast-related gadgets in one zone, cooking tools in another, and prep appliances in a third.
Where should small kitchen appliances be stored when not in use?
Store heat-producing appliances in cool, dry areas away from direct sunlight to avoid warping or damage to plastic components. Keep appliances with sharp blades (food processors, immersion blenders) in locked cabinets if you have small children. Use labeled bins or shelf dividers in pantries for seasonal appliances so you can locate them quickly when needed.
Where to put items in a small kitchen?
Maximize dead space that most homeowners overlook: mount narrow rolling carts in the gap between the fridge and wall for extra appliance storage; use the space above the fridge for rarely used items if you have a sturdy, weight-rated shelf; add adhesive hooks to the inside of cabinet doors to hang lightweight handheld appliances like electric whisks or measuring cups.
Final Thoughts
Organizing small appliances in a small kitchen doesn’t require expensive renovations or a full purge of your favorite gadgets – it just requires intentional, use-focused planning. Start by auditing your appliances to eliminate unused clutter, then maximize vertical and hidden storage for items you only use occasionally. Zone your counter space by task for daily-use appliances, prioritize multi-functional, compact models to reduce the number of gadgets you need to store, and follow basic safety rules to avoid accidents. Every inch counts in a small kitchen, but with these expert tips, you can create a functional, tidy space that works for your cooking routine. If you’re ready to upgrade to durable, space-saving appliances that fit small kitchens without sacrificing performance, browse our curated selection of compact, high-performance models built to make the most of limited space.

I’m Abby Lu, a passionate home cook who loves simplifying everyday meals. At PlugChef.com, I share product reviews and cooking guides to help you find the best tools for your kitchen.
Related posts:
 Smart Strategies to Organize a Small Kitchen: Maximize Space
 What Innovations Could Blenders Make: Unleashing Future Tech
 How to Organize a Kitchen Cabinet: Expert Tips & Tricks
 How to Organize Kitchen Drawers: Expert Tips and Tricks
 How to Organize Kitchen Cabinets And Drawers: Expert Tips
 Organizing Can Goods in Pantry: Smart Storage Hacks

