
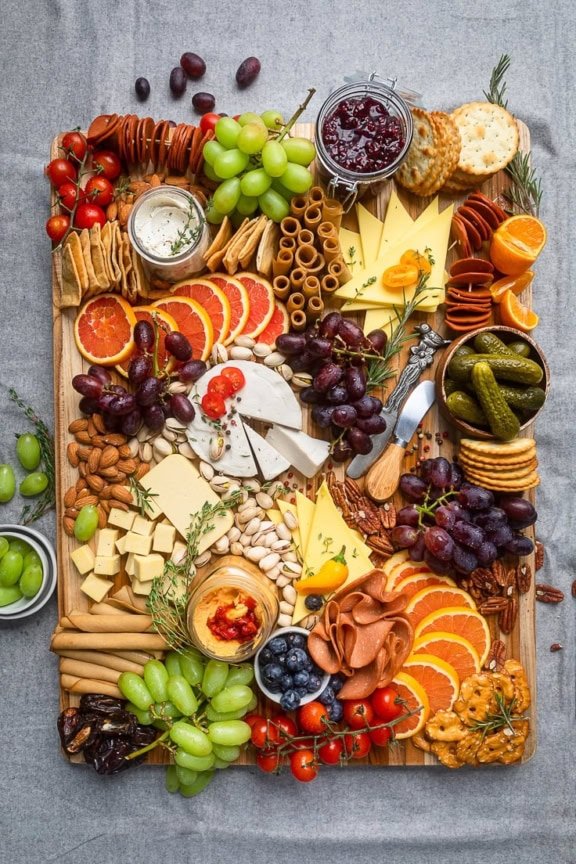
Bright, juicy oranges are a staple of well-arranged charcuterie boards, adding a pop of color, bright citrus acidity to balance salty cured meats and rich cheeses, and a refreshing, healthy bite for guests. But cutting oranges incorrectly can lead to squished, uneven slices, bitter pith, messy juice, or fast browning that ruins your board’s polished look. This guide shares tested, step-by-step methods for four popular orange cuts, plus pro tips for presentation, freshness, and avoiding common mistakes — no professional cooking skills required.
Why Oranges Belong on Every Charcuterie Board
Oranges are one of the most versatile fruits for charcuterie boards, and they earn their spot for three key reasons:
- Flavor balance: The bright, tangy acidity of oranges cuts through the rich, fatty texture of cheeses like brie, camembert, and aged cheddar, and balances the salty, savory flavor of cured meats like prosciutto, salami, and soppressata.
- Visual appeal: Their vibrant orange hue pops against the muted tones of cured meats, crackers, and cheese, adding a cheerful, inviting touch to both rustic and elegant board setups.
- Health and versatility: Oranges are packed with vitamin C and fiber, making them a guilt-free, crowd-pleasing option for all diets. They pair equally well with savory cured meats, sweet nuts and honey, and other fresh fruits like grapes and berries.
Unlike more delicate fruits like strawberries or raspberries, oranges hold their shape well at room temperature, making them ideal for parties where the board will sit out for a few hours. For more on this, see our guide on how to cut asiago cheese for charcuterie board.
 Credit: totallybamboo.com
A rustic coastal-style charcuterie board featuring fanned orange slices, cured prosciutto, and creamy brie
Credit: totallybamboo.com
A rustic coastal-style charcuterie board featuring fanned orange slices, cured prosciutto, and creamy brie
Essential Tools & Pre-Cut Prep
Before you start slicing, gather these simple tools for clean, even cuts:
- A sharp 8-inch chef’s knife (a dull knife will crush the orange and release excess juice, leading to messy, uneven slices)
- A stable, non-slip cutting board
- Paper towels for drying the orange and cleaning up spills
- A small bowl (optional, for catching juice or holding segments)
- Fresh lemon juice (optional, for preventing browning)
First, prep your workspace: wipe down your cutting board and counter with a gentle kitchen cleaner to remove any food residue or bacteria that could contaminate your fruit. Then, rinse the orange under cool running water — the USDA recommends washing all produce under running water, even if you plan to peel it, to remove surface wax, pesticide residue, and bacteria. Rub the skin gently with your hands to loosen any dirt, then dry thoroughly with a clean paper towel. A dry orange is far less likely to slip while you cut, reducing the risk of uneven slices or accidental nicks.
Step-by-Step Guide to 4 Popular Orange Cuts for Charcuterie Boards
Classic Thin Rounds (Most Versatile)
Thin rounds are the most popular orange cut for charcuterie boards, as they’re easy to arrange, look polished, and work for every board style.
- Place the trimmed, dried orange on one of its flat ends.
- Use a sharp chef’s knife to slice crosswise into ¼-inch thick rounds. For ultra-even slices, a mandoline slicer set to ¼-inch thickness works well, just be sure to use a hand guard to avoid cutting your fingers.
- Arrange the rounds in fanned clusters, small stacks, or scattered across the board near complementary items like soft cheese and cured meats.
Best for: All board styles, from casual game day spreads to formal dinner party spreads. Leave the peel on for a rustic, colorful look, or peel for a cleaner, more elegant aesthetic. Common mistake: Slicing too thin (less than ⅛-inch) — these will tear when arranged and get soggy within an hour. Slicing too thick (over ½-inch) makes them hard to bite through alongside other board items.
Bite-Size Half-Moons (Best for Easy Grazing)
Half-moons are perfect for casual gatherings or boards for kids, as their curved shape is easy to pick up by hand or with a toothpick.
- Slice the orange into thin ¼-inch rounds first, following the steps above.
- Cut each round in half crosswise to create half-moon shapes.
Best for: Casual outdoor gatherings, kids’ party boards, or pairing with spreadable cheeses like brie or goat cheese. You can mix peel-on and peeled half-moons for a varied, textured look. Common mistake: Cutting the initial rounds too thick, which makes the half-moons cumbersome to eat.
Seedless Supremes (Best for Elegant, No-Mess Boards)
Supremes (also called segments) are the most polished, no-mess option, with no peel, no pith, and no seeds to worry about.
- Trim the ends of the orange, then use a sharp knife to cut away the peel and all white pith, following the curve of the fruit to remove as little of the orange flesh as possible.
- Cut along the thin white membrane between each segment to release the pure, seedless fruit. Work over a small bowl to catch any stray juice, which you can drizzle over the board for extra flavor.
Best for: Formal events, boards with delicate cheeses, or for guests who prefer to avoid bitter pith or chewy peel. Common mistake: Leaving bits of white pith on the segments, which adds unwanted bitterness. Avoid over-handling the segments, as they can break apart easily.
Rustic Wedges (Best for Bold, Statement Boards)
Wedges are sturdy, eye-catching, and perfect for large, family-style boards.
- Cut the orange in half lengthwise, from top to bottom, through the center core.
- Cut each half into 3 or 4 equal wedges.
Best for: Large gatherings, boards with spicy cured meats, or outdoor BBQs. Leave the peel on for a vibrant, colorful look, or peel for a juicier, less messy option. Common mistake: Cutting the wedges too large, so they dominate the board and overshadow other items like cheese and crackers.
 Credit: plantbasedonabudget.com
A plant-based charcuterie board arranged with orange segments, spiced nuts, and dairy-free dips
Credit: plantbasedonabudget.com
A plant-based charcuterie board arranged with orange segments, spiced nuts, and dairy-free dips
Pro Tips for Stunning, Functional Orange Cuts
Follow these tested tips to make your orange cuts look and taste their best:
- Prevent browning: Toss cut slices or segments in a tiny bit of fresh lemon juice (not bottled, which contains preservatives that alter flavor) before arranging. The citric acid slows oxidation, so your oranges stay bright for 2-3 hours at room temperature.
- Prevent slipping: Place a damp paper towel under your cutting board to keep it from sliding while you slice, which leads to more even cuts and reduces injury risk.
- Mix cut styles: Combine thin rounds, supremes, and a few wedges for varied texture and height, which makes your board look professionally arranged.
- Manage juice: Arrange juicier cuts (like supremes and wedges) near small ramekins of honey or extra napkins, so any stray juice doesn’t soak into crackers or soft cheese.
- Clean up easily: After you’re done cutting, scrub your cutting board with warm soapy water, or use a baking soda sink cleaner to remove any lingering citrus oils or sticky residue. For any stuck-on pith or juice on your knife, a non-abrasive kitchen scrubber will scrape away residue without damaging your tools.
How to Keep Orange Slices Fresh on Your Board
Cut oranges start to brown and dry out after 2-3 hours at room temperature, so timing your prep is key to keeping them fresh:
- Cut oranges no more than 2 hours before serving for the best texture and color. If you need to prep earlier, store cut slices in an airtight container in the fridge for up to 24 hours.
- To prevent browning, toss cut pieces in a light coating of fresh lemon or lime juice before storing or arranging. For official guidance on storing pre-cut produce, follow University of Minnesota Extension recommendations for optimal freshness and food safety.
- Layer paper towels between slices in an airtight container to absorb excess moisture and prevent sogginess.
- Avoid storing cut oranges near strong-smelling foods (like onions or garlic) in the fridge, as they can absorb unwanted odors.
- If your slices do start to dry out right before serving, spritz them lightly with cold water to revive their juiciness.
Common Mistakes to Avoid
Even experienced home cooks make these common errors when prepping oranges for charcuterie boards:
- Using a dull knife: A dull knife crushes the orange’s cell walls, releasing excess juice and creating ragged, uneven cuts. Sharpen your knife regularly, or use a new paring knife if you don’t have a sharp chef’s knife.
- Leaving white pith on: The spongy white layer between the peel and the fruit is intensely bitter. Always trim it all away for sweet, flavorful slices.
- Cutting too early: As noted above, cut oranges no more than 2 hours before serving to avoid browning and sogginess.
- Skipping the drying step: Wet oranges slip on the cutting board, leading to uneven cuts and increased risk of cutting your fingers. Always dry the orange thoroughly after washing.
- Overcrowding the board: Don’t pile orange slices on top of each other, as they’ll stick together and get mushy. Arrange them in a single layer with small gaps between pieces for a polished look.
Pairing Ideas for Oranges on Charcuterie Boards
Oranges pair with almost every item on a standard charcuterie board. Try these tested combinations for a balanced, flavorful spread:
- Soft cheeses: Pair thin orange rounds with creamy brie, tangy goat cheese, or buttery camembert — the bright acidity cuts through the rich, fatty texture of the cheese.
- Cured meats: Match orange supremes with salty prosciutto, spicy soppressata, or smoky salami for a sweet-savory contrast that balances the meat’s saltiness.
- Nuts and sweets: Tuck orange wedges next to honey-roasted almonds, candied pecans, or a small ramekin of local honey for a sweet, crunchy bite.
- Mixed fruit: Add orange rounds to a mixed fruit section with red grapes, strawberries, and fresh figs for a colorful, varied spread.
- Drizzles and garnishes: Top orange slices with a light drizzle of balsamic glaze, honey, or a sprinkle of flaky sea salt for extra depth of flavor.
Frequently Asked Questions
How thick should orange slices be for a charcuterie board?
Aim for ¼-inch thick slices — this is thick enough to hold their shape without tearing, and thin enough to be easy to bite through alongside cheese and meat. Thinner slices will get soggy fast, while thicker slices can be cumbersome to eat and take up too much board space.
Should I peel oranges before putting them on a charcuterie board?
It depends on your aesthetic and preference: leaving the peel on adds vibrant color and a rustic, natural look, while peeling removes the bitter pith and makes the fruit easier to eat for guests who don’t like chewy peel. For formal boards, peeled supremes or half-moons are a polished choice; for casual outdoor gatherings, peel-on wedges or rounds work perfectly.
How far in advance can I cut oranges for a charcuterie board?
For the best texture and color, cut oranges no more than 2 hours before serving. If you need to prep earlier, store cut slices in an airtight container in the refrigerator for up to 24 hours, tossed lightly in lemon juice to prevent browning.
What's the best way to arrange orange slices on a charcuterie board?
Arrange slices in fanned clusters, small stacks, or scattered across the board near complementary items like soft cheese and cured meats. For a polished look, group similar cuts together, and leave small gaps between slices to prevent them from sticking together.
Can I use a mandoline to slice oranges for a charcuterie board?
Yes, a mandoline slicer set to ¼-inch thickness will give you perfectly even, uniform slices in seconds. Just be sure to use a hand guard to avoid cutting your fingers, and wipe the blade clean after each slice to prevent sticky citrus buildup.
Final Thoughts
Cutting oranges for a charcuterie board is a simple, low-effort way to elevate your spread’s look, flavor, and guest appeal. With the right prep, a sharp knife, and a few pro tips, you can create professional-looking cuts that balance salty, rich board items and add a bright, refreshing pop to every bite. Whether you’re hosting a casual game day gathering or a formal dinner party, these easy techniques will help you create a charcuterie board that looks as good as it tastes. If you’re prepping for a big event and want to make sure your entire kitchen is spotless ahead of time, consider booking a professional kitchen deep clean to sanitize all your prep surfaces and make cleanup a breeze.

Hi, I’m Daniel Brooks—a food lover and kitchen gear enthusiast. I enjoy testing cookware, utensils, and gadgets to see what really works in everyday cooking. At PlugChef.com, I share honest reviews, comparisons, and simple guides to help you choose the best tools for a safer, smarter, and more enjoyable kitchen.
Related posts:
 Can an Opened Bottle of Wine Go Bad: Unveiling the Truth
 Which Workholding Tool is Used on Bar Machines: Expert Guide
 What Tools Do You Need to Make Cheese: Essential Guide
 Soak Apples in Salt Water: Unlock Freshness and Remove Pesticides
 Shrimp Sweet And Sour Sauce: Irresistible Flavor in Every Bite
 Champagne to Use for Mimosas: Top Picks for Perfect Brunch Bubbles

