
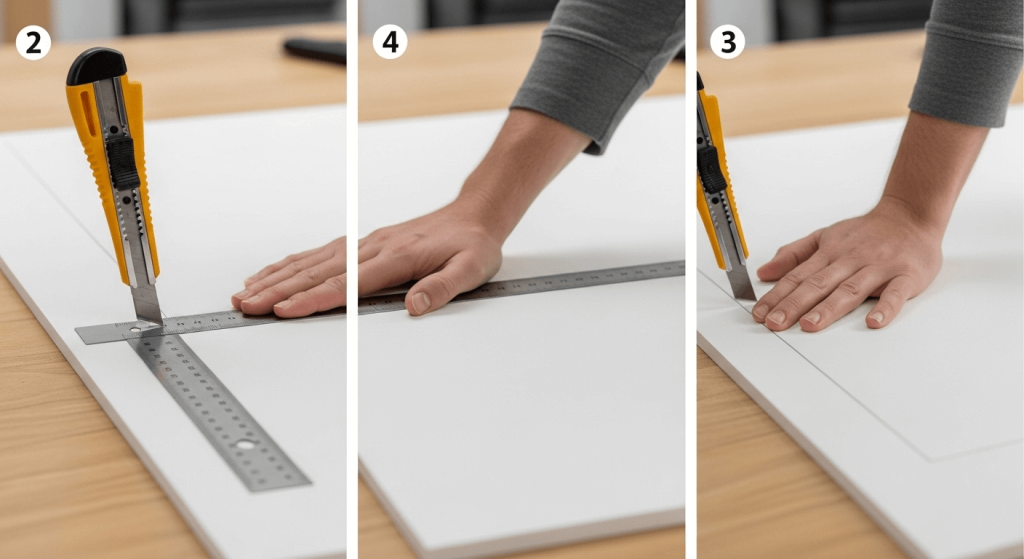
Foam core board is a go-to material for everything from school projects and craft decor to architectural models and custom kitchen organizers—its lightweight, rigid structure makes it far easier to work with than solid wood or cardboard, but only if you know how to cut it properly. If you’ve ever ended up with torn paper edges, crushed foam, or wavy, uneven cuts, you’re not alone: the layered construction of foam core (a foam core bonded to paper facings on both sides) makes it prone to damage if you use the wrong tools or technique. With the right steps, though, you can get perfectly straight, clean edges every time, no experience required.
What Is Foam Core Board (and Why It Needs Special Cutting Technique)
Foam core is typically constructed with a 3/16” to 1” thick expanded polystyrene (EPS) or extruded polystyrene (XPS) core, bonded to smooth, clay-coated paper facings on both sides. This layered construction gives it rigidity while keeping weight low, but the bond between the foam and paper is the weak point that makes improper cutting lead to delamination or ragged edges, a common issue noted in university extension crafting guides.
Standard scissors or dull blades crush the foam core instead of cutting it cleanly, leading to uneven edges that ruin the look of finished projects. The good news is that foam core is extremely forgiving if you use the right tools and follow a simple, repeatable process, even for complete beginners.
Essential Tools for Clean, Straight Cuts
You don’t need expensive specialty equipment to cut foam core perfectly, but a few key tools will make the process far easier and eliminate common mistakes. Use this quick reference to make sure you have everything you need before you start:
| Tool | Purpose | Pro Tip |
|---|---|---|
| Sharp craft/utility knife with fresh #10 or #18 blade | Makes clean, precise cuts without crushing foam | Snap-off blade knives let you access a fresh edge mid-project without replacing the whole blade |
| Metal straight edge (12” or 36” ruler/T-square) | Guides the knife for perfectly straight lines | Avoid plastic rulers, which can be cut into or shift mid-cut |
| Self-healing cutting mat | Protects your work surface and provides measurement grid for accuracy | A mat with a 1-inch grid eliminates the need for constant measuring for standard cuts |
| Sharp pencil or fine-tip marker | Marks cut lines without indenting or damaging the foam core | Use light pressure to avoid creating weak spots in the foam |
| Painter’s or masking tape (optional) | Secures the board to the mat to prevent shifting | Use small pieces at the corners to avoid leaving residue on the foam core |
| Fine-grit sandpaper (220 grit, optional) | Smooths slightly ragged edges after cutting | Sand lightly to avoid wearing through the paper facing |
A sharp blade is the most important tool on this list: dull blades crush the foam instead of cutting it, leading to torn paper and ragged edges. Replace your blade as soon as you feel it dragging, or after every 2-3 foam core projects for consistent results.
Step-by-Step Guide to Perfect Foam Core Cuts
Follow these 5 simple steps to get clean, straight edges every time, no matter your skill level:
Step 1: Prep Your Work Surface
Clear a 2×2 foot flat, hard work area, and place your self-healing cutting mat with the grid aligned to the edge of your table for easy measuring. Ensure bright, shadow-free lighting over the work area so you can see your cut line clearly. If you’re working on a slippery countertop, place a non-slip mat under the cutting mat to prevent shifting. Avoid soft surfaces like carpets or couches, which cause the board to bend mid-cut and lead to uneven edges.
Step 2: Measure and Mark Your Cut Line
Measure twice, mark once: use a metal ruler to measure from the factory edge of the foam core sheet (not a previously cut edge, which may be uneven) and draw a fine, continuous line with a sharp pencil. For multiple parallel cuts, use a T-square to ensure all lines are perfectly aligned. Press lightly with the pencil to avoid indenting the foam, which can create a weak spot that tears during cutting.
Step 3: Secure the Board (Optional but Recommended)
For small pieces, tack the corners of the foam core to the cutting mat with small pieces of painter's tape. For large sheets, weigh down the edges with heavy books or a clamp to prevent shifting. This step is especially important for thin 3/16” foam core, which is prone to sliding mid-cut and ruining your edge.
Step 4: Make the Cut (The Most Critical Step)
Place the metal straight edge directly over your marked cut line, hold it down firmly with your non-dominant hand, keeping your fingers well out of the blade’s path. Hold the craft knife at a 30-45 degree angle, with the blade facing away from your body. Start with a light scoring pass along the entire length of the line—do not try to cut all the way through in one go. Repeat the pass 2-3 more times, increasing pressure slightly each time, until you cut through both paper facings and the foam core. For thick 1” foam core, you may need 5-6 passes, or a specialized foam board cutter. Never force the blade, as this will crush the foam or tear the paper. If the blade starts to drag, replace it with a fresh one immediately.
Step 5: Inspect and Finish the Edge
Once cut, peel away any leftover paper scraps from the edge. If the edge is slightly ragged, lightly sand it with 220-grit sandpaper, being careful not to sand through the paper facing. Check the edge for straightness by holding it up to a light source—any gaps indicate an uneven cut, which you can trim with a sharp blade.
 A clean, straight foam core cut edge with no tearing or delamination
Pro Tips for Flawless Edges Every Time
These expert tricks will help you avoid common mistakes and get professional results even on your first try:
- Cut from the finished side first: If your foam core has a printed or painted side, cut from that side first so any minor tearing occurs on the back, which is usually hidden in finished projects.
- Use a T-square for long cuts: A T-square has a built-in right angle and stays in place without you holding it, freeing up both hands to guide the knife for perfectly straight long cuts.
- Clamp your straight edge for repetitive cuts: If you’re cutting multiple identical pieces, clamp the metal straight edge to the foam core sheet instead of holding it by hand to eliminate shifting.
- Use the right tool for curves: For tight curves, use sharp craft scissors and cut slowly to avoid crushing the foam. For smooth, large curves, a hot wire foam cutter melts through the foam cleanly without crushing it.
- Keep your workspace organized to avoid misplacing blades or rulers mid-project. Use smart countertop organizers to keep small tools and materials within easy reach.
Common Mistakes to Avoid (And How to Fix Them)
Even experienced crafters run into these issues from time to time. Avoid them to save time and material:
- Using a dull blade: The #1 cause of ragged edges and torn paper. Dull blades crush the foam instead of cutting it cleanly. Replace your blade after every 2-3 foam core projects, or as soon as you feel it dragging.
- Trying to cut through the board in one pass: This almost always leads to uneven cuts, crushed foam, and torn paper. Multiple light passes are always more effective than one heavy pass.
- Cutting on a soft surface: Soft surfaces like carpets or couches cause the board to bend mid-cut, leading to wavy edges and crushed foam. Always work on a hard, flat surface.
- Skipping the measurement check: Foam core is inexpensive, but wasting material due to a wrong measurement is frustrating. Always double-check your measurements before making any cuts.
- Holding the straight edge at an angle: If you tilt the straight edge while cutting, your cut line will be uneven. Hold the straight edge flat against the board and apply even pressure to keep it in place.
Choosing the Right Foam Core Board for Your Project
Not all foam core is created equal, and picking the right type for your project will make cutting and finishing far easier:
- 3/16” thick: Best for lightweight crafts, school projects, and temporary signs. Easy to cut with a standard craft knife, and lightweight enough for hanging on walls or using as props.
- 1/4” thick: Ideal for medium-weight projects like picture framing mats, custom drawer inserts, and lightweight signage. Requires 2-3 passes with a sharp craft knife to cut through.
- 1/2” and 1” thick: Best for heavy-duty projects like architectural models, free-standing signs, and props that need to withstand handling. Requires 4-6 passes with a sharp craft knife, or a specialized foam board cutter for clean edges.
- Facing options: Standard white clay-coated paper is best for most projects, but if you plan to paint the foam core, choose a board with a smooth, non-porous facing that won’t absorb paint. Black foam core is ideal for projects where you need a dark background, like photography backdrops or theater props. For outdoor use, choose a foam core with a PVC core, which is more water-resistant than standard EPS core (though you should still avoid prolonged exposure to rain, as the paper facings can warp).
Troubleshooting Uneven or Torn Edges
Even with the best technique, you may run into minor issues. Here’s how to fix the most common problems:
- Torn paper edges: Caused by a dull blade or cutting too fast. Fix by replacing your blade, making lighter passes, and cutting from the finished side of the board first. Lightly sand the edge with 220-grit sandpaper if tearing persists.
- Crushed foam edges: Caused by pressing too hard with the blade or using a dull blade. Fix by using multiple light passes instead of one heavy pass, and ensuring your blade is fresh.
- Wavy, uneven cuts: Caused by a shifting straight edge or cutting on a soft surface. Fix by securing the straight edge firmly with clamps or heavy weights, and working on a hard, flat surface.
- Delaminated edges (layers separating): Caused by cutting too fast or using a blade that’s too thick. Fix by using a thin, sharp craft blade and cutting slowly with light pressure. You can reattach separated layers with a small amount of craft glue if needed.
Common Projects That Use Foam Core Cuts
Foam core’s versatility makes it a favorite for a huge range of DIY and craft projects, including:
- School and science fair projects
- Custom picture frame mats
- Lightweight signage for events or small businesses
- Architectural scale models
- Photo backdrops and theater props
- Custom kitchen organization tools: Foam core is a popular, low-cost material for building budget cabinet refreshes, custom under-sink organizers, and drawer dividers that fit your space perfectly. If you’re working on a kitchen countertop project, adding under-cabinet LED strips will make it easier to see cut lines and work safely.
- Kitchen table decor: Foam core is also great for making custom placemats, centerpiece backdrops, or table signs. Pair your decor with a suitable under-table rug to complete the look of your dining space.
- Kitchen drawer organization: Custom foam core dividers work perfectly with specialty utensil organizers to keep your cooking tools tidy and easy to access.
 Examples of common foam core projects including signs, models, and craft decor
Safety Best Practices
Cutting foam core board is very low-risk when you follow basic safety guidelines:
- Always cut away from your body, and keep your non-dominant hand behind the path of the blade at all times. Never hold the board with your hand in front of the cut line.
- Use a sharp blade: dull blades require more force to cut, which increases the risk of the blade slipping and causing an accidental cut. Replace your blade as soon as it starts to drag.
- Work in a well-lit, clutter-free area: poor lighting makes it hard to see your cut line, leading to mistakes and accidental cuts. Keep your work area free of extra tools and materials to avoid tripping or knocking blades over.
- Dispose of used blades safely: used craft blades are extremely sharp, so never throw them in the regular trash. Store them in a dedicated blade disposal container or a thick, labeled cardboard tube until you can recycle them properly.
- If using a hot wire cutter for thick foam core or curves, work in a well-ventilated area, as hot wire cutters can release small amounts of foam fumes when in use. For official guidance on safe utility knife use, refer to OSHA's small tool safety standards.
Frequently Asked Questions
What tools do I need to cut foam core board cleanly?
A sharp craft knife with a fresh #10 or #18 blade, a metal straight edge, a self-healing cutting mat, and a pencil for marking cut lines are all you need for clean, precise cuts. Painter's tape can help secure the board for extra precision.
How do I prevent foam core board from tearing when cutting?
Use a sharp, fresh blade, make multiple light passes instead of one heavy pass, and cut from the finished (printed or painted) side of the board first. If tearing still occurs, lightly sand the edge with 220-grit sandpaper after cutting.
Can I cut foam core board without a cutting mat?
Yes, but you must use a hard, flat surface that you don’t mind scratching, such as a scrap piece of plywood or a glass cutting mat. Avoid cutting directly on your table or countertop, as the blade can damage the surface.
What's the best technique for cutting straight edges on foam core board?
Use a metal straight edge aligned exactly with your marked cut line, hold it firmly in place, and make 2-3 light passes with a sharp craft knife, increasing pressure slightly with each pass until the board is fully cut. Never try to cut through the board in one pass.
Can I use scissors to cut foam core board?
Standard scissors are only suitable for rough, non-precision cuts or curved cuts on thin foam core. For straight, clean edges, a craft knife and straight edge are far more effective, as scissors tend to crush the foam core and tear the paper facings.
How do I cut foam core board into curves?
For small, tight curves, use a pair of sharp craft scissors, cutting slowly to avoid crushing the foam. For larger, smoother curves, a hot wire foam cutter works best, as it melts through the foam cleanly without crushing it. You can also use a rotary cutter for smooth, consistent curves.
Conclusion
Cutting foam core board with perfect, straight edges is far simpler than it seems: the key is using a sharp blade, a stable straight edge, and multiple light passes instead of forcing the cut. With the steps and tips above, you’ll be able to tackle any foam core project, from school assignments to custom kitchen organizers, with professional results. Ready to put your new skills to work? Use foam core to build custom, low-cost organizers for your kitchen—our guide to under-sink storage solutions has step-by-step projects to get you started.

I’m Abby Lu, a passionate home cook who loves simplifying everyday meals. At PlugChef.com, I share product reviews and cooking guides to help you find the best tools for your kitchen.
Related posts:
 3 Tier Lazy Susan Spice Rack: Organize & Maximize Space
 How to Make a Spice Rack: DIY Guide for Kitchen Bliss
 Sweet Cream for Coffee Recipe: Easy, Rich & Delicious Delight
 Good Sides for Beef Tenderloin: Perfect Pairings to Impress Guests
 Penne Pasta Broccoli And Chicken: Easy, Delicious, and Healthy Recipe
 Shrimp in the Crock Pot: Easy, Flavorful Recipes for Busy Nights

