
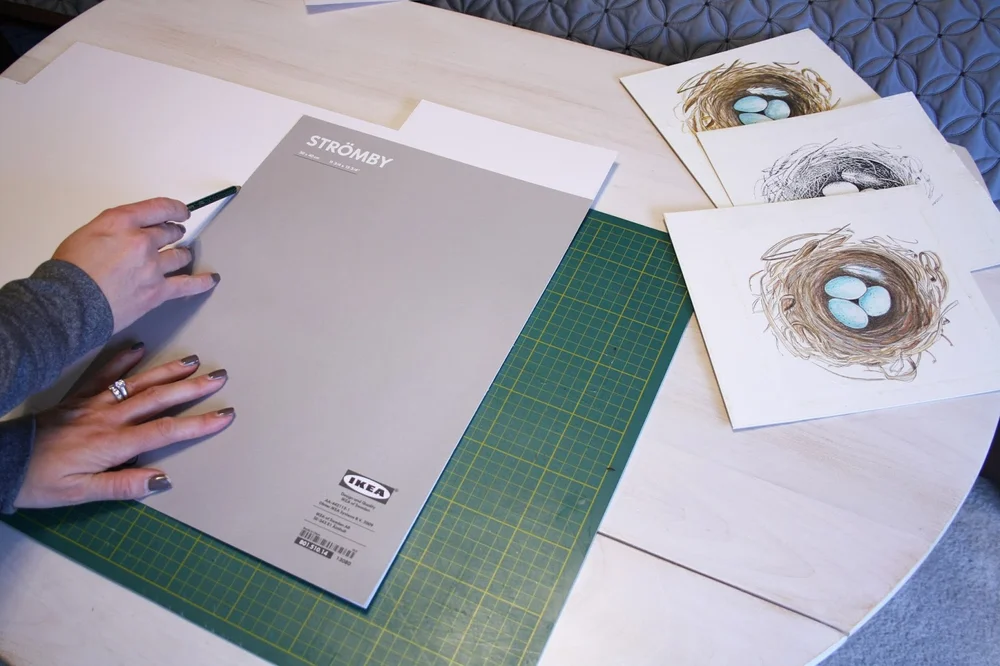
A well-cut mat board does more than make your framed art look polished: it creates visual breathing room around your piece, prevents glass from touching and damaging the artwork, and adds a layer of UV protection to keep colors vibrant longer. While custom framing shops charge $20 to $50 or more per mat cut, learning to cut mat board at home is a simple, cost-effective skill that even total beginners can master with the right tools and technique. If you’re new to DIY home projects, our full library of home tutorials has easy, budget-friendly guides for every skill level.
What Is a Mat Board, and Why Cut Your Own?
Core Purpose of a Mat Board
Mat board is a thick, stiff paper-based material used as a spacer between your artwork and the frame glass. The most common style is a window mount, which has a cutout opening that holds the art, with a visible border around the edge. Beyond aesthetics, mats protect delicate pieces from scratches, moisture, and direct contact with glass, which can cause sticking or damage over time. They also make oddly sized artwork fit standard frames without modification.
 A standard mat board laid next to a foam core backing board to check sizing before cutting.
Image source: www.metroframe.com
A standard mat board laid next to a foam core backing board to check sizing before cutting.
Image source: www.metroframe.com
Benefits of DIY Mat Cutting
Cutting your own mat board eliminates expensive custom shop fees, and gives you full control over border width, mat color, and sizing to fit non-standard artwork. It’s a useful skill for hobbyists framing personal photos, small business owners making custom framed gifts, or anyone looking to refresh old framed pieces without the cost of professional reframing. For a fun follow-up craft project, learn personalized engraved kitchenware techniques to make a one-of-a-kind housewarming gift.
Choosing the Right Mat Board for Your Project
Not all mat boards are created equal, and picking the right type for your needs will ensure your framed piece lasts for years.
Common Mat Board Types
- Standard paper mat: Affordable, widely available, and perfect for casual projects, temporary displays, or kids’ school art. It is not acid-free, so it may yellow over time if exposed to light.
- Acid-free, lignin-free mat: The gold standard for preserving valuable artwork, family photos, or collectibles. For long-term preservation of artwork, the University of Minnesota Extension recommends using acid-free, lignin-free mat board to prevent yellowing and degradation over time University of Minnesota Extension. It is slightly more expensive but will not damage your piece over decades of display.
- Linen-faced mat: A premium option with a textured fabric surface, ideal for formal framing, professional art displays, or high-end home decor.
Ply Count and Thickness
Mat board is rated by ply count, which refers to the number of layers of paper compressed together:
- 2-ply: Thin (about 1/32 inch), best for small photos, postcards, or narrow borders.
- 4-ply: Standard thickness (about 1/16 inch), suitable for most 8×10 to 16×20 inch artwork.
- 8-ply: Thick (about 1/8 inch), ideal for large pieces, deep frames, or projects that need extra durability.
Essential Tools for Clean, Precise Cuts
Using the right tools will make the cutting process far easier and deliver professional results every time. Dull or improper tools are the top cause of ragged, uneven cuts.
Required Tools
- Mat cutter or heavy-duty utility knife: A dedicated mat cutter has a 45-degree angled blade that creates the classic beveled edge seen on professional frames, hiding the cut edge for a polished look. A sharp 18mm utility knife works for straight cuts but will leave a square edge, which is fine for casual projects.
- 12-inch (or longer) metal ruler: Choose a ruler with non-slip backing to prevent shifting while you cut. Plastic rulers are not recommended, as the blade can cut into them, ruining both the ruler and your cut.
- Self-healing cutting mat: An 18×24 inch mat is ideal for most projects. The specialized material closes up after cuts, so it lasts for years, and it protects your work surface from accidental blade slips. Opt for a self-healing cutting mat that resists gouging from repeated blade use, a staple for regular crafters just like a reliable set of kitchen scrubbers is for daily kitchen cleanup.
- Soft pencil (HB or 2B): Hard lead (like a ballpoint pen) will indent the mat board, leaving visible marks even after erasing, so soft pencil is best for marking cut lines.
- Bone folder (optional): This small, smooth tool is used to crease the mat board cleanly when marking cut lines, which makes scoring and cutting far more precise.
Optional Tools
A craft knife for detailed notches or curved cuts, corner clamps to hold large mats steady while cutting, and a T-square for perfectly square cuts on oversized mats.
Step-by-Step Guide to Cutting a Mat Board
We’ll cover the most common cut: a window mount mat for standard framed art.
Step 1: Prepare Your Workspace
Start with a flat, stable, well-lit work surface. Good lighting is critical to see your cut lines clearly and avoid errors. Lay your self-healing cutting mat on the surface, and clamp the corners of large mats (over 16×20 inches) to the mat to prevent shifting. Clear away clutter to avoid accidental blade slips, and always cut away from your body for safety. Always cut away from your body and keep your non-dominant hand clear of the blade path, following OSHA utility knife safety guidelines to avoid injury OSHA Utility Knife Safety.
Step 2: Measure and Mark Your Cut Lines
First, measure your actual artwork (not the frame, as frames often have overlapping lips that throw off measurements). For a standard window mount, add your desired border width (1.5 to 4 inches is standard for most pieces) to each side of the artwork to calculate the total mat size. For example, an 8×10 inch artwork with 2-inch borders needs a 12×14 inch mat. Use your metal ruler and soft pencil to mark the outer edge of the mat on the front (art-facing) side, then mark the inner window line by measuring the border width in from each outer edge. Double-check all measurements before marking, and ensure opposite sides are exactly equal to avoid lopsided borders. A common mistake is aligning the 0 mark of the ruler with the edge of the ruler itself instead of the edge of your artwork, leading to off-by errors—always align the 0 mark with your reference point to avoid this.
Step 3: Cut the Mat Board
Place the mat board on the cutting mat, and align your metal ruler with your marked cut line, positioning the ruler on the waste side of the line (the part you will cut off). Hold the ruler down firmly with your non-dominant hand to prevent shifting.
- If using a mat cutter: Hold the cutter at a consistent 45-degree angle, start the blade at the edge of the mat, and pull it smoothly along the ruler in one continuous motion. Do not stop mid-cut, as this will create a jagged edge.
- If using a utility knife: Score the cut line lightly first with a single pass, then apply firm pressure to cut through the mat in 2-3 additional passes along the same line. To cut the window opening, flip the mat face down on the cutting mat, align the ruler with your inner window mark, and repeat the cutting process. Use a sharp craft knife to carefully cut out the waste window piece, taking care not to cut into the border.
 Using a metal ruler as a guide ensures straight, precise cuts when using a mat cutter.
Image source: www.youtube.com
Using a metal ruler as a guide ensures straight, precise cuts when using a mat cutter.
Image source: www.youtube.com
Step 4: Check the Fit and Trim as Needed
Brush away any loose mat fibers with a soft cloth, then place your artwork behind the mat window to test the fit. The art should sit slightly behind the mat, with equal, even borders on all sides and no gaps. If the window is too tight, use a craft knife to carefully trim the edges a tiny bit at a time—it is easy to cut more off, but impossible to add material back. If the outer mat is too large for your frame, trim the outer edges to fit, then test the full assembly (art, mat, backing, glass) in the frame before securing it.
Pro Tips for Professional-Quality Results
In practice, even experienced DIY framers run into small imperfections, but these tips will help you avoid common issues:
- Replace mat and utility knife blades after every 2-3 cuts. Dull blades crush mat fibers instead of cutting them, leading to ragged edges and increased slip risk. Dull blades not only leave ragged, uneven cuts on mat board, they also increase the risk of slips and injuries, so swap them after every 2-3 uses just as you would replace a worn kitchen scrub brush after heavy use.
- For consistent results when making multiple identical mats (like for a series of photos), cut a template out of cardboard first, trace it onto each mat, then cut along the line to ensure perfect uniformity.
- When working with acid-free archival mats, handle them only by the edges, as skin oils can discolor the mat surface over time.
- For curved cuts, use a sharp craft knife and cut slowly in small, smooth motions. Do not try to cut a full curve in one pass, as this will lead to wavy, uneven edges.
- If your first cut is slightly wavy, you can either trim the entire edge to straighten it, or use a craft knife to carefully shave off the uneven sections while holding a ruler as a guide.
Common Mistakes to Avoid
- Mismeasuring dimensions: Always measure your artwork twice before marking the mat, and double-check that opposite border widths are equal. One of the most frequent errors is mismeasuring the artwork or mat dimensions, so always measure twice and mark clearly before cutting, just as you would verify cabinet spacing before installing child-safe cabinet latches.
- Using a dull blade: As mentioned, dull blades tear mat fibers instead of cutting them, leading to unprofessional, ragged edges.
- Skipping the cutting mat: Cutting directly on a table will gouge the surface, and a blade slip can cause injury or ruin your mat.
- Rushing cuts: Pulling the cutter too fast leads to wavy lines. Cut at a steady, moderate pace for the cleanest results.
- Cutting the window too small: Always err on the side of a slightly larger window, as you can trim it down later, but you cannot add material back if you cut it too small. For projects involving family photos, children’s artwork, or valuable collectibles you plan to display long-term, opt for acid-free, lignin-free mat board, which prevents yellowing and degradation over time, just as durable no-drill drawer locks keep stored items safe from little hands.
Frequently Asked Questions
What tools do I need to cut a mat board?
The essential tools are a sharp mat cutter or 18mm utility knife, a 12-inch metal ruler, a self-healing cutting mat, a soft pencil, and a bone folder (optional). A craft knife is useful for detailed notches or curved cuts.
How do I measure a mat board correctly?
First measure your actual artwork, then add your desired border width (1.5 to 4 inches standard) to each side to get the total mat size. For the window opening, measure the border width in from each outer edge to get the window dimensions, ensuring opposite sides are equal.
What is the best knife to cut mat boards?
A dedicated mat cutter is best for professional beveled edges, while a sharp 18mm heavy-duty utility knife works well for straight cuts on casual projects. Always use a sharp blade, as dull tools will tear the mat.
How thick should a mat board be for framing?
4-ply (1/16 inch) mat board is standard for most 8×10 to 16×20 inch artwork. Use 8-ply (1/8 inch) for large pieces or deep frames, and 2-ply (1/32 inch) for small photos or postcards.
Can I cut a mat board without a dedicated mat cutter?
Yes, a sharp 18mm utility knife works for straight cuts. Score the cut line lightly first, then apply firm pressure to cut through the mat in 2-3 passes. Note that utility knives leave a square edge, not the beveled edge of a dedicated mat cutter.
How do I fix a ragged cut on a mat board?
For small uneven edges, use a sharp craft knife held against a metal ruler to carefully trim the ragged section. For larger damaged areas, it is usually easier to recut the entire edge for a clean, straight line.
What size mat do I need for an 8×10 photo?
The most common size is an 11×14 inch mat with 1.5-inch borders on all sides, but you can adjust the border to 2 or 3 inches for a more prominent look, depending on your frame and decor.
Can I cut curved shapes in mat board?
Yes, use a sharp craft knife and cut slowly in small, smooth motions. For consistent repeated curves, cut a template out of cardstock first, trace it onto the mat, then cut along the line for perfect uniformity.
Final Thoughts
Cutting a mat board is a simple, rewarding DIY skill that saves you money and lets you customize your framed pieces to match your style. The key to perfect results is taking your time, using sharp tools, and measuring twice before cutting. Start with a scrap piece of mat board to practice your technique before working on your favorite artwork, and you’ll be framing professional-looking pieces in no time. Ready to tackle your first project? Grab your tools and a pack of practice mat board this weekend to build your confidence.

Hi, I’m Daniel Brooks—a food lover and kitchen gear enthusiast. I enjoy testing cookware, utensils, and gadgets to see what really works in everyday cooking. At PlugChef.com, I share honest reviews, comparisons, and simple guides to help you choose the best tools for a safer, smarter, and more enjoyable kitchen.
Related posts:
 Seville Expandable Cabinet And Pantry Organizer: Space Savior
 Glideware Pull Out Cabinet Organizer for Pots & Pans: Space Saver
 Small 3-Tier Shelf Organizer: Maximize Space Effortlessly
 Trader Joe’S Spicy Lentil Wrap: Delicious, Healthy, and Quick Meal!
 Easy Way to Peel Pumpkin: Quick Tips for Effortless Prep
 How Long Do Grapes Last: Ultimate Freshness Guide Revealed

