

There’s nothing worse than biting into a breaded hot wing only to have the coating slide off, or sink your teeth into a soggy, grease-heavy crust. Perfectly breaded hot wings, by contrast, have a shatteringly crisp golden exterior that locks in juicy, tender chicken, and holds up to even the thickest buffalo sauce. Whether you’re prepping for game day, a backyard cookout, or a quick weeknight snack, mastering the breading process takes minimal effort and elevates your wings from forgettable to the star of the spread. This guide breaks down every step, from selecting the right wings to cooking and serving, so you can pull off crispy, flavorful bites every single time, no professional kitchen experience required.
Choosing the Best Wings for Breading
The quality and cut of your wings directly impact the final texture and flavor of your breaded hot wings. Selecting the right option for your cooking method and preference ensures even cooking and maximum crispiness.
Wing Cut Preferences
Chicken wings are sold in three primary cuts, each with unique benefits for breading:
- Drumettes: Small, meaty sections that mimic mini drumsticks. They have a higher meat-to-bone ratio, cook more evenly, and are easier for beginners to handle.
- Flats (wingettes): Thinner, two-boned sections with less meat. They crisp up faster than drumettes, making them ideal if you prefer a heavier crunch-to-meat ratio.
- Whole wings: Unseparated wings that you can cut yourself to control size and save money vs. pre-separated packs. Trim off the wing tips first (save these for homemade chicken stock for zero waste) to avoid cooking tough, meatless sections.
For consistent results, separate wings at the joint with a sharp knife before breading, so all pieces cook at the same rate.
Fresh vs. Frozen: What to Buy
Fresh wings have no ice crystals, a firmer texture, and absorb seasoning more evenly, making them the top choice if you’re cooking within 1-2 days of purchase. Frozen wings are a convenient, budget-friendly alternative for last-minute meals, but they require proper thawing to avoid soggy breading. Thaw frozen wings in the refrigerator for 24 hours before prepping; never thaw at room temperature for more than 2 hours, as this allows bacteria to grow. Follow USDA safe chicken handling guidelines for proper thawing and cooking temperatures to avoid foodborne illness. Pat frozen wings dry twice as thoroughly as fresh wings to remove excess ice moisture that can cause breading to slide off during cooking.
Prepping Wings for Perfect Breading Adhesion
Proper prep is the most important step to achieving breading that stays attached and crisps evenly. Damp, un-trimmed wings will lead to clumpy, falling-off crusts, no matter how good your breading mix is.
Cleaning and Drying for Maximum Crisp
Start by rinsing wings under cold running water to remove any leftover bone fragments or debris. Pat wings completely dry with paper towels, rotating each piece to ensure no moisture remains on the skin. For extra crisp results, let wings air dry on a wire rack for 10 minutes after patting — moisture is the #1 enemy of crispy breading, and even small amounts of water will cause the coating to steam and soften during cooking. Avoid soaking wings in water for extended periods, as this dilutes flavor and adds excess moisture.
Trimming for Even Cooking
Use a sharp, sturdy knife to separate drumettes and flats at the joint, and cut off wing tips. Trim any excess loose skin or visible fat, as these areas cook faster than the meat and can burn before the breading is fully crisp. Clean, evenly trimmed wings also coat more uniformly, so you won’t end up with thick clumps of breading on some spots and bare skin on others. For clean, precise cuts, use a sharp, reliable cutting tool that won’t tear the delicate wing skin.
Building the Perfect Breading Mix
A well-balanced breading mix is the foundation of crispy, flavorful wings. The right ratio of ingredients creates a crust that stays crunchy even after tossing in sauce, while seasoning blends add depth of flavor without extra work.
The Base: Flour, Cornstarch, and Ratios
Skip all-purpose flour alone for the crispiest results. A 2:1 ratio of all-purpose flour to cornstarch is the gold standard: cornstarch absorbs moisture from the chicken and oil far better than flour, creating a light, shattery crust that stays crisp for hours. Add 1 teaspoon of baking powder per cup of dry mix — this alkaline ingredient helps the crust puff up slightly during cooking for extra crunch. Season the dry mix generously with 1 teaspoon of salt per cup of flour, plus your choice of spices, as you won’t be able to season the breading evenly after cooking.
Customizing Spice Levels
Tailor your breading mix to your taste preference with these simple adjustments:
- Mild: 2 tsp paprika, 1 tsp garlic powder, 1 tsp onion powder, ½ tsp black pepper
- Medium: Add ¼ tsp cayenne pepper and 1 tsp chili powder to the mild blend
- Hot: Double the cayenne, add 1 tsp smoked paprika and a pinch of cumin for depth
- Herby: Add 1 tsp dried oregano or thyme for a savory, aromatic twist
Avoid fresh herbs in the breading mix, as their moisture will make the coating soggy.
Alternative Coating Options
For dietary restrictions or extra crunch, swap part or all of the flour mix for:
- Gluten-free options: almond flour, rice flour, or gluten-free panko
- Extra crispy textures: crushed cornflakes, pretzel crumbs, or plain panko breadcrumbs
- Nutty flavor: finely ground peanuts or sesame seeds mixed with flour
Setting Up an Efficient Breading Station
A organized breading station cuts down on mess, speeds up the coating process, and prevents cross-contamination between raw chicken and cooked food. Set up your workspace before you start prepping to avoid interruptions.
Wet and Dry Bowl Setup
Use two separate shallow, wide bowls for your breading components:
- Wet bowl: Buttermilk, beaten eggs, or a 1:1 mix of milk and hot sauce. The acid in buttermilk tenderizes the chicken, while hot sauce in the wet mix adds subtle flavor inside the crust, not just on top.
- Dry bowl: Your pre-mixed flour, cornstarch, and spice blend. Mix thoroughly before starting to avoid clumps of concentrated spice.
Shallow bowls make it easy to dip and coat wings without dragging excess wet mix into the dry bowl, which creates clumpy, uneven crusts.
Workflow for Even Coating
Arrange your station in this left-to-right order to streamline the process and avoid cross-contamination:
- Raw prepped wings on a tray on the far left
- Wet bowl in the center
- Dry bowl to the right of the wet bowl
- Wire rack on the far right to hold breaded wings
Set up your station on a non-slip kitchen mat to catch spills and keep your workspace safe while working with raw chicken. Keep a stack of paper towels and a pair of tongs nearby to handle wings without touching them directly.
Step-by-Step Breading Process
Follow these steps for an even, well-attached coating that stays crispy during cooking. This process works for all cooking methods, from deep frying to air frying.
First Coat: Wet Dip
Dip each wing fully into the wet mixture, letting excess drip off for 2 seconds before moving to the dry bowl. Avoid over-saturating the wing, as excess wet mix will cause the dry coating to clump. Ensure every part of the wing is coated, with no bare spots of skin exposed.
Second Coat: Dry Bread
Place the wet wing into the dry mix, and use your opposite hand to gently press the flour blend onto every surface of the wing. Turn the wing to coat all sides, then shake off excess mix gently. A light, even layer is better than a thick, packed-on coating, which can fall off during cooking and taste doughy.
Double Breading for Extra Crunch
For a thicker, extra-crispy crust that holds up to heavy sauce, repeat the wet and dry coating steps for a second layer. After coating, place wings on the wire rack and let them rest for 15 minutes before cooking. This rest period lets the coating hydrate and set firmly to the wing, which prevents it from sliding off into hot oil or falling off in the oven. A common mistake beginners make is skipping this rest step, leading to wasted breading and soggy crusts.
 Letting breaded wings rest for 15 minutes after coating helps the breading set for a crispier, longer-lasting crust.
Cooking Methods for Breded Hot Wings
The right cooking method depends on your preference for crispiness, convenience, and fat content. All methods require cooking wings to an internal temperature of 165°F, per USDA food safety standards, to ensure they are safe to eat.
Deep Frying for Maximum Crisp
Deep frying creates the crispiest, most golden crust, ideal for wings that will be tossed in heavy sauce. Heat 2-3 inches of high-smoke-point oil (peanut, canola, or avocado oil) in a heavy pot to 350-375°F, monitored with a candy thermometer. Cook wings in batches of 8-10 to avoid overcrowding the pot, which drops oil temperature and leads to soggy, grease-heavy wings. Fry for 8-10 minutes, until the crust is deep golden and the internal temperature reaches 165°F. Drain wings on a wire rack set over a baking sheet (not paper towels, which trap steam and make the bottom of the crust soggy). Never leave hot oil unattended, and keep a fire safety blanket nearby to smother small oil splatter fires.
Oven Baking for a Healthier Option
Baking is a low-mess, lower-fat alternative to frying that still delivers a satisfying crunch. Preheat your oven to 425°F (higher heat crisps the breading better than the 400°F many recipes call for). Place wings on a wire rack set over a baking sheet to allow hot air to circulate around all sides, and spray lightly with oil to help the crust brown. Bake for 25-30 minutes, flipping halfway through, until the crust is golden and the internal temperature hits 165°F. For extra crisp, broil for the last 2 minutes of cooking, watching closely to avoid burning.
Air Frying for Quick, Low-Fat Wings
Air frying is the fastest, lowest-fat option, perfect for small batches. Preheat your air fryer to 400°F, and arrange wings in a single layer with space between each piece for proper airflow (cook in batches if your air fryer is small). Spray wings lightly with oil, then cook for 18-22 minutes, shaking the basket halfway through, until the crust is crisp and the internal temperature reaches 165°F. Air fryers vary in size and power, so adjust timing by 2-3 minutes if your wings are not fully crisp after the recommended time.
When handling hot cookware straight from the oven, fryer, or air fryer, use hot handle protection to avoid burns.
Adding Post-Cooking Flavor Without Soggy Breading
The best part of breaded wings is that the crust holds up to sauce, rubs, and glazes without turning soggy immediately — as long as you apply them correctly.
Sauce Application Best Practices
Toss wings in sauce in a large bowl immediately after cooking, while they are still hot. Use 1-2 tablespoons of sauce per 10 wings, tossing gently to coat evenly without drenching the crust. For maximum crisp, serve extra sauce on the side for dipping, rather than tossing all wings in sauce ahead of time. Classic sauce pairings include buffalo, barbecue, honey garlic, and sriracha lime.
Dry Rubs and Caramelized Glazes
Dry rubs add bold flavor without adding moisture that softens the crust. Toss hot wings in your spice blend right after cooking, and the residual heat will help the rub adhere to the crust. For glazes, brush them on during the last 2 minutes of cooking so they caramelize into a shiny, flavorful coating that doesn’t soak into the breading.
Serving and Storage Tips
The right pairings and presentation take your breaded wings from good to great, while proper storage ensures leftovers stay as crispy as possible.
Pairings and Presentation
Balance the rich, savory flavor of wings with cool, crisp sides and dips. Classic dip options include ranch, blue cheese, and Greek yogurt garlic, but for a unique plant-based twist, try a savory artichoke white bean dip for a creamy, tangy contrast. Traditional sides like celery and carrot sticks cut through the richness, while fries, coleslaw, and pickled vegetables add extra texture and flavor. For presentation, arrange wings on a large platter, garnish with chopped parsley or sesame seeds, and serve dips in small bowls scattered around the platter for easy access.
Storing and Reheating Leftovers
Store leftover breaded wings in an airtight container in the refrigerator for up to 3 days. To reheat without losing crisp, use an air fryer at 375°F for 3-4 minutes, or an oven at 400°F on a wire rack for 5-7 minutes. Never microwave leftover breaded wings, as the steam will make the crust soggy. For longer storage, freeze breaded (uncooked or cooked) wings for up to 1 month, and reheat from frozen in the air fryer for 5-6 minutes.
After cooking, clean up grease and food residue easily with heavy-duty grease cleanup tools designed for tough kitchen messes.
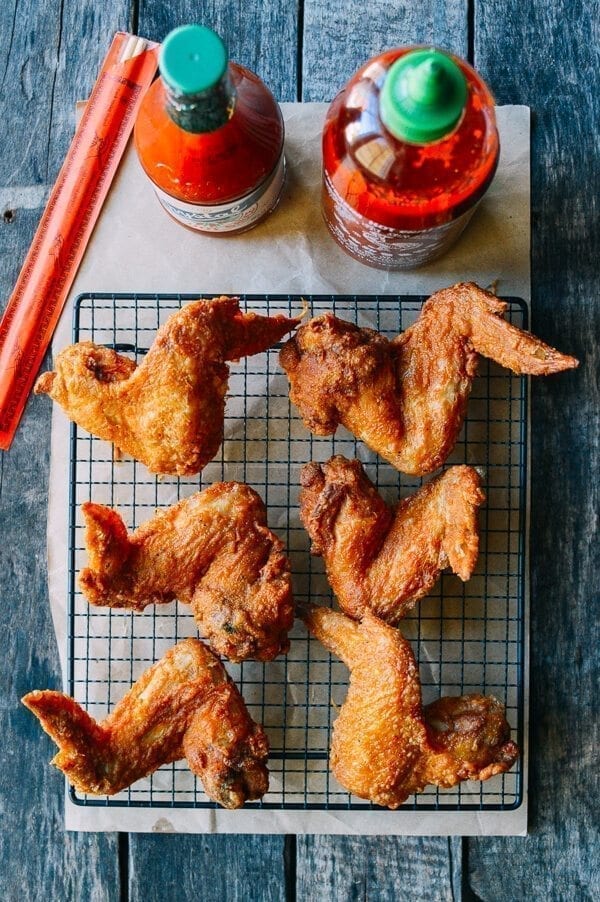 Deep-fried breaded wings have the crispest crust, ideal for holding heavy buffalo sauce.
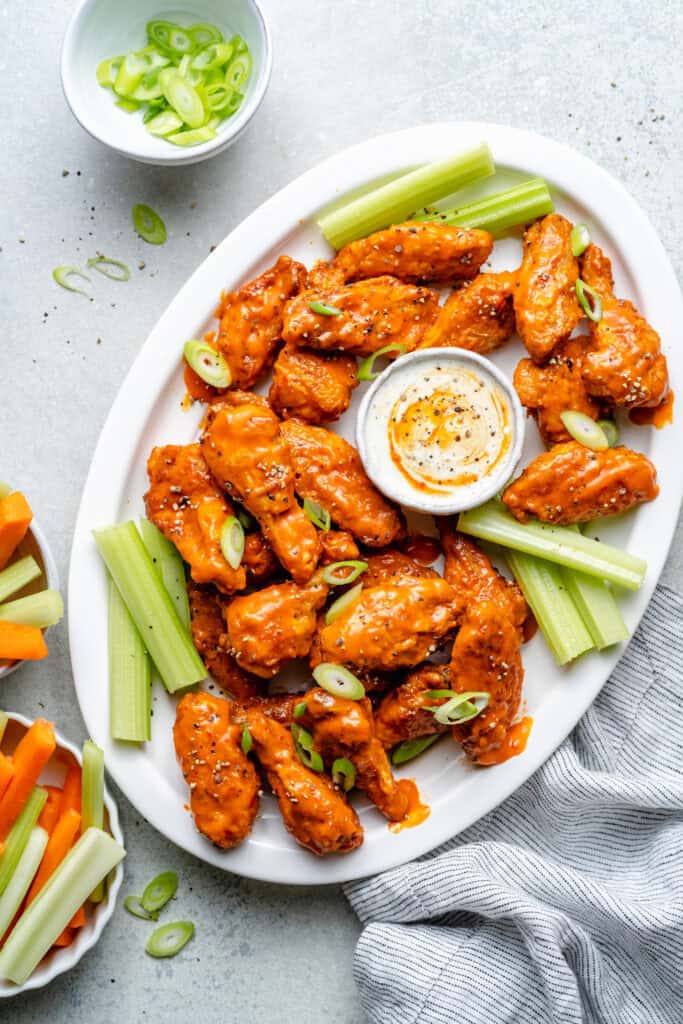 Oven-baked breaded wings offer a lower-fat alternative to frying while still delivering a satisfying crunch.
Frequently Asked Questions
What ingredients do I need to bread hot wings?
You need all-purpose flour, cornstarch, salt, pepper, and your choice of spices for the dry breading mix. For the wet mixture, use buttermilk, beaten eggs, or a mix of milk and hot sauce to help the dry coating adhere to the wings.
How do I keep breaded wings crispy for hours?
Keep cooked wings in a warm oven (200°F) on a wire rack after cooking. Never cover them with foil, as foil traps steam and softens the crust. If transporting wings, use a ventilated container instead of a sealed one to avoid sogginess.
Can I bread wings ahead of time?
Yes. Bread wings up to 24 hours in advance, store them uncovered on a wire rack in the refrigerator. The uncovered storage lets the coating dry out slightly, which makes it even crispier when cooked. Don’t bread wings more than 24 hours in advance, as moisture from the chicken will make the breading soggy.
Why is my breading falling off the wings?
The most common causes are: wings were not patted dry enough before breading, you skipped the 15-minute rest step after coating, you overcrowded the cooking vessel (which builds up steam and loosens the crust), or you flipped wings too early before the crust set.
What’s the difference between breaded and battered wings?
Breading uses a dry mix of flour, cornstarch, and spices that creates a crunchy, textured crust. Battering uses a thick, wet mixture of flour and liquid that creates a smooth, thicker coating. Breading is easier for beginners, holds sauce better, and stays crisp longer than batter.
Conclusion
Breading hot wings is a simple, rewarding technique that takes your wing game to the next level, no deep fryer required. The key to success lies in prepping your wings properly, using the right flour-to-cornstarch ratio, letting the coating rest before cooking, and choosing the cooking method that fits your needs. Experiment with spice blends and sauces to find your perfect flavor combination, and don’t be afraid to adjust the crisp level to your preference. Ready to test your skills? Try this method for your next game day spread, and browse our full recipe collection for more easy, crowd-pleasing meal ideas.

I’m Abby Lu, a passionate home cook who loves simplifying everyday meals. At PlugChef.com, I share product reviews and cooking guides to help you find the best tools for your kitchen.
Related posts:
 How to Make a Fruit Basket for a Gift: Easy DIY Guide
 Do You Need a Basket? Essential Guide for Air Fryers
 How to Adjust Syrup Dispenser Pressure: Expert Tips
 Kitchen Cabinets With Black Appliances: Trendy Design Tips
 White Kitchen And Stainless Steel Appliances: A Perfect Duo
 Kitchen Colors With White Cabinets And White Appliances: Vibrant Ideas

