
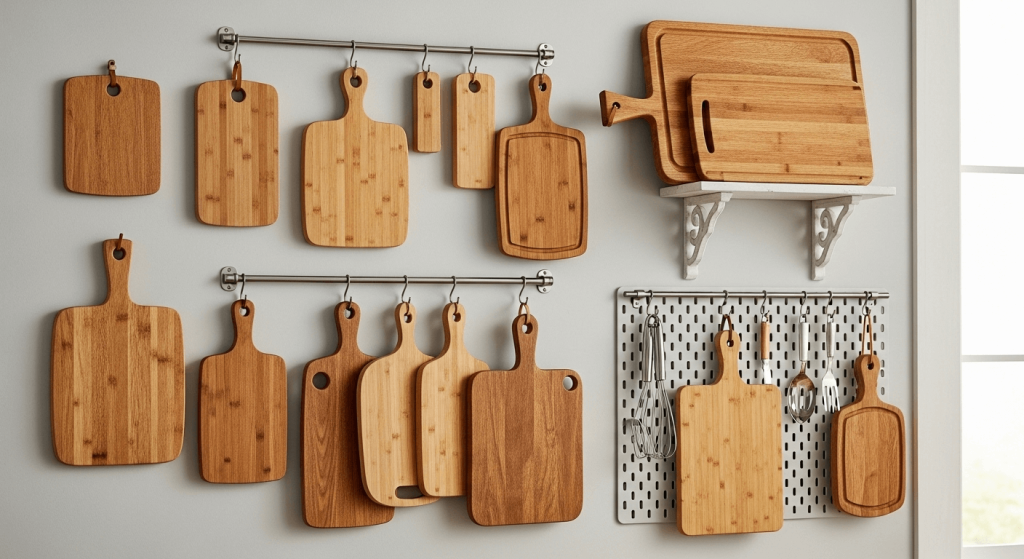
Cutting boards are the workhorses of every kitchen, but they’re also one of the most awkward items to store. If you’re tired of digging through overcrowded drawers or cluttering limited counter space with boards you use multiple times a day, wall mounting is a simple, stylish solution that solves both storage and decor problems at once. This guide covers everything you need to know to hang any type of cutting board securely, no prior DIY experience required, plus tips to make your wall display a functional, eye-catching feature of your kitchen.
Why Hang a Cutting Board on the Wall?
Wall-mounted cutting boards offer far more benefits than just freeing up counter space. For small kitchens, apartments, or RV cooking spaces, every inch of counter real estate is valuable — hanging a board you use daily eliminates the need to store it in a cabinet or drawer where it’s hard to access mid-recipe. Beyond functionality, hanging a board lets you display beautiful artisan, custom, or heirloom wooden boards instead of tucking them away out of sight. It also improves air circulation around the board, which prevents warping, cracking, and mold growth caused by trapped moisture from washing. According to FDA kitchen food safety guidelines, keeping cutting boards dry and well-ventilated reduces the risk of bacterial cross-contamination, making wall mounting a choice that supports both kitchen style and food safety. You’ll also never have to hunt for a board while cooking again — it will be right where you need it, within arm’s reach of your prep area.
 Credit: food52.com
What You’ll Need
The exact supplies you need depend on the weight of your cutting board and your wall type, but most projects fall into two categories of supplies:
Basic Tools and Hardware
- Your cutting board (note its weight: lightweight plastic and composite boards typically weigh 1–3 lbs, while thick hardwood or butcher block boards can weigh 10–20 lbs or more)
- Appropriate mounting hardware: adhesive removable hooks for boards under 5 lbs, screw-in hooks or a French cleat for heavier boards
- Drill/driver and matching screw bits
- Wall anchors rated for your wall type (drywall, tile, brick) and at least 1.5x the weight of your board
- Stud finder (required for boards heavier than 5 lbs, to anchor into wall studs for extra security)
- Measuring tape, pencil, and a 2-foot level
- Painter’s tape (to test placement on the wall without leaving permanent marks)
Optional Styling Add-Ons
If you want to elevate your wall display, consider adding:
- Decorative iron or natural wood hooks that match your existing kitchen hardware
- A small floating shelf below the board to store board care products like mineral oil and scrapers
- Matching potted herbs or dried decorative elements to create a cohesive kitchen feature wall
Step-by-Step Guide to Hang Your Cutting Board
Step 1: Choose and Prep the Mounting Spot
Pick a spot 4–6 inches below eye level, within arm’s reach of your main food prep area. Avoid mounting boards directly above the stove (prolonged heat can warp wood) or directly next to the sink (frequent splashes will trap moisture against the board). If hanging multiple boards, leave 2–3 inches of space between each to avoid scratching. Use painter’s tape to mark the planned hook positions on the wall, and hold the board up to the tape to confirm the placement feels natural before drilling any holes. A common mistake is hanging boards too high or low, forcing you to stretch or bend to access them during cooking.
Step 2: Measure and Mark Hardware Placement
First, ensure your cutting board is completely clean and dry before hanging — any trapped moisture will cause mold or warping while mounted. For boards under 12 inches wide, a single centered hook is sufficient. For boards 12–24 inches wide, use two hooks spaced evenly across the back to distribute weight. For boards over 24 inches or weighing more than 15 lbs, use a French cleat, which attaches to the full width of the board’s back for even weight distribution. Use your level to mark the exact drill points for your hooks or cleat, and double-check that the marks are perfectly level to avoid a crooked display.
Step 3: Install Mounting Hardware
If you’re hanging a board heavier than 5 lbs, use a stud finder to locate nearby wall studs and drill directly into them for maximum support. For drywall without stud access, drill a pilot hole, insert a heavy-duty wall anchor rated for your board’s weight, then drive the screw into the anchor, leaving enough space to hang the board. For tile or brick walls, use a masonry drill bit to create pilot holes, then secure the hardware with masonry screws and appropriate anchors. If using a French cleat, attach the wall half first, confirming it is perfectly level before attaching the board half to the back of your cutting board.
Step 4: Hang and Secure the Board
Carefully lift the board and align it with the installed hardware. For hook-mounted boards, make sure the hooks sit flush against the back of the board (not just the edge) to prevent tipping if bumped. For French cleats, slide the board’s cleat onto the wall cleat until it locks firmly into place. Give the board a gentle tug to confirm it is fully secure. For extra security on heavy boards, you can add a small adhesive felt pad to the bottom of the board to prevent it from slipping forward off the hooks.
 Credit: virginiaboyskitchens.com
Hanging Tips for Different Board and Wall Types
Lightweight Plastic and Composite Boards
Boards made of plastic, polypropylene, or composite material usually weigh less than 5 lbs, making them ideal for adhesive removable hooks — a perfect option for renters who can’t drill into walls. Clean the wall surface with rubbing alcohol before applying the adhesive to ensure a strong hold, and choose hooks rated for at least 5 lbs to account for accidental bumps.
Heavy Hardwood and Butcher Block Boards
Thick hardwood, end-grain, or custom butcher block boards often weigh 10 lbs or more, so you’ll need screw-in hardware anchored into wall studs or heavy-duty drywall anchors rated for at least 1.5x the board’s weight. A French cleat is the most secure option for boards over 15 lbs, as it distributes weight across the entire back of the board instead of just a few pressure points. If you built your own thick custom board, you can reference guides for crafting a durable butcher block board to ensure it is rated for wall mounting.
Delicate Walls (Rental, Plaster, Wallpaper)
If you can’t drill into your walls, opt for heavy-duty command hooks rated for your board’s weight, or a wall-mounted pegboard system that uses minimal anchoring. If you do need to drill small holes for anchors, fill them with spackle when you move out to avoid damaging paint or wallpaper.
Tile and Brick Walls
For tile or brick surfaces, use a masonry drill bit to create pilot holes, then secure hardware with stainless steel masonry screws and tile anchors to avoid cracking the surface. Skip adhesive hooks on tile, as grout degradation over time will cause the adhesive to fail, leading to board falls.
Stylish Storage and Display Tips
- Group boards of complementary wood tones and sizes together for a curated, cohesive look, keeping even spacing between each to avoid a cluttered appearance.
- Match your hardware to your existing kitchen finishes: matte black iron hooks pair well with modern appliances, while natural wood brackets fit rustic or farmhouse kitchens.
- Add small functional accents like a potted culinary herb or a set of small measuring spoons on a shelf below the board to make the display feel intentional, not haphazard.
- For a minimalist look, hang boards in a single horizontal row with matching hardware; for an eclectic gallery wall, mix board sizes and hang them at slightly varying heights for visual interest.
- Avoid hanging boards in direct sunlight, as UV rays will fade wood finishes and degrade plastic or composite boards over time.
Maintenance and Safety for Wall-Mounted Boards
- Check mounting hardware every 6 months to ensure screws haven’t loosened and hooks are still secure, especially for heavy boards that experience frequent bumping.
- Never hang a wet board on the wall: trapped moisture will cause warping, cracking, and mold growth. Wipe boards completely dry with a clean towel before mounting.
- For wooden boards, wipe them down regularly with a food-safe cleaner to prevent stains and odors. If you notice faint food smells over time, use simple odor elimination techniques to keep the board fresh without harsh chemicals. If you spot early mold growth from trapped moisture, use safe mold removal for wood boards to salvage the board without damaging the wood. You can also address minor surface discoloration with proper stain removal methods to keep your display looking pristine.
- Keep heavy boards out of reach of small children, as they can fall and cause injury if bumped.
- For plastic or composite boards, avoid hanging them near heat sources like stoves or radiators, as high heat can warp the material.
Frequently Asked Questions
How do I hang a cutting board without damaging the wall?
For renters or homes with delicate plaster or wallpaper, use heavy-duty adhesive hooks or command strips rated for at least 1.5x the weight of your board. Clean the wall surface with rubbing alcohol before application to ensure a strong hold, and avoid hanging boards heavier than 5 lbs with adhesive alone. When removing, pull the hook straight down slowly to avoid peeling paint or damaging wallpaper.
What tools do I need to hang a cutting board?
For lightweight boards under 5 lbs, you only need adhesive hooks and a level. For heavier hardwood or butcher block boards, you’ll need a drill, appropriate wall anchors, a stud finder, and a level. A French cleat is recommended for boards over 15 lbs for maximum security and even weight distribution.
Can I hang a heavy cutting board on drywall?
Yes, but you must anchor the hardware into wall studs or use heavy-duty drywall anchors rated for at least 1.5x the board’s weight. A board that weighs 10 lbs needs anchors rated for at least 15 lbs to prevent the hook from pulling out over time. Avoid using standard plastic drywall anchors for heavy boards, as they are not designed to hold constant weight.
What is the best height to hang a cutting board?
Hang boards 4–6 inches below eye level for easy reach while cooking. This height keeps the board accessible without forcing you to stretch or bend, and it also displays the board as a decorative feature rather than hiding it high up on the wall. If hanging multiple boards, keep the bottoms of all boards at the same height for a tidy, uniform look.
Can I hang a cutting board on a cabinet door?
Yes, if your cabinet doors are sturdy enough. Use small adhesive hooks or a cabinet door-mounted rack to hang lightweight boards on the inside of cabinet doors to save even more space. Make sure the hook doesn’t interfere with the door closing, and avoid hanging heavy boards on cabinet doors, as the weight can damage the hinges over time.
Conclusion
Hanging a cutting board on the wall is a fast, low-cost DIY project that solves common kitchen storage headaches while adding a personal, stylish touch to your space. With the right hardware for your board’s weight and wall type, you can create a secure, functional display that keeps your most-used tools within reach and your counters clutter-free. Whether you’re showing off a custom handmade board or organizing a set of everyday plastic boards, these tips will help you install a display that lasts for years. For more easy kitchen upgrades and DIY project ideas, browse our full library of kitchen guides to transform your cooking space.

I’m Abby Lu, a passionate home cook who loves simplifying everyday meals. At PlugChef.com, I share product reviews and cooking guides to help you find the best tools for your kitchen.
Related posts:
 Dried Flower Bud in a Spice Rack: Transform Your Cooking
 Coollog Waterproof under Sink Mat: Ultimate Leak Protection
 Recipe for Oven Roasted Shrimp: Easy, Quick & Delicious Delight
 Lemon Juice to Whiten Clothes: Natural Whitening Hacks That Work
 Tequila Sunrise With Cranberry Juice: Refreshing Twist to Classic Cocktail
 Can You Freeze Pudding Cups: Ultimate Guide to Safe Storage

