
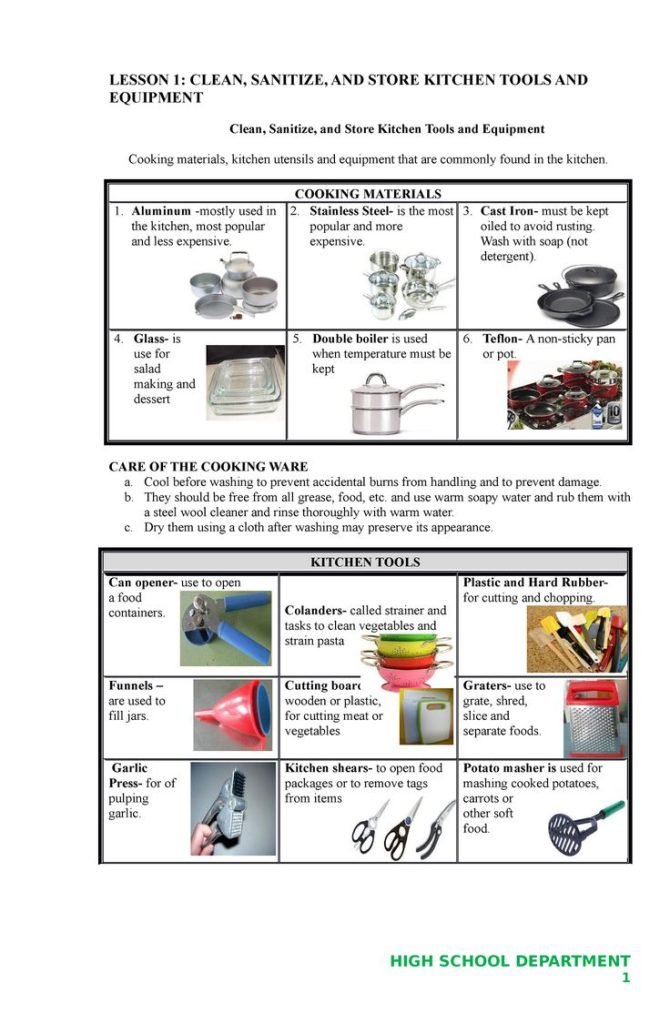
There’s nothing worse than finishing a perfect batch of chocolate chip cookies, only to face a sink full of stuck-on dough, rusty measuring spoons, and a pile of disorganized tools that make the next bake feel like a chore. Properly cleaning, sanitizing, and storing your baking tools isn’t just about keeping your kitchen tidy—it’s a critical step for food safety, extending the lifespan of your equipment, and ensuring consistent, delicious results every time you bake.
Flour and raw eggs can carry harmful bacteria like Salmonella and E. coli, which pose a serious food safety risk for home bakers, per USDA food safety guidance for home bakers. A well-cared for stainless steel stand mixer can last 15 years or more, while neglected models often fail within 3 years due to dried-on dough jamming the motor. This guide covers material-specific cleaning methods, safe sanitizing practices, and space-efficient storage hacks to cut down on post-bake cleanup time and keep your tools working perfectly for years.
Why Proper Tool Care Matters Beyond Cleanliness
Many bakers only think about cleaning their tools to avoid cross-contamination, but consistent care delivers three key benefits most home bakers overlook. First, it protects your health: improperly sanitized tools that have touched raw flour, eggs, or meat can spread bacteria to ready-to-eat baked goods. Second, it saves you money: replacing a warped baking sheet, cracked wooden rolling pin, or rusted mixer attachment adds up quickly, while regular maintenance extends the lifespan of most tools by 2 to 3 times. Third, it improves your baking results: a greased, warped pan causes uneven browning, while a dirty measuring cup throws off ingredient ratios and ruins delicate recipes.
Step 1: Efficient Cleaning for Every Baking Tool Type
Cleaning is the foundation of both sanitation and tool longevity. The biggest mistake home bakers make is using a one-size-fits-all approach: abrasive scrubbers that ruin nonstick coatings, hot water that warps plastic utensils, and soaking wooden tools for hours that causes cracking. Follow these material-specific steps for the best results.
Universal Pre-Clean Step: Remove Stuck-On Residue First
Before washing any tool, scrape off all leftover batter, dough, or food bits with a silicone or plastic bench scraper (avoid metal scrapers on nonstick surfaces). For stubborn, dried-on residue, soak the tool in warm, soapy water for 10 to 15 minutes to loosen grime before scrubbing. Use a small nylon brush to clean crevices in mixer attachments, cookie cutter edges, and the tines of whisks, where food particles often get trapped.
Cleaning by Tool Material
Nonstick Bakeware
Nonstick coatings degrade quickly when exposed to abrasive scrubbers, steel wool, or high heat from self-cleaning ovens. Wash nonstick pans, baking sheets, and mats with warm water, a few drops of mild dish soap, and a soft sponge while the pan is still warm (not hot) to lift residue easily. Avoid cooking spray on nonstick surfaces, as it leaves a gummy, hard-to-remove residue that reduces the pan’s nonstick performance over time—opt for butter or oil applied directly to the pan instead. Air dry nonstick tools completely before stacking, and place a paper liner between stacked pans to protect the coating.
Stainless Steel and Metal Tools
Stainless steel mixer bowls, whisks, baking sheets, and measuring cups are low-maintenance, but burnt-on bits require special treatment. For stuck-on residue, make a paste of equal parts baking soda and water, apply it to the affected area, let sit for 10 minutes, then scrub with a non-abrasive scrub pad. Never use chlorine bleach on stainless steel, as it causes pitting and corrosion that harbors bacteria. Rinse thoroughly and towel dry immediately to prevent water spots and rust.
Wooden Utensils and Cutting Boards
Wood is porous, so it absorbs moisture and odors quickly if cared for improperly. Never soak wooden utensils or cutting boards for more than 2 minutes, and never put them in the dishwasher, as high heat and prolonged water exposure causes warping, cracking, and bacterial growth. Hand wash with warm water and mild soap, then towel dry immediately and air dry upright in a well-ventilated area away from direct heat (like next to your oven). Condition wooden tools monthly with food-grade mineral oil to keep the wood from drying out and to seal small crevices where bacteria can grow.
 Drying wooden tools immediately after washing prevents warping and bacterial growth.
Silicone and Plastic Tools
Silicone spatulas, pastry mats, and measuring cups are heat-resistant and most are dishwasher safe, but thin plastic tools (like disposable piping bags or plastic measuring spoons) can warp in high dishwasher heat, so hand wash these instead. To remove stubborn stains from silicone, make a paste of baking soda and 3% hydrogen peroxide, apply to the stained area, let sit for 30 minutes, then rinse thoroughly.
Step 2: Sanitizing to Eliminate Foodborne Bacteria
Cleaning removes visible grime, but sanitizing kills the invisible bacteria that cause foodborne illness. Sanitizing is non-negotiable after any use involving raw flour, eggs, dairy, or meat-based fillings, and monthly for general use if tools are stored in a damp space. Always clean tools thoroughly before sanitizing: sanitizer cannot kill bacteria trapped under food residue.
Natural Sanitizing Options
For most home bakers, natural sanitizers are safe, non-toxic, and effective. Mix 1 part white vinegar with 3 parts water in a spray bottle, spray down tools, and let air dry—no rinsing is needed for food-contact surfaces, per EPA guidance for household sanitizers. For extra sanitizing power, use 3% hydrogen peroxide solution, spray on tools, let sit for 1 minute, then rinse. For heat-safe metal tools, boil in water for 5 minutes to kill 99.9% of bacteria without any additives.
Chemical Sanitizers for High-Risk Use
If you bake for immunocompromised household members, sell baked goods commercially, or are concerned about high bacteria exposure, use an EPA-approved chemical sanitizer. For a bleach solution, mix 1 tablespoon of unscented household bleach with 1 gallon of cool water, soak tools for 1 minute, then air dry—no rinsing is required for food-contact surfaces, per FDA food contact surface sanitizing guidelines. Never mix bleach with vinegar, ammonia, or other cleaning products, as this creates toxic fumes.
Step 3: Drying Tools to Prevent Rust, Mold, and Bacteria
Moisture is the #1 cause of tool damage and bacterial growth, so proper drying is just as important as cleaning and sanitizing. For metal tools, towel dry immediately with a lint-free microfiber towel to prevent water spots and rust; avoid cotton towels, as they leave behind fibers that stick to nonstick surfaces. For wooden tools, air dry upright in a well-ventilated area, never stacked, to allow air to circulate around the entire surface. For silicone tools, air dry on a rack to prevent water from pooling in crevices where mold can grow. A common mistake many bakers make is stacking wet pans or utensils, which traps moisture between layers and causes rust to spread quickly.
Step 4: Efficient Storage for Longevity and Easy Access
Proper storage protects your tools from damage, humidity, and cross-contamination, while also cutting down on prep time during bakes by keeping frequently used tools within easy reach.
Organizing by Frequency of Use
Store tools you use weekly (mixing bowls, whisks, measuring cups) in easy-to-reach drawers or cabinets near your prep area. Place specialty tools you only use occasionally (springform pans, pastry bags, cookie cutters) in labeled bins on higher or lower shelves. This eliminates the time wasted digging through a cluttered cabinet mid-bake.
 Grouping tools by use case and storing them in labeled containers cuts down on prep time during bakes.
Storage by Material to Prevent Damage
- Metal tools: Store in a dry, low-humidity area away from the sink or dishwasher. Avoid placing metal utensils directly against other metal surfaces to prevent scratching.
- Nonstick bakeware: Place a paper liner or silicone mat between stacked pans to protect the nonstick coating from scratches.
- Wooden tools: Store away from direct heat sources (like your oven or stovetop) to prevent warping and cracking.
- Glass/ceramic tools: Store with padding between pieces, or use a dedicated cabinet with shelf liners to prevent chipping and breaking.
Space-Saving Hacks for Small Kitchens
If you’re short on cabinet space, use vertical storage solutions: install a pegboard on your wall to hang lightweight tools like whisks, kitchen shears, and small rolling pins. Use over-the-door organizers for measuring cups, spatulas, and pastry brushes. Opt for nested mixing bowls and collapsible silicone baking mats to save drawer space.
Long-Term Storage for Seasonal Tools
For holiday-specific tools (like cookie cutters, turkey baking pans, or gingerbread house molds), clean and dry them thoroughly before storing in a sealed plastic bin with a silica gel pack to absorb moisture. Label the bin clearly and store it in a cool, dry area like a closet or basement to prevent rust and mold during the off-season.
Simple Maintenance Schedule to Keep Tools in Top Shape
Building a small routine into your post-bake cleanup will save you hours of deep cleaning and tool replacement down the line. Use this simple schedule as a guide:
| Frequency | Tasks | Target Tools |
|---|---|---|
| After every use | Scrape residue, wash with warm soapy water, dry thoroughly | All tools |
| Monthly | Condition wooden utensils, inspect for rust/damage, sanitize storage areas | Wooden utensils, metal bakeware, storage cabinets |
| Quarterly | Deep clean mixer attachments, baking sheets, and hard-to-reach crevices | Stand mixers, baking sheets, ingredient grinders |
| Annually | Assess for worn-out tools (warped pans, cracked wooden utensils, dull blades) to replace | All tools |
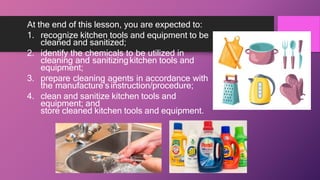 A visual checklist of cleaning, sanitizing, and storage steps ensures no step is skipped after baking.
Frequently Asked Questions
Can I put my baking tools in the dishwasher?
It depends on the material. Stainless steel utensils, silicone spatulas, and glass bowls are usually dishwasher safe, but always check the manufacturer’s instructions first. Never put wooden utensils, nonstick bakeware, or sharp blades (like pizza cutters) in the dishwasher: wood warps and cracks, nonstick coatings degrade, and blades dull quickly. Hand washing these tools will extend their lifespan significantly.
How often should I sanitize my baking tools?
Sanitize after any use involving raw animal products (eggs, dairy, meat-based fillings) or raw flour, which can carry Salmonella and E. coli. For general baking with only plant-based ingredients, sanitize monthly or if tools have been stored in a damp space. If you bake commercially or for immunocompromised household members, sanitize after every use.
What’s the best way to remove rust from metal baking tools?
For small rust spots, make a paste of baking soda and water, apply to the rusted area, let sit for 30 minutes, scrub with a nylon brush, then rinse and dry thoroughly. For heavier rust, soak the tool in a 1:1 solution of white vinegar and water for 1 hour, then scrub. If rust has pitted the metal, replace the tool, as pitted surfaces can harbor bacteria and affect baking performance.
How do I prevent wooden utensils from absorbing odors?
Avoid using wooden utensils for strong-smelling ingredients (garlic, curry) if you also use them for sweet baked goods. To remove existing odors, scrub the utensil with a paste of baking soda and lemon juice, let sit for 10 minutes, rinse, then condition with food-grade mineral oil. Regular conditioning also prevents absorption of odors and moisture.
Conclusion
Implementing this routine takes just 5 to 10 extra minutes after each bake, but it pays for itself quickly: you’ll avoid replacing rusted pans or cracked wooden utensils, reduce your risk of foodborne illness, and cut down on prep time for future bakes by keeping your tools organized and ready to use. Save this guide to your kitchen bulletin board for quick reference after every bake, and share your favorite tool care hack in the comments to help fellow bakers avoid common pitfalls. Happy baking!

I’m Abby Lu, a passionate home cook who loves simplifying everyday meals. At PlugChef.com, I share product reviews and cooking guides to help you find the best tools for your kitchen.
Related posts:
 How Do You Pronounce Colander: Clear Guide & Tips
 Is Nylon Or Silicone Better for Cooking Utensils: Ultimate Guide
 How to Cut Skirt Board for Stair: Expert Tips & Techniques
 Vintage First Aid Kit Metal Box: Timeless Safety and Style
 First Aid Kit for Restaurant: Essential Safety Gear You Need Today
 First Aid Kit for Sports: Essential Items for Quick Injury Care

