
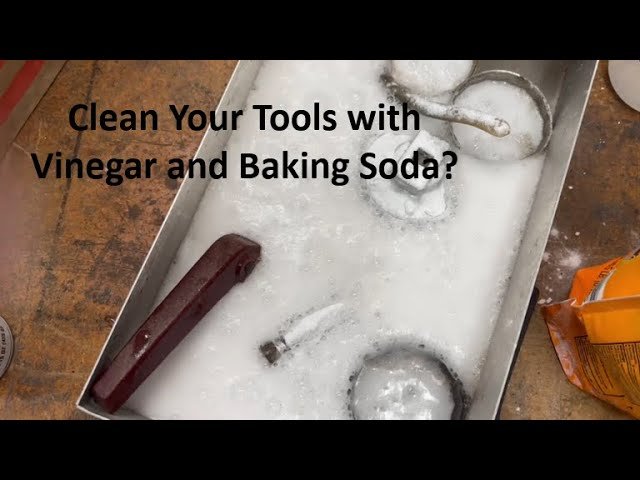
Rust is more than just an eyesore on your favorite tools—it causes pitting in metal, seizes moving parts on wrenches and pruning shears, and shortens the lifespan of everything from hand planes to garden trowels. If you’ve ever reached for a tool only to find it stuck or weakened by orange corrosion, you don’t need to spend money on harsh commercial rust removers to fix it. White vinegar and baking soda, two low-cost kitchen staples, are powerful enough to dissolve light to moderate rust without toxic chemicals, and the process takes less than 24 hours for most tools. In this guide, we’ll walk through the full, step-by-step process to clean rusty tools with vinegar and baking soda, plus expert tips for preventing rust from coming back.
 This short tutorial walks through the full process from soaking to post-cleaning oiling for rust-free tools.
Credit: www.youtube.com
This short tutorial walks through the full process from soaking to post-cleaning oiling for rust-free tools.
Credit: www.youtube.com
The Science Behind Why Vinegar And Baking Soda Remove Rust
Understanding how these two household ingredients work will help you adjust the process for different types of rust and tool materials. White distilled vinegar contains 5% acetic acid, which chemically breaks down iron oxide (the compound that makes up rust) by dissolving the bond between the rust and the underlying metal. Baking soda (sodium bicarbonate) is a mild, non-scratching abrasive that lifts dissolved rust residue from textured surfaces and tight crevices, and its mild alkaline nature neutralizes any remaining acidic vinegar on the metal to prevent further corrosion. The fizzing reaction that occurs when the two combine also helps dislodge rust particles from hard-to-reach spots like wrench jaws or pruning shear pivots. This method is recommended by many university extension services as a safe, low-cost rust removal option for DIYers.
Materials You’ll Need
Gathering all supplies before you start will streamline the process and avoid unnecessary trips back and forth while your tools soak.
Core Cleaning Supplies
- White distilled vinegar (5% acidity is standard; avoid cleaning vinegar with 6–10% acidity unless working with heavily rusted, uncoated steel, as higher acidity can etch some metal finishes or damage wood)
- Baking soda (not baking powder, which contains added starches and acids that will not work for rust removal)
- Large plastic bucket or storage bin (avoid metal containers for soaks longer than a few hours, as vinegar can corrode the container itself)
- Scrub brushes: wire brush for heavy rust on uncoated metal, nylon brush for painted, plated, or polished tools, old toothbrush for tight crevices and small parts
- Plastic putty knife or scraper for thick, flaky rust
- Lint-free cloths or old rags for drying
Protective Gear
- Nitrile gloves (prolonged vinegar contact can irritate skin, especially if you have small cuts or sensitive skin)
- Safety goggles (to protect eyes from splashes and loose rust particles when scrubbing)
- Long sleeves and closed-toe shoes for extra protection if working with heavy rust or wire brushes
Optional Add-Ons
- Lemon juice (extra acidity for very stubborn, set-in rust)
- Mineral oil, machine oil, or linseed oil (for post-cleaning protection of metal and wooden handles)
- Silica gel packs (for long-term rust prevention in storage)
- Drop cloth or old tarp (to protect work surfaces from vinegar stains)
Step-By-Step Rust Removal Process
This process works for most light to moderate rust on steel, iron, and other ferrous metal tools, from household wrenches to garden shears.
Step 1: Prep Your Tools And Workspace
First, brush off all loose dirt, mud, sap, and debris from your tools with a dry brush—skipping this step will just push dirt into the vinegar and make cleaning less effective. Set up your workspace in a well-ventilated area (outdoor shed, open garage, or porch) to avoid strong vinegar fumes building up in enclosed spaces. Lay down a drop cloth to protect floors or work surfaces from stains. For tools with wooden handles, wipe the handles with a damp cloth to remove surface dirt, but avoid soaking them in vinegar, as prolonged exposure will dry out and warp the wood.
Step 2: Submerge Tools In Vinegar
Place all rusty metal parts fully submerged in the bucket of white vinegar. Use a clean ceramic mug or heavy object to weigh down tools that float, ensuring all rusty areas are covered. Soak for 8–12 hours for light surface rust, or 12–24 hours for heavy, set-in rust. A common mistake is leaving tools to soak for 2–3 days, which can corrode intact metal and damage wooden handles—never exceed 48 hours of total soaking time. You may notice small bubbles forming on the metal during soaking; this is a normal reaction as the acetic acid breaks down the rust.
Step 3: Scrub With Baking Soda Paste
Remove tools from the vinegar and rinse thoroughly under warm water to wash away dissolved rust residue. Mix ¼ cup of baking soda with 2 tablespoons of water in a small bowl to form a thick, spreadable paste (add more baking soda if the mixture is too runny). Apply the paste evenly to all rusty areas of the tool, and let it sit for 10–15 minutes to allow the mild abrasive to lift remaining rust. For tight crevices, use an old toothbrush to work the paste into hard-to-reach spots. For heavy rust, use a wire brush to scrub firmly; for painted or plated tools, stick to a nylon brush to avoid scratching the finish.
Step 4: Rinse, Dry, And Protect
Rinse all tools thoroughly with warm water to remove all baking soda paste and loosened rust residue. Dry immediately with a lint-free cloth—air drying in humid conditions will cause new rust to form within hours. For tools with moving parts (wrenches, pliers, pruning shears), apply a thin coat of machine oil or mineral oil to all metal surfaces to create a barrier against moisture. For tools with wooden handles, rub a small amount of linseed oil into the wood to condition it and prevent drying and cracking.

Removing Stubborn, Set-In Rust
For rust that has built up over years, or has caused deep pitting in metal, you may need to adjust the standard process for better results.
Extended Soaking For Heavy Rust
If rust remains after the first round of soaking, you can repeat the vinegar soak for another 8 hours, but do not exceed 48 total hours of soaking to avoid damaging the tool. For rust that has caused visible pitting (small indentations in the metal), add ½ cup of lemon juice to the vinegar soak to boost the acidity and break down deeper rust layers.
Gentle Abrasion For Pitted Rust
For rust that remains in small pits after soaking and scrubbing, use 0000-grade (super fine) steel wool with a small amount of baking soda paste to gently buff the area. Avoid coarse steel wool or wire brushes on plated, painted, or polished tools, as these will scratch the surface and damage the finish. For antique tools with original patina, avoid abrasive scrubbing entirely: dab vinegar directly onto rust spots with a cloth, let sit for 30 minutes, then wipe away rust with a soft nylon brush to preserve the patina.
:max_bytes(150000):strip_icc()/homemade-rust-remover-recipes-1387936_FINAL-6c6543826627420ba5152b7ad0ea67c7.png) Baking soda’s mild abrasive action lifts rust without damaging underlying metal or tool markings.
Credit: www.thespruce.com
Baking soda’s mild abrasive action lifts rust without damaging underlying metal or tool markings.
Credit: www.thespruce.com
Preventing Future Rust On Your Tools
Cleaning rust is only half the battle—proper storage and maintenance will keep your tools rust-free for years to come. For evidence-based tool maintenance guidance, the University of Minnesota Extension recommends wiping tools down after each use and storing them in dry, elevated spaces to minimize rust risk University of Minnesota Extension.
Proper Storage
Store tools in a dry, climate-controlled space if possible. If storing in a garage, shed, or basement, use a sealed toolbox with a silica gel pack to absorb excess moisture—replace silica gel packs every 1–3 months for best results. Never store tools directly on concrete floors, which draw moisture from the air; use a wall rack or shelf to keep them elevated. For outdoor tools (pruning shears, shovels, rakes), hang them on a wall rack away from direct contact with wet soil or grass.
Post-Use Maintenance
After each use, wipe tools down with a dry cloth to remove moisture, dirt, sap, and plant debris—sap from pruning tools accelerates rust formation, so be sure to remove it immediately after use. For tools used in wet conditions (washing cars, working in rain, gardening after watering), wipe them down with a cloth lightly coated in machine oil before storing to create a moisture barrier.
Long-Term Protection For Seasonal Tools
For tools stored for extended periods (winter storage for lawn mowers, snow blowers, or garden shears), clean them thoroughly first, then coat all metal parts with a rust inhibitor spray or heavy coat of machine oil. Store them in a covered, dry space to protect them from humidity and temperature fluctuations.
Safety And Environmental Best Practices
While vinegar and baking soda are non-toxic household items, following these guidelines will keep you safe and reduce your environmental impact.
Safety Precautions
Always wear nitrile gloves to avoid skin irritation from prolonged vinegar contact, especially if you have cuts or sensitive skin. Wear safety goggles when scrubbing with a wire brush to avoid rust particles or splashes getting in your eyes. Work in a well-ventilated area to avoid inhaling vinegar fumes, which can cause throat irritation. Never mix vinegar with bleach, ammonia, or other commercial cleaners, as this creates toxic fumes.
Eco-Friendly Use And Disposal
Vinegar and baking soda are biodegradable and non-toxic, making them a far more eco-friendly choice than commercial rust removers, which often contain harsh acids that harm aquatic life if poured down the drain. After cleaning, you can dilute leftover vinegar solution with 10 parts water and pour it down the drain, or use it to clean outdoor surfaces like patio furniture (the mild acidity helps remove mildew). Avoid pouring large amounts of undiluted vinegar into septic systems, as it can disrupt the beneficial bacterial balance. For extra eco-friendly rust removal, you can substitute lemon juice for part of the vinegar, as it is similarly acidic and biodegradable.
Frequently Asked Questions
Does baking soda and vinegar actually remove rust from tools?
Yes. The acetic acid in white vinegar dissolves iron oxide (the chemical compound that makes up rust) over time, while baking soda acts as a gentle abrasive that lifts the dissolved rust and residue without scratching bare metal. This method works on light to moderate rust on steel, iron, and other ferrous metals, though it will not remove rust that has caused deep pitting or corrosion on non-ferrous metals like aluminum or copper.
How long should I soak tools in vinegar to remove rust?
For light surface rust, soak tools for 8–12 hours. For heavy, set-in rust, extend the soak to 12–24 hours, but do not leave tools soaking for longer than 48 hours total, as prolonged exposure to vinegar can corrode intact metal and damage wooden handles. Check the tools every 8 hours to monitor progress, and scrub off loosened rust mid-soak if needed to speed up the process.
How long do I leave the baking soda paste on rust before scrubbing?
Apply the baking soda paste to the rusty area and let it sit for 10–15 minutes. This gives the mild abrasive time to lift residual rust and neutralize any remaining acidic vinegar on the metal surface. For extremely stubborn rust, you can let the paste sit for up to 30 minutes, but avoid letting it dry out fully, as dried paste can be harder to rinse off.
Can I use this method on painted or coated tools?
Yes, as long as you use a nylon scrub brush instead of a wire brush, and avoid soaking the tool for extended periods. Prolonged vinegar exposure can soften or peel paint and protective coatings, so for painted tools, dab vinegar directly onto rust spots with a cloth instead of submerging the entire tool, and rinse thoroughly after 30 minutes.
Will this method work on rusted pruning shears or other tools with moving parts?
Absolutely. After cleaning, be sure to dry all moving parts (pivot points, joints, screw threads) thoroughly, then apply a thin coat of machine oil or tool oil to lubricate the parts and prevent future rust and seizing. This is especially important for pruning shears, loppers, and wrenches, which are often exposed to moisture and sap that accelerate rust.
Conclusion
Cleaning rusty tools with vinegar and baking soda is a low-cost, non-toxic, and surprisingly effective fix for everything from seized wrenches to corroded garden shears. By following the step-by-step process above, you can restore most tools to working order in less than a day, without spending money on specialized chemical cleaners. The key to long-lasting, rust-free tools is consistent post-cleaning care: dry them immediately after use, store them in a dry, elevated space, and apply a thin coat of oil to metal surfaces every few months to create a moisture barrier. If you’ve restored a set of rusty tools with this method, test all moving parts to make sure they operate smoothly before putting them back to work. For more practical DIY tool maintenance and home care guides, browse our full library of expert how-to resources.

I’m Abby Lu, a passionate home cook who loves simplifying everyday meals. At PlugChef.com, I share product reviews and cooking guides to help you find the best tools for your kitchen.
Related posts:
 How Do You Pronounce Colander: Clear Guide & Tips
 Is Nylon Or Silicone Better for Cooking Utensils: Ultimate Guide
 How to Cut Skirt Board for Stair: Expert Tips & Techniques
 Vintage First Aid Kit Metal Box: Timeless Safety and Style
 First Aid Kit for Restaurant: Essential Safety Gear You Need Today
 First Aid Kit for Sports: Essential Items for Quick Injury Care

