

Your morning coffee is only as good as the machine that brews it—yet most people go months without giving their coffee maker the deep clean it needs. Mineral buildup from hard water, oxidized coffee oils, and hidden mold can turn your brew bitter, shorten your machine’s lifespan, and even pose minor health risks. According to USDA household appliance data, 66% of U.S. households own a drip or single-serve coffee maker, making regular cleaning a universal kitchen priority. This guide covers every step, from daily quick care to monthly deep cleaning, for every type of coffee maker, so you can enjoy fresh, safe coffee every day.
Why Cleaning Your Coffee Maker Is Non-Negotiable
Skipping regular cleaning doesn’t just lead to bad-tasting coffee—it impacts your health and your wallet over time. Understanding the specific risks of a neglected machine will help you stick to a simple cleaning routine.
Preserve Bold, Unbiased Flavor
Coffee oils and fine grounds build up in your machine’s reservoir, filter basket, and carafe with every brew. Over time, these residues oxidize and turn acidic, adding a bitter, stale aftertaste to even the highest-quality beans. Limescale from hard water also insulates your machine’s heating element, leading to under-extraction and weak, flat coffee. A quick clean after each use and a monthly deep descale will eliminate these unwanted flavors, so your coffee tastes exactly as the roaster intended.
Avoid Health Risks From Mold and Bacteria
The warm, damp interior of a coffee maker is the perfect environment for mold and bacteria to grow if left uncleaned for more than a week. The FDA’s food safety guidelines note that reservoirs can harbor Aspergillus mold and Pseudomonas bacteria, which may cause mild gastrointestinal discomfort for sensitive individuals, including children, older adults, and people with compromised immune systems. Regular cleaning and drying of all parts eliminates this risk entirely.
Extend Your Machine’s Lifespan
Mineral deposits and coffee residue can clog your machine’s internal tubes, valves, and heating elements over time, leading to reduced performance, error codes, and even complete breakdowns. Most coffee maker manufacturers recommend monthly descaling to maintain warranty coverage and avoid costly repairs or early replacements. A well-maintained machine can last 5-7 years on average, compared to 2-3 years for a neglected one.
Tools and Supplies You’ll Need
You don’t need fancy products to clean your coffee maker effectively—most supplies are already in your kitchen. Having everything on hand before you start will make the process faster and less frustrating.
Natural and Commercial Cleaning Agents
White distilled vinegar is the most cost-effective, widely available descaling agent: mix equal parts vinegar and water for heavy limescale buildup, or 1 part vinegar to 2 parts water for light maintenance. If you dislike the strong vinegar smell, citric acid (1-2 tablespoons per gallon of water) works just as well for light scale and leaves no residual odor. For espresso machines, use a manufacturer-approved commercial descaling solution to avoid damaging sensitive pressure components. Avoid bleach, abrasive cleaners, or harsh dish soap, as these can leave toxic residues that contaminate your coffee or damage plastic parts.
Essential Tools for a Thorough Clean
- Measuring cup for accurate cleaning agent ratios
- Soft microfiber cloth for wiping exterior surfaces without scratching
- Small bristle brush (or a sturdy cleaning brush) for scrubbing hard-to-reach crevices like the carafe neck and filter basket seams
- Non-abrasive scrub pad for removing stubborn carafe stains
- Paper towels or a drying mat for air-drying parts after washing
- Gloves (optional) for sensitive skin when working with vinegar or cleaning solutions
Key Safety Precautions
Always unplug your coffee maker before cleaning to avoid electric shock. Never submerge the machine’s electrical base in water, even for cleaning. If you have young children or pets, store all cleaning solutions out of reach with safety latches to avoid accidental ingestion. Rinse all parts thoroughly after washing to remove any cleaning agent residue that could affect your coffee’s taste.
Daily Quick Clean Routine
This 1-2 minute routine takes less than a minute after your morning brew and prevents 90% of buildup and staining. Follow these steps every time you use your machine:
- Empty the carafe immediately after brewing, and discard used coffee grounds from the filter basket. Don’t let old coffee sit in the machine, as it will oxidize and leave bitter oils behind.
- Rinse the carafe, filter basket, lid, and drip tray under warm running water to remove loose grounds and residue.
- Wipe the machine’s exterior, brew basket, and around the carafe base with a damp microfiber cloth to remove coffee splashes and prevent staining.
- Leave the water reservoir lid open when not in use to air out and prevent mold growth.
Stashing your cleaning supplies near your coffee station cuts down on routine time and makes it easier to stick to this daily habit.
Monthly Deep Cleaning Process
This 15-minute deep clean tackles the mineral and oil buildup that daily rinsing can’t remove, and should be done once a month (every 2 weeks if you have very hard water, or if your machine has a descaling alert light that triggers frequently).
Step 1: Descale the Internal Reservoir
Fill your machine’s water reservoir with a 1:1 mixture of white vinegar and water. Run a full brew cycle without adding coffee grounds. If you have heavy limescale (visible as white, chalky flakes in your carafe), pause the machine halfway through the cycle and let the solution sit for 30 minutes to break down tough deposits, then finish the cycle.
Step 2: Wash All Removable Parts
Remove the carafe, filter basket, lid, drip tray, and any other detachable components. Soak them in warm, soapy water for 15 minutes to dissolve coffee oils and stains. Scrub hard-to-reach crevices with a small bristle brush, and use a non-abrasive scrub pad for stubborn carafe stains. Check your owner’s manual before putting parts in the dishwasher: most glass carafes and plastic filter baskets are dishwasher safe, but high heat can warp plastic lids or damage thermal carafe seals.
Step 3: Rinse and Dry Thoroughly
Run 2-3 full brew cycles with plain water to flush out all vinegar or cleaning solution residue. Sniff the water coming out of the carafe to confirm no strong vinegar smell remains before brewing coffee. Dry all parts thoroughly with paper towels or a microfiber cloth, and leave the reservoir lid open to air out completely before reassembling the machine.
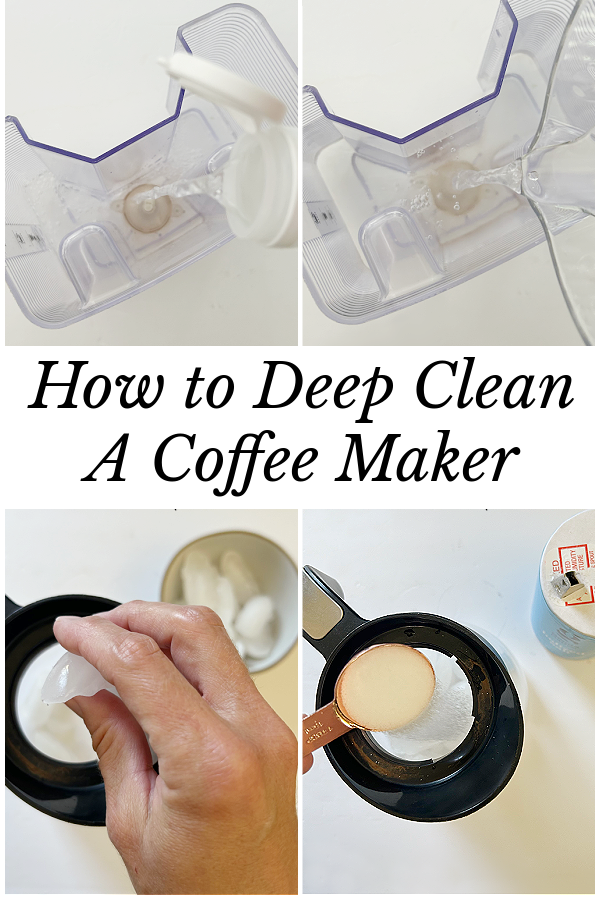 This guide covers all coffee maker types, from basic drip machines to high-end espresso makers.
Credit: www.lemonslavenderandlaundry.com
This guide covers all coffee maker types, from basic drip machines to high-end espresso makers.
Credit: www.lemonslavenderandlaundry.com
Cleaning Instructions for Every Coffee Maker Type
While the general deep cleaning process works for most machines, a few type-specific steps will help you avoid damage and get the best results.
Standard Drip Coffee Makers
For machines with a glass carafe and heating plate, wipe the heating plate with a damp cloth after each use to remove burnt coffee residue. For thermal carafe models, wash the carafe with warm soapy water after each use to avoid coffee oil buildup that can make coffee taste stale. If you notice stubborn brown stains inside the carafe, scrub with a paste of baking soda and water before rinsing.
Single-Serve Pod Machines (Keurig, Nespresso)
These compact machines need extra attention to avoid clogs. Remove the pod holder, drip tray, and water reservoir, and wash all parts with warm soapy water weekly. Clean the pod puncture needle (the small metal pin that pierces pods) with a precision scrub brush or straightened paperclip to remove ground residue that can cause slow brewing or leaks. Run a descaling cycle every month, and flush the machine with 3-4 cycles of plain water after descaling to remove all solution residue.
Espresso and Super-Automatic Machines
Espresso machines require more frequent, detailed cleaning to maintain pressure and shot quality. Wipe the steam wand with a damp cloth after every use, and purge it by releasing steam for 3 seconds to remove milk residue. Backflush the group head with a blind filter and espresso cleaner weekly to remove coffee oils from the internal brew group. Descale every 1-2 months using a manufacturer-approved solution, and clean the portafilter and basket with warm soapy water after each use. For super-automatic machines, run the built-in cleaning cycle as prompted by the machine’s display, usually every 100 cups.
 Visual guides can help you identify hard-to-reach parts like the pod puncture needle on single-serve machines.
Credit: www.youtube.com
Visual guides can help you identify hard-to-reach parts like the pod puncture needle on single-serve machines.
Credit: www.youtube.com
Pro Tips for a Perpetually Spotless Brew
Small habit changes will reduce how often you need to deep clean your machine, and keep your coffee tasting fresh year-round.
Use Filtered or Distilled Water
Tap water is the top cause of limescale buildup in coffee makers. If your home has hard water (above 180 ppm mineral content, which you can test with a home water test kit), use filtered or distilled water for brewing to reduce scale buildup significantly. Many modern coffee makers also have built-in water filters—replace these every 2-3 months as recommended by the manufacturer.
Stick to a Consistent Cleaning Schedule
Mark your calendar for a monthly deep clean, and tie the daily quick clean to an existing habit (like rinsing your coffee grounds right after you pour your morning cup). If you live in a hard water area, adjust your schedule to descale every 2 weeks instead of monthly to avoid heavy buildup.
Avoid Common Cleaning Mistakes
- Don’t leave coffee grounds or old coffee in the machine for more than a few hours: oxidized oils will leave a permanent bitter taste.
- Never use bleach, abrasive scrub pads, or steel wool: these can damage plastic parts and leave toxic residues that contaminate your coffee.
- Don’t reassemble your machine while parts are still damp: this creates a moist, enclosed environment that encourages mold growth.
- Don’t skip the final rinse cycles after descaling: leftover vinegar will sour your next few pots of coffee.
Thoroughly drying all removable parts before reassembly prevents mold growth in damp, enclosed spaces.
Credit: ca.style.yahoo.com
For a full set of durable, affordable tools to keep your entire kitchen spotless, check out our top-rated cleaning brush picks.
Frequently Asked Questions
How often should I clean my coffee maker?
Do a 1-minute quick clean (empty the carafe, rinse parts, wipe surfaces) after every use. Deep clean removable parts weekly, and descale the internal reservoir monthly for soft water, or every 2 weeks for hard water. Follow your machine’s built-in descaling alert prompts if it has one.
Can I use lemon juice instead of vinegar for descaling?
Yes. Mix 1/4 cup fresh lemon juice with 4 cups water for light scale, or equal parts lemon juice and water for heavy buildup. It leaves a fresh citrus scent, but white vinegar is more effective for breaking down thick, stubborn limescale.
Is it safe to use commercial coffee maker cleaner?
Yes, as long as the product is labeled safe for your specific machine type (drip, single-serve, espresso). Follow the manufacturer’s instructions for dilution and rinsing to avoid residue buildup.
Why does my coffee still taste funny after cleaning?
This is almost always due to leftover vinegar or cleaning solution residue: run 2-3 extra plain water cycles, and sniff the water from the carafe to confirm the smell is gone before brewing. If the taste persists, there may be mold growth in internal tubes you can’t reach—contact the manufacturer for guidance.
Can I put my coffee maker parts in the dishwasher?
Check your owner’s manual first. Most glass carafes and plastic filter baskets and drip trays are dishwasher safe, but high heat can warp plastic lids, damage thermal carafe seals, or harm electronic components if parts are not fully removed before washing.
Final Thoughts
A clean coffee maker is the easiest way to upgrade your daily coffee routine without spending money on new beans or a new machine. By sticking to a simple daily quick clean and monthly deep descale, you’ll avoid bitter, stale coffee, reduce health risks from mold and bacteria, and keep your machine running smoothly for years. You don’t need fancy products or professional help—just vinegar, a small brush, and 15 minutes of your time once a month. If you’re due for a deep clean today, run a descaling cycle before your next brew: you’ll taste the difference in your first cup. For more easy kitchen maintenance guides to keep your appliances running smoothly, browse our full library of easy kitchen care tips.

I’m Abby Lu, a passionate home cook who loves simplifying everyday meals. At PlugChef.com, I share product reviews and cooking guides to help you find the best tools for your kitchen.
Related posts:
 Seville Expandable Cabinet And Pantry Organizer: Space Savior
 Glideware Pull Out Cabinet Organizer for Pots & Pans: Space Saver
 Small 3-Tier Shelf Organizer: Maximize Space Effortlessly
 Trader Joe’S Spicy Lentil Wrap: Delicious, Healthy, and Quick Meal!
 Easy Way to Peel Pumpkin: Quick Tips for Effortless Prep
 How Long Do Grapes Last: Ultimate Freshness Guide Revealed

