
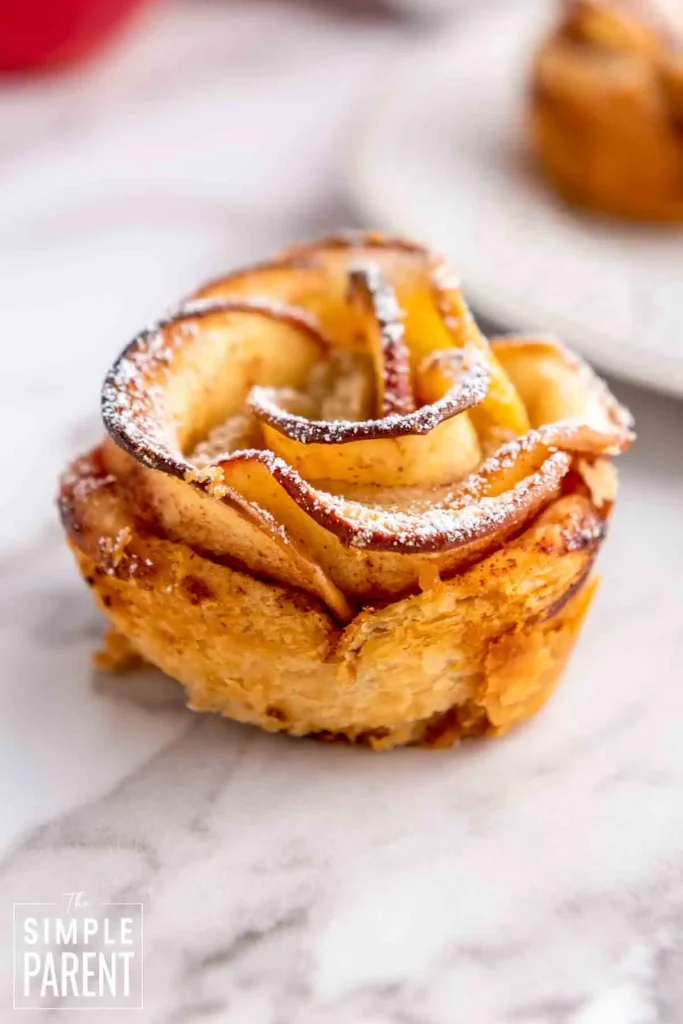
Imagine biting into a dessert that looks as stunning as a bouquet of roses but tastes like your favorite warm apple pie. Apple roses with pie crust are the perfect way to impress your guests or treat yourself to something special.
If you love simple recipes that deliver big flavors and eye-catching results, this is for you. Keep reading, and you’ll discover how easy it is to create these beautiful, delicious treats that will make your kitchen smell like heaven and your taste buds sing.
Ingredients For Apple Roses
Creating beautiful and tasty Apple Roses starts with the right ingredients. Each component plays a vital role in the final look and flavor. Choosing fresh, quality items will make your dessert stand out. Below are the essential ingredients to prepare perfect Apple Roses with pie crust.
Choosing The Right Apples
Apple type affects taste and texture. Pick firm apples that hold shape after baking. Tart apples balance sweetness well. Popular choices include:
- Granny Smith – tart and firm
- Honeycrisp – sweet and crisp
- Pink Lady – sweet-tart with firmness
- Fuji – sweet and crunchy
Slice apples thinly for easy rolling. Keeping skin on adds color and structure.
Pie Crust Options
Pie crust forms the base and wrap for apple slices. Use a crust that bakes crisp yet stays tender. Options include:
- Store-bought pie dough for convenience
- Homemade butter pie crust for rich flavor
- Phyllo dough for a lighter, flakier texture
Ensure the dough is chilled before rolling. This helps in handling and shaping the roses.
Essential Spices And Sweeteners
Flavor spices enhance the apple’s natural sweetness. Common choices are:
- Cinnamon for warmth and depth
- Nutmeg for a subtle, nutty note
- Cloves for a hint of spice
Sweeteners balance tartness and add caramel notes. Options include:
- Granulated sugar for sweetness
- Brown sugar for molasses flavor
- Honey or maple syrup for natural sweetness
Preparing The Pie Crust
Preparing the pie crust is a crucial step in making apple roses that look as good as they taste. The crust acts as the sturdy yet flaky base that holds the delicate apple slices in place. Whether you decide to make your own crust or use a store-bought one, handling it properly can make all the difference in your final presentation and flavor.
Making Homemade Crust
Making your own pie crust gives you full control over the ingredients and texture. Use cold butter and ice water to keep the dough flaky and tender. Mix just until the dough comes together—overworking it can make the crust tough.
I once tried to speed up the process by warming the butter slightly, and the crust turned out dense. Keeping everything cold really does help create those perfect layers you want in a flaky pie crust. Chill the dough for at least 30 minutes before rolling to make it easier to handle.
Using Store-bought Crust
Store-bought crusts can save you time without sacrificing too much quality. Look for a crust labeled “all-butter” for better flavor and flakiness. Thaw the crust in the refrigerator, not at room temperature, to prevent it from becoming too soft.
Have you noticed how some crusts shrink during baking? To avoid this, prick the dough gently with a fork before assembling your apple roses. This simple step helps steam escape and keeps your crust in place.
Tips For Rolling And Cutting
Roll your dough on a lightly floured surface to prevent sticking without drying it out. Keep the rolling pin moving evenly and apply gentle pressure to maintain uniform thickness. Thin dough works best for wrapping the apple slices.
Cut the dough into even strips, about 1.5 inches wide, so your apple roses look consistent. If the dough tears, patch it gently with a little water and extra dough—don’t worry, it won’t affect the final bake. How precise can you be with your cuts? Sometimes, a little imperfection adds charm.
Slicing And Softening Apples
Slice apples thinly to create delicate, bendable pieces for shaping. Softening them in warm water or microwave makes rolling easier and prevents breakage.
To create perfect apple roses, start with slicing and softening apples. This step is vital for achieving the desired look and texture. Proper slicing ensures the apple slices fit neatly into the pie crust. Softening them allows easy bending without breaking. Follow these techniques for success.Thin Slicing Techniques
Thin slices are key to beautiful apple roses. Use a sharp knife or mandoline. Aim for slices about 1/8 inch thick. Consistency in thickness helps with even cooking. Thinner slices bend more easily without cracking.Soften Apples For Flexibility
Softening apples is essential for flexibility. Boil water in a pot. Add apple slices for 2-3 minutes. They should be tender, not mushy. Drain and pat dry with a paper towel. They are now ready for shaping.Preventing Browning
Prevent browning to keep apples looking fresh. Dip slices in lemon juice or a mix of lemon and water. This acidic bath keeps apples bright. Pat dry before placing on pie crust. This step maintains their visual appeal.Assembling The Apple Roses
Assembling the apple roses is a simple, creative part of this dessert. It lets you see the beauty of the apple slices and pie crust coming together. This process shapes the dessert into a lovely rose form that bakes evenly and looks stunning.
Layering Apple Slices On Dough
Start by laying out the pie crust on a flat surface. Slice apples thinly to make them easy to bend. Arrange the slices along the edge of the dough. Overlap each slice slightly to form a long row. This layering creates the petals of the rose.
Rolling And Shaping
Carefully roll the dough and apple slices into a tight log. Keep the apple slices visible on the outside. This shape gives the look of rose petals curling outward. Press gently to secure the roll without squashing the apples.
Arranging In Muffin Tins
Cut the rolled dough into even pieces about 1.5 inches wide. Place each piece upright into a muffin tin cup. Space them evenly to allow room for rising. This helps the roses keep their shape while baking. The muffin tin also gives a clean edge to each rose.
Baking To Perfection
Baking apple roses with pie crust requires attention to detail. The right temperature and timing bring out the perfect texture and flavor. This section guides you through baking steps for soft, golden apple roses with a flaky crust.
Oven Temperature And Time
Preheat the oven to 375°F (190°C). This temperature helps the crust bake evenly and apples soften gently. Bake the apple roses for 35 to 40 minutes. Watch for a golden-brown crust and tender apple slices.
Checking Doneness
Look for a crust that is golden and crisp. The apples should be soft but not mushy. Use a toothpick to test the crust’s inside. If it comes out clean, the apple roses are done. Avoid underbaking to keep the crust flaky.
Cooling Tips
Let the apple roses cool in the pan for 10 minutes. This prevents them from falling apart when removed. Transfer the roses to a wire rack to cool fully. Cooling helps the crust stay crisp and the filling set nicely.

Credit: tatyanaseverydayfood.com
Serving Suggestions
Serving Apple Roses with Pie Crust can turn a simple dessert into a memorable experience. How you present and complement these delicate pastries can enhance their flavor and charm. Let’s explore some easy yet effective ways to serve your apple roses that will impress your guests and delight your taste buds.
Dusting With Powdered Sugar
A light dusting of powdered sugar adds a touch of sweetness and a beautiful finish to your apple roses. Use a fine sieve to sprinkle it evenly, creating a delicate snow-like effect on top. This simple step instantly makes your dessert look more inviting and adds a subtle contrast to the warm apple tones.
If you want to get creative, try mixing the powdered sugar with a pinch of cinnamon before dusting. It brings a cozy spice flavor that pairs perfectly with the apples. Have you ever noticed how such a small detail can change the entire dessert experience?
Pairing With Ice Cream Or Whipped Cream
Apple roses taste incredible when paired with creamy sides like vanilla ice cream or freshly whipped cream. The cold creaminess balances the warm, tender apples and flaky crust beautifully. Adding a scoop of ice cream can turn your dessert into a comforting treat, especially on cooler evenings.
Whipped cream offers a lighter alternative that adds richness without overpowering the delicate flavors. For an extra touch, sprinkle cinnamon or nutmeg on top of the cream. Which do you think your guests would prefer – the cool melt of ice cream or the airy softness of whipped cream?
Presentation Ideas
How you plate your apple roses can make all the difference. Try serving them on a rustic wooden board for a cozy, homemade feel or on a sleek white plate for a modern look. Adding fresh mint leaves or thin apple slices around the roses creates a fresh and colorful contrast.
You can also drizzle a little caramel sauce or honey over the roses for extra sweetness and shine. For special occasions, serve them in individual ramekins or small glass jars to make each portion feel unique. What presentation style would make your dessert table stand out?
Variations And Flavor Twists
Apple roses with pie crust are already a delightful treat, but adding your own variations and flavor twists can elevate them even more. Small changes can bring out different aromas, textures, and colors, making each batch uniquely yours. Are you ready to experiment and find your favorite version?
Adding Cinnamon Or Nutmeg
Cinnamon and nutmeg are classic spices that pair beautifully with apples. Adding a pinch of cinnamon to the apple slices before rolling them in the pie crust brings warmth and depth to every bite. Nutmeg offers a slightly nutty and sweet aroma that complements the fruit without overpowering it.
You can sprinkle these spices directly onto the apples or mix them into the sugar you use for sweetening. Try combining both for a cozy autumn feel. Have you tried spicing your apple roses this way? It might just become your go-to flavor.
Using Different Fruit Combinations
Why limit yourself to apples? Mixing fruits can add exciting new flavors and colors to your roses. Pears, peaches, or even thin slices of plums work wonderfully with pie crust and create a fresh twist.
Consider layering apples with thin slices of berries or kiwi for a surprising contrast in taste and texture. Each fruit brings its own sweetness and tartness, so you can customize your roses to suit your mood or the season. What fruit combo will you try next?
Glazing And Toppings
Glazing your apple roses enhances their shine and adds a subtle sweetness or tang. A simple brush of apricot jam or honey right after baking creates a beautiful glossy finish. You can also sprinkle powdered sugar or drizzle a light caramel sauce for extra indulgence.
For a crunchy contrast, try adding chopped nuts or a sprinkle of coarse sugar on top before baking. These small touches can transform the texture and presentation dramatically. Which topping would make your apple roses irresistible?

Credit: food52.com
Troubleshooting Common Issues
Apple roses with pie crust are stunning and delicious, but they can come with a few challenges. If your roses don’t look or taste just right, don’t get discouraged. Troubleshooting common issues can help you create beautiful and tasty apple roses every time.
Preventing Crust Sogginess
Soggy crust ruins the crisp texture that makes apple roses so delightful. To keep the crust flaky, brush it lightly with beaten egg white before adding the apple slices. This creates a barrier that stops moisture from soaking into the dough.
Also, try draining excess juice from the apple slices before arranging them. You can even sprinkle a thin layer of ground almonds or breadcrumbs on the crust to absorb moisture. Have you noticed that some pie recipes call for pre-baking the crust? That’s another way to avoid sogginess.
Avoiding Apple Breakage
Apple slices can break while you’re rolling the roses, making the presentation less tidy. Use thin, even slices to improve flexibility. Thicker slices tend to snap when bent.
Warm apple slices slightly in the microwave for about 10 seconds to make them more pliable. You’ll find they bend smoothly without breaking. Does your kitchen have a warm spot? Letting the slices sit there for a few minutes can help too.
Fixing Uneven Baking
Uneven baking can leave some parts undercooked while others get too brown. Position your apple roses in the center of the oven for the most consistent heat. If your oven has hot spots, rotate the tray halfway through baking.
Cover the edges of the crust with foil if they brown too fast. This protects them while the apples finish cooking. Have you tried baking at a slightly lower temperature for a longer time? It can help the apples cook through without burning the crust.

Credit: thesimpleparent.com
Frequently Asked Questions
How Do You Make Apple Roses With Pie Crust?
To make apple roses, slice apples thinly and soften them in lemon water. Roll them in pie crust strips, then bake until golden. This creates beautiful, edible rose shapes perfect for desserts.
What Type Of Apples Work Best For Apple Roses?
Firm apples like Granny Smith, Honeycrisp, or Fuji work best. They hold their shape well after baking and offer a balance of tartness and sweetness.
Can I Prepare Apple Roses Ahead Of Time?
Yes, you can assemble apple roses a few hours before baking. Keep them refrigerated on a baking sheet covered with plastic wrap to maintain freshness.
How Do You Prevent Apple Slices From Browning?
Soak apple slices in lemon juice and water for 10 minutes. This prevents oxidation and keeps the slices fresh and vibrant for baking.
Conclusion
Apple roses with pie crust make a lovely dessert for any day. They look like flowers but taste like sweet apple pie. You can make them with simple ingredients found at home. Baking them brings a warm, cozy feeling to the kitchen.
Serve these treats with a scoop of vanilla ice cream or a drizzle of honey. They are perfect for sharing with family or friends. Try this recipe to enjoy a fresh, tasty dessert that everyone will love. Simple, beautiful, and delicious—apple roses brighten any meal.

Hi, I’m Daniel Brooks—a food lover and kitchen gear enthusiast. I enjoy testing cookware, utensils, and gadgets to see what really works in everyday cooking. At PlugChef.com, I share honest reviews, comparisons, and simple guides to help you choose the best tools for a safer, smarter, and more enjoyable kitchen.
Related posts:
 What Type of Cooking Utensils are Safe: Expert Picks
 What Innovations Could Blenders Make: Unleashing Future Tech
 Smart Strategies to Organize a Small Kitchen: Maximize Space
 How to Organize a Kitchen Cabinet: Expert Tips & Tricks
 How to Organize Kitchen Drawers: Expert Tips and Tricks
 How to Organize a Corner Kitchen Cupboard: Expert Tips

