
A well-finished cutting board is one of the hardest working tools in any kitchen: it handles daily meal prep, charcuterie spreads, and vegetable chopping without warping, staining, or harboring harmful bacteria. But skipping the finishing process—or using the wrong products—can turn a high-quality wood board into a cracked, unsanitary mess in just a few months. Over years of testing wood finishes for kitchen tools, the most common avoidable mistake we see is using non-food-safe oils that seep into food, or rushing the curing step that locks in long-term protection. This guide walks you through the exact, food-safe process to finish any wood cutting board for a durable, perfect seal that lasts for years, plus maintenance tips to keep it in top shape. Pair proper board finishing with sanitizing boards after raw meat to eliminate cross-contamination risks during meal prep.
Why Finishing a Cutting Board Is Non-Negotiable
Unfinished wood is porous, meaning it absorbs moisture, food particles, and bacteria deep into its fibers. When you wash an unsealed board, water seeps into the wood, causing it to swell, warp, or crack over time. Acidic foods like lemon juice, vinegar, and tomato sauce can also stain unsealed wood permanently, leaving dark, unsightly marks that are impossible to remove. A proper seal creates a non-porous barrier on the surface of the wood that repels moisture, prevents staining, and stops bacteria from embedding in the material. The USDA notes that properly sealed wood cutting boards are just as sanitary as plastic alternatives when maintained correctly, as the sealed surface prevents bacteria from hiding in wood grooves. Beyond food safety, a sealed board is easier to clean, resists knife scarring, and can last for decades with proper care, making it a far more cost-effective investment than replacing cheap boards every year.
Supplies You’ll Need (No Fancy Tools Required)
You don’t need specialized equipment to finish a cutting board, but using the right materials will make the process faster and ensure a durable, food-safe seal.
Essential Supplies
- Sandpaper: 120-grit (for smoothing rough spots or old, peeling finish) and 220-grit (for final pre-finish smoothing)
- Food-safe finish: NSF-certified mineral oil (the standard all-purpose option) or beeswax-infused cutting board conditioner (for extra water resistance)
- Tools: Lint-free microfiber cloths (paper towels leave lint that can stick to wet finish), a rubber sanding block for even pressure, rubber gloves if you have sensitive skin, and a small brush for applying finish to grooves and edges
If you’re interested in building a custom board from scratch, you can pair this finishing process with building custom resin cutting boards for a one-of-a-kind kitchen tool.
What to Avoid
Never use cooking oils (olive, vegetable, coconut) or outdoor wood finishes on cutting boards. Cooking oils go rancid within 1 to 2 weeks of application, leaving off-flavors and trapping bacteria in the wood. Outdoor finishes, polyurethane, and varnish often contain chemicals not safe for food contact, and can chip when cut on, creating sharp edges and hidden bacteria traps. Always look for finishes labeled NSF-certified for food contact, per NSF guidelines for food-safe cutting board finishes, to avoid harmful chemical leaching.
Finish Comparison Table
| Finish Type | Best For | Pros | Cons |
|---|---|---|---|
| NSF-Certified Mineral Oil | All board types, daily use | Non-toxic, penetrates deep into wood, affordable, no flavor transfer | Requires reapplication every 1-2 months with heavy use |
| Beeswax Conditioner | End-grain boards, humid kitchens | Water-resistant, adds a hard protective top layer, easy to apply | Slightly more expensive, may need reapplication every 4-6 weeks in high-use scenarios |
| Cooking Oils (olive, vegetable) | N/A | N/A | Rancid quickly, harbor bacteria, leave off-flavors |
| Polyurethane/Varnish | N/A | N/A | Can chip when cut on, may leach chemicals, difficult to reapply |
 A sealed board repels water and resists staining from acidic foods like tomatoes and wine.
Credit: crownpointwood.co
A sealed board repels water and resists staining from acidic foods like tomatoes and wine.
Credit: crownpointwood.co
Step-by-Step Finishing Process for a Perfect Seal
Follow these exact steps to get a smooth, durable, food-safe seal on any wood cutting board. Rushing any step will lead to a finish that wears off quickly or traps moisture in the wood.
Step 1: Deep Clean and Fully Dry the Board
Start by removing all food residue, old finish, and debris from the board. For new boards, wipe it down with a damp cloth to remove factory dust. For used boards, scrub with warm water and mild dish soap, using a stiff-bristle brush to get into knife marks and grooves. For boards with old, sticky residue or mild mildew, make a paste of baking soda and water, scrub gently, then rinse thoroughly with clean water. This step is critical: any moisture left on the board will get trapped under the finish, causing warping, cracking, and mold growth later. Pat the board dry with a clean towel, then let it air dry completely for 24 to 48 hours in a warm, well-ventilated area. Flip it halfway through drying to ensure both sides dry evenly.
Step 2: Sand for a Smooth, Even Surface
Sanding removes rough spots, old finish, and splinters that can trap food and bacteria, while also opening up the wood pores so the finish can penetrate deeply for a longer-lasting seal. Start with 120-grit sandpaper, using a rubber sanding block to keep pressure even across the entire surface. Always sand with the grain of the wood—never against it—as cross-grain sanding creates tiny scratches that trap dirt and make the finish look uneven. Sand the entire top surface, edges, and underside of the board (if it’s solid wood) to ensure even wear. Wipe away all sawdust with a dry lint-free cloth, then repeat the process with 220-grit sandpaper for a final, ultra-smooth pass. For end-grain boards, spend extra time sanding the cut ends, as these are more porous and prone to splintering.
Step 3: Apply the First Coat of Finish
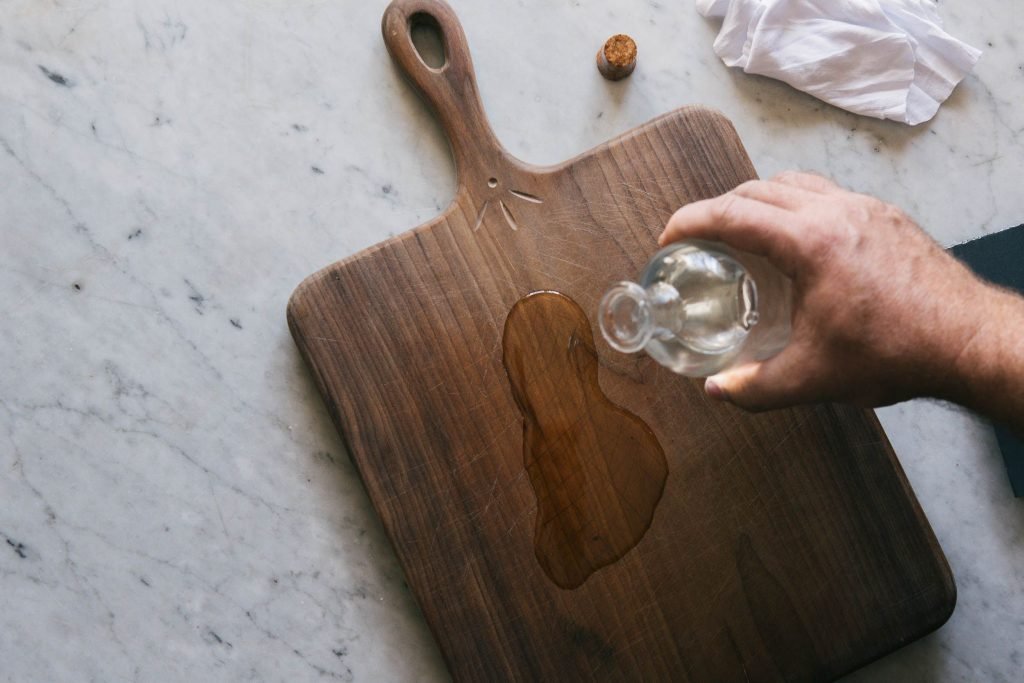
Pour a small amount of your chosen food-safe finish onto the center of the board. Use a lint-free cloth to spread it evenly across the entire surface, rubbing it firmly into the wood grain. Pay extra attention to edges, corners, and end-grain surfaces, which absorb oil much faster than the flat face of the board. For very dry or new boards, the wood will soak up oil quickly; reapply a small amount every 30 minutes until the board stops absorbing it and the surface feels slightly damp. Let the finish soak for 2 to 4 hours (for mineral oil) or 30 minutes (for beeswax conditioner), then wipe off all excess finish with a clean dry cloth. Leftover finish on the surface will turn gummy and attract dirt over time.
 Rub oil into the wood grain with a lint-free cloth to ensure even absorption.
Credit: www.amazon.ca
Rub oil into the wood grain with a lint-free cloth to ensure even absorption.
Credit: www.amazon.ca
Step 4: Cure and Apply Additional Coats
After the first coat, let the board cure for 24 hours in a warm, dry, well-ventilated area. Curing is different from drying: it’s the process where the finish hardens slightly and bonds to the wood fibers, creating a durable barrier. Most boards need 2 to 3 coats of mineral oil, or 1 to 2 coats of beeswax conditioner, for a full seal. Apply each coat the same way as the first, wiping off all excess after the soaking period. To test if the seal is complete, splash a small amount of water on the board surface: if it beads up instead of soaking in, the seal is fully formed.
Step 5: Final Cure Before Use
Once the final coat is applied, let the board cure for a full 72 hours before using it for food prep. Even if the board feels dry to the touch, the finish needs time to fully penetrate the wood and harden. Using the board too early will cause the finish to wear off quickly, and you may get oil residue on your food.
Long-Term Maintenance to Keep Your Seal Intact
Finishing your board is a one-time process, but regular maintenance will keep the seal effective for decades. Follow these tips to avoid common wear and tear:
- Reapply finish regularly: Most boards need re-sealing every 1 to 3 months, depending on use. Boards used daily for meal prep need oiling every 4 to 6 weeks, while occasional-use boards can go 2 to 3 months between coats. You’ll know it’s time to re-seal when water stops beading on the surface, or the wood looks dull, dry, or slightly gray. In practice, end-grain boards absorb oil 3x faster than edge-grain boards, as the exposed end pores are far more porous, so they may need re-sealing every 4 weeks even with occasional use.
- Wash by hand only: Never soak your board in water, put it in the dishwasher, or expose it to high heat, as this will warp the wood and break down the seal. Wash with warm water and mild dish soap after each use, using a soft brush to scrub out grooves. Dry immediately with a clean towel, then air dry upright so all sides get airflow.
- Avoid harsh abrasives: Never use steel wool, scouring pads, or harsh cleaning chemicals on your board, as these will scratch the seal and create grooves where bacteria can grow. For stuck-on food, use a baking soda paste and a soft brush.
- Store properly: Keep your board in a cool, dry area away from direct sunlight and heat sources, which can dry out the wood and crack the finish. If you own a bamboo board, check out our guide to maintaining bamboo cutting boards for material-specific care tips, as bamboo is denser than hardwood and may need slightly different maintenance.
Frequently Asked Questions
We’ve answered the most common questions about cutting board finishing below:
What is the best finish for a wooden cutting board?
For most home cooks, food-grade, NSF-certified mineral oil is the best all-around finish: it’s non-toxic, odorless, affordable, and penetrates deep into wood to hydrate it from the inside out. If you want extra water resistance for end-grain boards or boards used in humid kitchens, a beeswax-infused cutting board conditioner is a great add-on, as the wax creates a water-repellent barrier on top of the oil. Avoid cooking oils (olive, vegetable, coconut) as they go rancid quickly, and avoid polyurethane or varnish, as these can chip when cut on and may leach chemicals if not fully cured.
How often should I finish my cutting board?
Most solid wood cutting boards need re-sealing every 1 to 3 months, depending on use. Boards used daily for meal prep will need oiling every 4 to 6 weeks, while occasional-use boards can go 2 to 3 months between coats. You’ll know it’s time to re-seal when water stops beading on the surface, or the wood looks dull, dry, or slightly gray. End-grain boards absorb oil faster than edge-grain, so they may need more frequent coats.
Can I use vegetable oil to finish my cutting board?
No, you should never use vegetable, olive, or coconut oil to finish a cutting board. These cooking oils are prone to rancidity, meaning they will turn sour and develop off-flavors within 1 to 2 weeks of application, even if the board is stored properly. They can also trap bacteria in the wood, creating a food safety risk. Stick to food-safe mineral oil or purpose-made cutting board conditioner, which are formulated to not go rancid.
Should I sand my cutting board before finishing?
Yes, sanding is a critical step for a smooth, even seal. Sanding removes rough spots, old finish, and knife gouges that can trap food particles and bacteria. It also opens up the wood pores so the finish can penetrate deeply, leading to a longer-lasting seal. Always sand with the grain, and finish with a fine-grit sandpaper (220-grit) for the smoothest surface.
How do I know if my cutting board finish is food-safe?
Always look for finishes that are labeled NSF-certified or FDA-compliant for food contact. Pure, refined food-grade mineral oil is always safe, as it has no additives or fragrances. Avoid finishes with unknown ingredients, or products labeled for outdoor wood use, as these often contain chemicals not safe for food contact.
Final Thoughts
Finishing a cutting board is a simple, low-effort process that pays off huge in terms of longevity and food safety. By following the steps above—deep cleaning, sanding, applying food-safe finish, and curing properly—you’ll create a durable seal that repels moisture, resists staining, and keeps your board free of harmful bacteria for years. With regular maintenance, a high-quality wood cutting board can last for decades, making it one of the most valuable tools in your kitchen.
Once your board is fully cured, put it to use prepping charcuterie spreads, slicing fresh strawberries, or hosting your next gathering with a perfectly sealed, food-safe surface. For easy prep, follow our guide to prepping asiago for charcuterie and slicing strawberries for charcuterie to make the most of your new board.

I’m Abby Lu, a passionate home cook who loves simplifying everyday meals. At PlugChef.com, I share product reviews and cooking guides to help you find the best tools for your kitchen.
Related posts:
 How to Make a Fruit Basket for a Gift: Easy DIY Guide
 Do You Need a Basket? Essential Guide for Air Fryers
 How to Adjust Syrup Dispenser Pressure: Expert Tips
 Kitchen Cabinets With Black Appliances: Trendy Design Tips
 White Kitchen And Stainless Steel Appliances: A Perfect Duo
 Kitchen Colors With White Cabinets And White Appliances: Vibrant Ideas

