
An end grain cutting board is the gold standard for home cooks and professional chefs alike: its unique construction creates a self-healing surface that’s gentle on knife edges, resistant to moisture and staining, and durable enough to last for decades with proper care. Unlike cheaper edge or face grain boards, an end grain board is made by gluing together small wood strips cut with their end grain facing up, creating a soft, forgiving surface that closes back up after each cut. Building your own custom end grain cutting board is a rewarding weekend woodworking project that results in a heirloom-quality kitchen tool tailored to your style, and it costs a fraction of the price of a premium store-bought version. This ultimate step-by-step guide covers everything you need to know, from selecting the right wood and tools to avoiding common build mistakes and caring for your board for years to come.
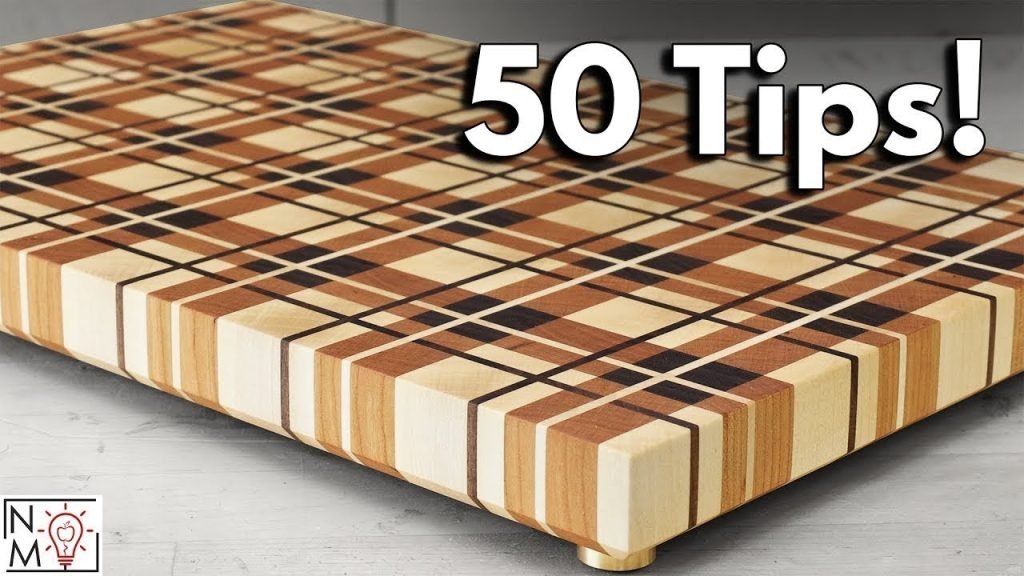
 This classic maple and walnut end grain board features a tight, even pattern and smooth, oiled finish ready for use.
Image source: m.youtube.com
This classic maple and walnut end grain board features a tight, even pattern and smooth, oiled finish ready for use.
Image source: m.youtube.com
Why Choose an End Grain Cutting Board?
End grain boards are constructed with the cut end of wood fibers facing upward, rather than the side of the plank (edge grain) or the flat surface (face grain). This orientation creates a surface of tiny, open wood pores that act as a cushion for knife blades: when you cut into the board, the fibers separate and spring back into place once the blade is removed, a property called "self-healing." In practice, this means end grain boards dull knife edges far slower than edge or face grain alternatives, and are far more resistant to deep cuts, scarring, and moisture absorption.
While end grain boards require more labor to build than other board types, their longevity and performance make them a worthwhile investment for anyone who cooks regularly. The open end grain structure also allows for striking visual patterns using contrasting wood tones, making each board a unique decorative piece for your kitchen.
| Board Type | Knife Gentleness | Durability | Typical Pre-Made Cost (12×18") | Build Difficulty | Self-Healing |
|---|---|---|---|---|---|
| End Grain | Excellent (gentlest on blades) | Highest (resists deep cuts and moisture) | $80–$200+ | Moderate (requires two glue-ups) | Yes |
| Edge Grain | Good | Moderate | $40–$100 | Low (single glue-up) | Partial |
| Face Grain | Fair | Lowest | $20–$60 | Very low | No |
Materials and Tools You’ll Need
Using the right materials and tools is critical to building a sturdy, food-safe end grain board that lasts for years. Avoid cutting corners with cheaper alternatives, as they can lead to weak joints, warping, or even food safety risks.
Wood Selection
Stick to closed-pore, hard hardwoods with a Janka hardness rating of 1000 lbf or higher for the best durability and food safety. The most popular, widely available options include:
- Hard rock maple: Janka rating ~1450 lbf, light neutral tone, extremely durable and resistant to staining
- Black walnut: Janka rating ~1010 lbf, rich dark brown hue, naturally gentle on knife edges
- Cherry: Janka rating ~950 lbf, warm reddish tone that darkens beautifully with age and use
Avoid softwoods like pine, fir, or cedar, which dent easily and absorb moisture rapidly. Skip open-pore hardwoods like oak, which trap food particles and bacteria in their pores, and never use pressure-treated, stained, or chemically treated wood, as these contain harmful substances not safe for food contact. For best results, pair wood species with similar expansion rates to prevent warping over time — maple and walnut are a classic, compatible pairing for this reason.
For best practices on selecting safe, durable wood for food contact items, the University of Minnesota Extension recommends using only hard, closed-pore hardwoods free of chemical treatments or pressure-treated coatings.
Glue and Finishing Supplies
- Wood glue: Use a waterproof, food-safe PVA glue like Titebond III, which is FDA-approved for indirect food contact. Regular white PVA glue is not water-resistant and will break down when exposed to moisture, leading to failed joints.
- Finishing oil: USP-grade food-safe mineral oil is the standard finish for cutting boards, as it is non-toxic, odorless, and penetrates deep into the wood to prevent drying and cracking. For extra water resistance and a subtle satin sheen, you can optionally use a food-safe beeswax conditioner to rub over the final oil coats.
- Cleaning supplies: A damp cloth for wiping away excess glue, a tack cloth for removing sanding dust, and a soft brush or lint-free cloth for applying finish.
Essential Tools
You don’t need a fully stocked woodworking shop to build this project, but a few key tools will make the process far easier and yield better results:
- Saw: A table saw is ideal for making precise, uniform strips, but a circular saw with a straight edge guide works for beginners. A miter saw can be used for crosscutting strips to length.
- Clamps: At least 4 bar clamps, 24” or longer, plus scrap wood cauls to distribute pressure evenly across glue-ups.
- Sander: A random orbital sander speeds up sanding, but a hand sanding block works for smaller projects.
- Sandpaper: 80, 120, 220, and 320-grit sandpaper for progressing from rough smoothing to a fine, splinter-free finish.
- Safety gear: Safety glasses, hearing protection, and push blocks for operating saws safely.
- Optional tools: A planer to flatten the board after glue-ups, a jointer to prep rough lumber, a router with a round-over bit for softened edges, and a Forstner bit to cut handle holes in the ends of the board.
If you don’t have the tools or time for a full build, a pre-made bamboo cutting board is a durable, low-maintenance alternative; our guide to bamboo board care explains how to keep it in top condition for years.
Step-by-Step End Grain Cutting Board Build Process
Follow these steps carefully to build a sturdy, even end grain board with a professional-looking finish. Total active build time is 4 to 6 hours, spread over 2 to 3 days to account for glue cure time and oil absorption.
Step 1: Prepare and Cut Uniform Wood Strips
If you are using rough-sawn lumber, first joint one face and one edge flat to create a uniform reference surface. Cut all wood strips to your desired board length (standard sizes are 12”x18” or 16”x20” for general use) and a consistent width of 1.5” to 2” — all strips must be exactly the same width, within 1/16”, to avoid an uneven final pattern. Cut a few extra strips to use for test glue-ups, sanding trials, or small scrap projects.
A common mistake here is using uneven strips, which leads to a wavy final surface and gaps between glued joints.
Step 2: Dry Fit and Mark Your Strip Pattern
Lay all strips out on a flat work surface in your desired pattern: alternate light and dark woods for a classic checkerboard, or arrange them randomly for a rustic, variegated look. Check that all strips are flush on the top and bottom edges, with no overhangs or gaps. Mark each strip with a pencil to note its position, and take a photo of the dry fit with your phone for reference during glue-up. If you notice gaps between strips, sand the edges slightly to create a tight fit.
Step 3: Glue Up the First Cross-Grain Panel
Apply a thin, even coat of waterproof food-safe glue to the edge of each strip, taking care not to apply excess glue that will squeeze out and mar the final surface. Assemble the strips in the exact order you marked during the dry fit, press them firmly together, and clamp the panel using your bar clamps. Place scrap wood cauls between the clamps and the board to distribute pressure evenly and prevent the strips from bowing. Tighten clamps until a small, consistent bead of glue squeezes out of every joint — this is your sign that pressure is even across the entire panel. Wipe away any excess glue immediately with a damp cloth before it dries.
Let the glue cure for the time listed on your glue packaging (usually 30 minutes for initial set, 24 hours for full cure) before moving to the next step.
 Bar clamps with cauls apply even pressure across the glue-up to prevent warping and ensure strong joints.
Image source: www.youtube.com
Bar clamps with cauls apply even pressure across the glue-up to prevent warping and ensure strong joints.
Image source: www.youtube.com
Step 4: Crosscut the Panel into End Grain Strips
Once the first glue-up is fully cured, trim the long edges of the panel square with a table saw or circular saw, so the panel is exactly your desired board width. Set your saw fence to cut 1” to 1.5” wide strips, and crosscut the panel perpendicular to the glued joints — this cut exposes the end grain face of the wood, which will become the top surface of your cutting board. Cut all strips to the exact same width for an even final pattern, and label each strip as you cut to make reassembly easier.
Step 5: Dry Fit the End Grain Pattern
Lay the crosscut end grain strips out on a flat surface in your desired pattern. Alternate light and dark woods for a classic checkerboard, or arrange them in blocks or random patterns for a custom look. Do a second dry fit to confirm all strips are flush, with no gaps, and the pattern is aligned how you want it. Take another photo of the dry fit for reference during the second glue-up.
Step 6: Complete the Second End Grain Glue-Up
Apply a thin coat of glue to the edges of the end grain strips. Because end grain is more porous than face or edge grain, apply a thin coat of glue to the end faces of the strips first, let it soak in for 5 minutes, then apply a second coat to the edges to prevent glue starvation (when glue is absorbed too quickly into the wood, leading to weak joints). Assemble the strips in your marked order, clamp the panel again with cauls to distribute even pressure, wipe away excess glue, and let cure for a full 24 hours.
Step 7: Flatten and Square the Board
Once the second glue-up is fully cured, the board will likely have minor warping or uneven surfaces. If you have a planer, run the board through it to flatten both faces to your desired thickness (1.5” to 2” is ideal for a sturdy, warp-resistant board). If you don’t have a planer, use a sander with a flat sanding block to sand the surfaces flat, starting with 80-grit sandpaper to remove high spots, then moving to finer grits. Next, trim the long edges of the board square with a saw, so it is exactly your desired final dimensions.
Step 8: Sand to a Smooth Finish
Start with 80-grit sandpaper to remove any remaining glue residue, saw marks, or uneven spots, sanding with the grain to avoid cross-grain scratches. Progress to 120-grit, then 220-grit, then 320-grit for a smooth, splinter-free surface. Pay special attention to the edges: you can round them over slightly with sandpaper or a router with a round-over bit for a comfortable, splinter-free edge that won’t damage countertops. Wipe away all dust with a tack cloth before moving to finishing.
Step 9: Apply Food-Safe Finish
Apply a generous coat of USP-grade food-safe mineral oil to the entire board, including the edges and end grain faces. Let the oil soak in for 30 minutes, then wipe away any excess with a clean cloth. Repeat this process 3 to 4 times, waiting 24 hours between coats, until the board no longer absorbs oil and has a uniform, rich tone. For extra water resistance and a subtle satin sheen, rub a thin coat of food-safe beeswax conditioner over the board after the final oil coat, let it sit for 1 hour, then buff with a clean cloth.
Always use USP-grade food-safe mineral oil, which is free of additives and safe for direct food contact. For official guidance on approved food-contact materials, refer to the FDA’s food contact substance guidelines.
Never use vegetable oils (olive oil, canola oil, etc.) to finish a cutting board, as they go rancid over time and will leave your board with an unpleasant, lasting odor.
Pro Tips to Avoid Common Build Mistakes
Even experienced woodworkers run into avoidable issues when building end grain boards. Keep these tips in mind to ensure a successful build:
- Skip the dry fit: Always dry fit your strips twice (once before the first glue-up, once before the second) to catch pattern gaps and alignment issues before glue is applied.
- Skip the cauls: Always use scrap wood cauls between clamps and the board during glue-ups to distribute even pressure and prevent bowing.
- Use the wrong glue or finish: Only use waterproof, food-safe Titebond III or equivalent glue, and USP-grade mineral oil or food-safe beeswax for finishing.
- Rush the glue cure: Wait the full 24 hours for each glue-up to cure fully before sanding or crosscutting, otherwise joints will shift and the board will be uneven.
- Under-oil the board: Apply 3 to 4 coats of mineral oil, waiting 24 hours between each, to fully saturate the end grain and prevent drying and cracking over time.
Caring for Your End Grain Cutting Board
With proper care, your end grain cutting board will last for decades. Follow these guidelines to keep it in top condition:
- Daily care: Hand wash only with warm, soapy water, never submerge the board in water or put it in the dishwasher, which will warp the wood and break down the glue joints. Dry immediately and thoroughly with a clean towel after washing.
- Monthly maintenance: Apply a thin coat of mineral oil to the entire board to replenish the wood’s natural moisture and prevent drying.
- Long-term care: If the board develops deep cuts or stains, sand it lightly with 220-grit sandpaper and reapply 2 to 3 coats of mineral oil. Store the board flat in a cool, dry place, away from direct heat, sunlight, or standing water to prevent warping and cracking.
For thorough sanitization after cutting raw proteins like chicken or beef, follow our guide to proper raw meat cleanup to avoid cross-contamination.
Store your board flat in a cool, dry place, away from direct heat and sunlight — a kitchen storage rack works well for this, and keeps your countertops organized.
Customization Options for a One-of-a-Kind Board
One of the biggest perks of building your own end grain board is the ability to customize it to match your style and kitchen needs:
- Handles: Use a Forstner bit to cut 1” to 1.5” diameter handle holes in the two short ends of the board for easy carrying.
- Juice groove: Route a ¼” deep, ½” wide groove around the inner edge of the board to catch juices when carving meat or preparing juicy fruits.
- Custom patterns: Experiment with less common wood species like purpleheart, padauk, or zebrawood for vibrant, one-of-a-kind color patterns.
- Engraving: Use a wood burner to add initials, dates, or custom designs for a personalized gift.
If you’re looking for a more colorful, decorative alternative to a traditional wood board, our guide to custom epoxy board builds walks through adding vibrant resin accents to your project.
For precise ingredient prep to go with your new board, consider a quality paring knife with a protective sheath for safe storage.
Frequently Asked Questions
What is the best wood for an end grain cutting board?
Opt for closed-pore, hard hardwoods with a Janka hardness rating of 1000 lbf or higher. The most popular options are hard rock maple (Janka ~1450 lbf, light color, durable), black walnut (Janka ~1010 lbf, rich dark tone, gentle on knives), and cherry (Janka ~950 lbf, warm reddish hue that darkens with age). Avoid softwoods like pine or fir, which dent easily, and open-pore woods like oak, which absorb moisture and bacteria. Never use pressure-treated or chemically treated wood, as it is not food-safe.
How long does it take to build an end grain cutting board?
Total active build time is 4 to 6 hours, spread over 2 to 3 days to account for glue cure time and oil soaking. You’ll spend 1 to 2 hours cutting and prepping wood, 1 hour on the first glue-up, 30 minutes crosscutting and prepping for the second glue-up, 1 hour on the second glue-up and clamping, 1 to 2 hours sanding and flattening, and 1 hour applying finish (with 24 hours between each oil coat for full absorption).
Are end grain cutting boards better than edge grain boards?
End grain boards are superior for knife longevity and durability, as the end grain fibers separate when cut rather than being sliced across, reducing friction and wear on the blade. They are also more resistant to moisture damage and deep scarring than edge grain boards. The trade-off is that end grain boards require more labor to build, and are slightly more expensive if purchased pre-made.
How do I prevent my end grain board from warping?
Warping is usually caused by uneven glue pressure, moisture exposure, or improper storage. To prevent it: use cauls during both glue-ups to distribute even pressure across the entire panel, avoid pairing wood species with drastically different expansion rates, never submerge the board in water or put it in the dishwasher, and store it flat in a cool, dry place away from direct heat or sunlight.
Can I use regular wood glue for a cutting board?
No. Always use a waterproof, food-safe PVA glue like Titebond III, which is FDA-approved for indirect food contact. Regular white PVA glue is not water-resistant and will break down when exposed to moisture, leading to failed joints and potential food safety risks.
Conclusion
Building your own end grain cutting board is a fulfilling project that results in a functional, beautiful kitchen heirloom you’ll use for decades. Whether you’re a beginner woodworker or an experienced DIYer, following these steps will help you avoid common pitfalls and create a board that’s as unique as your cooking style. For more DIY kitchen projects, cooking tips, and recipe inspiration, browse our project guides library for hundreds of free, step-by-step tutorials.

I’m Abby Lu, a passionate home cook who loves simplifying everyday meals. At PlugChef.com, I share product reviews and cooking guides to help you find the best tools for your kitchen.
Related posts:
 How to Make a Fruit Basket for a Gift: Easy DIY Guide
 Do You Need a Basket? Essential Guide for Air Fryers
 How to Adjust Syrup Dispenser Pressure: Expert Tips
 White Appliances in Kitchen Design: Elevate Your Space
 Kitchen Appliances Stainless Steel Vs White: Ultimate Showdown
 Kitchen Appliances Made in Usa: Quality and Innovation

