
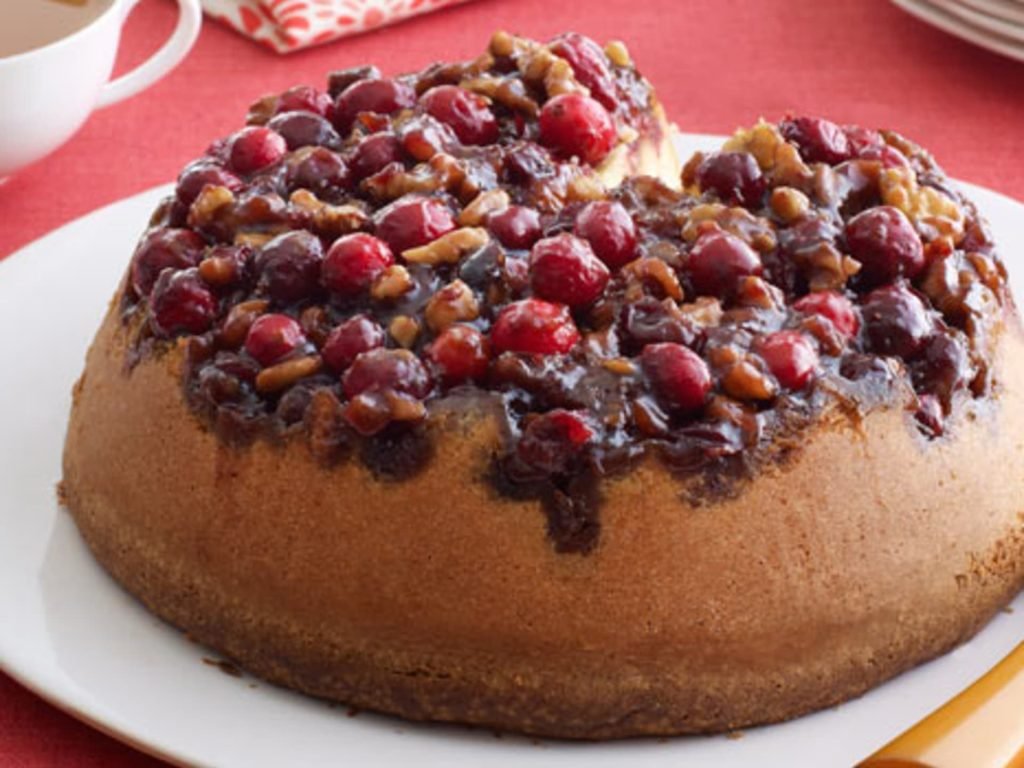
Imagine biting into a warm, sweet cake where juicy apples and tangy cranberries melt perfectly together. That’s exactly what you get with an Upside Down Apple Cranberry Cake.
If you love desserts that feel cozy and fresh at the same time, this recipe will become your new favorite. You don’t need to be a baking expert to make it, and the results will impress everyone at your table.
Ready to discover how simple ingredients can create a dessert that’s both beautiful and delicious? Keep reading—your taste buds will thank you.

Credit: artandkitchen.wordpress.com
Ingredients Needed
Gathering the right ingredients is key to making a delicious Upside Down Apple Cranberry Cake. Fresh and simple items create a perfect balance of sweet and tart flavors. You will need some basic baking staples along with fresh fruit to bring this cake to life.
Each ingredient plays a role in texture, taste, and appearance. Using quality apples and cranberries enhances the natural flavor. The cake batter must be moist yet firm enough to hold the fruit on top.
Fruits And Toppings
- 2 large apples, peeled and sliced thin
- 1 cup fresh or frozen cranberries
- 1/2 cup brown sugar for caramelizing
- 2 tablespoons butter for the topping
Cake Batter Ingredients
- 1 1/2 cups all-purpose flour
- 1 cup granulated sugar
- 1/2 cup unsalted butter, softened
- 2 large eggs
- 1/2 cup milk
- 2 teaspoons baking powder
- 1 teaspoon vanilla extract
- 1/4 teaspoon salt

Credit: www.ricardocuisine.com
Preparing The Fruit Topping
Slice fresh apples and combine with tart cranberries for a vibrant topping. Sprinkle sugar evenly to create a sweet, caramelized layer. Spread the fruit mixture gently over the cake base before baking.
Preparing the fruit topping for your Upside Down Apple Cranberry Cake is an essential step. It sets the stage for a delightful blend of flavors and textures. The right combination of apples and cranberries creates a juicy, sweet, and tangy topping. This complements the moist cake beneath perfectly. Let’s dive into the process of creating this delicious topping.
Choosing The Right Apples
Select firm apples for the best results. Granny Smith or Honeycrisp apples work well. They hold their shape and add a delightful tartness.
Slicing The Apples
Peel and core the apples. Slice them thinly for even cooking. Aim for uniform slices, about a quarter-inch thick.
Preparing The Cranberries
Use fresh or frozen cranberries. Rinse them thoroughly. Pat them dry to remove excess moisture.
Creating The Sugar Mixture
Combine brown sugar and butter in a pan. Melt them over medium heat. Stir until the mixture is smooth and bubbly.
Layering The Fruit
Arrange the apple slices in a pattern. Pour the sugar mixture over them. Sprinkle cranberries evenly on top. This ensures a balanced flavor in each bite.
Mixing The Cake Batter
Mixing the cake batter for your Upside Down Apple Cranberry Cake is where the magic begins. This step sets the foundation for the cake’s texture and flavor. Paying close attention here ensures every bite is moist and perfectly balanced between sweet and tart.
Gathering Your Ingredients
Before you start mixing, make sure all your ingredients are ready and at room temperature. Softened butter and eggs blend more smoothly, creating a lighter batter. Having everything prepared helps avoid overmixing or under-mixing later.
Combining Dry Ingredients
Start by whisking together the flour, baking powder, and a pinch of salt. This helps distribute the leavening agent evenly throughout the flour. You want to avoid pockets of baking powder that could cause uneven rising.
Mixing Wet Ingredients Separately
In a separate bowl, beat the butter and sugar until creamy and light. This step traps air, which is essential for a fluffy cake. Then, add eggs one at a time, mixing well after each addition to maintain that airy texture.
Bringing It All Together
Alternate adding the dry ingredients and the milk to the wet mixture, starting and ending with the dry. This gentle folding keeps the batter smooth without overworking the gluten. Overmixing can make the cake dense—have you ever noticed that in your own baking?
Final Touches To The Batter
Once combined, fold in any spices or vanilla extract carefully. These small additions elevate the flavor without disrupting the batter’s texture. Remember, the batter should be thick but pourable, ready to absorb the sweet and tart notes from the apples and cranberries.
Assembling The Cake
Assembling the Upside Down Apple Cranberry Cake is where the magic truly happens. This step brings together the juicy fruit topping and the rich cake batter into one delicious creation. Paying attention here ensures your cake looks stunning and tastes incredible.
Preparing The Fruit Layer
Start by evenly spreading the sliced apples and fresh cranberries over the bottom of your greased pan. Arrange the apple slices in a single layer so they caramelize nicely. Scatter the cranberries between the apple slices to give every bite a burst of tartness.
Try to avoid piling the fruit too thickly; this helps it cook evenly and prevents sogginess. I once layered my fruit too heavily, and the cake didn’t set properly on top. Have you noticed how thin, even fruit layers caramelize better?
Pouring The Batter Over The Fruit
Next, carefully pour the prepared cake batter over the fruit layer. Pour slowly and use a spatula to gently spread the batter so it covers the fruit without mixing in. This step creates the signature upside-down effect once the cake is flipped.
Be patient here—pouring too quickly can disturb your fruit arrangement. A smooth batter layer helps the cake rise evenly and keeps the fruit intact on top after baking.
Final Touches Before Baking
Sprinkle a little cinnamon or brown sugar on top of the batter to add extra flavor and encourage caramelization. Double-check that the fruit pieces are still visible through the batter’s surface. This ensures your cake will have that perfect, colorful topping once flipped.
What small detail have you added to your cakes that made a big difference in the final taste? Often, these little touches create the most memorable desserts.
Baking Tips For Perfect Texture
Baking the perfect Upside Down Apple Cranberry Cake needs careful attention. Texture plays a big role in how the cake feels and tastes. A soft, moist crumb pairs well with the tender, caramelized fruit topping. Follow these tips to get the best texture every time.
Choosing The Right Flour
Use all-purpose flour for a balanced texture. It gives enough structure without making the cake tough. Avoid bread flour, which is too strong, or cake flour, which can be too light.
Measuring Ingredients Accurately
Use a kitchen scale for precise measurements. Too much flour makes the cake dry. Too little makes it too soft and crumbly. Scoop flour lightly with a spoon before measuring to avoid packing.
Mixing The Batter Properly
Mix until ingredients just combine. Overmixing develops gluten, leading to a dense cake. Use gentle folding motions to keep the batter light and airy.
Controlling Oven Temperature
Preheat the oven fully before baking. Bake at the temperature stated in the recipe. Oven too hot? Cake edges burn before inside cooks. Oven too cool? Cake stays wet and dense.
Using Fresh Apples And Cranberries
Fresh fruit adds moisture and flavor. Avoid canned or frozen fruits that release extra water. Pat fresh fruit dry if needed to prevent soggy topping.
Allowing Cake To Cool Properly
Let cake cool in the pan for 10 minutes. This helps the topping set and hold shape. Then invert gently onto a plate. Cool completely before slicing for neat pieces.
Serving Suggestions
Serving Upside Down Apple Cranberry Cake offers a delightful experience. This cake shines with its warm fruit topping and soft crumb. Pairing it well enhances every bite.
Try simple accompaniments that bring out the cake’s natural flavors. Cold or warm options work great. Presentation also makes a difference at the table.
Classic Whipped Cream
Light whipped cream adds a creamy texture. Its mild sweetness balances the tart cranberries. Serve a dollop on each slice for a smooth finish.
Vanilla Ice Cream
Vanilla ice cream melts gently over the warm cake. The cold and warm contrast feels comforting. Choose a high-quality vanilla for the best taste.
Fresh Fruit Garnish
Add fresh apple slices or cranberries as a garnish. This adds color and freshness. It also highlights the cake’s main ingredients visually.
Warm Caramel Sauce
Drizzle warm caramel sauce for extra richness. The sweet, buttery flavor complements the tart fruit well. Use sparingly to avoid overpowering the cake.
Herbal Tea Pairing
Serve the cake with a cup of herbal tea. Chamomile or cinnamon tea pairs well with the spices in the cake. It helps cleanse the palate between bites.
Variations To Try
Upside down Apple Cranberry Cake is a classic dessert with room for creativity. Trying different variations can bring new flavors and textures to this favorite. Small changes can make the cake unique and exciting for every occasion.
Experimenting with ingredients or toppings can create delightful twists. Some variations add richness, while others make the cake lighter or more festive. These ideas are easy to try and can inspire your baking adventures.
Substitute Fruits For Seasonal Flavors
Swap apples and cranberries with pears, peaches, or mixed berries. Seasonal fruits add fresh taste and color. Choose fruits that hold shape well during baking to keep texture.
Add Spices For Warmth
Include cinnamon, nutmeg, or ginger in the batter or topping. Spices bring depth and warmth to the cake. Adjust amounts to match your taste preference.
Use Different Nuts For Crunch
Try walnuts, pecans, or almonds as a crunchy topping. Toast nuts lightly for extra flavor. Nuts add texture contrast to the soft cake and fruit.
Make It Gluten-free
Replace regular flour with gluten-free blends for a safe option. Use xanthan gum to improve texture. Gluten-free cakes can be just as moist and tasty.
Try A Vegan Version
Use plant-based milk, oil, and egg substitutes in the recipe. Vegan cakes can be rich and moist with proper ingredients. This version suits those avoiding animal products.
Incorporate Citrus Zest
Add lemon or orange zest to the batter or fruit topping. Citrus zest brightens the flavor and adds a fresh aroma. It pairs well with apple and cranberry.
Credit: www.saveur.com
Storing And Reheating
Storing and reheating Upside Down Apple Cranberry Cake keeps it fresh and tasty. Proper storage preserves the flavors and texture. Reheating helps enjoy the cake warm, like fresh from the oven.
Storing The Cake
Let the cake cool completely before storing. Wrap it tightly with plastic wrap or aluminum foil. Use an airtight container to keep moisture in. Store at room temperature for up to two days.
For longer storage, place the cake in the fridge. It stays good for up to five days. Bring it back to room temperature before serving for best taste.
Freezing the cake is also an option. Wrap it well to avoid freezer burn. Freeze for up to three months. Thaw in the fridge overnight before reheating.
Reheating The Cake
Reheat slices gently to keep them moist. Use an oven or microwave for best results.
- Oven:Preheat to 300°F (150°C). Place cake on a baking sheet. Heat for 10-15 minutes until warm.
- Microwave:Put a slice on a microwave-safe plate. Heat in 20-second bursts until warm. Avoid overheating to keep texture soft.
Tips For Best Results
- Cover the cake during reheating to prevent drying out.
- Use a low heat setting to preserve flavor and texture.
- Serve warm with a scoop of vanilla ice cream or whipped cream.
Frequently Asked Questions
What Makes Upside Down Apple Cranberry Cake Special?
This cake combines tart cranberries and sweet apples for a balanced flavor. The fruit caramelizes on top, creating a moist, flavorful dessert with a beautiful presentation.
How Do I Prevent Sticking In Upside Down Cakes?
Grease the pan well and sprinkle sugar or flour before adding fruit. This helps create a barrier and promotes easy release after baking.
Can I Use Frozen Cranberries In This Recipe?
Yes, frozen cranberries work well. Just thaw and drain them before use to avoid excess moisture that may affect the cake’s texture.
What Is The Best Apple Variety For This Cake?
Firm apples like Granny Smith or Honeycrisp work best. They hold shape during baking and provide a nice tartness that complements the cranberries.
Conclusion
This upside down apple cranberry cake is perfect for any day. Its sweet and tart flavors blend wonderfully. Baking it is simple and fun. Serve it warm for the best taste. Friends and family will enjoy every bite. Try this recipe and make your kitchen smell amazing.
A tasty dessert that feels like home. Easy, delicious, and sure to please everyone. Give it a try and enjoy a cozy treat.

Hi, I’m Daniel Brooks—a food lover and kitchen gear enthusiast. I enjoy testing cookware, utensils, and gadgets to see what really works in everyday cooking. At PlugChef.com, I share honest reviews, comparisons, and simple guides to help you choose the best tools for a safer, smarter, and more enjoyable kitchen.
Related posts:
 What Type of Cooking Utensils are Safe: Expert Picks
 What Innovations Could Blenders Make: Unleashing Future Tech
 Smart Strategies to Organize a Small Kitchen: Maximize Space
 How to Organize a Kitchen Cabinet: Expert Tips & Tricks
 How to Organize Kitchen Drawers: Expert Tips and Tricks
 How to Organize a Corner Kitchen Cupboard: Expert Tips

