
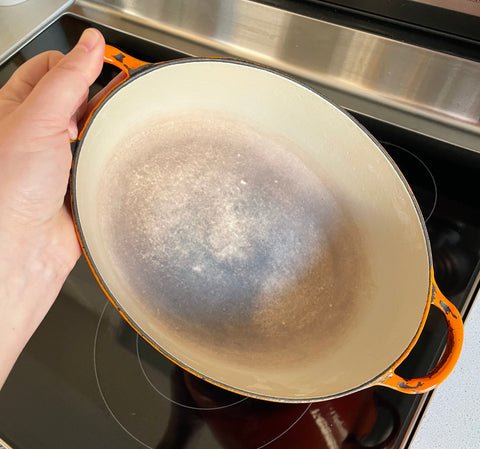
Enameled cookware — from glossy Dutch ovens to saucepans with vibrant colored exteriors — is a staple in many home kitchens for its even heat retention, non-reactive surface, and sleek aesthetic. But if you’ve ever battled burnt-on food, stubborn tomato sauce stains, or dulled finishes, you know the wrong cleaning method can ruin that pristine look in seconds, or even chip the delicate enamel coating. Unlike bare cast iron, enameled cookware doesn’t require seasoning, but it does need gentle, consistent care to keep its shine and functionality for decades. In this guide, we’ll cover exact, manufacturer-approved cleaning methods, stain removal hacks that won’t scratch, and damage prevention tips to keep your cookware looking brand new, no harsh chemicals required.
What Is Enameled Cookware, and Why Does It Need Special Care?
Enameled cookware is made by fusing a layer of vitreous glass enamel to a cast iron core, creating a non-reactive, low-stick surface that’s safe for all types of food, including acidic ingredients like tomato sauce and citrus. While it’s far easier to maintain than bare cast iron, the enamel coating is a hard but porous layer that can chip under impact, and harsh abrasives or chemicals can etch, dull, or scratch it permanently. Improper cleaning is the top cause of shortened lifespan for enameled cookware, so understanding its unique structure is the first step to keeping it in top condition. To ensure your cookware meets food safety standards for regular use, refer to FDA guidelines on food-contact materials for the latest requirements on safe cookware coatings.
Essential Tools for Cleaning Enameled Cookware (No Scratching Allowed)
The #1 rule of enameled cookware care is to never use abrasive tools, which can leave micro-scratches that trap food particles and stain permanently over time, even if you can’t see the damage right away.
Safe, Recommended Tools
- Soft cellulose sponges with no scrubbing side (even the "soft" scouring pad on dual-sided sponges can scratch enamel with repeated use)
- Lint-free microfiber or cotton cloths for wiping and drying
- Soft-bristled nylon brushes for tough, stuck-on food
- Non-abrasive cleaning pastes like baking soda or cream of tartar For a complete set of gentle, durable options, our top-rated kitchen cleaning brush set includes soft-bristled brushes designed specifically for delicate cookware surfaces that won’t scratch. If you prefer a single heavy-duty option for stubborn grime, the best kitchen cleaning brush we tested has a long handle to keep your hands away from hot surfaces while scrubbing. A soft-bristled brush for both bathroom and kitchen scrubbing also works well for scrubbing crevices in pot handles without damaging the enamel finish. For quick daily cleanups while cookware is still warm (but not hot), a long-handled cleaning brush for cookware lets you scrub stuck-on food without burning your fingers.
Tools to Avoid at All Costs
- Steel wool, scouring pads, or rough plastic scrubbers
- Metal utensils (spatulas, spoons) that can chip the enamel edge
- Harsh chemical cleaners: oven cleaner, bleach, undiluted citrus degreasers, or abrasive powdered cleansers like Comet
- Rough paper towels or scratchy dishcloths
 Enameled cookware retains its glossy finish with consistent, gentle cleaning
Credit: dwellingonthepast.ca
Enameled cookware retains its glossy finish with consistent, gentle cleaning
Credit: dwellingonthepast.ca
Step-by-Step Daily Cleaning Routine
Daily cleaning takes less than 2 minutes and is the most effective way to prevent stains and damage before they set in. Follow this exact routine after every use:
- Let cookware cool completely before washing. Never pour cold water on a hot pot, as this causes thermal shock that can chip the enamel.
- Fill the pot with warm (not boiling) water and a drop of mild, fragrance-free dish soap. Hot water can set stains, so stick to lukewarm temperatures.
- Use a soft sponge or non-abrasive brush to wipe away all food residue. If food is stuck, let it soak for 5-10 minutes first — never scrub hard, as this can scratch the surface.
- Rinse thoroughly under warm running water to remove all soap residue, which can leave a dull film if left behind.
- Dry immediately with a lint-free microfiber cloth to prevent water spots, which are caused by mineral deposits in hard water. If you cooked acidic foods (tomato sauce, citrus curries, vinegar-based dishes), rinse the pot as soon as possible, as prolonged acid exposure can dull the enamel over time. Leading manufacturers like Lodge recommend hand washing over dishwasher use, as high heat and harsh detergents in dishwashers can dull the enamel finish over time, per their official care recommendations.
How to Remove Common Stains (No Harsh Scrubbing Required)
Even with regular cleaning, stains happen. These gentle methods will lift discoloration without damaging the enamel:
Light Stains (from coffee, tea, or light food discoloration)
Mix 2 parts baking soda with 1 part warm water to form a thick paste. Spread the paste over the stained area and let it sit for 10-15 minutes — in practice, letting it sit 20 minutes makes a noticeable difference for set-in discoloration. Gently scrub with a soft sponge in circular motions, then rinse thoroughly. For extra stubborn light stains, add a squeeze of lemon juice to the paste, as the mild citric acid helps break down discoloration without etching the enamel.
Burnt-On Food
First, try the boiling method: fill the pot 3/4 full with water, add 2 tablespoons of baking soda, and bring to a gentle simmer for 10-15 minutes. Don’t let the water boil vigorously, as rapid temperature changes can cause thermal shock. Pour out the water, and the burnt food should wipe away easily with a soft sponge. If bits remain, let the pot soak overnight in warm soapy water with 1/2 cup of baking soda, then scrub gently.
Heat Discoloration (gray or brown spots from high heat, not actual burnt food)
Mix equal parts white vinegar and water, bring to a simmer for 5 minutes, then let cool completely. Scrub gently with a soft sponge — the acidic vinegar will lift the discoloration without scratching the enamel. Rinse thoroughly to remove any vinegar smell.
 Non-abrasive tools are the only safe option for scrubbing enamel surfaces
Credit: food52.com
Non-abrasive tools are the only safe option for scrubbing enamel surfaces
Credit: food52.com
Deep Cleaning for Set-In Grime
Deep clean your enameled cookware every 1-2 months if you use it regularly, or immediately after cooking a heavily soiled meal like a stew with burnt bits or a sticky glaze. These methods target set-in grime without risking damage:
Overnight Soak Method
This is the safest option for heavily burnt cookware that won’t budge with quick scrubbing. Fill the cookware with warm water, add 1-2 tablespoons of mild dish soap and 1/2 cup of baking soda, and let it soak for 8-12 hours (overnight is perfect). The baking soda will loosen stuck-on food and lift stains without any scrubbing required. In the morning, dump the water, wipe away residue with a soft sponge, rinse, and dry.
Boiling Water Method (for faster deep cleaning)
If you don’t have time for an overnight soak, this method works in 30 minutes or less. Fill the cookware 3/4 full with water, add 2 tablespoons of baking soda, and bring to a gentle simmer for 10-15 minutes. Don’t walk away while it’s simmering, to avoid boiling dry, which can burn the enamel. Let the pot cool completely before scrubbing with a soft sponge.
Note: Never use oven cleaner or harsh chemical degreasers on enameled cookware, as these can etch the enamel surface and cause permanent discoloration.
How to Prevent Damage and Preserve the Shine Long-Term
Preventing damage is far easier than fixing it. Follow these guidelines to keep your cookware looking new for decades:
Avoid Thermal Shock
Thermal shock — rapid temperature changes — is the #1 cause of chipped or cracked enameled cookware. The enamel coating expands and contracts at a different rate than the cast iron core, so sudden temperature shifts cause it to crack or chip. Follow these rules to avoid it:
- Never preheat an empty enameled pot above medium heat; empty pots heat up too quickly and can cause the enamel to warp or crack.
- Don’t pour cold water or add cold ingredients to a hot pot.
- Never place a hot pot directly on a cold countertop, stovetop, or sink — use a trivet or wooden board instead.
- Avoid cooking on high heat; enameled cookware is designed for low to medium heat cooking, which prevents hot spots that can burn food and discolor the enamel.
Proper Storage Practices
Improper storage is the second most common cause of chipped enamel. Follow these tips to keep your cookware safe:
- Never stack pots directly on top of each other — place a soft cloth, paper towel, or felt pan protector between each layer to avoid scratches and chips.
- Store cookware in a dry, cool place to prevent rust on any exposed cast iron (from small chips in the enamel).
- Hang pots on a pot rack if you have limited cabinet space, to avoid stacking damage.
- Store lids separately from pots, or place a cloth between the lid and pot rim, to avoid chipping the delicate enamel edge. If you have young kids, storing cookware in lower cabinets can pose a risk of pulls and falls. Adding childproof cabinet locks prevents accidental access that can lead to chipped cookware or injury.
Fixing Small Chips
If you notice a small chip in the enamel (smaller than a quarter), your cookware is still safe to use as long as the exposed cast iron doesn’t rust. Wash the chipped area gently after each use, dry it thoroughly, and avoid cooking highly acidic foods (like tomato sauce or citrus) in that spot to prevent rust. Large chips that expose a significant amount of cast iron may lead to rust that spreads, so contact the manufacturer if your cookware is under warranty, or replace the piece to avoid rust and food contamination.
 Drying immediately after washing prevents water spots and mineral buildup
Credit: www.lodgecastiron.com
Drying immediately after washing prevents water spots and mineral buildup
Credit: www.lodgecastiron.com
Frequently Asked Questions
How do I clean burnt food from enameled cookware?
First, try the gentle boiling method: fill the pot 3/4 full with water, add 2 tablespoons of baking soda, and simmer for 10-15 minutes. The burnt food should wipe away easily with a soft sponge. If bits remain, let the pot soak overnight in warm soapy water with 1/2 cup of baking soda, then scrub gently with a non-abrasive brush. Never use steel wool or metal scrapers, as these will scratch the enamel permanently.
Can I use vinegar to clean enameled cookware?
Yes, diluted white vinegar is safe and effective for removing stains and mineral deposits. Mix equal parts vinegar and water, bring to a gentle simmer for 5 minutes, then let cool completely before scrubbing and rinsing. Avoid leaving vinegar on the enamel for more than 30 minutes, as prolonged acid exposure can dull the finish over time.
Is baking soda safe for enameled cookware?
Absolutely. Baking soda is a mild, pH-neutral abrasive that lifts stains and grime without etching or scratching the enamel surface. It’s safe for regular use on both the interior and exterior of your cookware.
Can I put enameled cookware in the dishwasher?
Most enameled cookware manufacturers, including Lodge and Staub, recommend against dishwasher use. The high heat and harsh alkaline detergents in dishwashers can dull the enamel finish, cause fading, and increase the risk of chips over time. Hand washing is always the safest option to preserve your cookware’s appearance and lifespan.
What should I do if the enamel chips?
Small chips (smaller than a quarter) are usually safe to continue using, as long as you dry the exposed cast iron thoroughly after each wash to prevent rust. Avoid cooking acidic foods in the chipped area to reduce rust risk. Large chips that expose a large area of cast iron may lead to rust that spreads, so contact the manufacturer if your cookware is under warranty, or replace the piece if the chip is significant.
How often should I deep clean my enameled cookware?
Deep clean your cookware every 1-2 months if you use it regularly, or immediately after cooking a heavily soiled meal (like a stew with burnt bits or a dish with lots of sticky sauce). Daily gentle cleaning is enough for regular use, but deep cleaning prevents buildup that can cause permanent stains over time.
Conclusion
Cleaning enameled cookware doesn’t have to be a chore, and with the right tools and techniques, you can keep that glossy, showroom finish for decades. The key rules are simple: stick to non-abrasive tools, hand wash with mild soap, avoid thermal shock, and address stains as soon as they appear to prevent set-in discoloration. A little consistent care goes a long way — no harsh chemicals or expensive cleaners required. For more expert kitchen care tips, product reviews, and easy cooking hacks, explore the full Plug Chef blog for guides that make meal prep and cleanup simpler.

Hi, I’m Daniel Brooks—a food lover and kitchen gear enthusiast. I enjoy testing cookware, utensils, and gadgets to see what really works in everyday cooking. At PlugChef.com, I share honest reviews, comparisons, and simple guides to help you choose the best tools for a safer, smarter, and more enjoyable kitchen.
Related posts:
 3 Shelf Hanging Closet Organizer: Maximize Your Space
 Do It Yourself Pantry Organizers: Transform Your Space
 How to Organize a Pantry With Wire Shelves: Expert Tips
 How to Organize Snacks in Pantry: Smart Tips
 Small Walk in Pantry Organization Ideas: Transform Spaces
 Under Cabinet Pot And Pan Organizer: Maximize Your Space

