
Imagine opening your kitchen pantry and grabbing the exact spice, grain, or snack you need in 2 seconds flat — no rummaging, no knocking over stacks of cans, no discovering expired goods hiding in the back. This isn’t a far-off fantasy: a well-organized pantry cuts 5–10 minutes off average meal prep time, reduces food waste, and makes cooking feel far less like a chore. Based on common pantry organization pitfalls observed in home kitchens, this guide walks you through actionable, low-cost steps to transform even the messiest pantry into a tidy, functional space that works for your household’s unique needs.
Why a Tidy Pantry Is Worth the Effort
Your pantry is the hub of your kitchen’s food storage, and its state impacts far more than just how your kitchen looks. Cluttered pantries lead to duplicate purchases (you’ll buy a second jar of cumin because you can’t find the first one hidden behind a box of cereal), expired food waste, and unnecessary stress during busy meal prep. The USDA estimates U.S. households waste roughly 30% of the food they purchase each year, much of it due to forgotten or expired pantry staples USDA food loss and waste resources. A tidy, zoned pantry eliminates these headaches, saves you money on groceries, and makes cooking feel intentional rather than rushed.
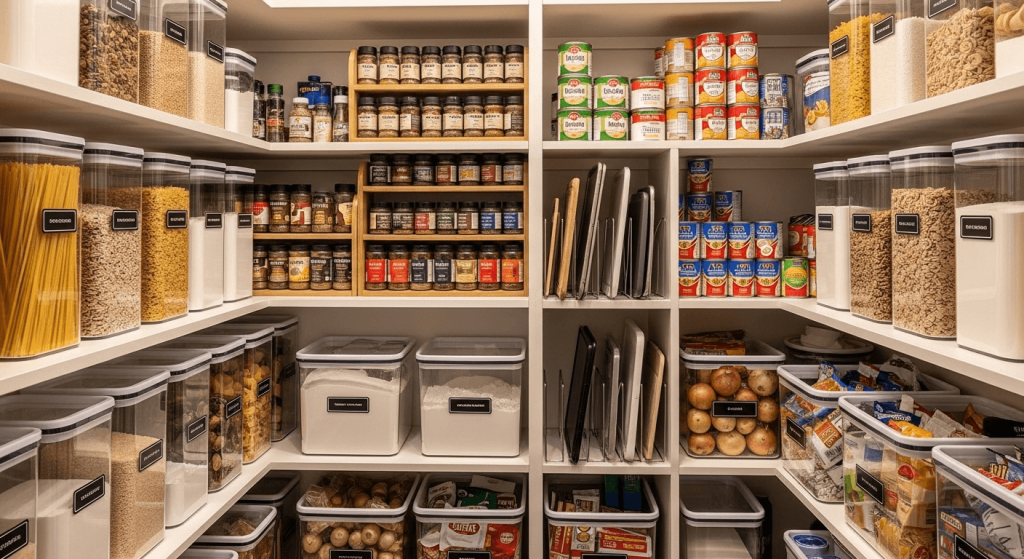
 Credit: www.styleanddwell.com
A well-zoned pantry puts everyday ingredients at eye level for fast access
Credit: www.styleanddwell.com
A well-zoned pantry puts everyday ingredients at eye level for fast access
Step 1: Start With a Full Pantry Purge
The biggest mistake people make when organizing a pantry is skipping the purge step and just rearranging existing clutter. This leads to the same messy, hard-to-navigate space in 2–3 months. To do a proper purge:
- Pull every single item out of your pantry and wipe down all shelves and floors to remove crumbs, spills, or pest residue.
- Check every expiration date, and toss any items that are past their prime, including opened dry goods that have gone stale or developed an off smell.
- Sort remaining items into three piles: keep (items you use at least once a month), donate (unopened, unexpired items you’ll never use), and toss (expired or damaged goods).
- A common mistake here is holding onto "just in case" specialty ingredients you haven’t touched in over a year — if you can’t recall the last time you used it, it’s safe to let it go.
Once purged, group your keep pile into broad categories to guide your zoning: dry grains and pasta, canned goods, baking supplies, snacks, spices, breakfast items, and specialty ingredients (like international sauces or holiday baking supplies).
Step 2: Choose the Right Storage Containers
Clear, airtight containers are the gold standard for pantry organization, but not all containers are created equal. When picking containers, prioritize function over fancy matching sets:
- For dry goods (flour, rice, cereal, pasta): Opt for BPA-free plastic or glass airtight jars. Glass doesn’t hold odors or stains, but it’s heavier and more fragile, making it a better pick for low shelves in households without young kids. Plastic is lighter and more durable for high-traffic pantries.
- For snacks and small items: Stackable plastic bins with lids work well, as they’re easy to grab and won’t break if dropped.
- Avoid overbuying: You don’t need a full set of matching containers before you purge. Start with the categories you use most, and add containers as needed to avoid wasting money on unused storage.
For evidence-based shelf life guidelines for common pantry items like flour, rice, and canned goods, the University of Minnesota Extension provides up-to-date, research-backed storage timelines UMN Extension pantry storage tips.
Step 3: Zone Your Pantry by Category and Frequency of Use
Grouping similar items together is only half the battle — where you place those zones matters just as much for day-to-day usability. Follow this accessibility-first zoning logic:
- Eye level (36–60 inches high): Store your most frequently used items here, including cooking oils, spices, daily snacks, and breakfast staples. This eliminates the need to bend or reach for items you use every day.
- Lower shelves (below 36 inches): Place heavy, bulky items here, including large bags of pet food, cases of canned goods, and appliance manuals. This prevents injury from lifting heavy items from high shelves, and makes it easier for kids to access their own snacks if you store them here.
- Upper shelves (above 60 inches): Store occasional-use items here, including holiday baking supplies, bulk items you only buy a few times a year, and extra dishware.
- Implement a FIFO (First In, First Out) system: Always place newer items behind older ones of the same type. This ensures you use older items before they expire, cutting down on waste without extra effort.
Step 4: Maximize Every Inch of Space
Even small, awkward pantries can hold more than you think with a few low-cost space-saving additions:
- Under-shelf baskets: These slide onto existing shelves to create 2–3 extra storage tiers per shelf, doubling usable vertical space for small items like spice jars, snack packs, and tea boxes.
- Shelf risers: For deep pantries, risers create a tiered effect so you can see items sitting in the back of the shelf without moving everything in front.
- Lazy Susans: Perfect for corner shelves or deep cabinets, lazy Susans make it easy to spin and access small items without knocking over surrounding goods.
- Door organizers: Over-the-door racks or adhesive pockets hold spices, small condiment packets, or even reusable shopping bags, turning unused door space into functional storage.
- Pull-out shelves: If your pantry has deep, fixed shelves, install pull-out slides to make back items accessible without crawling into the pantry.
If your pantry is a small corner closet, corner storage solutions are designed to eliminate dead space that standard shelving can’t reach, giving you 20–30% more usable storage in awkward nooks.
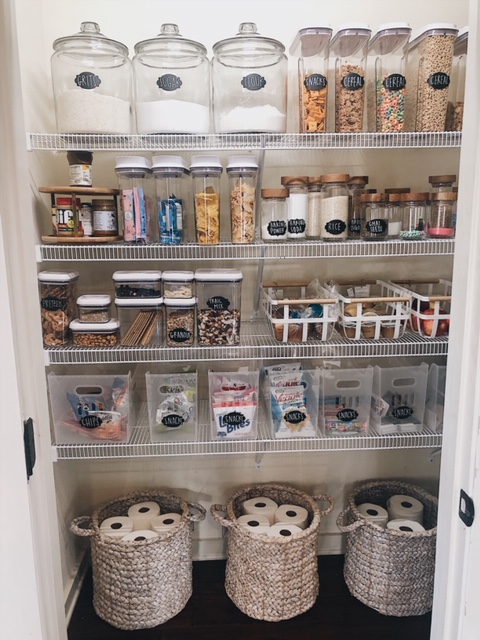 Credit: shegaveitago.com
Small pantries benefit from vertical storage solutions to maximize limited square footage
Credit: shegaveitago.com
Small pantries benefit from vertical storage solutions to maximize limited square footage
Small Pantry Hacks for Tight Spaces
If you’re working with a narrow, shallow, or otherwise tiny pantry, these targeted hacks will help you make the most of every square inch:
- Use slim, stackable bins instead of wide ones to fit more items along shallow shelves.
- Install adjustable shelving to customize height for different-sized items, so you don’t waste vertical space above short containers.
- Skip bulky storage bins for small pantries, and use clear, stackable mason jars or acrylic containers to keep items visible without taking up extra room.
- Create a dedicated "grab-and-go" zone on the lowest shelf for daily snacks and lunch items, so you can quickly grab what you need during busy mornings.
Once your pantry is sorted, you can extend these same categorize-and-zone principles to streamlining drawer storage for a fully cohesive, clutter-free kitchen.
Step 5: Label and Maintain Your System
Labels are the small detail that makes the difference between a temporarily tidy pantry and a system that lasts long-term. They eliminate guesswork, reduce duplicate purchases, and make it easy for every household member to put items back in their correct spot.
- Choose the right label type: Permanent vinyl labels work well for static items like flour or rice, while chalkboard or dry-erase labels are ideal for items that change frequently, like snacks or bulk goods.
- Keep labels consistent: Use the same font, size, and color scheme for all labels to keep your pantry looking neat and intentional.
- Involve the whole household: Walk family members through the zoning system after you set it up, so everyone knows where to find and return items.
To keep your pantry tidy long-term, commit to a 10-minute monthly tidy: rotate stock, check for expired items, and straighten any misplaced goods. For larger items like stock pots and baking sheets that don’t fit in the pantry, cabinet storage for cookware follows the same accessibility-first logic to keep them easy to grab when needed.
Common Pantry Organization Mistakes to Avoid
Even with the best intentions, it’s easy to fall into common traps that derail your pantry organization progress:
- Buying matching containers before purging: You don’t know what size or shape of containers you need until you know what items you’re storing. Purge first, then buy storage to fit your actual inventory.
- Overcomplicating your system: You don’t need 10 different categories or color-coded labels for every single item. Stick to 4–6 broad zones that make sense for your household’s cooking habits.
- Ignoring your household’s habits: If your kids reach for snacks every afternoon, don’t store their snacks on a high shelf out of reach. Design your system around how your household actually uses the pantry, not just what looks good on social media.
- Skipping regular maintenance: A pantry only stays organized if you commit to quick monthly checks. Set a reminder on your phone to do a 10-minute tidy the first weekend of every month to keep clutter from building back up.
- Storing items you never use: If you bought a specialty spice for a recipe you made once two years ago, it’s taking up valuable space. Donate it to make room for items you actually use regularly.
If you regularly host gatherings, create a dedicated zone for charcuterie ingredients and party snacks so you can pull together a spread in minutes without rummaging through unrelated items.
Frequently Asked Questions
How do I organize a small kitchen pantry?
Start with a full purge to remove expired and unused items, then use stackable clear containers and under-shelf baskets to maximize vertical space. Store everyday items at eye level for easy access, and use over-the-door organizers for spices and small packets to free up shelf space. Stick to 4–5 broad categories to avoid overcomplicating the system.
What are the best containers for pantry organization?
Airtight, clear containers are ideal for most pantry items, as they keep food fresh and let you see contents at a glance. Glass containers are best for items that hold odors (like spices or coffee), while BPA-free plastic is more durable for households with kids. Stackable containers in uniform sizes create the neatest look and maximize space.
How do I maximize pantry space?
Focus on vertical storage first: add under-shelf baskets, shelf risers, and door-mounted organizers to use space that’s often wasted. Use pull-out shelves for deep pantries to make back items accessible, and store less-frequently used items on upper shelves to keep everyday items within easy reach.
Why is labeling important in pantry organization?
Labels eliminate guesswork, reduce duplicate purchases, and make it easy for every household member to put items back in their correct spot. They also help you quickly spot when you’re running low on staples, so you can add them to your shopping list before you run out.
How often should I reorganize my pantry?
Do a full purge and full reorganization every 3–6 months, depending on how often you shop and cook. Commit to a quick 10-minute monthly tidy to rotate stock, check expiration dates, and straighten misplaced items to keep your system working long-term.
Conclusion
A tidy, functional pantry isn’t just an aesthetic upgrade — it cuts meal prep time, reduces food waste, and makes daily cooking feel far less stressful. You don’t need expensive custom installations to see these benefits: start with a full purge, zone your items by category and frequency of use, use clear labeled containers, and commit to a quick monthly tidy to keep your system working long-term. An organized pantry also makes it easier to pull ingredients for quick hot soups or weeknight meals without the usual scavenger hunt.
Ready to transform your pantry this weekend? Start with the purge step first — you’ll be amazed at how much space you free up in under an hour. For more practical kitchen organization tips to keep your entire space tidy, browse our full library of kitchen guides.

I’m Abby Lu, a passionate home cook who loves simplifying everyday meals. At PlugChef.com, I share product reviews and cooking guides to help you find the best tools for your kitchen.
Related posts:
 Kitchen Sink Mats at Target: Enhance Your Kitchen Space
 Wall Mounted Spice Rack With Door: Maximize Kitchen Space
 Yukon Gold Potatoes Air Fryer: Crispy, Easy, and Delicious Recipes
 Rolled Steel Vs Cast Iron: Ultimate Strength and Durability Showdown
 Make Ahead Steel Cut Oatmeal: Easy, Nutritious Breakfast Boost
 Carajillo Recipe Without Licor 43: Easy & Authentic Delight

