
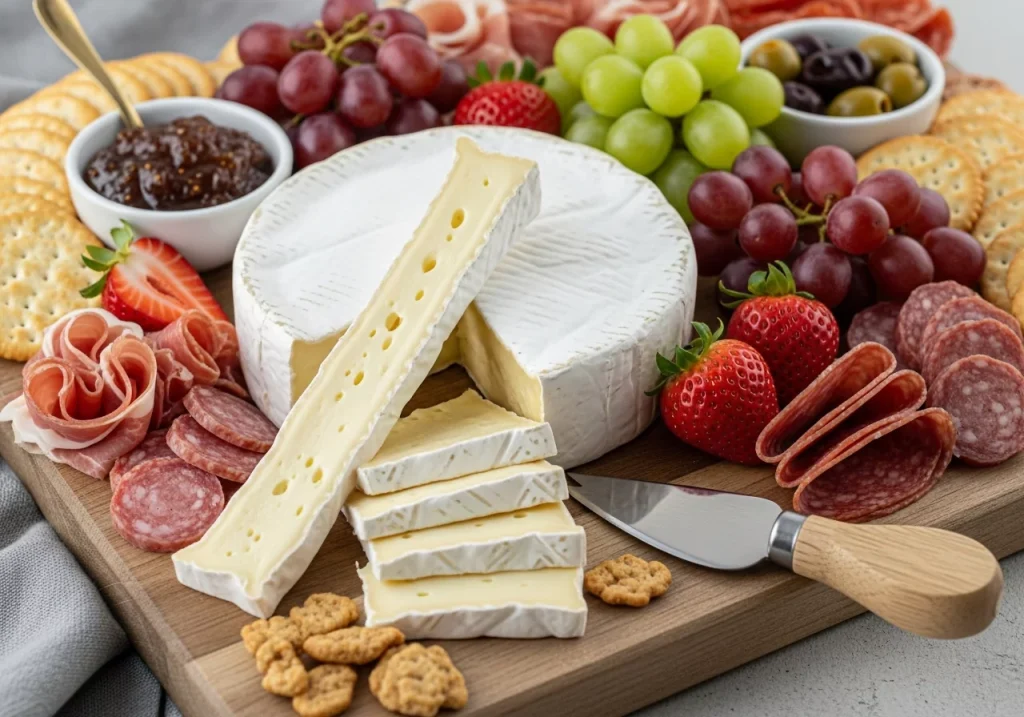
There’s nothing worse than pulling a perfectly ripe wheel of brie off the fridge for your charcuterie board, only to end up with squished, messy wedges that ooze all over your crackers and cured meats. Unlike hard aged cheeses, brie’s soft, creamy paste and delicate bloomy rind require a specific cutting technique to keep its shape, look intentional, and taste perfect for every guest. This guide walks you through exactly how to cut brie for a charcuterie board, plus pro tips to avoid common mistakes and make your spread look as good as it tastes.
Brie is a French soft-ripened cheese with a signature white bloomy rind made of Penicillium candidum mold, which is completely safe to eat and adds an earthy, mushroomy depth of flavor, per University of Minnesota Extension cheese serving guidance University of Minnesota Extension cheese serving guidance. Its rich, buttery texture makes it a crowd favorite on charcuterie boards, but that same softness is exactly why standard cheese-cutting methods fall short. Pressing down on brie while cutting squishes the interior, creates uneven wedges, and makes a mess of your board — but with the right technique, you’ll get perfect, presentation-ready slices every time. It’s a staple on paired charcuterie spreads alongside cured meats, fresh fruit, and crunchy nuts.
Essential Tools for Clean, Mess-Free Cuts
Having the right tools on hand will make the cutting process fast and frustration-free. Stick to these options for the best results:
- Thin-bladed cheese knife (hollowed edge is best, as the holes prevent soft brie from sticking to the blade)
- Cheese wire (ideal for very ripe, oozing brie, as it cuts with zero pressure to avoid squishing)
- Small offset spatula (for lifting cut wedges without breaking their shape)
- Chilled wooden or marble cutting board (marble keeps the cheese cold longer during prep, while wood is gentler on knife blades)
- Sharpening steel (to ensure your knife is perfectly sharp before you start)
Tools to Skip
Avoid these common kitchen items that will ruin your brie cuts:
- Serrated knives: their sharp teeth tear the delicate rind and create ragged edges on the soft paste
- Dull knives: they press down instead of cutting cleanly, leading to squished, uneven wedges
- Thin plastic cutting boards: they retain odors and slip while you work, making precise cuts difficult
A well-maintained bamboo cutting board won’t dull your knife; learn how to maintain your board to keep it in top shape maintain your board. Keep your cheese knives and wires organized with drawer storage solutions to avoid dulling blades drawer storage solutions.
Step-by-Step Guide to Cutting Brie for Charcuterie
Follow these steps for perfect, mess-free wedges every time:
Step 1: Chill the brie thoroughly
Pull brie from the fridge 30 minutes before your event to let it come to serving temperature, but chill it for at least 1 hour before cutting if it’s very ripe. Cold brie’s firm paste holds its shape far better than room-temperature brie, which will squish under even the lightest knife pressure. In practice, most home cooks cut brie at room temperature and end up with smushed, uneven wedges — chilling it for just 30 minutes makes a night-and-day difference in cut cleanlines. If you forgot to chill it, pop it in the freezer for 10-15 minutes as a quick fix. Following USDA soft cheese handling guidelines USDA soft cheese handling guidelines ensures your brie stays safe to eat during prep, especially if you’re serving vulnerable guests like young children or pregnant people.
Step 2: Prep your workspace
Sanitize your cutting board first to avoid cross-contamination, especially if you’re prepping raw cured meats alongside cheese avoid cross-contamination. If you’re prepping in a dimly lit kitchen, install bright under-cabinet lighting to see the cheese’s texture clearly as you cut bright under-cabinet lighting. Place your chilled board on a stable surface, and have a small plate ready for any trimmings.
Step 3: Trim the rind (optional)
Brie’s white bloomy rind is fully edible and adds an earthy, mushroomy depth of flavor, but some guests prefer to avoid it. A common mistake is removing the entire rind, which can make the brie dry out and lose its signature flavor — only trim the top layer if needed. To trim the top rind only (leaving the sides intact for structure), hold your knife parallel to the top of the wheel, and slice off a thin ¼-inch layer of the rind in one smooth motion. Don’t cut deeper than the rind, or you’ll waste precious cheese.
Step 4: Cut the brie into wedges
For a standard 8-ounce wheel of brie, cut it into 8 even wedges, just like you would slice a pizza. Start at the center of the wheel, and cut straight out to the edge, using a gentle sawing motion rather than pressing down. For very ripe, runny brie, use a cheese wire instead of a knife to avoid squishing the interior. Cut wedges 1-2 inches wide at the base for easy grabbing, and avoid cutting them too thick — ½-inch thick wedges are ideal for pairing with other board items. Use the same precision cutting techniques you’d use for craft projects to get smooth, even edges on your brie wedges precision cutting techniques.
Step 5: Arrange on your charcuterie board
Use a small offset spatula to lift wedges off the cutting board and place them around the edge of your serving board, leaving space in the center for crackers, cured meats, and garnishes. Fan the wedges slightly so guests can see the creamy interior, and add small bowls of honey, jam, or nuts next to the brie for pairing. If you’re prepping your board on a crowded countertop, an appliance slider makes it easy to move the board out of the way while you finish other dishes appliance slider. If you’re hosting a small gathering, a kitchen table with hidden storage keeps extra servingware and cheese tools out of sight until you need them kitchen table with hidden storage. Set your finished board on a round rug under your kitchen table to catch crumbs and protect your flooring during gatherings round rug under your kitchen table. Add fresh board garnishes like orange slices or fresh berries to balance brie’s rich creaminess fresh board garnishes.
 A sharp, thin-bladed knife and gentle sawing motion are key to clean, even brie wedges.
Pro Tips for Flawless Brie on Every Board
These small adjustments will take your brie prep from good to great:
- Let brie come to room temperature for 30-60 minutes before serving: cold brie’s flavor is muted, and its paste will be firm instead of creamy. Don’t leave it out for more than 2 hours, though, as it can dry out or develop unsafe bacterial growth per USDA guidance.
- Pair brie with complementary flavors: sweet options like honey, fig jam, and fresh berries balance its rich, savory notes, while salty cured prosciutto, spicy salami, and crunchy nuts add textural contrast. For a tangy twist, add a few dollops of whole-grain mustard.
- For very ripe, oozing brie, place the wheel in a small bowl before slicing to catch any drips, keeping your board mess-free.
- Store leftover cut brie properly: wrap wedges tightly in plastic wrap or parchment paper, and store them in an airtight container in the fridge for 3-4 days. If you need extra fridge storage, keep pre-cut wedges in an airtight container on a shelf for under your kitchen sink (as long as it’s cool and out of direct sunlight) for short-term storage shelf for under kitchen sink.
- You can cut brie up to 24 hours in advance for stress-free hosting: wrap the wedges tightly, store them in the fridge, and let them come to room temperature before serving.
Common Brie Cutting Mistakes to Avoid
Even experienced hosts run into these issues — skip them for perfect results every time:
- Cutting brie at room temperature: this is the #1 cause of squished, messy wedges. Always chill it for at least 30 minutes before cutting.
- Using a serrated or dull knife: these tear the rind and squish the soft interior instead of cutting cleanly.
- Cutting wedges too thick: thick wedges are hard to eat alongside other board items, and they’re more likely to break apart when lifted.
- Removing the entire rind: while the rind is edible, trimming it entirely can make the brie dry out and lose its signature earthy flavor. Only trim the top layer if needed.
- Pressing down on the knife: let the sharp blade do the work. Pressing down squishes the cheese and creates uneven cuts.
Frequently Asked Questions
How do you properly cut brie cheese for serving?
Chill the brie for at least 30 minutes first, then trim the top rind if desired, and cut it into 1-2 inch wide wedges using a gentle sawing motion with a sharp, thin-bladed knife. Avoid pressing down on the cheese to prevent squishing.
What is the best knife for cutting brie cheese?
A thin-bladed cheese knife with a hollowed edge is ideal, as it prevents the soft paste from sticking to the blade. For very ripe, runny brie, a cheese wire is even better, as it cuts through the cheese with zero pressure, eliminating squish entirely.
Should brie cheese be sliced cold or at room temperature?
Always slice brie when it’s cold. Room-temperature brie is too soft and will squish under the knife, leading to messy, uneven wedges. Let the cut wedges come to room temperature for 30-60 minutes before serving to bring out their full creamy flavor.
How large should brie cheese wedges be on a board?
Cut wedges 1-2 inches wide at the base and ½-inch thick. This size is easy for guests to grab, pairs well with other board items like crackers and cured meats, and holds its shape without breaking.
Can I cut brie ahead of time for a charcuterie board?
Yes! You can cut brie up to 24 hours in advance. Wrap the wedges tightly in plastic wrap, store them in an airtight container in the fridge, and let them come to room temperature for 30 minutes before serving.
What if my brie is very ripe and runny?
For over-ripe brie that’s oozing, use a cheese wire instead of a knife to cut it into wedges. You can also trim off the top layer of rind to contain the ooze, and serve the brie in a small bowl on the board to catch any drips.
 Evenly sized wedges make it easy for guests to grab a perfect bite without making a mess.
Conclusion
Cutting brie for a charcuterie board doesn’t have to be stressful. By chilling the cheese first, using the right tools, and following the simple step-by-step process above, you’ll get perfectly shaped, mess-free wedges every time. Remember to let your cut brie warm up slightly before serving to bring out its full creamy, earthy flavor, and pair it with your favorite sweet and savory board additions for a hit at any gathering. With proper long-lasting board care, your cutting surface will stay in great shape for years of charcuterie prep long-lasting board care. Ready to build your perfect spread? Check out our guide to pairing brie with seasonal produce for your next event.
 A well-arranged board balances creamy brie with salty, sweet, and crunchy elements for a crowd-pleasing spread. With these simple steps, you’ll never have to deal with squished, messy brie on your charcuterie board again. Whether you’re hosting a casual game night or a formal holiday gathering, perfectly cut brie wedges will make your spread look polished and intentional, while pairing seamlessly with all your favorite cured meats, fruits, and garnishes. Bookmark this guide for your next hosting event, and test out different pairing combinations to find your favorite flavor matches.
Ready to streamline your hosting prep even more? Our guide to under-kitchen-sink cabinet storage ideas will help you keep all your cheese boards, serving utensils, and garnishes organized and out of the way until you need them.

I’m Abby Lu, a passionate home cook who loves simplifying everyday meals. At PlugChef.com, I share product reviews and cooking guides to help you find the best tools for your kitchen.
Related posts:
 How to Cut Round Cheese for Charcuterie Board: Expert Tips & Tricks
 Organizing Can Goods in Pantry: Smart Storage Hacks
 Spice Rack Biryani Pot Chopstix Restaurant Photos: Vibrant Views
 How to Organize Your Medicine Cabinet: Expert Tips
 How to Fix Bitter Greens: Simple Tricks for Delicious Flavor
 No Peel Hard Boiled Eggs: Easy, Quick, and Mess-Free Cooking Tips

