
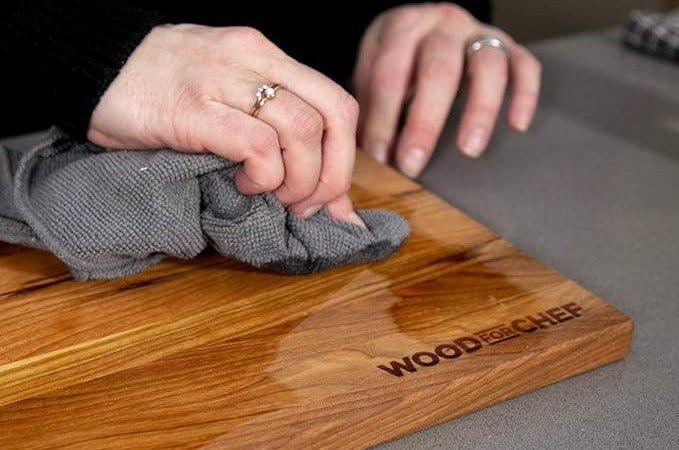
Wooden cutting boards are the unsung workhorses of every home kitchen, used daily for everything from chopping vegetables to slicing raw meat. Without regular maintenance, these porous natural materials dry out, crack, warp, and even harbor harmful bacteria. Oiling is the single most effective step to extend your board’s lifespan, keep it performing like new, and protect your family from food safety risks. This updated 2026 guide covers everything you need to know, from choosing the right oil to troubleshooting common issues and maximizing your board’s usable life. For more general kitchen maintenance tips, explore our full kitchen care blog.
Why Oiling Your Cutting Board Is Non-Negotiable for Longevity and Food Safety
Wood is a highly porous material that absorbs moisture from food, dishwater, and ambient humidity over time. Un-oiled wood shrinks as it dries out, leading to deep cracks, splits, and warping that make the board unstable for cutting and dull your knife edges faster. Even worse, these crevices are impossible to fully sanitize, and can harbor harmful pathogens like E. coli and Salmonella, even after thorough washing, per USDA food safety guidance, making regular oiling a critical food safety step, not just a cosmetic task.
Oiling fills these open pores to create a hydrophobic barrier that repels water, prevents staining from acidic foods like beets or wine, and keeps the board’s surface smooth and splinter-free. End-grain boards, which have exposed wood fibers that absorb liquid far faster than flat-grain or edge-grain boards, require even more frequent conditioning to stay in good shape. If you own a bamboo board, our guide to bamboo board upkeep has material-specific tips for extending its lifespan.
 Properly conditioned boards have a uniform satin sheen and repel water droplets instead of absorbing them
The Only Oils You Should (and Shouldn't) Use on Your Board
Not all oils are safe or effective for cutting board care. The wrong products can go rancid, leave sticky residue that traps bacteria, or even transfer off-flavors to your food. Below is a breakdown of safe and unsafe options, based on current food safety and wood care best practices:
Safe Oils for Cutting Boards
- Food-grade mineral oil: The gold standard for board conditioning. It is inert, odorless, tasteless, and certified by the NSF for food contact, meaning it is safe for repeated use with food. It will never go rancid, is inexpensive, and available at most grocery stores or kitchen supply shops, making it ideal for deep, regular conditioning.
- Fractionated coconut oil: A natural, plant-based alternative that stays liquid at room temperature and does not spoil. It is a great option for cooks who prefer to avoid mineral oil, though it is slightly more expensive.
- Food-grade walnut oil: Imparts a subtle, warm tone to light wood boards and conditions effectively. Note that it is a tree nut product, so avoid it if you have nut allergies, or if you use the board for nut-free prep.
- Beeswax and mineral oil blends: These are best used as a finishing coat after deep conditioning with mineral oil. The beeswax adds extra water resistance and a subtle sheen, but on its own, it is too thick to penetrate wood pores effectively.
Unsafe Oils to Avoid
Cooking oils like olive oil, vegetable oil, and canola oil are high in unsaturated fats that oxidize quickly when exposed to air and moisture. This leads to rancidity, which causes unpleasant off-flavors to transfer to food, sticky buildup that traps bacteria, and a gummy surface that is hard to clean. Never use these oils on your cutting board, no matter how readily available they are. Non-food-grade products like motor oil, varnish, or paint are also strictly off-limits for food-contact surfaces.
| Oil Type | Safe for Cutting Boards? | Key Details | Best Use Case |
|---|---|---|---|
| Food-grade mineral oil | ✅ Yes | Inert, NSF-certified, never rancid, affordable | Deep, regular conditioning for all wood boards |
| Fractionated coconut oil | ✅ Yes | Plant-based, shelf-stable, no rancidity | Natural alternative to mineral oil |
| Food-grade walnut oil | ✅ Yes (allergy permitting) | Adds warm tone, conditions well | Light wood board conditioning for nut-free households |
| Beeswax (alone) | ⚠️ Limited | Too thick to penetrate wood, adds surface shine only | Finishing coat after oiling, not standalone conditioning |
| Olive, vegetable, canola oil | ❌ No | Oxidize quickly, go rancid, leave sticky residue | Never use on cutting boards |
| Non-food-grade oils (motor oil, varnish, etc.) | ❌ No | Toxic if in contact with food | Never use on food-contact surfaces |
Note that custom resin board builds are sealed with epoxy and do not require regular oiling, as the non-porous surface does not absorb moisture.
How Often Should You Oil Your Cutting Board?
Oiling frequency depends on how often you use your board and what type of wood it is made from:
- Daily use (3+ times per week): Oil every 2-3 weeks
- Occasional use (1-2 times per week): Oil every 3-4 weeks
- End-grain boards: Oil every 1-2 weeks, as their porous structure absorbs moisture far faster than other board types
- Boards in humid environments or washed frequently: Oil more often, as moisture evaporates faster from the wood
The easiest way to test if your board needs oil is to drop a few drops of water on the surface. If the water beads up, your board has enough protective coating. If it soaks in immediately, or the board looks dull, rough, or faded, it is time to condition.
Step-by-Step: How to Oil Your Cutting Board for Maximum Protection
Oiling your board is a simple 5-step process that takes less than an hour of active time, plus overnight curing. Follow these steps for best results:
- Clean and dry the board completely Wash the board with warm, soapy water (use a mild dish soap, avoid harsh abrasives that can scratch the wood). For boards that have been used for raw meat, follow proper cleaning after raw meat sanitization steps first to eliminate bacteria before oiling. Rinse thoroughly, then pat dry with a clean towel. Leave the board upright in a well-ventilated area for 1-2 hours, or until it is 100% dry to the touch. Oiling a damp board traps moisture under the oil, leading to warping and mildew growth — this is the most common mistake home cooks make.
- Apply a thin, even coat of oil Pour 1-2 tablespoons of your chosen food-safe oil (enough for a standard 12×18 inch board) directly onto the surface. Use a clean, lint-free cloth or paper towel to spread the oil in a thin, even layer across the entire board: top, bottom, sides, and any cut-out handles or grooves. Do not skip the edges or underside, as these areas are just as prone to drying out as the top surface. Avoid over-applying oil, as this leads to sticky, gummy buildup that is difficult to remove.
- Let the oil soak into the wood Leave the board in a well-ventilated area, away from direct sunlight or heat sources, for 30-60 minutes. For very dry, cracked boards, you can leave it for up to 2 hours, or reapply a second thin coat halfway through if the first coat is fully absorbed. Do not leave the board in a hot car or near a stove, as heat causes the oil to dry too quickly on the surface without penetrating the wood.
- Wipe off all excess oil Use a clean, dry cloth to wipe away any oil that has not absorbed into the wood. If you leave pools of oil on the surface, they will dry sticky and attract dust and debris.
- Let the board cure fully Leave the board upright in a well-ventilated area for 4-6 hours, or ideally overnight, before using it again. This allows the oil to fully cure and harden in the wood pores, rather than rubbing off onto food during use. For boards that are extremely dry or damaged, repeat this oiling process 2-3 times in a row for deep conditioning.
 A thin, even coat of oil penetrates wood pores best without leaving sticky residue
A well-oiled board also reduces unnecessary wear on your knife edges during prep, helping you maintain clean, consistent cuts.
Common Oiling Mistakes to Avoid
Even experienced cooks make these errors that can damage their cutting boards over time:
- Oiling a wet board: Trapping moisture under the oil leads to warping, swelling, and mildew growth. Always confirm the board is 100% dry before starting the oiling process.
- Using cooking oils: Olive, vegetable, and canola oil go rancid quickly, leaving sticky residue and off-flavors that transfer to food.
- Over-oiling: Too much oil leads to gummy buildup that attracts dust and bacteria, and can make food taste off. A thin, even coat is all your board needs.
- Oiling right before use: If you don’t let the oil cure fully, it will transfer to food and leave an unpleasant taste. Always oil your board at least 24 hours before you plan to use it for food prep, if possible.
- Skipping the edges and underside: The edges and bottom of the board are just as exposed to moisture as the top surface, so they need oil too to prevent warping.
- Storing the board in a damp area: Even a well-oiled board can warp if stored in a humid cabinet, under the sink, or against a wet exterior wall.
For boards with severe damage that oil cannot repair, consider building a custom resin cutting board for a long-lasting, low-maintenance alternative.
How to Store Your Oiled Cutting Board for Maximum Lifespan
Proper storage is just as important as regular oiling for preventing warping and damage. After oiling and curing, store your board upright, not flat, to allow air circulation on both sides and prevent moisture from getting trapped against one surface. Avoid storing it in a damp cabinet, under the sink, or near a dishwasher or stove, where heat and steam can degrade the wood over time. If you store your board in a drawer, place a dry cloth or paper towel between the board and the drawer bottom to absorb any residual moisture. Never lean the board against heavy pots or pans that could dent or scratch the surface. For extra organization, check out our guide to kitchen storage solutions to keep your prep space tidy and functional.
Troubleshooting Common Cutting Board Issues
Even with regular oiling, you may run into minor issues with your board. Here’s how to fix them:
- Sticky or gummy surface: Caused by over-oiling or using cooking oils. Wipe the board down with a mixture of warm water and mild dish soap, then dry completely. Sand the surface lightly with 220-grit sandpaper to remove buildup, then re-oil with a thin, even coat of food-grade mineral oil.
- Small cracks or splits: Apply a thick layer of mineral oil and let it sit for 24 hours to fill the gap. For deep, large cracks that cannot be filled with oil, replace the board for food safety reasons, as these crevices cannot be fully sanitized.
- Minor warping: Place the board on a flat surface with a heavy object (like a cast iron skillet) on top of the warped area for 24-48 hours to press it back into shape. Severe warping requires replacement, as a warped board is unstable for cutting and can cause knives to slip.
- Stains from acidic foods (beets, turmeric, wine): These are usually surface stains that will fade with regular oiling. For stubborn stains, make a paste of baking soda and water, scrub gently with a soft cloth, then rinse, dry, and re-oil.
Frequently Asked Questions
How often should I oil my wooden cutting board?
For daily use, oil your board every 2-3 weeks. For occasional use, every 3-4 weeks is sufficient. End-grain boards require more frequent oiling, every 1-2 weeks, as their porous structure absorbs moisture faster. Test if your board needs oil by dropping a few drops of water on the surface: if the water beads up, it is sufficiently oiled; if it soaks in immediately, it is time to condition.
What is the best oil for cutting boards?
Food-grade mineral oil is the most widely recommended option, as it is NSF-certified for food contact, odorless, tasteless, and will never go rancid. Fractionated coconut oil is a great natural alternative for those who prefer to avoid mineral oil.
Can I use olive oil on my cutting board?
No. Olive oil and other cooking oils (vegetable, canola, etc.) are high in unsaturated fats that oxidize quickly when exposed to air and moisture. This leads to rancidity, which causes off-flavors to transfer to food, sticky buildup that traps bacteria, and a gummy surface that is hard to clean.
How do I apply oil to a cutting board properly?
First, ensure the board is completely clean and dry. Apply a thin, even coat of food-safe oil to the entire surface (top, bottom, sides) with a lint-free cloth. Let it soak for 30-60 minutes, then wipe off all excess oil. Let the board cure overnight before using it again.
Can I over-oil my cutting board?
Yes. Over-oiling leads to sticky, gummy buildup that attracts dust and bacteria, and can make food taste off. A thin, even coat is all your board needs to stay conditioned. If you have over-oiled, wipe away excess oil, let the board dry completely, then lightly sand with fine-grit sandpaper if needed before re-oiling lightly.
How long does cutting board oil take to dry?
Most food-grade mineral oils will absorb into the wood within 30-60 minutes. Wipe off excess, then let the board cure for 4-6 hours, or ideally overnight, before using it for food prep.
Conclusion
Oiling your cutting board is a simple, low-effort task that extends the life of your board by years, prevents food safety risks from bacteria buildup, and keeps your prep surface smooth and functional for all your cooking needs. By using the right food-safe oil, following the step-by-step process above, avoiding common mistakes, and storing your board properly, you can keep your cutting board looking and performing like new for decades. Ready to keep all your kitchen tools in top shape? Browse our full kitchen care blog for guides on everything from knife maintenance to produce storage.

I’m Abby Lu, a passionate home cook who loves simplifying everyday meals. At PlugChef.com, I share product reviews and cooking guides to help you find the best tools for your kitchen.
Related posts:
 How to Make a Fruit Basket for a Gift: Easy DIY Guide
 Do You Need a Basket? Essential Guide for Air Fryers
 How to Adjust Syrup Dispenser Pressure: Expert Tips
 White Appliances in Kitchen Design: Elevate Your Space
 Kitchen Appliances Stainless Steel Vs White: Ultimate Showdown
 Kitchen Appliances Made in Usa: Quality and Innovation

