

There’s a reason sun-dried tomatoes are a staple in gourmet pantries: their concentrated, tangy-sweet flavor adds depth to pasta, salads, charcuterie boards, and weeknight meals far better than fresh or canned varieties. Store-bought options often contain added sulfites, preservatives, and excess salt, but homemade versions let you control every ingredient for a fresher, more customizable result. Best of all, the process requires minimal equipment and just a little patience, whether you have backyard space for traditional sun drying or only a standard oven. This guide walks you through every step to make perfect, chewy sun-dried tomatoes at home, with pro tips to avoid common mistakes like sogginess, mold, or burnt flavor.
Choosing the Right Tomatoes for Drying
The type and ripeness of tomatoes you select will make or break your final batch, so start with high-quality produce for the best results.
Top Varieties for Perfect Results
Not all tomatoes are suited for drying: the best options have thick flesh, low water content, and few seeds, which cut down drying time and prevent sogginess. Plum tomatoes are the gold standard for sun drying, with Roma and San Marzano being the most widely available varieties. These tomatoes have roughly 5% less water content than standard slicing tomatoes like beefsteak, and their dense flesh dries evenly into a chewy, flavorful final product. Heirloom plum varieties like Amish Paste also work beautifully for a more complex, sweet flavor. Cherry tomatoes are a viable alternative if you prefer their bright, tangy taste, but they take 20–30% longer to dry and should be halved lengthwise to expose more surface area. Avoid large, watery beefsteak or heirloom slicing tomatoes entirely: their high moisture content leads to long, uneven drying times and a high risk of mold or spoilage. If you’re concerned about pesticide residue, opt for organic tomatoes, as the skin remains on the final product.
Ripeness and Quality Checks
Tomatoes should be fully ripe but still firm to the touch when you select them for drying. Underripe tomatoes lack the natural sugars needed for that signature sweet-tangy flavor, and will taste bland even after drying. Overripe tomatoes, meanwhile, have soft, mushy flesh and excess water content that slows drying and increases the risk of mold. Look for deep, uniform color (red for standard varieties, yellow or orange for heirloom types) and a slight give when pressed gently – they should not feel squishy or have soft spots. If your tomatoes are slightly underripe, leave them on the counter at room temperature for 1–2 days to ripen fully before prepping. A common mistake new makers make is using overripe "discard" tomatoes to avoid waste, but this almost always leads to ruined batches.
Prep Work for Consistent Drying
Proper prep is the difference between perfectly chewy sun-dried tomatoes and soggy, unevenly dried slices. Follow these steps to set your batch up for success.
Washing and Pre-Drying
Start by rinsing tomatoes under cool running water to remove dirt, debris, and any surface pesticide residue. For tomatoes with thick or bumpy skins, scrub gently with a comprehensive brush set to dislodge trapped dirt. Pat the tomatoes completely dry with clean paper towels or a lint-free kitchen towel – excess surface moisture will slow down the drying process and lead to uneven results. In practice, skipping this step is one of the most common causes of sogginess, even when using a dehydrator or oven.
Slicing for Even Drying
Uniform slice thickness is critical for consistent drying: aim for ¼-inch thick slices for chewy, flexible sun-dried tomatoes, or ⅛-inch slices if you prefer a crispier, chip-like texture. For plum and Roma tomatoes, slice lengthwise from top to bottom to expose the maximum surface area to heat and air. Halve cherry tomatoes crosswise, and remove any large core pieces to avoid tough, chewy bits in the final product. Uneven slices will dry at different rates, leaving you with a mix of underdone, moist slices and overdone, brittle ones.
Seeding for Faster, Sweeter Results
While optional, removing the seed gel (the moist, jelly-like substance holding the seeds) will significantly improve your final product. The gel holds a disproportionate amount of the tomato’s total water content, so removing it cuts overall drying time by roughly 25% and reduces bitterness from overripe seeds. To seed, slice tomatoes in half lengthwise, then use a small spoon or your finger to scoop out the gel and seeds, leaving only the firm flesh behind. You do not need to remove every individual seed – just scoop out the bulk of the gel for the best results.
Seasoning Options for Custom Flavor
Seasoning can be added either before or after drying, depending on the flavor profile you want. Keep these guidelines in mind to avoid burnt or muted flavors.
Pre-Drying Seasoning
Lightly sprinkling salt on tomato slices before drying draws out excess surface moisture, which can speed up drying time slightly. If you choose to salt before drying, use a light hand: excess salt will be concentrated as the tomatoes lose water, leading to an overly salty final product. Dried herbs like oregano, thyme, and basil work well added before drying, as their flavors will infuse the tomatoes as they dry. Avoid fresh herbs, however, as their high moisture content can lead to mold during long drying cycles. Skip sugary seasonings like brown sugar or honey before drying, as they will caramelize and burn at low drying temperatures.
Post-Drying Flavor Boosts
Once tomatoes are fully dried, you can toss them with olive oil, balsamic vinegar, fresh garlic, or chili flakes for extra flavor. If you plan to store tomatoes in oil (see the storage section below), add dried herbs, garlic, or peppercorns to the jar at this stage to infuse the oil as it sits. Note that adding fresh garlic to oil-preserved tomatoes increases the risk of foodborne illness if not stored properly, so only use fresh aromatics if you plan to keep the jar refrigerated and use it within 2–3 weeks.
 Low-heat oven drying is a reliable option for makers without consistent outdoor sun.
Credit: insimoneskitchen.com
Low-heat oven drying is a reliable option for makers without consistent outdoor sun.
Credit: insimoneskitchen.com
Three Proven Drying Methods
Choose the method that fits your climate, schedule, and available equipment. Each produces delicious results with the right technique.
Traditional Sun Drying
Sun drying is the most energy-efficient method, but it only works in warm, dry, sunny conditions. For successful sun drying, you’ll need at least 6 hours of direct sunlight per day, temperatures above 85°F (29°C), and humidity below 60%. Set up a stainless steel or food-safe plastic mesh rack elevated off the ground to allow airflow underneath, and lay tomato slices in a single layer without overlapping. Cover the slices with cheesecloth or a fine mesh bug netting to keep out insects and debris, and turn them every 2–3 hours to ensure even drying. Bring the rack indoors at night or if rain is forecast, as overnight dew will add moisture and slow the drying process. Drying time ranges from 3 to 7 days depending on weather conditions. A small fan placed nearby can increase airflow and cut drying time by a day or more in humid climates.
Oven Drying (No Sun Required)
Oven drying is a reliable option for makers without consistent outdoor sun, and works in any climate. Preheat your oven to the lowest possible setting, ideally 140°F (60°C). If your oven only goes down to 150°F, prop the door open 1–2 inches with a wooden spoon to let moist air escape, and use the convection setting if available to speed up moisture removal. Line a baking sheet with parchment paper, arrange tomato slices in a single layer with space between each slice for airflow, and place in the oven. Check the tomatoes every hour, turning them halfway through the drying process. Drying time ranges from 6 to 12 hours, depending on slice thickness and oven temperature. This method uses more energy than sun drying or a dehydrator, but is accessible for almost all home cooks.
Using A Dehydrator
A food dehydrator is the most reliable option for consistent, year-round results, as it maintains steady temperature and airflow regardless of outdoor conditions. Set your dehydrator to 135°F (57°C), arrange tomato slices on the trays without overlapping, and place the trays in the dehydrator. Rotate the trays halfway through the drying cycle if your dehydrator has a single heating element, to ensure even exposure to warm air. Drying time ranges from 8 to 12 hours, depending on slice thickness. This method also lets you dry other produce, like herbs, fruit, or jerky, at the same time for maximum efficiency.
Testing for Doneness and Avoiding Spoilage
The Perfect Bend Test
Properly dried tomatoes should be leathery, slightly flexible, and completely dry to the touch, with no wet or sticky spots in the center. To test for doneness, hold a slice by the edge and bend it gently: it should flex without cracking, and bounce back slightly when released. If it cracks or crumbles easily, it is over-dried (still safe to use, just more brittle, ideal for blending into sauces or pesto). If it feels soft, damp, or pliable in the middle, it needs 1–2 more hours of drying time. Per USDA food preservation guidance, properly dried tomatoes should have a moisture content of 20% or lower to prevent mold growth during long-term storage USDA Drying Preservation Guide.
Preventing Mold
Mold is the most common cause of spoiled sun-dried tomatoes, but it is easy to avoid with proper technique. Always use clean, food-safe drying equipment and avoid cross-contamination with dirty utensils. If you notice any white, green, or black fuzz on a slice during drying, remove it immediately, and lower your drying temperature by 10°F if using an oven or dehydrator to reduce condensation on remaining slices. For sun drying, avoid drying on days with humidity above 70%, as excess moisture in the air will encourage mold growth. A small fan placed near your drying setup can increase airflow and reduce mold risk significantly.
Storing Sun Dried Tomatoes for Long-Term Freshness
How you store your sun-dried tomatoes depends on how soon you plan to use them and your available storage space. Follow these guidelines to keep them fresh for months.
Short-Term Room Temperature Storage
Fully dried tomatoes (with 20% or lower moisture content) will keep for 1–2 months in an airtight glass jar or food-safe container stored in a cool, dark pantry, away from direct sunlight and heat sources. If you live in a humid climate, add a food-safe desiccant packet to the container to absorb excess moisture and prevent the tomatoes from absorbing humidity and becoming sticky. For added safety if you have young children, store jars behind childproof lock systems to prevent access to choking hazards or spoiled goods.
Long-Term Freezer Storage
For storage up to 8 months, place dried tomatoes in a freezer-safe zip-top bag or airtight container, removing as much air as possible before sealing. Label the container with the date for easy tracking. No need to blanch tomatoes before freezing, and you can use them directly from frozen in cooked dishes like soups, stews, and sauces, or thaw at room temperature for 30 minutes before adding to cold dishes like salads.
Oil-Preserved Storage
Submerging dried tomatoes in extra virgin olive oil is a popular way to add extra richness and infuse the oil with tomato flavor. To do this safely, sterilize a glass jar by boiling it for 10 minutes, then let it air dry completely. Layer dried tomatoes in the jar, adding optional dried herbs, garlic, or chili flakes between layers, then pour olive oil over the top until the tomatoes are completely submerged. Seal tightly and refrigerate: oil-preserved tomatoes will keep for 2–3 weeks for best quality and food safety. Never store oil-preserved tomatoes at room temperature, as this increases the risk of botulism. The leftover infused oil can be used for salad dressings, sautéing, or as a dipping oil for bread. For extra safety, secure the jar in a cabinet with childproof cabinet latches to keep it out of reach of young children. After drying, clean your dehydrator trays or sun drying racks with a heavy-duty scrub brush to remove stuck-on tomato residue without scratching plastic or metal surfaces.
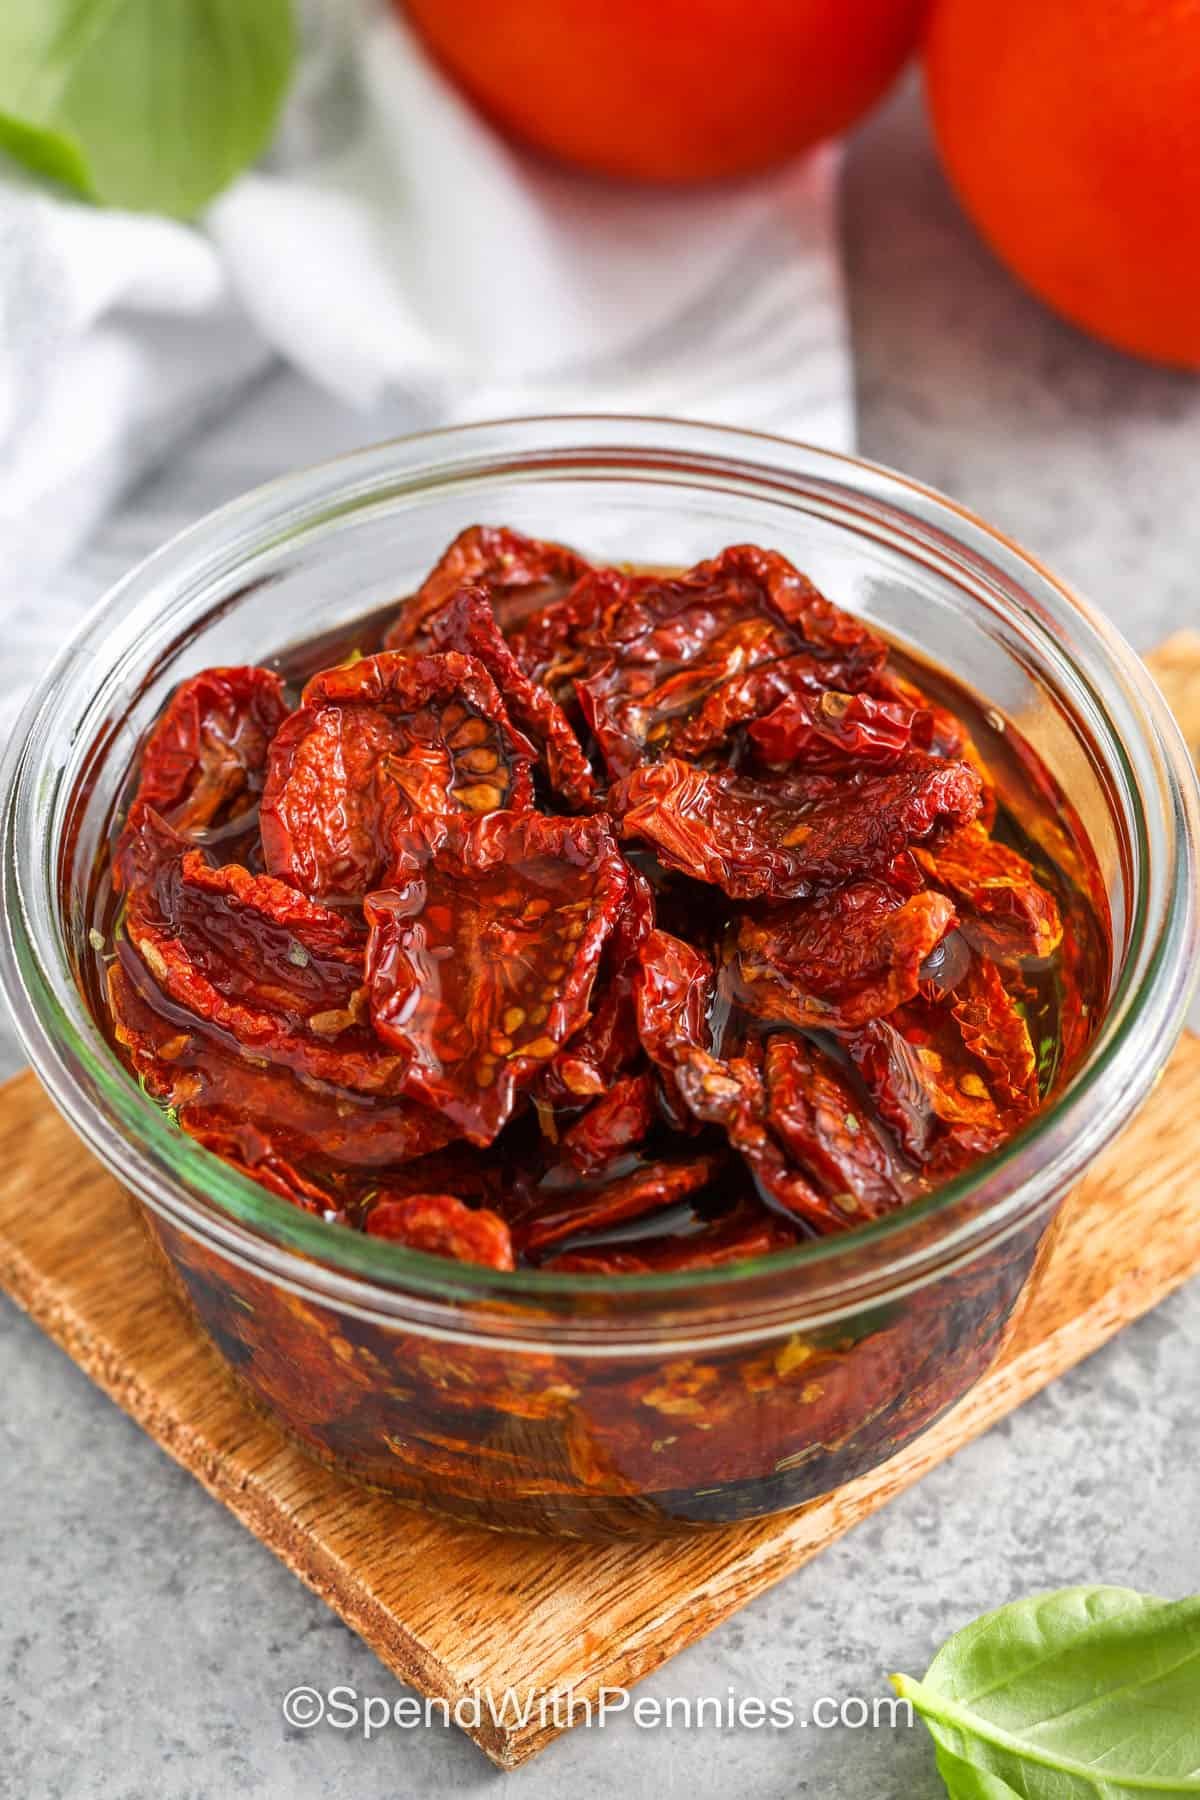 Airtight, light-blocking containers are ideal for preserving flavor and texture.
Credit: www.spendwithpennies.com
Airtight, light-blocking containers are ideal for preserving flavor and texture.
Credit: www.spendwithpennies.com
Creative Ways to Use Sun Dried Tomatoes
Sun-dried tomatoes are incredibly versatile, adding a burst of concentrated flavor to almost any savory dish. Here are our favorite ways to use them:
Quick Rehydrating Tips
If a recipe calls for softer tomato pieces, rehydrate dried tomatoes in warm water for 20 minutes, or in warm olive oil for 10 minutes for a richer, more luxurious texture. Save the rehydrating liquid to add to soups, sauces, or braises for an extra boost of tomato flavor – it’s packed with concentrated taste that you won’t want to waste.
Recipe Inspiration
- Fold chopped sun-dried tomatoes into frittatas, quiches, or scrambled eggs for a savory brunch twist
- Mix into tuna, chicken, or egg salad for a tangy, texture-rich upgrade
- Blend into hummus, pesto, or tapenade for a Mediterranean-inspired dip
- Top avocado toast or grilled cheese sandwiches for a gourmet, restaurant-quality snack
- Add to grain bowls with quinoa, farro, or roasted vegetables for extra depth
- Toss into pasta sauces, pizza toppings, or braised meat dishes for concentrated tomato flavor
- Include on charcuterie boards alongside cured meats, cheese, and crackers: for a polished presentation, use our guide to charcuterie cheese slicing to cut and arrange cheese perfectly alongside your homemade tomatoes.
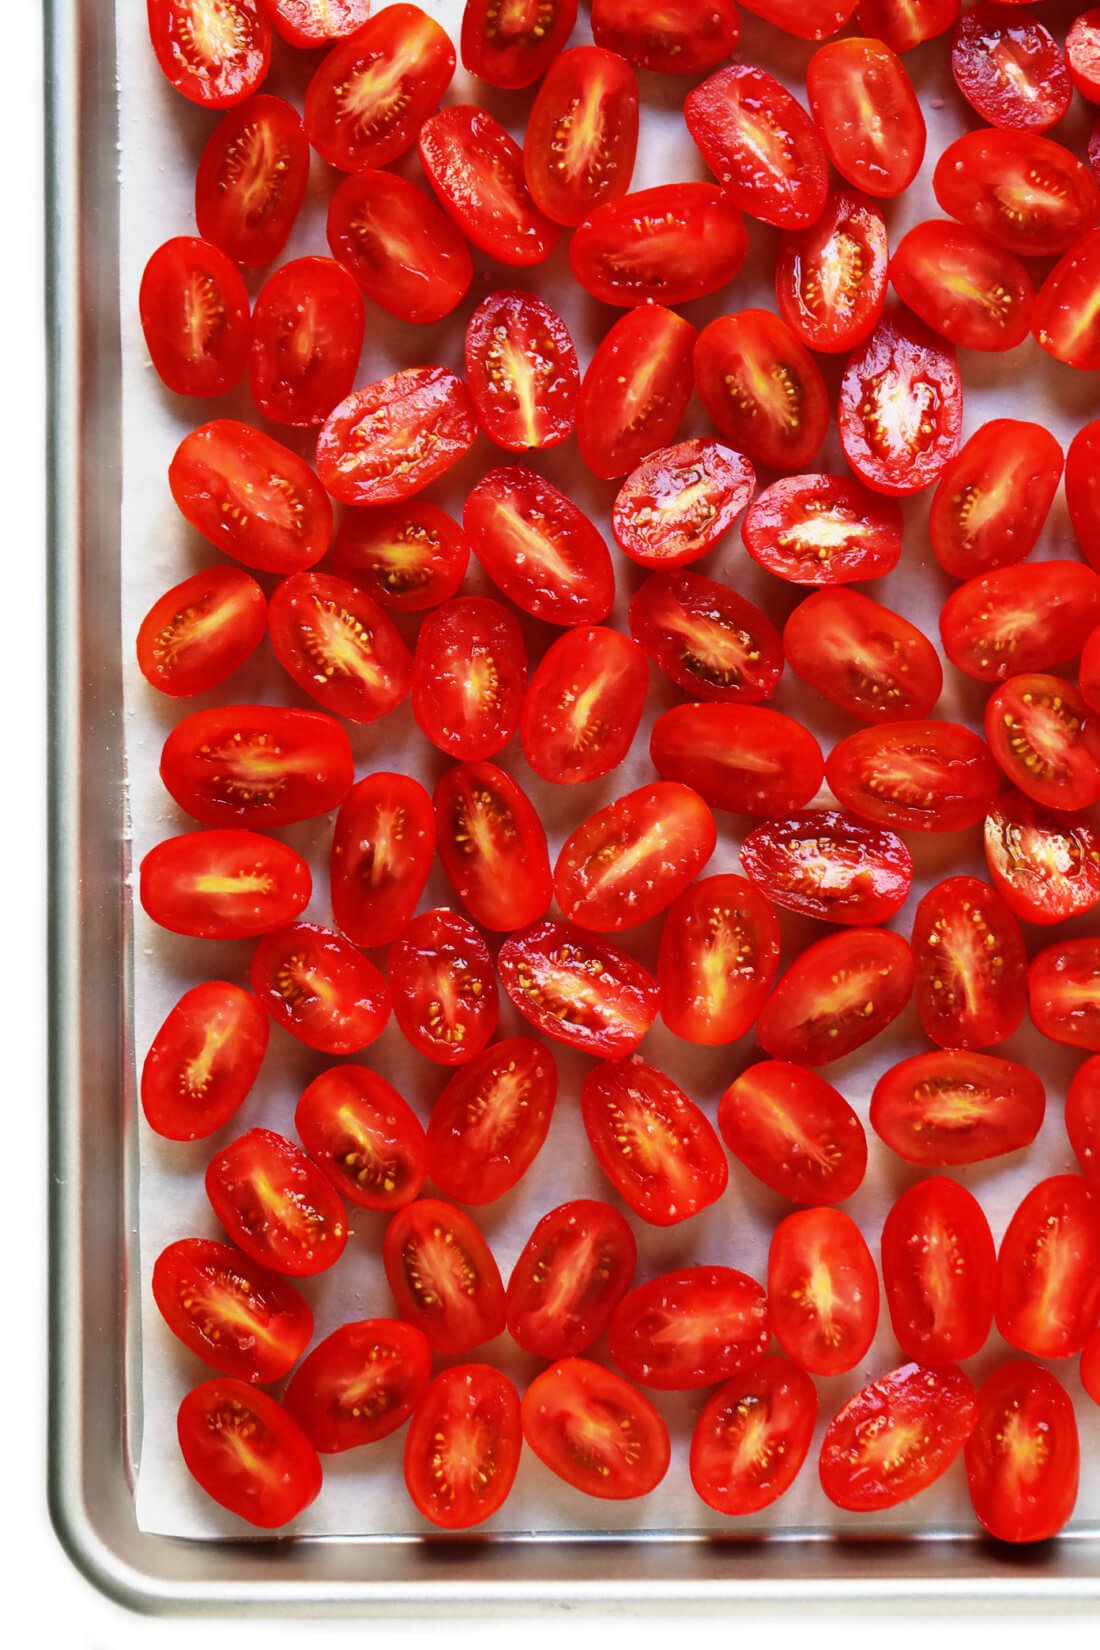 Seasoning after drying avoids burning delicate herbs during the heating process.
Credit: www.gimmesomeoven.com
Seasoning after drying avoids burning delicate herbs during the heating process.
Credit: www.gimmesomeoven.com
Frequently Asked Questions
What happens if I use overripe tomatoes for drying?
Overripe tomatoes have higher water content and softer flesh, which leads to longer drying times and a high risk of mold or spoilage. They may also turn mushy during drying, resulting in a sticky, unappealing final product. Always use firm, fully ripe tomatoes for the best results.
Can I sun dry tomatoes indoors without a dehydrator?
Indoor sun drying without direct sunlight is not effective, as tomatoes need consistent UV exposure and warm temperatures (above 85°F) to dry properly. If you don’t have access to outdoor space, use an oven or dehydrator for reliable, consistent results.
Do I need to blanch tomatoes before drying?
No, blanching is not required for sun-dried tomatoes. The drying process itself preserves the produce and prevents spoilage. Blanching is only necessary when freezing fresh tomatoes to preserve their texture, not for drying.
Why are my sun-dried tomatoes too tough?
Over-drying is the most common cause of tough, brittle sun-dried tomatoes. Remove them from the heat source as soon as they pass the bend test. If they are already over-dried, you can rehydrate them in warm water or oil for 10 minutes before use, or blend them into sauces or pesto where texture is less important.
Can I use sun-dried tomatoes that have small spots of mold?
No. Discard any tomatoes with visible mold immediately, as mold can produce harmful mycotoxins that are not destroyed by cooking. Always inspect dried tomatoes before use, and store them in airtight containers to prevent mold growth.
How do I know if my tomatoes are dry enough for oil storage?
Tomatoes intended for oil storage must be completely dry to the touch, with no moisture in the center, as excess water can cause the oil to spoil or develop harmful bacteria. If you are unsure, dry them for an additional 1–2 hours to be safe.
Conclusion
Homemade sun-dried tomatoes are a simple, cost-effective way to add intense, tangy-sweet flavor to your favorite dishes, without the added preservatives, sulfites, and excess salt common in store-bought versions. Whether you opt for traditional sun drying on a warm, sunny weekend, quick oven drying on a low-heat day, or consistent dehydrator results, you’ll end up with a versatile pantry staple that lasts for months and elevates everything from weeknight pasta to gourmet charcuterie boards. The process requires minimal equipment and just a little patience, and you can customize the flavor with your favorite herbs and spices to suit your taste. Try a small batch this week to test the method, and experiment with different seasoning combinations to find your favorite blend. For easy cleanup after prepping and drying, a high-quality quick-clean scrub brush makes quick work of tomato residue on cutting boards and drying racks.

I’m Abby Lu, a passionate home cook who loves simplifying everyday meals. At PlugChef.com, I share product reviews and cooking guides to help you find the best tools for your kitchen.
Related posts:
 Seville Expandable Cabinet And Pantry Organizer: Space Savior
 Glideware Pull Out Cabinet Organizer for Pots & Pans: Space Saver
 Small 3-Tier Shelf Organizer: Maximize Space Effortlessly
 Trader Joe’S Spicy Lentil Wrap: Delicious, Healthy, and Quick Meal!
 Easy Way to Peel Pumpkin: Quick Tips for Effortless Prep
 How Long Do Grapes Last: Ultimate Freshness Guide Revealed

