
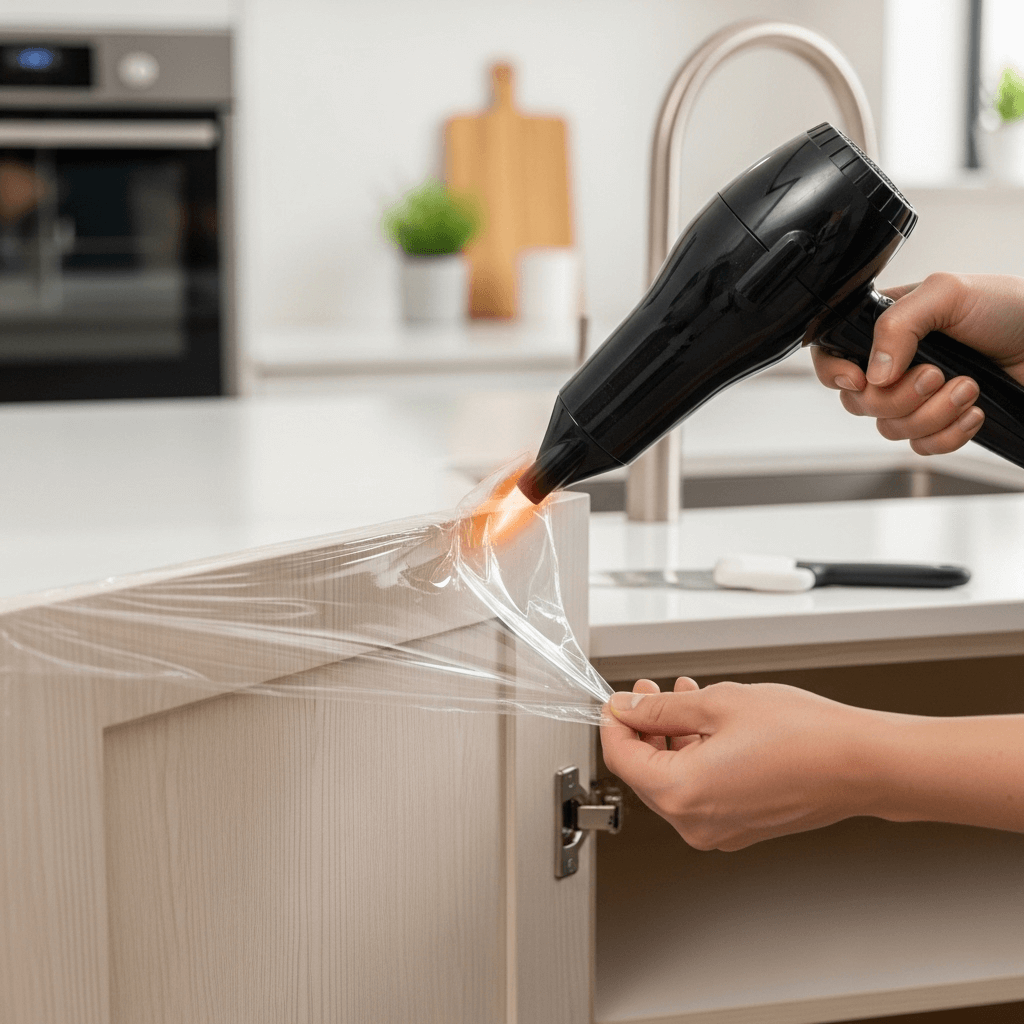
Protective film or cling wrap left on kitchen cabinets can become sticky, brittle, or discolored — but you usually don’t need to replace the cabinet. This guide gives a clear, step-by-step workflow for safe, effective removal of plastic protective film and adhesive residue from common finishes (painted, varnished wood, laminate/thermofoil, and metal). It explains how to choose tools, how different finishes respond, which solvents are safe, and when to stop and call a professional. Read the quick checklist, follow the staged technique, then use the finish-specific residue methods and aftercare.
Summary of what to expect
- Typical time: 20–60 minutes for one cabinet door (larger projects scale up).
- Basic approach: heat to soften adhesive, peel slowly, clean residue with finish-appropriate solvent, then restore the finish.
- Safety: ventilate when using solvents, test in a hidden spot, and avoid metal scrapers.
Key tools and supplies (quick checklist)
- Hairdryer (or heat gun on low)
- Plastic razor blade or plastic putty knife
- Microfiber cloths, paper towels
- 70% isopropyl alcohol and white vinegar
- Mild dish soap and warm water
- Baking soda (for paste)
- Citrus- or soy-based adhesive remover (optional)
- Gloves and eye protection
Gather the hairdryer, plastic scraper, and isopropyl alcohol first — they handle most jobs.
Assess the situation before you start
Take a few minutes to identify what you’re dealing with; this prevents common mistakes like using the wrong solvent or excessive heat.
- Identify the film type
- Thin cling film (temporary protection) — usually low-adhesion and peels cleanly.
- Factory protective film (heavier, often vinyl) — stronger adhesive and may leave residue.
- Vinyl wrap or contact film — thicker and sometimes heat-activated adhesives.
- Inspect the cabinet finish
- Painted (latex/enamel): can lift or dull with strong solvents.
- Stained/varnished wood: sensitive to saturation and abrasive scrubbing.
- Laminate/thermofoil: thin plastic surface bonded to substrate; heat can soften it.
- Metal/stainless: usually tolerant of mild solvents, but avoid polishing abrasives on brushed finishes.
- Test a corner
- Warm and lift a tiny hidden corner (inside edge or door back). If it peels cleanly, continue with heat-and-peel. If it fragments or leaves heavy residue, plan for residue removal and gentler methods.
A common mistake is jumping to solvents before trying heat and mechanical lifting. In practice, heat + slow peeling often prevents the need for chemicals.
Safety, ventilation, and disposal
Safety prevents finish and health problems.
- Ventilation: open windows and run a fan. If you use commercial adhesive removers, ventilate according to label instructions and follow NIOSH guidance on workroom ventilation and PPE from the CDC’s NIOSH pages.
- PPE: wear nitrile gloves and eye protection when using solvents. Don’t inhale fumes.
- Fire safety: keep heat tools away from flammable vapors and materials.
- Disposal: collect used cloths and paper towels in a sealed bag; follow local guidance for disposing of solvent-saturated rags (some solvents can be fire hazards). For safer chemical choices and disposal guidance, refer to EPA guidance on household products at the EPA site.
If you’re unsure about disposal or chemical safety, stop and consult the product label or a local hazardous-waste authority.
Tools: what to use and what to avoid
Use tools that remove film without damaging finishes.
Recommended
- Hairdryer on medium or heat gun on low — keep it moving and test first.
- Plastic scraper or plastic razor blade — firm but non-scratching.
- Microfiber cloths for cleaning and buffing.
- Cotton swabs for detail work around hinges.
Avoid
- Metal putty knives or razor blades directly on finishes — they cause scratches and gouges.
- Acetone or lacquer thinner on painted, laminate, or thermofoil surfaces — these can strip finishes.
- High, focused heat near veneers or thermofoil — warping or bubbling can occur.
Step-by-step removal: heat, lift, and peel
Follow these controlled steps for the safest removal.
- Prepare the area (10 minutes)
- Clear countertops and remove nearby objects. Lay down towels to catch scraps and drips.
- Open windows and set a fan to exhaust air. Keep all tools within reach.
- Warm a small section (30–90 seconds)
- Hold the hairdryer 4–6 inches from the surface. Move back and forth to warm evenly. The surface should feel warm, not painfully hot. For thin thermofoil or veneer, use shorter bursts.
- Lift an edge
- Use a fingernail or the corner of a plastic scraper to start a corner. Don’t force it; if the edge resists, apply more heat. If the film tears, reheat the surrounding area and lift the next segment.
- Peel at a low angle
- Pull the film back slowly at about a 30–45° angle. This reduces adhesive transfer. Work one 6–12 inch section at a time for large pieces.
- Reheat as needed
- If you hit a stubborn patch, warm just ahead of the peel line and continue slowly. Keep the heat source moving to avoid localized overheating.
- Remove residue
- After peeling, proceed to residue-removal methods in the next section.
Trade-offs: higher heat speeds removal but increases risk to delicate finishes. In practice, medium heat and patience give the best results.
Image source: www.reddit.com
Removing adhesive residue — quick reference table
Use this table to pick the first-line solvent and a backup for tougher residue.
| Finish | First attempt | If residue persists |
|---|---|---|
| Painted (latex/enamel) | Warm soapy water → microfiber cloth | 70% isopropyl alcohol on cloth |
| Varnished/stained wood | Damp soft cloth (minimal water) | Baking soda paste; very mild citrus remover |
| Laminate / thermofoil | 70% isopropyl alcohol | Citrus- or soy-based remover (test first) |
| Metal / stainless steel | Mineral oil or alcohol | Citrus remover; then stainless polish |
Always test in an inconspicuous area for 30–60 seconds before full use.
Detailed residue-removal techniques (by finish)
Painted surfaces (latex/enamel)
- Start with warm water and mild dish soap on a microfiber cloth. Wipe with the grain if visible.
- If adhesive remains, dampen a cloth with 70% isopropyl alcohol and blot gently, then wipe clean. Avoid acetone or strong solvents — they can remove paint.
- When finished, rinse with a damp cloth and dry. Consider a light coat of a water-based polish for sheen restoration.
Varnished or stained wood
- Do not saturate the wood. Use a barely damp cloth with warm soapy water and wipe lightly.
- For stuck spots, make a paste of baking soda + a few drops of water; rub gently with a soft cloth — test first.
- If needed, use a citrus-based remover sparingly and wipe immediately; always finish with a small amount of wood-appropriate oil or polish to restore surface oils.
Laminate and thermofoil
- Heat + peel usually works best. For residue, use isopropyl alcohol applied to a cloth and rubbed lightly.
- Avoid prolonged solvent exposure and avoid acetone or lacquer-based removers — they can cloud or delaminate laminate surfaces.
- After cleaning, buff with a dry microfiber cloth.
Metal and stainless steel
- Mineral oil or isopropyl alcohol usually dissolves adhesive. Rub with the grain on brushed finishes.
- Wipe off any oil residue, then finish with a stainless cleaner/polish to restore luster.
Practical tip: apply solvent to the cloth first — never soak the cabinet surface. Blot and lift residue; do not rub aggressively.
Stronger options and how to use them safely
When mild methods fail, commercial adhesive removers work but require care.
Common household options
- Citrus-based removers (d-limonene): effective and lower odor; safe on many surfaces if tested.
- Soy-based removers: similar to citrus, often less aggressive.
- Isopropyl alcohol (70–99%): fast-evaporating, good for many finishes.
What to avoid
- Acetone, lacquer thinner, or nail-polish remover on painted, laminate, or thermofoil finishes — they dissolve or haze surfaces.
- Petroleum distillates on unfinished wood (can darken grain).
How to apply
- Test a hidden area for 30–60 seconds.
- Apply product to a cloth, not directly to the cabinet.
- Gently blot and lift adhesive; let the solvent sit only as long as the product label allows.
- Wipe with warm soapy water to remove residues and neutralize the solvent.
- Ventilate until odors dissipate.
Environmental note: Collect solvent-soaked rags and dispose of them per local hazardous-waste rules. For guidance on safer cleaning choices and disposal, see EPA recommendations.
Aftercare: restore and protect the finish
Once adhesive is removed, restore the surface.
- Clean: wash with warm soapy water, rinse with a damp cloth, and dry thoroughly.
- Wood: apply a small amount of wood oil or polish after full drying to replenish oils and protect the finish (follow manufacturer instructions).
- Laminate/thermofoil: buff with a dry microfiber cloth to remove streaks. Avoid oil-based polishes that leave residue.
- Metal: finish with an appropriate stainless or metal polish to restore sheen.
Allow finishes to cure for several hours before heavy use, and avoid placing wet or hot items against recently treated areas until dry.

Close view of protective film being peeled from cabinet edge.
Image source: seashell-kudu-262783.hostingersite.com
Troubleshooting common problems
- Film shreds into fragments: heat a small zone, use the plastic scraper at a shallow angle, and pick up fragments with a soft cloth (not metal tweezers).
- Finish softens or clouds during testing: stop immediately. This indicates the solvent or heat is too aggressive — switch to gentler methods or consult a pro.
- Dark spots or stain changes on wood: do not keep wet; dry immediately. Consider a professional refinisher if discoloration persists.
- Haze on laminate after solvent: buff with a clean microfiber cloth and, if needed, a manufacturer-recommended laminate polish.
If repeated gentle attempts fail, or if the finish is damaged during testing, consult a local cabinet refinisher. Often the trade-off between more aggressive chemical removal and a refinishing repair makes a professional estimate worthwhile.
Prevention: how to avoid future problems
- Remove factory protective film promptly — don’t leave it in place for months.
- For short-term protection, use painter’s tape and paper or cloth coverings rather than long-term adhesive films.
- Choose low-adhesion temporary films if temporary protection is needed.
- Use non-adhesive shelf liners and protective pads for inside cabinets.
For broader kitchen organization and protection ideas, see our kitchen organization guide and our tips to organize pots and pans for related projects.
When to call a professional
Hire a pro when:
- A finish softens or discolors during your test.
- You’re dealing with antique or high-value cabinetry.
- The film covers very large areas and DIY attempts would take many hours.
- You prefer a refinisher to repair finish damage rather than risk further DIY attempts.
A cabinet refinisher can advise whether strip-and-refinish, spot repair, or repainting is the safer long-term solution.
FAQs — quick answers
- How long should I heat the film before peeling? Aim for 30–90 seconds per small section with a hairdryer 4–6 inches away; the surface should be warm, not too hot.
- Can I use a metal scraper? No — metal tools often scratch and gouge cabinet finishes. Use plastic scrapers only.
- Will vinegar remove adhesive? Diluted vinegar can help light residue but is usually slower than isopropyl alcohol or citrus removers.
- Is nail polish remover (acetone) safe? Avoid acetone on painted, laminate, or thermofoil surfaces — it can dissolve or dull the finish.
- What if the film has been on for years? Older films may fragment and require repeated heating and gentle scraping; patience and testing are essential.
- Where can I find safer cleaning guidance? For general household product safety and alternatives, see EPA recommendations and NIOSH ventilation guidance.
Useful internal resources
- For broader cleaning and organization projects, check the kitchen organization guide.
- Need to organize cookware? See how to organize pots and pans.
- For natural cleaning approaches, read natural sink cleaning.
- Regular upkeep tips are in routine kitchen upkeep.
- For drawer projects, see organize drawers.
- For step-by-step cabinet layout tips, try kitchen cabinet organization.
Conclusion — one-cabinet mini plan
Start with one cabinet: warm a corner (30–90 seconds), lift slowly with a plastic scraper, and switch to isopropyl alcohol on a cloth for residue. Work patiently, test solvents, and ventilate. If you hit damaged finish or persistent haze, stop and consult a professional refinisher.
Ready to try it? Gather a hairdryer, a plastic scraper, and 70% isopropyl alcohol and remove the film from a single door today — you’ll likely find the rest follows easily. If you prefer professional help, get a local refinisher estimate before using aggressive chemicals.

Finished cabinet after adhesive removal and polishing.
Image source: seashell-kudu-262783.hostingersite.com For related how-to help and follow-up projects, check these step-by-step guides: kitchen organization, organize cabinets and pots, clean sink naturally, kitchen maintenance, organize drawers, and organize a cabinet.
For official workplace ventilation and personal-protection guidance when using solvents or working in enclosed spaces, see NIOSH at https://www.cdc.gov/niosh/.
Quick one-door checklist (printable)
- Gather: hairdryer, plastic scraper, microfiber cloths, 70% isopropyl alcohol.
- Test: hidden corner — heat + solvent for 30–60 seconds.
- Remove: heat 6–12" sections, lift at 30–45° angle, reheat as needed.
- Clean: blot residue with alcohol or mild remover, rinse, and dry.
- Restore: apply finish-appropriate polish or oil if needed.
Ready to remove the film? Start with a single cabinet door, work slowly, and stop if a test area shows finish damage — then get a professional estimate.

I’m Abby Lu, a passionate home cook who loves simplifying everyday meals. At PlugChef.com, I share product reviews and cooking guides to help you find the best tools for your kitchen.
Related posts:
 How to Organize a Corner Kitchen Cupboard: Expert Tips
 How to Grow Organic Kitchen Garden: Expert Tips
 How to Best Organize Kitchen Cabinets: Expert Tips
 How to Clean Kitchen Sink Drain Naturally: Easy & Effective Tips
 7 Steps in Cleaning the Kitchen: Ultimate Guide for a Sparkling Space
 Granite Sink Cleaner: The Best Way to Keep Your Sink Clean

