
Opening a kitchen drawer to find tangled utensils, lost gadgets, and cluttered space is a daily frustration for most home cooks. In practice, rummaging through disorganized drawers adds 2–5 minutes to every meal prep session, wasting hours of time annually, not to mention the risk of nicks from loose sharp tools or scratched utensils tossed in a pile. The good news? A functional, easy-to-navigate drawer system is achievable in under an hour, no expensive custom solutions required. This guide covers practical, expert-backed steps to transform your kitchen drawers from chaotic to efficient, tailored to your cooking habits and drawer size.
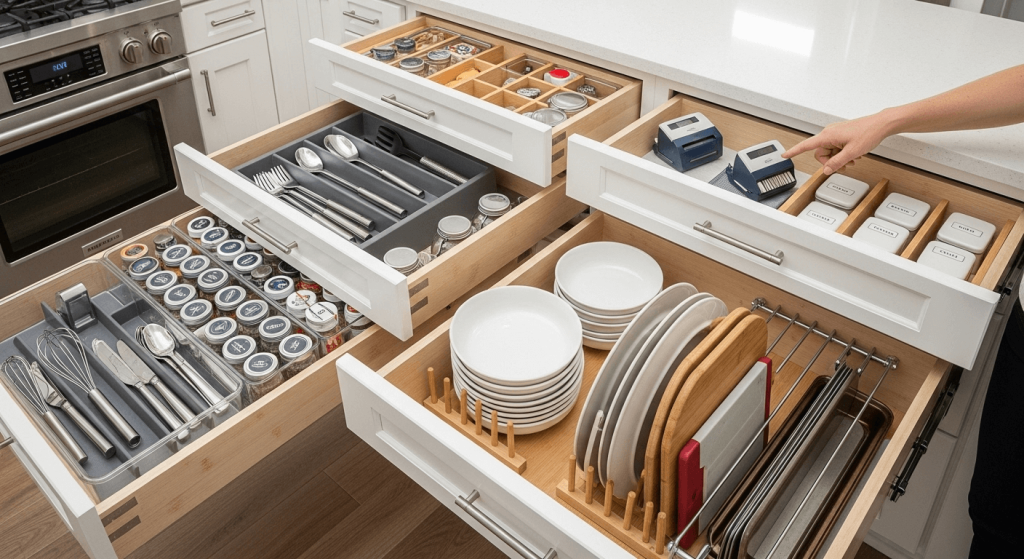
 Organized kitchen drawer with utensil trays and categorized tools keeps essentials accessible for fast meal prep.
Why Kitchen Drawer Organization Is Worth the Effort
Beyond the obvious benefit of finding what you need in seconds, organized drawers improve kitchen safety, extend the life of your tools, and reduce daily stress. Loose sharp knives and heavy pots stored in shallow drawers are a leading cause of minor kitchen cuts, per common home safety observations, while bent or scratched utensils from being tossed in a pile need to be replaced far more often. A well-designed system also cuts down on decision fatigue: when every tool has a designated spot, you can focus on cooking instead of hunting for a spatula. The small upfront time investment of 30–60 minutes pays for itself in saved frustration over the course of a year. For more on this, see our guide on kitchen hood maintenance tips.
Step-by-Step Kitchen Drawer Organization
Follow this proven process to organize any kitchen drawer, from shallow utensil slots to deep pull-out storage:
1. Empty and Declutter First
Start by removing every item from the drawer and laying them out on a counter. Sort items into three piles: keep, donate, and toss. Be ruthless with "just in case" gadgets: if you haven’t used a tool in 12 or more months, it likely doesn’t belong in your everyday drawer. Per University of Illinois Extension recommendations, purging unused kitchen tools every 6–12 months prevents clutter buildup and makes meal prep more efficient. Toss any damaged items: cracked plastic utensils can harbor bacteria, rusted metal tools should be discarded, and non-stick cookware with peeling coating is no longer safe for food contact.
2. Categorize by Use Frequency, Not Just Type
Instead of only grouping items by type (all utensils together, all gadgets together), split items into two core groups: everyday essentials (the 20% of tools you use 80% of the time) and occasional items. Everyday tools like your go-to spatula, tongs, chef’s knife, and wooden spoon belong at the front of the drawer, at waist height, so you don’t have to bend or reach to grab them. Following FDA kitchen safety guidelines, store heavy items like cast iron skillets at the bottom of deep drawers to prevent tipping and reduce injury risk. Occasional tools like pastry brushes, zesters, and corn strippers can go in the back of the drawer or a lower, less accessible storage spot.
3. Measure and Choose the Right Organizers
Before buying any drawer organizers, measure your drawer’s interior width, depth, and height to avoid ill-fitting products that slide around or won’t close properly. The best organizer type depends on your drawer size and needs:
- Adjustable bamboo dividers: Durable, sustainable, and flexible for oddly shaped drawers, but may slide if not secured with non-slip liner.
- Silicone utensil trays: Non-slip, dishwasher safe, and gentle on utensils, but can hold odors if not cleaned regularly.
- Tiered organizers: Ideal for deep drawers, creating two levels of storage to eliminate digging, but add a small amount of height so confirm your drawer can close fully with the organizer installed. Honest trade-off: custom cut-to-size dividers cost 2–3x more than adjustable options, but they fit perfectly and never slide, making them a worthwhile investment for high-use cooking drawers.
4. Arrange, Label, and Maintain
Arrange items so handles face upward for easy grabbing, and avoid overfilling drawers: leave 20–30% empty space to make it easy to find and retrieve items without rummaging. Labeling doesn’t need to be fancy: a label maker, or even a piece of masking tape with a marker, works for most households. For multi-cook homes, color-code labels to avoid confusion: red for baking tools, blue for everyday utensils, green for small gadgets. Add a non-slip drawer liner to the bottom of the drawer to prevent items from sliding when you open it quickly, and to protect the drawer surface from scratches. Do a quick 5-minute tidy every week to put items back in their designated spots, and a full declutter and reorganize every 6 months to keep the system functional. Wipe down your cutting boards before storing to avoid tough surface stains and bacterial buildup.
How to Organize Specific Drawer Types
Different drawer sizes and uses require slightly tailored approaches:
Shallow Utensil Drawers
Common in small apartments, RVs, and galley kitchens, shallow drawers have limited vertical space. Use slim, low-profile dividers to avoid wasting space, and only store your 10–15 most-used everyday tools. Store bulkier items like rolling pins, large whisks, or specialty gadgets in a deeper drawer or adjacent cabinet. Stand utensils handle-up in vertical slots to fit more items without tangling.
Deep Drawer Organization
Deep drawers are often the most underutilized storage space in a kitchen, but they can quickly become chaotic if not organized properly. Use tiered organizers to create two levels of storage, so you don’t have to dig to the back to find items. Store heavy items like cast iron skillets or Dutch ovens at the bottom of the drawer to prevent tipping. Use vertical file organizers to store flat items like your handmade wooden cutting boards, baking sheets, and placemats upright, so they’re easy to grab without sliding around. A non-slip liner on the drawer bottom keeps all items in place, even when you pull the drawer out quickly. Store cast iron skillets at the bottom of deep drawers to prevent tipping, and season them regularly to avoid rust, just as you would with a quality cast iron set.
 Tiered organizers maximize vertical space in deep, underutilized kitchen drawers.
Cookware and Lid Drawers
If you store pots, pans, and lids in a dedicated drawer, use vertical lid organizers to stack lids neatly without scratching non-stick surfaces. Store lids separately from pots to avoid damage, and label lid slots by size if you have multiple matching sets, so you can grab the right lid in seconds without lifting every pot to check.
Coordinating Drawer and Cabinet Organization
A cohesive kitchen storage system reduces cognitive load, so you don’t have to hunt for items across drawers and cabinets. Use matching organizers across all storage spaces for consistency, and store similar items in the same general zone: for example, keep all baking tools (measuring cups, mixing bowls, cookie cutters) in one cabinet and one adjacent drawer, so you don’t have to run around the kitchen to find what you need. Store food storage containers with their lids in a dedicated drawer, sorted by size, so you can grab a matching set in seconds. Stack pots and pans in cabinets with shelf risers to create extra levels, so you can see all sizes at a glance. Store rarely used items like holiday serveware, extra gadgets, or bulk dry goods in upper cabinets, so your everyday drawers stay uncluttered and easy to access. This coordinated approach extends to all kitchen storage areas, reducing overall clutter and speeding up meal prep.
 Coordinated kitchen storage with organized drawers, cabinets, and clear countertops streamlines meal prep and reduces clutter.
Common Kitchen Drawer Organization Mistakes to Avoid
Even with the best intentions, these common errors can derail your organization system:
- Overfilling drawers: Cramming too many items into a drawer makes it hard to find what you need, and can damage utensils. Stick to 70–80% capacity to leave room for easy access.
- Buying ill-fitting organizers: Always measure your drawer before purchasing organizers, as even 1 inch of extra width can make an organizer useless or prevent the drawer from closing.
- Ignoring ergonomics: Store heavy or frequently used items at waist height to avoid unnecessary bending or reaching, which reduces long-term strain on your back and joints.
- Skipping maintenance: Even the best organization system fails if you don’t do quick weekly tidies and full declutters every 6 months. Set a recurring phone reminder to make maintenance a habit.
Frequently Asked Questions
How long does it take to organize a kitchen drawer?
Most standard utensil drawers take 15–30 minutes to fully declutter and organize, including time to sort items and set up dividers. Deep drawers or those storing large cookware may take 45–60 minutes. The small upfront time investment pays off in hours of saved frustration over the course of a year.
What are the best drawer organizers for small kitchens?
Adjustable slim dividers, over-the-door hanging utensil organizers, and tiered shallow trays work best for small spaces, as they maximize vertical storage without taking up extra footprint. Avoid bulky, fixed-size organizers that waste valuable drawer space.
How often should I reorganize my kitchen drawers?
Do a full declutter and reorganize every 6–12 months, and complete a quick 5-minute tidy every week to put items back in their designated spots. This prevents clutter from building up and keeps your system functional long-term.
Can I organize deep drawers without expensive custom dividers?
Yes, adjustable tiered organizers, stackable plastic bins, and even repurposed lined cardboard boxes work well for deep drawers, and cost a fraction of custom cut-to-size dividers. For a budget-friendly option, use old cardboard boxes cut to the height of your drawer, lined with non-slip shelf liner, to create custom compartments.
Conclusion
Organizing your kitchen drawers doesn’t require expensive custom solutions or hours of work — it just requires a clear system tailored to your cooking habits. Start by decluttering unused tools, categorize items by how often you use them, choose organizers that fit your drawer size and type, and stick to a simple maintenance routine to keep everything tidy long-term.
A well-organized drawer cuts down on meal prep time, reduces daily frustration, and even keeps your tools in better condition for longer. An organized system also makes it easy to throw together simple weeknight meals without hunting for utensils, turning cooking from a chore into an enjoyable task. Ready to get started? Pick your most-used utensil drawer today and work through the step-by-step process above. For more kitchen hacks to simplify every part of your cooking routine, browse our full library of guides.

Hi, I’m Daniel Brooks—a food lover and kitchen gear enthusiast. I enjoy testing cookware, utensils, and gadgets to see what really works in everyday cooking. At PlugChef.com, I share honest reviews, comparisons, and simple guides to help you choose the best tools for a safer, smarter, and more enjoyable kitchen.
Related posts:
 How to Organize Kitchen Cabinets And Drawers: Expert Tips
 How to Completely Organize Your Kitchen: Expert Tips
 How Do You Organize Small Appliances in a Small Kitchen: Expert Tips
 Kamenstein 20 Jar Rotating Spice Rack: Organize Effortlessly
 Frozen Salmon How to Cook: Easy, Delicious & Quick Methods
 Roast Nuts in Air Fryer: Quick, Crispy, and Delicious Snacks

