
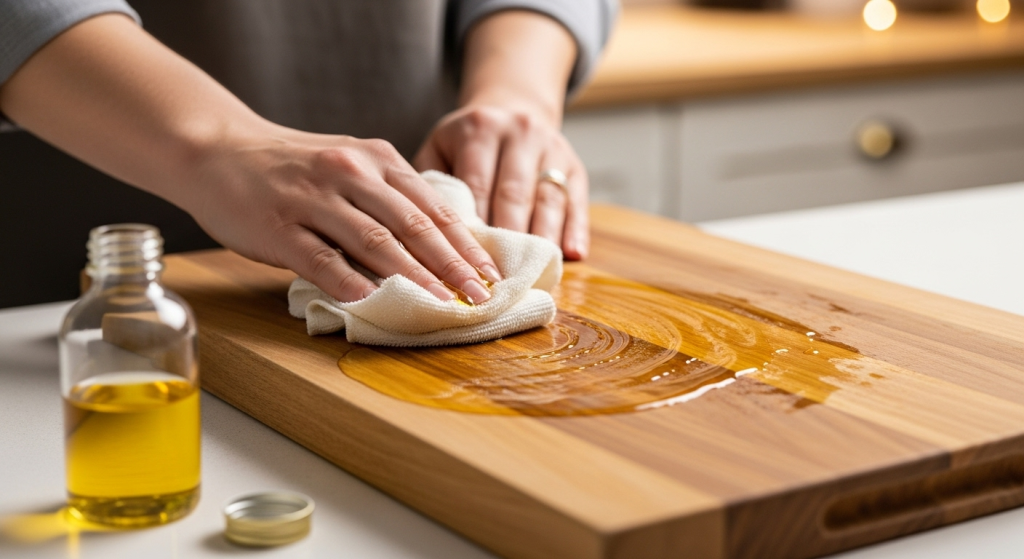
A well-seasoned wooden cutting board resists stains, warping and bacterial growth while staying beautiful for years. This guide shows exactly how to season a wooden cutting board, which oils and waxes to trust, when to reapply, and how to repair or sanitize boards safely. Read on for practical steps, troubleshooting tips from hands-on experience, and a simple maintenance plan you can follow.
Why seasoning matters
Seasoning (also called oiling or conditioning) saturates the wood’s pores with a water-resistant, food-safe barrier. In practice, a well-conditioned board:
- Reduces water absorption that causes cupping or cracking.
- Makes cleaning more effective and reduces lingering odors.
- Helps prevent stains and extends the board’s usable life.

Image: Why Seasoning is Important.
For kitchen-safety basics on food-contact surfaces and handling, follow official guidance from the USDA on safe food handling practices: USDA. University extension services also publish practical comparisons between wood and plastic board safety and maintenance — helpful background reading is available from extension.umn.edu.
What you’ll need
- Food-grade mineral oil or a commercial butcher-block/mineral oil product
- Optional: beeswax or a beeswax + oil conditioner
- Lint-free cloths or paper towels
- Mild dish soap and warm water (for cleaning)
- Sandpaper (120–220 grit) and a sanding block (only if resurfacing)
- A small dish or applicator bottle for oil
Buy food-grade mineral oil labeled “food safe” or a dedicated “butcher block oil.” Avoid vegetable oils (olive, canola) — they can go rancid and leave sticky residue.
Best oils and finishes: pros and cons
- Food-grade mineral oil — Clear, inexpensive, non-toxic, easy to apply. Needs reapplication more often (monthly with heavy use).
- Fractionated coconut oil — Stable (won’t go rancid) but some users report surface tackiness; choose fractionated versions if used.
- Butcher-block conditioner (mineral oil + beeswax) — Adds a longer-lasting surface film and a bit of sheen. Good for boards that see heavy wet use.
- Pure beeswax — Provides a protective top layer when melted into oil; excellent for edges and end-grain boards.
In practice a mineral oil base with a small beeswax top coat gives the best blend of penetration and surface protection for most home users.
Step-by-step: how to season a wooden cutting board
Follow these steps for a successful seasoning.
Clean the board
- Wash with warm water and a small amount of mild dish soap. Do not soak the board or put it in the dishwasher.
- Rinse and dry thoroughly with a towel. Allow it to air-dry fully upright for at least an hour before oiling.
- If you discover mold, follow a targeted guide for removal: see the removing mold guide.
Sand any rough or stained areas (only when necessary)
- Lightly sand deep knife marks or staining starting with ~120 grit and finishing with 220–320 grit for a smooth surface. Wipe away dust with a damp cloth and let dry.
- If you plan to trim or work on a board edge, consult a cutting mat tutorial for safe cutting techniques.
Apply the oil
- Pour a small puddle of oil (about 1–2 tablespoons for a medium board) directly on the surface. Use a lint-free cloth to spread it evenly, working with the grain. Don’t forget edges and both faces.
- Apply until the wood stops sucking oil in—if the wood quickly absorbs the first coat, add another light coat.
Let it soak
- Let the board rest flat in a warm area for 4–24 hours (overnight is common). Heavier woods or very dry boards may take longer.
- If you need faster turnaround, apply oil, wait 2–4 hours, then reapply a second coat.
Wipe off excess
- After soaking, wipe any surface oil that remains with a clean, dry cloth so it doesn’t stay tacky. The board should feel dry to the touch—if it still feels oily after 24 hours, remove the excess.
Optional beeswax finish
- For extra protection, rub a small amount of melted beeswax or a premade conditioner in after oiling. Buff with a soft cloth until smooth. If you make your own, melt beeswax into mineral oil and cool into a balm for easy application.
Practical tip: A common mistake is using too much oil during one session. Thin, repeated coats are better than a single thick coat that never fully penetrates.
How often to season
Maintenance frequency depends on use:
- Heavy home use (daily chopping, lots of washing): season every 3–4 weeks.
- Moderate use: every 6–8 weeks.
- Light or decorative boards: every 3–6 months.
Check for signs before time: dryness, light-colored spots, or an increase in stains indicate the board needs oiling. If you spill oil and the surface becomes sticky, wipe and lightly sand, then re-season correctly.
Cleaning, sanitizing and stain removal
- Routine cleaning: hand-wash with warm water and mild soap; dry immediately.
- Quick sanitizing: wipe with a 1:4 solution of white vinegar to water or a dilute bleach solution only when necessary (follow proper bleach dilution and rinsing). Avoid leaving strong chemicals on wood.
- For odors and stains: sprinkle coarse salt and rub with a halved lemon; let sit 5–10 minutes, then rinse and dry.
- If deep sanitization is needed, consult detailed sterilization procedures: see this sterilize guide.
Note: University extension resources compare bacterial survival across board materials—wood can be safe when properly cleaned and maintained: extension.umn.edu.
Repairing deep cuts and resurfacing
- Small knife marks: sand lightly (120 → 220 grit) and re-oil.
- Deep gouges: sand down to even the surface or, for end-grain boards, carefully plane if you have the tools. After sanding, always remove dust and re-condition.
- Large cracks: if small and clean, glue with food-safe waterproof wood glue clamped until set, sand and reseal. For major damage, replacement may be safer.
For guidance on trimming or making boards, you can review a practical safe drying tips resource on working with board stock.
Troubleshooting common problems
- Sticky surface after oiling: you likely applied too much oil or used an oil that oxidizes. Wipe excess, let air dry, or sand lightly and reapply proper food-grade mineral oil.
- Rancid smell: caused by vegetable oils going rancid. Sand off the surface layer and re-season with mineral oil.
- Discoloration or deep stains: sand down to remove; then re-oil.
- Persistent warping: remove from moisture exposure, store upright, and consider replacing if structural instability continues.
Quick maintenance schedule (practical)
- After each use: wash, dry immediately.
- Weekly: inspect for dryness, deep cuts, or stains.
- Monthly (heavy use): oil board.
- Every 3–6 months: apply beeswax conditioner if desired; sand and refinish if the surface is rough.
Frequently Asked Questions
Q: Can I use olive oil or vegetable oil? A: No. Vegetable oils can oxidize and become rancid, leaving sticky residues and foul odors. Use food-grade mineral oil or a commercial butcher-block oil.
Q: How long does seasoning take? A: Applying oil takes 5–15 minutes; allow 4–24 hours for proper soaking. Beeswax finishes require brief additional buffing.
Q: Is it safe to cut raw meat on a wooden board? A: Yes, when the board is properly cleaned and maintained. Follow safe food-handling practices from authorities like the USDA and rinse and sanitize as needed.
Q: Can I put my wooden board in the dishwasher? A: Never. Dishwashers expose wood to heat and prolonged moisture, causing warping and cracking.
Q: How much oil should I use each time? A: Start with a tablespoon for a medium board; spread thinly and repeat until the wood stops absorbing. Multiple thin coats are better than one heavy coat.
Conclusion
Seasoning a wooden cutting board is a simple, high-impact task that protects your investment and keeps food prep safe. Use a food-grade mineral oil as your base, add a beeswax finish for extra protection if desired, and follow a routine of cleaning, drying, and periodic re-oiling. In practice, a quick oiling every month or two for most home cooks will prevent most problems and keep your board looking and performing its best.
Ready to protect your board? Keep a small bottle of food-grade mineral oil on the counter and give your board a quick conditioning tonight — it takes minutes and adds years to its life.

I’m Abby Lu, a passionate home cook who loves simplifying everyday meals. At PlugChef.com, I share product reviews and cooking guides to help you find the best tools for your kitchen.
Related posts:
 Kitchen Pantry Cabinet With Spice Rack: Ultimate Organization
 Ace Hardware Rubbermaid Sink Mats: Durable & Stylish Protection
 When is a Plum Ripe: Expert Tips to Pick Perfect Fruit
 How to Properly Store Asparagus: Keep It Fresh Longer!
 Old Fashioned Buttermilk Donuts Recipe: Classic, Easy & Delicious
 Velveeta Queso Dip With Rotel: Irresistible Party Snack Recipe

