
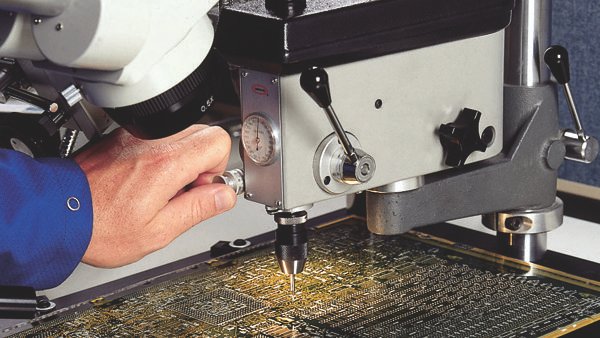
Cutting a circuit board (also called a printed circuit board, or PCB) is a core skill for electronics hobbyists, repair technicians, and small-scale manufacturers building custom projects. A poorly executed cut can sever critical copper traces, damage sensitive components, or leave jagged edges that cause short circuits, ruining hours of soldering work. This guide covers everything you need to know to make clean, precise cuts on both bare and populated PCBs, with step-by-step instructions for every skill level and tool budget. Whether you’re resizing a prototype Arduino board to fit a custom enclosure or trimming a production panel for a small batch of devices, these tips will help you avoid costly mistakes.
What Is a Circuit Board (and Why Precision Cuts Matter)
A PCB is a flat, rigid or flexible substrate (most commonly green fiberglass-reinforced epoxy, called FR4) with etched copper traces that connect electronic components to create a functional circuit. The copper lines carry electrical current between components like resistors, microcontrollers, and sensors, so even a small nick or misaligned cut can break a trace and render the board useless. For populated boards (boards with components already soldered on), extra care is needed to avoid damaging parts or melting solder joints during cutting. Precision is non-negotiable for high-frequency circuits (like RF or Bluetooth devices), where messy cuts can create stray capacitance or signal interference that causes devices to malfunction. Even for low-voltage hobby projects, a clean, straight edge ensures the board fits properly into its enclosure and aligns with mounting holes.
 Diagram of a standard FR4 PCB layout, showing copper traces, solder pads, and component outlines
Image source: www.electronicsandyou.com
Diagram of a standard FR4 PCB layout, showing copper traces, solder pads, and component outlines
Image source: www.electronicsandyou.com
Common Use Cases for Cutting PCBs
You may need to cut a PCB for a wide range of projects, including:
- Resizing a prototype board to fit a custom 3D-printed enclosure for a Raspberry Pi or Arduino project
- Trimming a larger production panel into individual circuit boards for a small batch of consumer devices
- Modifying a board to clear mounting brackets or other components in RC cars, drones, or retro gaming console repairs
- Cutting notches or curved edges to fit around existing hardware in custom electronics builds Understanding your end use case will help you choose the right tools and cutting method for the job.
Tools You’ll Need for Clean, Precise Cuts
The right tools make all the difference between a clean, professional cut and a splintered, ruined board. We’ve split tools into two categories: essentials for every skill level, and optional upgrades for ultra-precise or high-volume work.
Essential Manual Tools
These low-cost tools are perfect for beginners and one-off hobby projects:
- ANSI Z87.1-rated safety goggles: Protect your eyes from sharp copper and fiberglass debris
- Cut-resistant nitrile gloves: Prevent cuts from sharp board edges and tool slips
- 12-inch stainless steel straight edge: For drawing perfectly straight cut lines (avoid flimsy plastic rulers that can bend mid-measurement)
- Fine-tip permanent marker: Marks cut lines that won’t smudge during cutting (pencil marks often rub off during the cutting process)
- PCB shear or heavy-duty utility knife: PCB shears make straight cuts with minimal effort, while a utility knife works for scoring thin boards
- 220-grit (or higher) wet/dry sandpaper: Smooths rough edges without creating burrs
- Adjustable C-clamps or quick-grip clamps: Hold the board firmly to your workbench to prevent movement mid-cut
- Deburring tool: Removes sharp copper burrs that can cause short circuits or injury
- Magnifying loupe: Inspect cut edges and traces for damage, especially on fine-pitch boards
Optional Power Tools for Faster Work
If you cut PCBs regularly or need to make complex curved cuts, these power tools will speed up your workflow:
- Rotary tool with diamond cutting disc: Ideal for intricate cuts and notches; use low speed (10,000–15,000 RPM) to avoid melting the PCB
- Oscillating multi-tool with fine-tooth metal cutting blade: Cuts through thick FR4 boards quickly and consistently, perfect for production work
- Hot air rework station: Makes removing SMD components from populated boards fast and easy before cutting
Tool Comparison Table
| Tool Type | Best For | Precision Rating | Average Cost | Skill Level Required |
|---|---|---|---|---|
| PCB shear | Straight cuts on thin 1.6mm FR4 boards | ★★★★★ | $10–$20 | Beginner |
| Utility knife + scoring | Thin flexible PCBs, quick straight cuts | ★★★★☆ | $5–$10 | Beginner |
| Fine-tooth hacksaw | Thick FR4 boards, curved cuts | ★★★☆☆ | $8–$15 | Intermediate |
| Rotary tool | Intricate notches, populated boards | ★★★★☆ | $30–$60 | Intermediate |
| Oscillating multi-tool | Production runs, thick multi-layer boards | ★★★★☆ | $50–$150 | Advanced |
Pre-Cut Preparation Steps
Skipping prep is the most common cause of ruined PCBs and preventable injuries. Follow these steps before you start cutting:
- Clear a flat, well-lit workbench and lay down a cutting mat to protect your surface from scratches and blade damage.
- If working with a populated board, first remove all through-hole components with a soldering iron and desoldering pump. Use a hot air rework station to remove surface-mount components (SMDs) from the cut line area, and mask any remaining components on the opposite side of the board with Kapton tape to protect them from debris.
- Lay out all your tools within arm’s reach so you don’t have to move while cutting.
- If you’re new to cutting PCBs, practice on a scrap piece of FR4 first to get a feel for your tool’s pressure and speed requirements.
- Measure your cut against the actual mounting points or enclosure the board will fit into, not just a digital design file that may be outdated. Account for the thickness of standoffs, screws, or rubber gaskets to avoid a board that’s too large to fit.
Step-by-Step Guide to Cutting a Circuit Board
Follow these steps for clean, precise cuts every time, whether you’re using manual or power tools.
Step 1: Measure and Mark Your Cut Line
Measure twice, cut once: this old woodworking rule applies double to PCBs, where a 1mm error can break a critical trace or make the board too large to fit its enclosure. Align a stainless steel straight edge with your reference point (the edge of the board or a pre-drilled mounting hole) and draw a clear, straight cut line with a fine-tip permanent marker on both sides of the board. For curved cuts, use a compass or a cardboard template cut to your desired shape. For boards with complex layouts, print a 1:1 template of your cut outline from your design software and tape it to the board to cut along the line for perfect accuracy.
Step 2: Secure the Board to Your Work Surface
Clamp the board firmly to your workbench, with the cut line hanging 1/2 inch over the edge of the bench if using a saw to avoid cutting into your work surface. Place a scrap piece of wood under the board to prevent splintering when the blade exits the other side of the board. Do not over-tighten the clamps, as this can crack thin PCBs. When clamping your PCB to the workbench, use the same steady pressure you would when securing a cabinet door with childproof cabinet locks to avoid movement mid-cut.
Step 3: Cut the Board (Manual and Power Tool Methods)
Your cutting method will depend on the tool you’re using and the thickness of your board:
- Manual tools (PCB shear/utility knife): For a PCB shear, align the blade with your marked line and apply steady, even pressure—do not force the shear, as this will splinter the board. For a utility knife, score the cut line 10–15 times with firm, even pressure, then snap the board along the scored line (this works best for thin 1.6mm FR4 boards).
- Hacksaw: Use a fine-tooth blade (32 TPI minimum) and use long, slow strokes, letting the blade do the work. Apply minimal pressure to avoid bending the board or breaking the blade.
- Rotary tool: Set to low speed (10,000–15,000 RPM) to avoid melting the PCB, and use a thin diamond cutting disc. Cut along the line with light, steady pressure, and cut from the back side of the board if possible to avoid splintering the component side.
- Oscillating multi-tool: Use a fine-tooth metal cutting blade, and use slow, even strokes to avoid overheating the board.
If you’re cutting a populated board, work slowly to avoid generating heat that can melt solder joints and dislodge components.
 Screenshot of a tutorial showing proper rotary tool positioning for clean, straight PCB cuts
Credit: www.youtube.com
Screenshot of a tutorial showing proper rotary tool positioning for clean, straight PCB cuts
Credit: www.youtube.com
Step 4: Smooth and Deburr the Edges
A rough cut edge can cause short circuits, cut through wire insulation, or give you a painful cut when handling the board. First, use a deburring tool to remove any sharp copper burrs along the cut edge. Next, use 220-grit wet/dry sandpaper to smooth the fiberglass edge, working in one direction to avoid rounding the edge. For an ultra-smooth finish, wet sand with 400-grit paper, then dry sand with 600-grit. Wipe the board with isopropyl alcohol to remove all dust and debris before testing or installing it in your project.
Critical Safety Guidelines
Cutting PCBs carries specific hazards, including sharp fiberglass shards, copper dust, and risk of tool injury. Follow these guidelines to stay safe:
- Always wear ANSI-rated safety goggles, cut-resistant nitrile gloves, and a N95 mask to avoid inhaling fine fiberglass and copper dust, per OSHA respiratory safety standards for fine particulate matter. Wear heat-resistant gloves like the hot handle holder you would use for hot cookware to avoid burns from power tools.
- Never cut a board that is still connected to a power source; discharge all capacitors first if you are modifying a live circuit board.
- Keep your fingers at least 2 inches away from the cutting line at all times, and never force a cutting tool—if the blade is struggling, you are using the wrong tool or moving too fast.
- Work in a well-ventilated area away from flammable materials, as cutting generates fine dust that can irritate your lungs and eyes.
- Wipe up dust with a damp cloth instead of sweeping, just like you would after grill brush steam cleaning to avoid inhaling fine particles.
- Dispose of PCB waste properly: do not throw dust or scrap boards in regular trash, as they contain lead and brominated flame retardants. Follow EPA electronic waste guidelines for safe disposal.
Common Mistakes to Avoid (And How to Fix Them)
Even experienced makers make these errors, but they are easy to avoid with a little preparation:
- Incorrect measurements: A common mistake is measuring only against a digital design file, not the actual enclosure or mounting points the board will fit into. Always account for the thickness of screws, standoffs, and gaskets to avoid a board that is too large to install.
- Using the wrong tool: Using a wood saw for FR4 leads to splintered edges, while using a high-speed rotary tool melts the PCB and damages nearby traces. Match your tool to the board thickness and your required precision level.
- Cutting too fast: Rushing leads to uneven edges, severed traces, and tool slips that can cause injury. Take slow, steady strokes, and reduce pressure as you near the end of the cut to avoid splintering the final edge.
- Skipping deburring: Sharp copper burrs can cut through wire insulation, cause short circuits, or cause minor cuts when handling the board. Always deburr and sand the edge after cutting.
- Not securing the board properly: A loose board will move mid-cut, leading to a crooked edge or severed traces. Clamp the board firmly to your workbench before starting.
Why Precision Is Non-Negotiable for PCB Projects
A precise cut does more than just make your board look neat—it ensures your project functions as intended. Even a 1mm deviation can cause the board to misalign with mounting holes, making it impossible to install securely. For high-frequency circuits (like Wi-Fi or Bluetooth devices), a messy cut can create stray capacitance or signal interference that causes connectivity issues or total device failure. For production projects, precise cuts reduce material waste and ensure every unit fits its intended enclosure without modification. A clean, smooth edge also prevents sharp fiberglass shards from causing short circuits when the board is installed in a tight, confined space.
Fixing Cut Errors Without Wasting a Board
Mistakes happen, even to experienced makers. You don’t always need to scrap a board if you make a cut error:
- If you cut too much and the board is too small: Salvage the board by soldering a small piece of FR4 scrap to the edge with copper tape to extend mounting points, as long as no critical traces are damaged.
- If you sever a copper trace: Test the trace with a multimeter to confirm the break, then scrape away a small amount of the solder mask on either side of the gap and solder a short piece of 30AWG insulated wire across the break to restore connectivity. For high-current traces, use a piece of copper tape soldered over the break for added durability.
- If the edge is splintered: Sand it down smooth with 220-grit sandpaper, then apply a thin coat of conformal coating to protect the exposed fiberglass from moisture and short circuits.
- If you damaged a component on a populated board: Desolder and replace the part—most through-hole components are inexpensive and easy to swap with a basic soldering kit. Store cut PCBs in a dry, padded container to protect the sharp edges and delicate traces, similar to how you would store a fixed blade knife in a leather sheath to prevent nicks and damage.
Frequently Asked Questions
How do I safely cut a circuit board?
Start by disconnecting any power sources and removing all components from the board if possible. Wear ANSI-rated safety goggles, cut-resistant nitrile gloves, and a N95 mask to avoid inhaling fine fiberglass and copper dust, per OSHA respiratory safety standards. Secure the board firmly to a workbench, keep your fingers at least 2 inches from the cutting line, and work in a well-ventilated area away from flammable materials.
What tools are best for cutting circuit boards for hobbyist projects?
For most DIY and hobbyist use cases, a PCB shear or heavy-duty utility knife works perfectly for straight cuts on thin 1.6mm FR4 boards, offering high precision without the cost of power tools. For thicker boards or curved cuts, a fine-tooth hacksaw (32 TPI minimum) or rotary tool with a diamond cutting disc is ideal. For small production runs, an oscillating multi-tool with a fine metal-cutting blade delivers consistent, fast results.
Can I cut a populated circuit board without damaging components?
Yes, but it requires extra preparation. First, remove all through-hole components with a soldering iron and desoldering pump, and use a hot air rework station to remove surface-mount components (SMDs) from the cut line area. Mask any remaining components on the opposite side of the board with Kapton tape to protect them from cutting debris, and use a low-speed cutting tool to avoid generating heat that melts solder joints.
How do I measure accurately where to cut a circuit board?
Always measure twice against the actual mounting points or enclosure your board will fit into, not just a design file that may be outdated. Use a stainless steel straight edge to draw a clear cut line with a fine-tip permanent marker on both sides of the board. For complex shapes, print a 1:1 template from your design software, tape it to the board, and cut along the template for perfect accuracy.
Can I cut a circuit board with regular household scissors?
Only for very thin (0.8mm) flexible polyimide PCBs, using heavy-duty scissors designed for sheet metal. Standard household scissors will dull within a few cuts and create ragged, splintered edges that can sever traces or cause short circuits.
What should I do if I accidentally cut into a copper trace?
First, test the trace with a multimeter to confirm it is fully severed. Scrape away a small amount of the solder mask on either side of the break, then solder a short piece of 30AWG insulated wire across the gap to restore full connectivity. For high-current traces, use a wider piece of copper tape soldered over the break for added durability.
Conclusion
Cutting a circuit board is a simple but critical skill for electronics hobbyists, repair technicians, and small-scale manufacturers. With the right tools, careful preparation, and slow, steady strokes, you can achieve clean, precise cuts every time, even on populated boards with sensitive components. Remember to always prioritize safety: wear proper protective gear, work in a well-ventilated area, and dispose of PCB waste responsibly per EPA guidelines. If you’re setting up a dedicated home electronics workspace, our guide to selecting non-slip kitchen rugs can help you choose a safe, durable mat to protect your floors from tool drops and solder splatter.

I’m Abby Lu, a passionate home cook who loves simplifying everyday meals. At PlugChef.com, I share product reviews and cooking guides to help you find the best tools for your kitchen.
Related posts:
 How to Make a Fruit Basket for a Gift: Easy DIY Guide
 Do You Need a Basket? Essential Guide for Air Fryers
 How to Adjust Syrup Dispenser Pressure: Expert Tips
 Kitchen Cabinets With Black Appliances: Trendy Design Tips
 White Kitchen And Stainless Steel Appliances: A Perfect Duo
 Kitchen Colors With White Cabinets And White Appliances: Vibrant Ideas

