
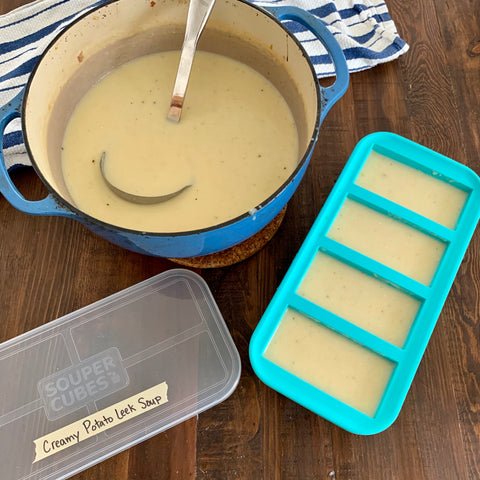
Leftover creamy potato soup is one of the best weeknight shortcuts—until you reheat it and end up with a watery, grainy mess that doesn’t taste like the fresh batch you made. Freezing potato soup correctly preserves its rich flavor and smooth texture, so you can enjoy a comforting bowl whenever you want without extra cooking effort. This guide covers tested, food-safe steps to freeze any type of potato soup, from brothy chunky versions to creamy blended batches, plus hacks to fix common texture and flavor issues after thawing. We’ll also share pro tips to cut down on prep time and reduce food waste, so you never have to toss out leftover soup again. If you’re looking for more tested, freezer-friendly meal ideas to add to your rotation, our kitchen blog has hundreds of recipes and kitchen hacks to simplify your weekly cooking.
Why Some Potato Soups Freeze Better Than Others
Not all potato soups freeze equally, and choosing the right base and potato variety upfront will save you from disappointing texture changes later. A common mistake is assuming any potato soup will hold up in the freezer, but small recipe adjustments make a huge difference in final quality.
Best Potato Varieties for Freezer-Friendly Soup
The type of potato you use directly impacts how the soup holds up during freezing and reheating:
- Russet potatoes: High in starch, they break down easily to create an ultra-smooth, thick texture for blended creamy soups. However, their high starch content can lead to a grainy, gluey texture after freezing and thawing, so they’re best reserved for soups you plan to blend before serving.
- Yukon Gold potatoes: Medium-starch with a naturally buttery flavor, they hold their shape well while still adding creaminess to the soup. They freeze and reheat with minimal texture change, making them the most versatile choice for all potato soup styles.
- Red waxy potatoes: Low in starch, they hold their firm, chunky shape perfectly even after freezing. They’re ideal for chunky, broth-based soups where you want visible potato pieces, and they won’t turn mushy when thawed.
Soup Base Types That Hold Up in the Freezer
Your soup’s liquid base is just as important as the potato variety for freezer success:
- Broth-based soups: These freeze the best, with almost no texture change after thawing. The low fat content prevents separation, and the broth preserves the flavor of potatoes and add-ins like vegetables or bacon.
- Cream-based soups: These can separate or develop a slightly grainy texture after freezing, due to the breakdown of dairy fat and proteins when thawed. The issue is easy to fix with a quick blend or splash of fresh cream when reheating, but they’re not ideal for long-term storage.
- Cheese-heavy soups: Shredded cheese can turn grainy and oily when frozen, especially if it’s a low-moisture variety like cheddar. For best results, add cheese fresh after thawing, rather than mixing it in before freezing.
 Chunky broth-based potato soup freezes and reheats with minimal texture change.
Credit: food52.com
Chunky broth-based potato soup freezes and reheats with minimal texture change.
Credit: food52.com
 A fully prepared bowl of creamy potato cheese soup, ready to serve or freeze.
Credit: heidishomecooking.com
A fully prepared bowl of creamy potato cheese soup, ready to serve or freeze.
Credit: heidishomecooking.com
Prepping Potato Soup for Freezer Success (Food Safety First)
Proper prep before freezing prevents foodborne illness, texture changes, and wasted soup. Follow these steps to set your batch up for perfect storage.
Cool Soup Safely to Avoid Bacterial Growth
Never put hot soup directly into the freezer: this raises the freezer’s internal temperature, putting other stored foods at risk of spoilage, and creates excess steam that leads to ice crystal formation. Per U.S. Department of Agriculture (USDA) food safety guidelines, perishable foods should never be left at room temperature for more than 2 hours (1 hour if your kitchen is above 90°F / 32°C) to avoid bacterial growth. To cool soup quickly and safely:
- Let it sit at room temperature for 20 to 30 minutes after cooking.
- Transfer it to shallow, wide containers (1-2 inches deep) to speed up cooling, or place the pot in an ice bath and stir occasionally to bring the temperature down faster.
- Once the soup is lukewarm to the touch, transfer it to the fridge to finish cooling completely before freezing (this takes 1-2 hours for most batches).
Portion Smart to Reduce Waste
Freezing soup in pre-portioned servings makes thawing and reheating faster, and avoids the need to thaw a full large batch when you only need one or two servings. After chopping your potatoes, scrub your cutting board with a heavy-duty scrub brush to remove starchy residue before moving on to cooking. For portioning:
- Use single-serve containers (1-2 cup portions) for quick lunches, or family-sized (4-6 cup) portions for weeknight dinners.
- Leave 1-2 inches of headspace in each container or bag: soup expands 5-10% when frozen, and overfilling will cause containers to crack or bags to burst.
- Use airtight, freezer-safe containers or heavy-duty freezer bags, and squeeze all excess air out of bags before sealing to prevent freezer burn.
- Label every portion with the date and contents using a permanent marker, so you can easily track how long it’s been stored.
Keeping kitchen surfaces clean during food prep is key to avoiding cross-contamination, and a top-rated cleaning brush makes wiping down counters and utensils after handling raw ingredients quick and easy. If you have young children in the home, secure lower cabinets and drawers with no-drill safety locks to keep cleaning supplies and sharp objects out of reach while you cook.
Step-by-Step Freezing Methods for Long-Term Storage
Choose the freezing method that matches how you plan to use your soup, and follow these tips for best results.
Airtight Container Freezing (Best for Stacking)
Rigid, freezer-safe BPA-free plastic or tempered glass containers are the easiest option for most home cooks. Make sure the lid seals tightly to prevent air from getting in, and leave the recommended 1-2 inches of headspace to account for expansion. Glass containers are a great non-toxic alternative, but avoid sudden temperature changes (like moving a frozen container directly to the microwave) to prevent cracking. Stack containers in the freezer to save space, and place older batches in front so you use them first.
Vacuum Sealing for Maximum Freshness (Best for 3+ Month Storage)
Vacuum sealing removes 99% of the air from packaging, which eliminates freezer burn and extends the soup’s shelf life to 4-6 months. Pour cooled soup into heavy-duty freezer bags designed for vacuum sealing, seal the bags, and lay them flat in the freezer to save space and speed up thawing. If you don’t own a vacuum sealer, use the water displacement method: seal the bag all but 1 inch, submerge it in cold water to push air out through the opening, then seal completely.
Flash Freezing for Individual Servings (Best for Quick Thawing)
For soups you plan to add to casseroles, or for single servings you’ll thaw quickly, flash freezing is the best method to avoid ice crystals forming on the surface:
- Pour cooled soup into silicone muffin tins or ice cube trays, filling each cavity ¾ full to allow for expansion.
- Place the trays in the freezer for 2-3 hours, until the soup is completely solid.
- Pop the frozen portions out of the trays and transfer them to a labeled freezer bag for long-term storage. Flash-frozen portions thaw in 30 minutes or less at room temperature, or 1-2 hours in the fridge.

Thawing and Reheating for Creamy, Grain-Free Results
Thawing and reheating correctly is just as important as freezing properly to preserve texture and flavor. Rushed thawing or high heat will ruin even the best-prepped batch of soup.
Safe Thawing Methods (No Food Safety Risks)
The refrigerator is the safest, most reliable thawing method: transfer frozen soup to the fridge 12 to 24 hours before you plan to eat it (8 hours for single servings, 24 hours for large family portions). This slow, steady thawing prevents bacterial growth and keeps potatoes from turning mushy. If you need to thaw soup faster, use the cold water method: seal the soup in a waterproof freezer bag, submerge it in a bowl of cold water, and change the water every 30 minutes until fully thawed (1-2 hours for most portions). Never thaw soup at room temperature, as this leaves it in the food safety danger zone (40°F to 140°F / 4°C to 60°C) where bacteria multiply rapidly. According to USDA freezer storage guidelines, thawed soup can be stored in the fridge for 3-4 days before reheating.
Reheating Without Separation or Graininess
High heat is the number one cause of grainy, separated potato soup after freezing. Follow these steps for perfect results every time:
- Reheat soup on the stovetop over low to medium heat, stirring frequently to prevent sticking and to recombine separated dairy.
- If the soup looks separated or grainy, blend it with an immersion blender for 30 seconds to restore a smooth, creamy texture.
- Add a splash of milk, cream, or a pat of butter to bring back richness if the soup feels too thick after thawing.
- For microwave reheating, use 50% power and heat in 1-minute intervals, stirring between each, to avoid overheating. Never boil the soup, as high heat breaks down potato starch and dairy proteins, leading to a gritty texture.
After chopping fresh garnishes like green onions or chives, use a versatile brush set to clean your knife and cutting board in seconds.
Fixing Common Freezing and Reheating Issues
Even with perfect prep, small issues can pop up after thawing. These quick, tested fixes will restore your soup to its fresh, just-made quality:
Grainy or Watery Soup After Thawing
Graininess usually comes from using too many high-starch Russet potatoes, or reheating the soup too quickly. To fix it:
- Blend the soup with an immersion blender for 30 seconds to break down clumped starch.
- If the soup is too watery, mix 1 teaspoon of cornstarch with 1 tablespoon of cold water to make a slurry, then stir it into the soup and simmer for 2 minutes to thicken.
Separated Creamy Soup
Fat separates when frozen and reheated too quickly, leaving you with a lumpy, oily texture. To fix it:
- Stir the soup vigorously over low heat for 2-3 minutes to recombine the dairy and broth.
- If it’s still separated, add a splash of heavy cream or a teaspoon of cornstarch slurry while stirring to emulsify the mixture back together.
Dull or Bland Flavor
Freezing dulls seasoning and mutes fresh herb flavors. To bring back the bright, fresh taste of your original batch:
- Add a pinch of flaky sea salt and cracked black pepper to taste.
- Stir in a squeeze of fresh lemon juice to cut through richness and brighten flavors.
- Top with fresh herbs like chives, parsley, or dill, and a sprinkle of shredded cheese or cooked bacon for extra depth.
Frequently Asked Questions
We’ve answered the most common questions about freezing potato soup to help you avoid common pitfalls:
How Long Can You Freeze Potato Soup Safely?
Properly stored potato soup stays safe to eat for 2 to 3 months in a standard home freezer set to 0°F (-18°C). While it will remain safe beyond that window, quality (texture and flavor) will gradually decline. Always label containers with the freeze date to track storage time, and discard any soup that has developed large ice crystals, off smells, or discoloration.
What Is The Best Container For Freezing Potato Soup?
Airtight, freezer-safe containers are ideal for freezing potato soup. BPA-free plastic rigid containers with locking lids work well for stacking, while tempered glass containers are a great non-toxic alternative (just leave 1-2 inches of headspace to prevent cracking from expansion). Heavy-duty freezer bags are perfect for portioning, as long as you squeeze out as much air as possible before sealing to prevent freezer burn.
How Do You Thaw Frozen Potato Soup Properly?
The safest thawing method is to move frozen soup to the refrigerator 12 to 24 hours before you plan to eat it (8 hours for single servings). For faster thawing, seal the soup in a waterproof bag and submerge it in cold water, changing the water every 30 minutes until thawed. Never thaw potato soup at room temperature, as this allows bacteria to grow rapidly in the temperature danger zone (40°F to 140°F / 4°C to 60°C).
Can You Freeze Potato Soup With Cream Or Milk?
Yes, but creamy potato soup may separate or develop a slightly grainy texture after freezing and thawing, due to the breakdown of dairy proteins and fat. To fix this, reheat the soup slowly over low heat while stirring vigorously, or blend it with an immersion blender for 30 seconds to restore a smooth consistency. For the best results, add fresh cream, milk, or cheese after thawing and reheating, rather than mixing them in before freezing.
Conclusion
Freezing potato soup is a simple way to cut down on food waste, save money, and have a ready-to-eat meal on hand for busy weeknights. The key to perfect results is choosing the right potato variety and soup base, cooling and portioning the soup properly before freezing, and thawing and reheating it gently to preserve texture and flavor. Even if you run into common issues like graininess or separation, these quick fixes will restore your soup to its just-made quality in minutes. Ready to cut down on weeknight cooking time? Freeze a batch of your favorite potato soup this week using these tips, and you’ll have a warm, comforting meal ready in moments whenever you need it. For more kitchen hacks and freezer-friendly recipes, check out our kitchen blog for new ideas every week.

I’m Abby Lu, a passionate home cook who loves simplifying everyday meals. At PlugChef.com, I share product reviews and cooking guides to help you find the best tools for your kitchen.
Related posts:
 What Oil to Use on Cutting Board: Best Options Revealed
 Is Teak Wood Good for Cooking Utensils: Discover Benefits
 How to Build End Grain Cutting Board: Step-by-Step Guide
 Scuba Diving First Aid Kit: Essential Gear for Safe Adventures
 Bulk Mini First Aid Kits: Essential Safety Solutions for Everyone
 First Aid Kits for Workplace: Essential Safety Gear You Need Now

