
You’re mid-meal prep, camping in the backcountry, or dealing with post-move kitchen chaos, and you reach for your can opener only to find it missing, broken, or packed away in a box you haven’t opened yet. It’s a universal frustration, but it doesn’t mean you have to skip the canned beans, soup, or tuna you were counting on. Tested, low-risk hacks let you open almost any standard metal can with common household or outdoor tools, no specialized equipment required. All methods listed below have been field-tested by campers, home cooks, and emergency preparedness experts, and are recommended for emergency use only. This guide walks you through each method step-by-step, highlights safety trade-offs, and shares pro tips to avoid injury and spoiled food, so you can access your meal safely and quickly.
When to Use These No-Can-Opener Hacks
These methods are designed for true emergencies: camping trips, power outages, broken openers, or unexpected situations where you can’t access a replacement can opener right away. They are not recommended for everyday use, as prying open a can can leave sharp, ragged edges, risk small metal shards in your food, and compromise the can’s airtight seal if you puncture the side or damage the rim. If you have access to a standard manual or electric can opener, that will always be the faster, safer option. These hacks are only for situations where you have no other choice.
Method 1: Open a Can With a Spoon
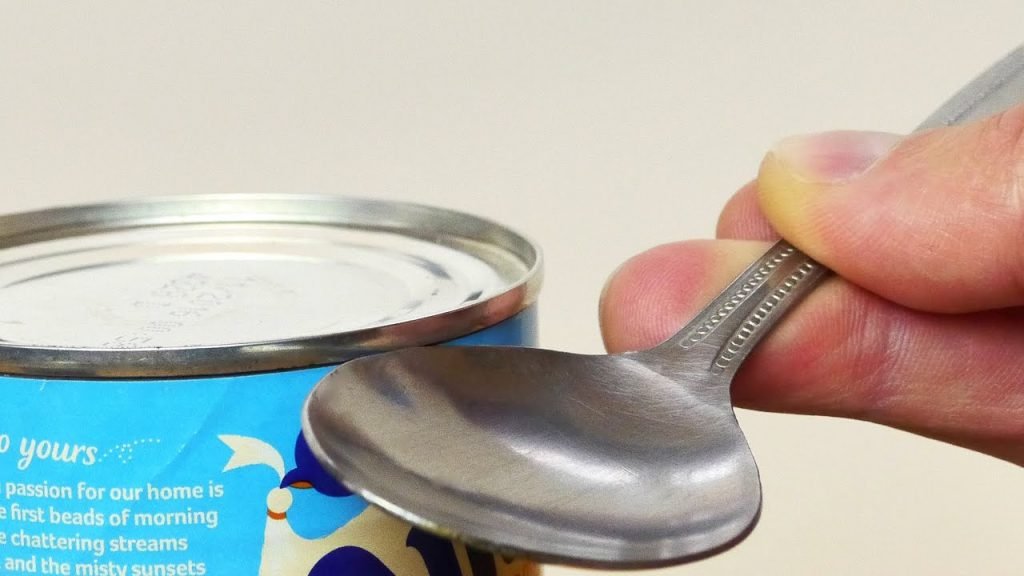
A sturdy metal spoon is the most accessible tool for this task, as nearly every household and camping kit includes one. Its curved bowl edge provides enough leverage to grind through the thin metal of standard steel can lids with consistent pressure. In practice, this method works best on standard steel cans, but struggles with thick aluminum lids common in some craft soda and energy drink brands.
Step-by-Step Instructions
- Select a sturdy stainless steel spoon: Avoid plastic, wood, or thin disposable spoons, which will bend or break under pressure.
- Hold the spoon in your dominant hand, positioning the tip of the curved bowl against the inner rim of the can lid, about 1/4 inch from the edge.
- Apply firm, consistent pressure while rocking the spoon back and forth along the rim. You’ll feel the metal thin and eventually puncture after 30–60 seconds of consistent work.
- Once you have a 1/2 inch opening, work the spoon around the entire circumference of the lid, repeating the rocking motion to cut through the remaining seal.
- Once the lid is fully loosened, use the spoon to pry it up carefully, taking care to avoid the sharp, ragged edges left behind.
Common Mistakes to Avoid
A common error is using the tip of the spoon handle instead of the bowl edge, which reduces leverage and increases the risk of the spoon slipping. Rushing the process can also cause the spoon to bend or leave large metal shards in the can’s contents.
Pros and Cons
Pros: Universally accessible, low risk of severe injury if used correctly. Cons: Leaves very ragged lid edges, takes 2–5 minutes for standard cans, and struggles with thick aluminum lids.
 A metal spoon is one of the most accessible tools for opening cans in a pinch, and works well for standard steel lids.
Method 2: Open a Can With a Sturdy Knife
This is the fastest method for most standard cans, but it carries a higher risk of injury if you’re not comfortable handling sharp blades. It works by puncturing the lid and cutting through the seal with repeated small cuts.
Safety Precautions First
Always use a sturdy, sharp chef’s knife or paring knife—dull blades are more likely to slip and cause cuts. Never use a thin, flexible butter knife, as it will bend under pressure. Always work on a stable, flat surface, and hold the can steady with a towel to avoid slipping.
Step-by-Step Instructions
- Place the can on a stable flat surface, and hold it steady with your non-dominant hand (use a towel for extra grip if needed).
- Position the tip of the knife against the inner rim of the lid, at a 45-degree angle pointing toward the center of the can.
- Apply firm, steady pressure to the tip of the knife until it punctures the lid. You may need to tap the back of the knife with the heel of your hand for extra force if the lid is thick.
- Once punctured, slide the knife along the rim, repeating small punctures every 1/4 inch around the entire circumference of the can.
- Once the seal is broken all the way around, use the knife tip to pry the lid up carefully.
Common Mistakes to Avoid
A common mistake is angling the knife too steeply, which causes the blade to slip off the rim and cut your hand instead of the can lid. Never apply force perpendicular to the can lid, as this increases slip risk.
Pros and Cons
Pros: Fast (1–2 minutes total for standard cans), works on both steel and thick aluminum lids. Cons: Higher risk of injury for inexperienced users, can leave larger metal shards if the blade slips.
Method 3: Open a Can With an Abrasive Outdoor Surface (Rock or Concrete)
If you’re camping, hiking, or in a survival scenario with no kitchen tools, a hard rock or smooth concrete surface can grind through a can’s seal with friction. This method requires no additional tools, but is slower and carries a higher risk of contamination or metal shards.
Selecting the Right Abrasive
For rock methods, choose a hard, non-porous stone like granite, quartz, or slate—avoid crumbly sandstone or limestone, which will wear down before breaking the metal seal. Look for a rock with a slightly rough, flat surface that fits comfortably in your hand, and inspect it for sharp edges that could cut you. For concrete, use a clean, smooth section of sidewalk or driveway; avoid rough, pebbled concrete that could damage the can or create large metal shards.
Step-by-Step Technique
- Place the can upside down on the rock or concrete surface, so the lid is facing the abrasive material.
- Rub the can back and forth firmly against the surface, focusing on the seam where the lid meets the can body.
- After 1–2 minutes of consistent rubbing, you’ll feel the seal break, and the lid will start to loosen.
- Once the lid is fully separated, use a rock or stick to pry it up, taking care to avoid sharp edges.
Common Mistakes to Avoid
A common error is rubbing too aggressively, which can dent the can body and leak contents, or create large metal shards that can end up in your food. Another mistake is using a dirty concrete surface, which can contaminate the can’s contents with dirt or debris.
Pros and Cons
Pros: No additional tools required, ideal for scenarios with no kitchen supplies. Cons: Slow (3–10 minutes per can), high risk of metal shards and contaminated food, only works on standard steel cans.
Method 4: Open a Can With Edged Multi-Use Tools
If you have heavy-duty scissors, a pocket knife, flathead screwdriver, or other sturdy edged tools on hand, you can use them to cut or pry open a can lid quickly. This method is faster than abrasive methods, but requires sharp, sturdy tools to avoid slipping.
Best Tools for This Method
Heavy-duty kitchen or utility scissors, a pocket knife with a sturdy fixed blade, or a flathead screwdriver work best for this method. Avoid thin craft scissors, plastic tools, or serrated blades, which will bend or slip under pressure.
Step-by-Step Cutting Technique
- For scissors: Hold the can steady on a flat surface, and use the tip of one scissor blade to puncture the lid near the edge.
- Once punctured, use the full length of the blade to cut along the rim, working your way around the can. Keep the blades angled slightly toward the center of the can to avoid slipping.
- For a pocket knife or screwdriver: Puncture the lid near the edge with the tip, then work the blade or tip under the lip of the lid, twisting gently to lift and cut through the seal.
- Once the seal is broken all the way around, pry the lid off carefully.
Common Mistakes to Avoid
A common mistake is using scissors with loose screws or wobbly blades, which can slip and cause cuts. Another error is cutting too deep into the can body, which can cause leaks or contaminate the contents.
Pros and Cons
Pros: Fast (1–3 minutes total), works on thick aluminum and steel lids. Cons: Requires sharp, sturdy tools, higher risk of injury for inexperienced users.
 Use only thick, sharp utility or kitchen scissors for this method; thin craft scissors will bend and fail to cut through metal.
Critical Post-Opening Safety Steps
Opening a can with a non-standard tool can leave sharp, ragged edges on the lid and can body, and may compromise the can’s airtight seal if you damage the rim. Follow these steps to avoid injury and foodborne illness:
- Inspect the can before and after opening: If the can was dented, swollen, or leaking before opening, discard it entirely—these are signs of botulism risk, per USDA food safety guidelines for canned goods.
- Check the opened can for metal shards: Shine a light into the can and run a clean utensil along the bottom and sides to dislodge any small metal fragments before eating.
- Smooth sharp edges: Use a metal file or the back of a knife to gently file down any ragged edges on the can rim and lid to avoid cuts when handling or eating from the can.
- Store leftovers properly: Transfer any unused contents to a sealed airtight container immediately, as the compromised seal will cause the food to spoil faster than a can opened with a proper can opener.
How to Stay Prepared for Future Can-Opener Emergencies
While these hacks work in a pinch, the easiest way to avoid the hassle of opening a can without a can opener is to prepare ahead of time. Follow these tips to never get stuck without a working can opener again:
- Keep a multi-tool with a built-in can opener in your kitchen drawer, camping gear, and emergency kit: Look for a model with a sharp, rust-resistant can opener attachment, and test it every 6 months to make sure it still works.
- Store a backup manual can opener in a separate location from your primary one: If your main opener breaks, you won’t have to search for it in a crowded drawer during an emergency.
- Practice one of the no-can-opener hacks once every few months: This will help you remember the steps and identify any safety risks before you actually need to use the method in a high-stress scenario.
- Avoid storing cans in extreme heat or cold: Damaged cans are harder to open with any method, and increase the risk of foodborne illness.
 A multi-tool with a built-in can opener is the most reliable backup for emergencies, camping trips, and travel.
Frequently Asked Questions
Can I open a can with a plastic spoon or butter knife?
Plastic spoons and thin butter knives will almost always bend or break under the pressure needed to puncture a metal can lid. Stick to sturdy stainless steel spoons and sharp, thick chef’s knives for the best results.
Is it safe to eat food from a can opened with a non-standard tool?
Yes, as long as you inspect the can for damage, remove any metal shards, and follow proper food storage guidelines. Discard the contents immediately if the can was swollen, leaking, or dented before opening, as these are signs of potential contamination.
What’s the fastest no-can-opener method for home use?
The sturdy knife method is the fastest for most standard steel cans, taking 1–2 minutes total. The spoon method is a close second, and is lower risk if you’re not comfortable handling sharp knives.
Can I use these hacks on dented or damaged cans?
No. If a can is severely dented (especially along the rim), swollen, or leaking, do not attempt to open it with any method. Damaged cans have a high risk of containing botulism or other foodborne pathogens, and should be discarded immediately.
Can I open a can with a metal bottle cap?
Yes, in a true survival scenario, a metal bottle cap can be used like a small knife to puncture the lid, but it requires significantly more force and has a high risk of slipping and causing cuts. This method is only recommended if no other tools are available.
Conclusion
Opening a can without a can opener is a useful skill for camping trips, power outages, move-in days, and other unexpected scenarios where your standard tools are out of reach. While no non-standard method is as fast or safe as a proper can opener, the hacks outlined above are low-risk, tested, and use tools most people have on hand. Always prioritize safety: work slowly, avoid sharp edges, and follow food safety guidelines to avoid injury or spoiled food. Bookmark this guide for your next camping trip or emergency kit checklist, and share these easy hacks with friends and family who love outdoor adventures or want to be prepared for unexpected kitchen mishaps.

I’m Abby Lu, a passionate home cook who loves simplifying everyday meals. At PlugChef.com, I share product reviews and cooking guides to help you find the best tools for your kitchen.
Related posts:
 How Do You Pronounce Colander: Clear Guide & Tips
 Is Nylon Or Silicone Better for Cooking Utensils: Ultimate Guide
 How to Cut Skirt Board for Stair: Expert Tips & Techniques
 Vintage First Aid Kit Metal Box: Timeless Safety and Style
 First Aid Kit for Restaurant: Essential Safety Gear You Need Today
 First Aid Kit for Sports: Essential Items for Quick Injury Care

