
Have you ever wondered what really goes on inside your chest? The heart, one of the most vital organs, beats tirelessly to keep you alive.
But its complexity is often shrouded in mystery. Imagine if you could see and understand this intricate powerhouse through art. A drawing of the heart organ offers you a unique chance to visualize its beauty and complexity. This article will guide you through the fascinating world of heart illustrations, highlighting how they can transform your understanding of anatomy.
So, whether you’re an aspiring artist, a curious student, or just someone intrigued by the marvels of the human body, this exploration promises to captivate your imagination and enrich your knowledge. Keep reading to discover how a simple drawing can unlock the secrets of your heart.

Credit: www.shutterstock.com
Materials Needed
Gather paper, pencils, erasers, and colored markers for a heart organ drawing. Reference images and anatomy books help. A comfortable workspace enhances creativity.
When it comes to drawing a heart organ, having the right materials can make all the difference. Whether you’re a seasoned artist or a beginner, gathering the necessary tools ensures you’re prepared to capture the intricate details of this vital organ. Let’s dive into the essentials that will enhance your drawing experience and bring your artwork to life.Basic Drawing Tools
- Pencils:A range of pencils from HB to 6B offers versatility for sketching and shading. Consider using mechanical pencils for precise lines.
- Eraser:A good quality eraser is a must to correct mistakes and refine your drawing. Kneaded erasers are great for subtle corrections without smudging.
- Pencil Sharpener:Keeping your pencils sharp ensures clean lines and detailed work. Opt for a hand-held sharpener to maintain control.
Paper Types
- Sketch Paper:Choose a smooth surface for easy blending and sketching. A heavier weight paper can withstand multiple erasures.
- Tracing Paper:Ideal for overlaying and refining details. It helps you transfer your sketch without losing its essence.
Coloring Materials
- Colored Pencils:Adds depth and realism to your drawing. Consider using watercolor pencils for a different texture.
- Markers:Use fine-tip markers to highlight veins and arteries. They provide vibrant colors that stand out.
Additional Tools
- Ruler:Helpful for drawing accurate proportions and angles. A clear ruler can aid in precise measurements.
- Reference Images:Utilize anatomical diagrams and photographs for accurate representation. They are crucial for understanding the heart’s structure.
Credit: stock.adobe.com
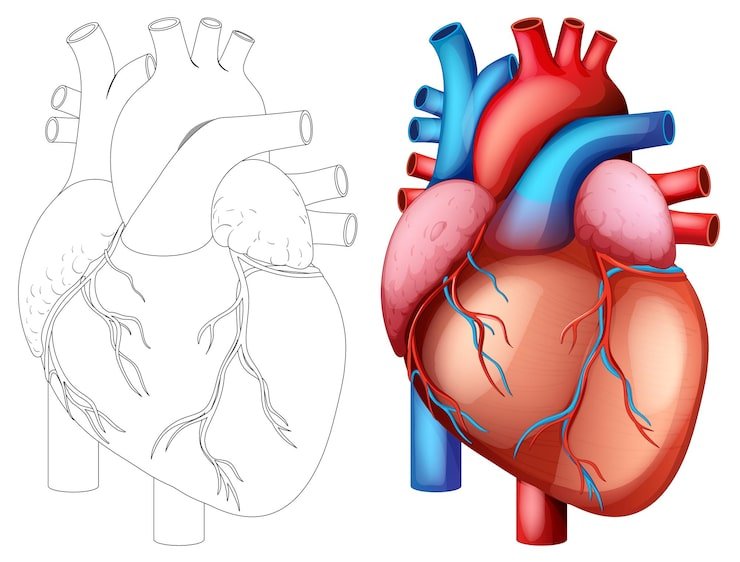
Basic Anatomy Of The Heart
The heart is a vital organ in the human body. It pumps blood through the circulatory system. Understanding its anatomy helps in drawing it accurately.
Artists often start with the heart’s basic structure. Knowing its parts makes drawing easier.
Heart Chambers
The heart has four chambers. Two atria and two ventricles. Atria are on the upper part. Ventricles are on the lower part.
The right side pumps blood to the lungs. The left side pumps blood to the body.
Heart Valves
Valves control blood flow in the heart. There are four main valves. They ensure blood flows in one direction.
The tricuspid valve is on the right. The bicuspid or mitral valve is on the left.
Major Blood Vessels
Blood vessels connect to the heart. These include arteries and veins. The aorta is the largest artery. It carries oxygen-rich blood from the heart.
The vena cava brings oxygen-poor blood to the heart. Pulmonary arteries and veins connect the heart to the lungs.
Heart Muscle
The heart is made of a special muscle. It is called the myocardium. This muscle helps the heart contract and pump blood.
Drawing the heart requires understanding this muscle’s function.
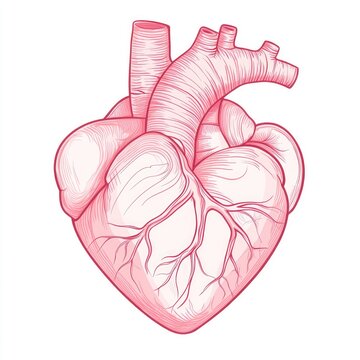
Sketching The Heart Shape
Capturing the heart’s intricate details requires patience and observation. Focus on its unique curves and chambers. Use gentle strokes to depict the organ’s texture and depth.
Sketching the heart shape, especially as a beginner, can feel like venturing into a world of intricate detail and complexity. You might be wondering how to capture the essence of this vital organ on paper, balancing accuracy with artistic flair. Understanding the heart’s anatomy and translating it into a drawing requires practice and a few guiding principles.Understanding The Basic Structure
Before you start sketching, familiarize yourself with the heart’s basic parts: atria, ventricles, and arteries. A quick look at a medical diagram can provide a helpful reference. Imagine the heart as a roughly triangular shape, with rounded edges and a slightly tilted appearance. Keep this image in mind as you sketch.Start With Simple Shapes
Begin your drawing by outlining simple shapes. Use a pencil to lightly draw a large oval or circle, which will form the heart’s main body. Add smaller circles or ovals for the atria and ventricles. This will help you get the proportions right.Refine The Outline
Once you have your basic shapes, start refining the outline. Smooth the edges and adjust the curves to mimic the heart’s natural form. Don’t worry about getting it perfect on the first try; the beauty of sketching is that you can always adjust.Add Details Carefully
With your outline in place, it’s time to add details. Focus on the arteries and veins that branch off the heart. Use light strokes to sketch these lines, paying attention to their placement and direction. Details like these bring your drawing to life.Shading For Depth
Shading can dramatically enhance your sketch by adding depth. Lightly shade areas that would naturally be darker, like the interior of the atria and the spaces between veins. Experiment with different shading techniques to find what works best for you.Practice Makes Perfect
Don’t be discouraged if your first attempt doesn’t meet your expectations. Drawing is a skill that improves with practice. Challenge yourself to sketch the heart multiple times, gradually adding more details and refining your technique. Do you remember the first time you tried to draw something complex? It might have seemed daunting, but each attempt taught you something new. The same applies to sketching the heart. Keep experimenting, and you’ll find your unique style.
Credit: www.freepik.com
Outlining Major Structures
Explore the beauty of the heart through art. Draw the organ by outlining major structures like atria and ventricles. Highlight details to showcase its complex anatomy.
Outlining the major structures of the heart organ drawing can be intriguing. The heart, a vital organ, consists of several key components. Understanding these components helps in accurately depicting its anatomy. In this section, we explore the heart’s chambers, valves, and major blood vessels. Each part plays a crucial role in the heart’s function.Chambers And Valves
The heart has four chambers: two atria and two ventricles. The atria are the upper chambers. They receive blood coming into the heart. The ventricles are the lower chambers. They pump blood out of the heart. Between these chambers are valves. They ensure blood flows in one direction. The tricuspid valve is on the right side. It separates the right atrium and right ventricle. The bicuspid, or mitral valve, is on the left. It separates the left atrium and left ventricle. These valves prevent backflow of blood. Understanding their placement is key in drawing a realistic heart.Major Blood Vessels
Major blood vessels connect to the heart. The aorta is the largest artery. It carries oxygen-rich blood from the left ventricle to the body. The pulmonary arteries carry blood from the right ventricle to the lungs. There, blood gets oxygenated. The superior and inferior vena cava are large veins. They bring oxygen-poor blood from the body back to the heart. The pulmonary veins carry oxygen-rich blood from the lungs to the left atrium. These vessels are vital to the heart’s function. Depicting them accurately enhances your drawing’s authenticity.Adding Details
Enhancing a heart organ drawing involves focusing on its intricate anatomy. Highlight the chambers, valves, and arteries to create realism. Use shading and textures to add depth and dimension, bringing the heart to life on paper.
Adding intricate details to your drawing of a heart organ can transform it from a basic sketch into a lifelike representation. By focusing on elements such as muscle texture, veins, and arteries, you can enhance the realism of your artwork. These details not only improve the visual appeal but also deepen the anatomical accuracy of your drawing. Let’s dive into how you can achieve this.Muscle Texture
When depicting the heart, capturing the muscle texture is crucial. The heart is a muscle, and its surface is not smooth. Consider using short, curved lines to mimic the fibrous nature of cardiac muscle. To add depth, vary the pressure of your pencil strokes. Lighter strokes can show softer areas, while darker strokes highlight the pronounced muscle fibers. This technique can bring your heart drawing to life, making it appear more three-dimensional.Veins And Arteries
Veins and arteries are essential features of the heart that add complexity and realism. Start by sketching the main arteries, such as the aorta and pulmonary arteries, using bold lines to signify their importance. Next, incorporate veins with more delicate lines, showing how they intertwine around the heart. Pay attention to the way they wrap and branch out, as this adds authenticity to your drawing. Consider the flow of blood when positioning these vessels. Are you indicating the oxygenated or deoxygenated blood flow? This detail can make your drawing not just visually appealing but also educational. Adding these elements requires patience and observation. Take your time to study real-life heart images if possible, as this will guide your artistic process. So, are you ready to elevate your heart drawing with detailed textures and intricate vascular networks? Remember, every stroke counts in making your drawing a masterpiece.Shading Techniques
Shading techniques bring depth and realism to a heart organ drawing. Light and dark tones highlight intricate details. Smooth transitions create lifelike textures and emphasize the heart’s complex structure.
Shading techniques bring life to a drawing of a heart organ. They add depth and highlight important areas. These skills are essential for creating realistic and detailed artwork. Let’s explore how shading can enhance your drawing.Creating Depth
Depth gives a heart drawing a three-dimensional look. Use varying pressure with your pencil. Light strokes create softer areas. Darker strokes add shadows. This contrast gives the heart volume. Blending tools can soften transitions between light and dark. Smudge sticks and fingers work well. They blur lines and create smooth gradients.Highlighting Key Areas
Highlighting makes certain parts stand out. Use an eraser to lift graphite for highlights. This technique mimics light reflecting off the heart’s surface. Focus on areas like the arteries and veins. These parts often catch light. A sharp pencil adds crisp details. Use it to outline and emphasize important structures. This precision enhances realism.Coloring The Heart
Capturing the intricate details of the heart organ through drawing can deepen understanding of human anatomy. Highlighting its chambers and vessels, this artistic expression merges creativity with science, offering an engaging learning experience.
Coloring the heart is a vibrant journey of creativity. It breathes life into the anatomical structure, offering a visual feast. This process enhances understanding and appreciation of the heart’s intricate details. With thoughtful color choices, the heart becomes a captivating masterpiece. Below, explore key aspects of coloring the heart organ drawing.Choosing The Right Palette
Selecting the perfect colors is crucial. A realistic palette brings authenticity to your drawing. Use reds and pinks for arteries and veins. Blue shades work well for oxygen-depleted areas. This contrast highlights various heart components. Earth tones can represent surrounding tissues. A balanced palette ensures visual appeal and accuracy.Blending Colors
Blending adds depth and texture. It softens transitions between hues. Layering different shades creates a three-dimensional effect. Gradual shading techniques achieve a smooth finish. Use blending tools for seamless color flow. This technique enhances realism and engages viewers. A well-blended heart drawing captivates attention and sparks curiosity.Final Touches
Completing a heart organ drawing requires careful attention to detail. These final touches bring your artwork to life, ensuring realism and depth. Focus on refining details and correcting mistakes to enhance the drawing’s quality. This stage transforms your sketch into a detailed piece.
Refining Details
Examine your drawing closely. Identify areas needing more detail. Add subtle shading to indicate depth and dimension. Highlight the heart’s curves and contours. Enhance veins and arteries with gentle lines. Ensure the texture mimics the heart’s surface. Use a reference image for accuracy. Small adjustments make a big impact.
Correcting Mistakes
Review your drawing for errors. Erase unnecessary lines with a soft eraser. Correct any inaccurate shapes or proportions. Adjust shading to balance light and shadow. Revisit the heart’s symmetry. Make sure both sides look harmonious. A clean, precise drawing is the goal. Taking time to correct mistakes improves overall quality.
Common Mistakes
Drawing a heart organ can be challenging for beginners. Many artists make common mistakes that affect the realism and accuracy of their work. Understanding these errors can help improve your skills and create more lifelike drawings. Below, we discuss some frequent pitfalls.
Proportional Errors
One common mistake is incorrect proportions. The heart has a unique shape, with different chambers and vessels. Artists often make the heart too large or small in relation to its parts. Pay attention to the size of the atria and ventricles. They should be balanced and symmetrical. Reference images can aid in achieving correct proportions.
Misplaced Elements
Another error involves misplaced elements. The heart has specific anatomical features like arteries, veins, and valves. These elements must be accurately positioned. Misplacement can confuse viewers and distort the heart’s function. Study diagrams to understand the placement of these parts. Practice with sketches to internalize their positions.
Tips For Improvement
Enhance your heart organ drawings by focusing on realistic shapes and proportions. Study anatomy images to understand details better. Use light and shadow to give depth and make the heart look three-dimensional.
Drawing the human heart organ with precision and detail can be a challenging yet rewarding endeavor. Whether you’re a budding artist or someone looking to refine their skills, improving your heart organ drawings requires dedication, practice, and a keen eye for detail. Here are some tips to help you enhance your drawing skills and bring your heart illustrations to life.Practice Exercises
Commit to regular practice sessions. The more you draw, the better you become. Start with simple sketches of the heart’s basic shape. Gradually add layers of complexity by incorporating veins, arteries, and other anatomical details. Try varying your perspectives. Draw the heart from different angles to understand its three-dimensional form better. This exercise can broaden your understanding and improve your overall depiction.Learning From Experts
Seek inspiration from experienced artists who specialize in anatomical drawings. Analyze their techniques and styles. Watch tutorials or attend workshops where professionals share their insights on drawing anatomy. These sessions can provide valuable tips and shortcuts you might not have considered. Don’t hesitate to reach out to artists for feedback. Constructive criticism from a seasoned eye can highlight areas for improvement and offer new directions for your practice. Incorporating these strategies into your routine will not only enhance your skillset but also deepen your appreciation for the art of drawing. How will you elevate your next heart drawing?Frequently Asked Questions
How To Draw A Heart Organ Accurately?
To draw a heart organ accurately, start with basic shapes. Focus on proportions and anatomical details. Study reference images for guidance. Use shading to add depth and texture. Practice regularly to improve your skills and understanding of heart anatomy.
What Tools Are Best For Heart Organ Drawing?
Use pencils, charcoal, or digital tools for heart organ drawings. Pencils offer control and precision. Charcoal provides depth and texture. Digital tools allow for flexibility and easy corrections. Choose tools that suit your style and experience level for best results.
Why Is Heart Organ Anatomy Important In Drawing?
Understanding heart organ anatomy ensures accuracy in your drawing. It helps depict structure and function realistically. Knowledge of anatomy enhances detail and depth. Accurate representation can aid in educational purposes and artistic expression, adding value to your artwork.
Can Beginners Draw A Heart Organ Easily?
Beginners can draw a heart organ with practice. Start with basic shapes and gradually add details. Use reference images for guidance. Practice regularly to improve. Focus on proportions and shading for a realistic effect. Patience and persistence are key to mastering heart organ drawing.
Conclusion
Exploring heart organ drawings enriches our understanding of human anatomy. Art captures the heart’s complexity and beauty. Sketching helps visualize its intricate structures. This creative approach aids in learning. It bridges science and art. Drawings can simplify complex medical concepts.
They make knowledge accessible to everyone. Whether you’re a student or enthusiast, drawing offers a unique perspective. It’s a powerful tool for education and appreciation. Dive into the world of anatomical art. Discover the marvels of the heart. Let your curiosity guide your pencil.
Each sketch reveals more of its fascinating story.

Hi, I’m Daniel Brooks—a food lover and kitchen gear enthusiast. I enjoy testing cookware, utensils, and gadgets to see what really works in everyday cooking. At PlugChef.com, I share honest reviews, comparisons, and simple guides to help you choose the best tools for a safer, smarter, and more enjoyable kitchen.
Related posts:
 What Type of Cooking Utensils are Safe: Expert Picks
 What Innovations Could Blenders Make: Unleashing Future Tech
 Smart Strategies to Organize a Small Kitchen: Maximize Space
 How to Organize a Kitchen Cabinet: Expert Tips & Tricks
 How to Organize Kitchen Drawers: Expert Tips and Tricks
 How to Organize a Corner Kitchen Cupboard: Expert Tips

