
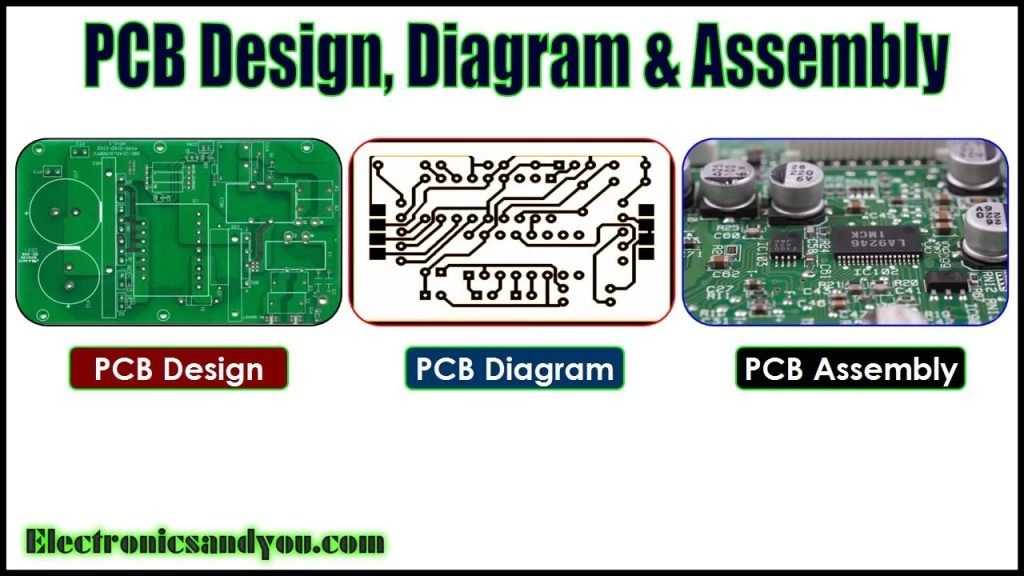
Whether you’re a hobbyist building a custom Arduino enclosure, a repair technician modifying a damaged consumer electronics board, or a prototype engineer trimming a test PCB to fit a tight assembly space, knowing how to cut a printed circuit board (PCB) precisely is a core skill for anyone working with electronics. A sloppy cut doesn’t just look unprofessional: it can sever critical copper traces, cause short circuits, create sharp edges that damage wiring, or leave the board too large to fit its intended housing. Unlike cutting wood or plastic, PCBs are made of layered fiberglass and copper, which splinter easily if cut incorrectly, so following proven, safety-first steps is non-negotiable for consistent, damage-free results.
Why Precise PCB Cutting Matters
Many DIYers and new electronics enthusiasts assume PCB cutting is a simple “measure and snip” task, but poor cutting practices lead to costly, avoidable issues:
- Severed copper traces that break circuit functionality, requiring expensive board replacement or time-consuming trace repair
- Delaminated fiberglass layers that leave the board weak and prone to cracking under stress
- Rough, sharp edges that can cut through wiring, damage adjacent components, or cause injury during handling
- Boards that are slightly too large or misshapen, making them impossible to fit into custom enclosures or existing device housings
Common use cases for cutting PCBs include trimming oversized production boards to fit small device housings, removing water-damaged or fried sections of a board to salvage working components, and modifying prototype boards during product development. Taking the time to cut precisely the first time saves hours of repair work and wasted materials down the line.
Essential Tools and Safety Gear
The right tools make all the difference between a clean, precise cut and a splintered, damaged board. Below is a breakdown of the equipment you’ll need, organized by function:
Cutting Tools
Choose a tool based on your board type and the shape of the cut you need to make:
- PCB shears: The best option for straight cuts on thin (1.6mm) single-layer FR4 boards. They require minimal force, produce almost no dust, and create clean, splinter-free edges. Look for shears with a hardened steel cutting edge for longevity.
- Rotary tool with diamond cutting disc: Ideal for curved, irregular, or internal cuts (like cutouts for ports or components). Use a thin, reinforced diamond disc for the cleanest results, and run the tool at the manufacturer’s recommended speed to avoid burning the board or breaking the disc.
- Fine-toothed coping saw: Best for thick multi-layer boards or boards with heavy copper pours. The fine teeth minimize chipping, but this tool produces more dust and vibration than shears or a rotary tool, so it requires a steady hand.
- Carbide-tipped utility knife: Perfect for scoring and snapping thin single-layer boards. Score the same line 3–4 times with firm, even pressure, then snap the board along the scored line for a clean break.
Proper material preparation is key for all rigid sheet cutting projects, from foam core crafts to custom framing mat work, and PCBs are no exception.
Safety Gear
PCBs are made of fiberglass, epoxy, and copper, all of which pose minor but avoidable health and safety risks when cut:
- ANSI-rated safety glasses: Protect your eyes from flying copper fragments and fiberglass splinters. Wrap-around styles work best to catch debris from the side.
- N95 or higher respirator: Inhaling fiberglass and epoxy dust can cause respiratory irritation, so a fitted dust mask is non-negotiable, especially if you’re cutting multiple boards in a single session.
- Cut-resistant gloves: Sharp copper edges and fiberglass splinters can cause deep cuts, so nitrile or cut-resistant work gloves protect your hands during handling and cutting.
- Work mat: A silicone or rubber work mat catches dust and debris, and prevents the board from slipping while you cut.
The global electronics manufacturing standards body IPC recommends wearing ANSI-rated eye protection and a NIOSH-approved respirator when cutting PCBs to avoid exposure to irritant fiberglass and epoxy dust per IPC safety guidelines.
Supporting Tools
These small items make the cutting process far more accurate:
- Metal ruler or straight edge (plastic will get cut by sharp tools)
- Permanent marker (pencil rubs off easily during handling)
- Fine-grit sandpaper (120-grit for coarse deburring, 220-grit for finishing)
- Deburring tool for hard-to-reach edge areas
- Bench vise or clamps with padded jaws (to avoid cracking the board)
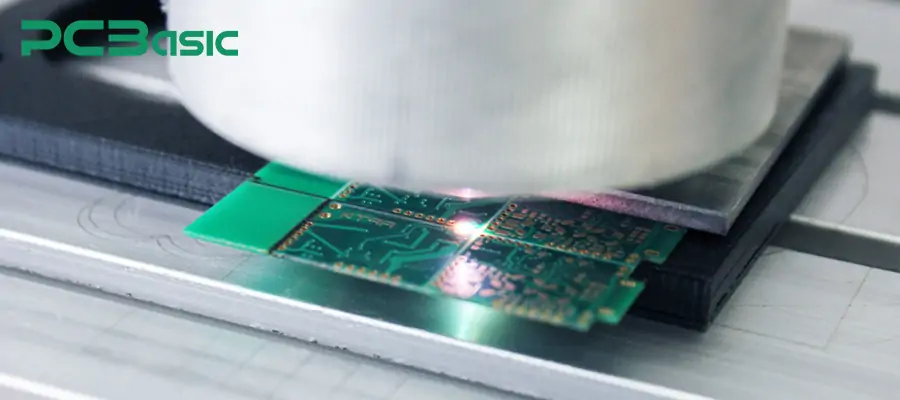 A dedicated PCB shear produces clean, splinter-free straight cuts with minimal dust.
Step-by-Step Guide to Precise PCB Cutting
Follow these steps to get a clean, precise cut every time, whether you’re working with a thin prototype board or a thick multi-layer production board:
Step 1: Plan and Mark Your Cut Line
Before you touch a cutting tool, confirm your required dimensions against your project specs (enclosure size, damaged section to remove, etc.). Use a metal ruler to measure twice, then mark your cut line with a permanent marker: make the line 1–2mm wider than your final required size if you plan to sand the edges later, to account for material removal. If you’re cutting near existing traces, leave at least 1–2mm of space between your cut line and any copper to avoid severing critical circuitry.
Common mistake: Marking the cut line with pencil, which rubs off when you handle the board, leading to misalignment and uneven cuts.
Step 2: Secure the PCB Firmly
Never hold a PCB with your free hand while cutting. If using a bench vise, wrap the jaws in soft cloth or rubber to avoid cracking the board or damaging mounted through-hole components. If using clamps, secure the board to a solid, non-wobbly work surface, and ensure the cut line hangs slightly over the edge of the surface if you’re using shears or a saw, to avoid cutting into your workbench. This step works similarly to how you would secure backer board for tile projects to avoid cracking during cutting.
Common mistake: Over-tightening clamps or a vise, which can crack fragile PCBs, especially those with large surface-mount components.
Step 3: Perform the Cut
Align your chosen cutting tool exactly on your marked line. For shears or a utility knife, apply steady, even pressure—don’t yank or force the tool, as this will splinter the fiberglass and sever unintended traces. For a rotary tool or saw, let the tool do the work at a consistent pace; forcing it will overheat the board, warp the fiberglass, and break the cutting disc or saw blade.
Common mistake: Cutting too fast, which leads to uneven edges, splintering, and increased risk of tool slippage.
Step 4: Deburr and Finish the Edges
After cutting, the edge will have sharp copper fragments, fiberglass splinters, and rough residue. Start with 120-grit sandpaper to remove major burrs, then move to 220-grit or higher for a smooth, safe finish. Use a deburring tool for hard-to-reach areas, then wipe the board with a dry, lint-free cloth to remove all dust. Inspect the cut edge under good lighting: if you accidentally severed a copper trace, you can repair it by soldering a small jumper wire between the two broken ends, or using conductive epoxy for non-critical connections. Smooth, burr-free edges are not just for PCBs—you’ll want the same finish when prepping tile backer board for installation to avoid cutting into waterproofing membranes or thinset.
Common mistake: Skipping deburring, which can lead to short circuits if sharp copper fragments touch other traces or components during assembly.
 Smoothing cut edges with sandpaper removes sharp copper fragments and fiberglass splinters.
Pro Tips for Flawless Cuts Every Time
Even with the right tools and steps, these small best practices will help you get consistent, precise results:
- Cut on the waste side of your line if you’re unsure: You can always sand more material off, but you can’t add it back. Leaving a small buffer ensures you don’t accidentally cut your board too small.
- Inspect the board under magnification before cutting: Use a magnifying glass or jeweler’s loupe to check for hidden traces on the reverse side of the board, and confirm your cut line won’t intersect any critical circuitry.
- Remove fragile components before cutting: If your board has large through-hole components or delicate surface-mount parts, desolder and remove them before cutting to avoid damage.
- Make a cutting jig for repeated cuts: If you’re cutting multiple identical boards, build a simple jig from scrap wood to hold the board in place, so you don’t have to remeasure each time.
- Test on a scrap board first: If you’re using a new cutting tool or working with an unfamiliar board type, practice on a scrap piece of the same material to get a feel for the tool’s pressure and speed requirements.
Common Cutting Mistakes to Avoid
Even experienced DIYers run into these avoidable issues when cutting PCBs:
- Skipping safety gear: Fiberglass dust can cause skin irritation and respiratory issues, and sharp copper edges can cause deep cuts. Always wear safety glasses, a dust mask, and gloves, even for small cuts.
- Using dull tools: A dull utility knife or PCB shear requires more force to cut, increasing the risk of slippage, splintering, and accidental trace damage. Replace utility knife blades regularly, and sharpen PCB shears as needed.
- Cutting too close to traces: Leaving less than 1mm of space between your cut line and copper traces makes it far too easy to sever critical circuitry. When in doubt, leave more space and sand the board down to your final size later.
- Cutting in a poorly lit area: Poor visibility makes it hard to see your cut line and existing traces, leading to misalignment and damage. Work in a bright, well-lit space, or use a task light pointed directly at your work area.
- Not cleaning up dust after cutting: Fiberglass dust can linger on your work surface and in the air, causing irritation later. Vacuum the area thoroughly after cutting, and wipe down all surfaces with a damp cloth, similar to routine post-DIY sink cleanup to avoid irritants lingering in your workspace.
Just like you would select a specialized tool to prepare charcuterie board ingredients without crushing soft cheeses, choosing the right PCB cutting tool for your board type will prevent damage.
Frequently Asked Questions
What tools work best for cutting thin single-layer PCBs?
For standard 1.6mm thick FR4 single-layer boards, a dedicated PCB shear or sharp utility knife with a carbide blade produces the cleanest straight cuts with minimal dust. For curved or irregular cuts, a rotary tool with a diamond cutting disc is ideal. For thicker multi-layer boards, a fine-toothed coping saw minimizes chipping. Always test your chosen tool on a scrap piece of the same PCB first to confirm it won’t delaminate the board.
Can I cut a PCB without damaging the copper traces?
Yes, as long as you plan your cut line carefully. Mark your cut at least 1–2mm away from any visible copper traces, and inspect the board under good lighting (or magnification) before cutting to identify any hidden traces on the reverse side. If you do accidentally sever a trace, you can repair it by soldering a small jumper wire between the two broken ends, or use conductive epoxy for non-critical connections.
Is it safe to cut a PCB with a household saw?
A fine-toothed coping saw or hacksaw can be used for thicker PCBs, but it produces more dust and vibration than a dedicated PCB cutting tool, increasing the risk of splintering or trace damage. If you use a saw, wear a dust mask and eye protection, and cut slowly to avoid overheating the board, which can damage components or warp the fiberglass substrate. Inhaling fiberglass and epoxy dust from cut PCBs can cause respiratory irritation, per OSHA workplace safety guidelines.
What safety gear do I need for PCB cutting?
At minimum, wear ANSI-rated safety glasses to protect your eyes from flying copper fragments and fiberglass dust, a NIOSH-approved dust mask to avoid inhaling irritant epoxy and fiberglass particles, and cut-resistant gloves to protect your hands from sharp board edges. Work in a well-ventilated area, and avoid cutting PCBs near food prep surfaces, as fiberglass dust can contaminate food.
Conclusion
Cutting a PCB precisely doesn’t require professional-grade equipment or years of experience—it just requires careful planning, the right tools for your board type, and a steady, patient hand. By following the steps above, prioritizing safety, and avoiding common mistakes, you can get clean, damage-free cuts every time, whether you’re working on a hobbyist prototype, a repair project, or a custom electronics build. For more step-by-step DIY guides for electronics, crafts, and home improvement projects, browse our full blog library for actionable, tested tips and tutorials.

I’m Abby Lu, a passionate home cook who loves simplifying everyday meals. At PlugChef.com, I share product reviews and cooking guides to help you find the best tools for your kitchen.
Related posts:
 Rubber Mat for Kitchen Sink: Essential Protection Tool
 Vintage Spice Rack With Glass Bottles: Timeless Kitchen Charm
 How to Microwave Steam Asparagus: Quick & Easy Perfect Results
 How to Soak Grill Grates: Easy Tips for a Sparkling Clean Grill
 What is a Dry Rub: Ultimate Guide to Flavorful BBQ Seasoning
 Can You Freeze Homemade Gravy: Easy Tips to Preserve Flavor

