
You’re halfway through a 20-mile backcountry descent, focused on a rocky switchback, when your front tire hits a hidden root. You go over the handlebars, landing hard on a bed of loose gravel. Your knee is bleeding, your chain is jammed, and your phone has no signal. In that moment, the 1-pound first aid kit strapped to your bike frame is the most valuable gear you own.
Mountain biking often takes place in remote areas where emergency services are 30 minutes to 2 hours away, per US Forest Service outdoor safety guidelines. A generic household first aid kit won’t cut it for trail riding: you need supplies tailored to common MTB injuries, bike repair tools to get you home, and emergency gear to stay safe if you’re stranded. This guide breaks down exactly what to pack, how to organize it, and how to maintain it for every ride, from quick local laps to multi-day backcountry expeditions.
 Waterproof first aid kits secured to your bike frame are accessible even if you’re separated from your pack during a crash.
Credit: www.liveactionsafety.com
Waterproof first aid kits secured to your bike frame are accessible even if you’re separated from your pack during a crash.
Credit: www.liveactionsafety.com
Core Medical Supplies for Trail Injuries
Lacerations, abrasions, puncture wounds, and blisters make up 70% of all non-mechanical MTB injuries, per outdoor safety data. Your medical kit should prioritize lightweight, durable supplies that work even when you’re dirty, sweaty, and miles from a sink.
Wound Care Basics
- Sterile 4×4 gauze pads for applying firm pressure to bleeding wounds
- Adhesive bandages in multiple sizes for small cuts and blisters
- Butterfly closure bandages for deep lacerations that need to be held shut to heal
- Liquid bandage for small abrasions that won’t stay covered by traditional bandages during rough riding
- Hemostatic gauze for severe bleeding that won’t stop with standard pressure A common mistake new riders make is relying solely on small adhesive bandages, which often fall off during rough rides. Opt for flexible, sweat-resistant bandages designed for active use to keep wounds protected until you can get proper care.
Antiseptics and Disinfectants
Cleaning wounds immediately reduces infection risk, especially on trails where dirt, bacteria, and debris are unavoidable. Pack:
- Benzalkonium chloride wipes, which are gentler than alcohol on open wounds and won’t sting
- Small individual saline solution packets for flushing dirt and gravel out of deep cuts
- A 1-ounce bottle of povidone-iodine solution for disinfecting larger wounds Avoid harsh hydrogen peroxide or rubbing alcohol on deep wounds, as they can damage healthy tissue and slow healing. For minor scrapes, antiseptic wipes are sufficient for on-trail cleaning, following CDC outdoor first aid recommendations.
Pain Relief and Allergy Medications
Pain management is critical for staying mobile after an injury, and allergies to insect stings or poison ivy are common on trails. Include:
- Ibuprofen (200mg tablets) for reducing inflammation and pain from sprains, strains, and swelling
- Acetaminophen for pain relief if you can’t take NSAIDs due to medical restrictions
- Antihistamine tablets for allergic reactions to insect stings, pollen, or poison ivy
- Any personal prescription medications you need, stored in a labeled, waterproof pouch Keep all medications sealed in their original packaging to avoid moisture damage, and check expiration dates every 3 months.
Blister and Minor Irritation Care
Blisters are one of the most common ride-ending injuries for new and experienced riders alike, caused by ill-fitting shoes or long hours of pedaling. Add these supplies to prevent and treat them:
- Hydrocolloid blister pads that cushion and protect blisters without sticking to the wound
- Moleskin for padding hot spots before they turn into blisters
- Fine-tipped tweezers for removing splinters, ticks, and thorns from skin
- A small pair of blunt-nosed scissors for cutting tape and bandages to size
Bike Repair Tools to Avoid Being Stranded
Many MTB injuries are minor, but a mechanical issue can leave you stranded miles from the trailhead with no cell service. Pack these tools to fix common problems on the fly:
Multi-Tool Essentials
A quality multi-tool is the backbone of your on-trail repair kit. Look for one that includes:
- 4, 5, and 6mm Allen keys (standard for most MTB bolt sizes)
- A Torx T25 bit for adjusting disc brake rotors and derailleur hangers
- A chain breaker for replacing a damaged chain without needing a full workshop
- A spoke wrench for truing a bent wheel mid-ride A common mistake is buying a cheap multi-tool with bits that strip easily; opt for a hardened steel model from a reputable brand to avoid being stuck with a broken tool when you need it most. Use a small divided storage vessel to separate multi-tool bits from other small parts so you don’t have to dig through your pack mid-repair.
Flat Tire Repair Kit
Punctures are the most frequent mechanical issue on trails, caused by sharp rocks, thorns, and broken glass. Your kit should include:
- 2 reinforced plastic tire levers (flimsy levers often break under the pressure of tight MTB tires)
- A patch kit with glue and rubber patches for repairing small punctures
- A spare inner tube sized for your tire, in case the puncture is too large to patch
- A 2-inch strip of duct tape wrapped around your multi-tool for temporarily booting a slashed sidewall Always test your patch kit before heading out on a long ride—old glue dries out quickly and won’t stick to rubber when you need it most.
Inflation Options
After repairing a flat, you’ll need to get your tire back to the correct pressure (usually 20-30 PSI for most MTB tires, depending on terrain). Pack one of these options:
- A compact mini hand pump with a built-in pressure gauge, which lets you inflate tires to the exact PSI needed for your terrain
- A CO2 inflator with 2-3 cartridges, which inflates tires in seconds but is single-use and can be costly for frequent riders Many experienced riders carry both: a CO2 inflator for quick fixes mid-ride, and a mini pump for topping off tires or inflating multiple flats on long trips.
Safety and Emergency Signaling Gear
Even the most skilled riders can get lost or injured on unfamiliar trails. These items help you stay visible, signal for help, and stay safe if you’re stranded:
Impact Protection
Your helmet and pads are your first line of defense against serious injury:
- Replace your helmet every 3-5 years, or immediately after any impact, even if there’s no visible damage—cracks in the foam can compromise protection without being obvious to the naked eye
- Opt for knee pads with hard plastic caps for rocky, technical descents, and elbow pads with gel padding for falls on gravel
- Consider hip and tailbone pads if you regularly ride drops or jump features A common mistake is wearing loose-fitting pads that shift during falls; make sure all protective gear fits snugly before every ride.
Visibility and Signaling
If you’re stuck after dark or in low-visibility conditions, these items can help rescuers find you:
- Reflective tape applied to your bike frame, helmet, and pack, which is visible from car headlights up to 500 feet away
- A small LED strobe light that attaches to your pack or helmet, which runs for 50+ hours on a single charge and is visible for miles in low light
- A high-decibel emergency whistle, which is louder and easier to use than shouting when you’re injured or exhausted
- A lightweight emergency blanket, which retains 90% of your body heat to prevent hypothermia if you’re stuck out after temperatures drop, even on summer nights Keep all signaling gear attached to the outside of your pack or helmet so it’s accessible even if you’re separated from your bike during a crash.
 A well-organized kit separates medical supplies from bike repair tools for fast access during emergencies.
Credit: www.aliexpress.com
A well-organized kit separates medical supplies from bike repair tools for fast access during emergencies.
Credit: www.aliexpress.com
Navigation and Communication Tools
Even if you’re riding a familiar trail, it’s easy to get turned around in dense forest or low visibility. Pack redundant navigation tools to avoid getting lost:
Redundant Navigation
- A physical topographic map of the trail system you’re riding, which works even if your electronics fail
- A GPS device or smartphone with offline trail maps downloaded, which works without cell service
- Extra AA batteries for your GPS, or a portable power bank for your phone, to avoid running out of power on long rides Mark your route on your map before you head out, and let someone who isn’t riding with you know your planned route and expected return time.
Emergency Communication
- A waterproof phone case to protect your device from rain, mud, and impacts
- A satellite communicator (like a Garmin inReach) if you’re riding in areas with no cell service, which lets you send emergency texts and location data to rescue services For severe injuries, call emergency services as soon as you have a signal, and use your whistle or strobe light to guide rescuers to your location.
Hydration, Nutrition, and Weather Preparedness
Fatigue, dehydration, and exposure to extreme weather are major contributors to MTB accidents and injuries. Pack these supplies to stay safe and comfortable on the trail:
Hydration and Water Safety
Dehydration causes dizziness, fatigue, and poor decision-making, which increases your risk of crashes. Carry 1 liter of water for every hour of riding, more in hot or humid weather. For rides longer than 2 hours, add a lightweight water filter (like a Sawyer Squeeze or Katadyn BeFree) to safely refill from streams and lakes, avoiding harmful bacteria and protozoa. Add electrolyte tablets to your water for rides over 90 minutes to replace salts lost through sweat and prevent hyponatremia, a dangerous condition caused by drinking too much plain water. Pack extra water and snacks in leak-proof food storage to keep them dry and accessible even if you get caught in rain.
Trail Nutrition
Your body burns 400-600 calories per hour of moderate mountain biking, so you need to refuel regularly to avoid fatigue. Pack:
- Calorie-dense, high-protein snacks like nut butter packets, beef jerky, and dried fruit, which provide long-lasting energy without sugar crashes
- Avoid sugary energy gels and candy, which cause a quick energy spike followed by a crash that leaves you fatigued and more likely to crash
- Store snacks in airtight high-protein storage to keep them fresh and protected from moisture and pests If you’re leading a group ride, pack extra portion-controlled snack portions to share with riders who run low on fuel or need a quick energy boost after a minor injury.
Weather-Specific Gear
Weather in mountainous areas can change in minutes, even on sunny summer days. Pack:
- A lightweight, breathable packable rain jacket that fits over your layers, to keep you dry and warm if you get caught in a storm
- SPF 50+ sweat-resistant sunscreen and a lip balm with SPF, which won’t wash off during long rides
- A lightweight thermal base layer or fleece jacket that packs down to the size of a water bottle, to put on if temperatures drop unexpectedly, especially after a crash when you’re not generating body heat Check the weather forecast before you head out, and add extra layers if temperatures are expected to drop below 60°F (15°C) at higher elevations.
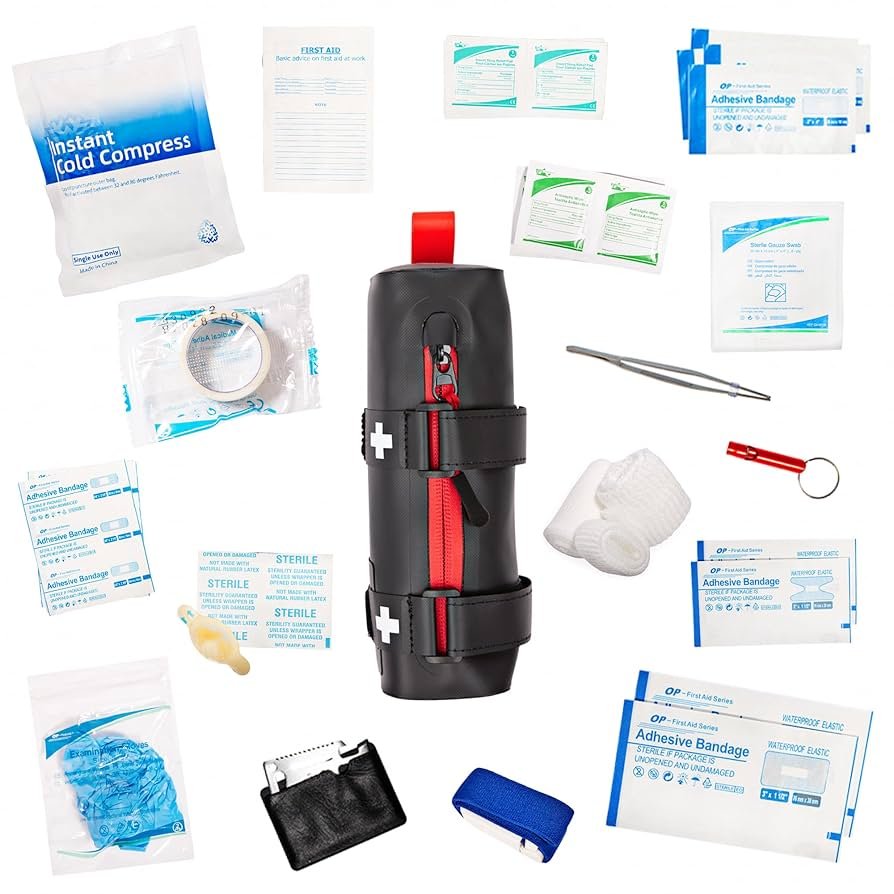
 Key emergency items including a whistle, sterile gauze, and pain relievers laid out for quick identification.
Credit: www.amazon.com
Key emergency items including a whistle, sterile gauze, and pain relievers laid out for quick identification.
Credit: www.amazon.com
How to Pack and Maintain Your MTB First Aid Kit
A first aid kit is only useful if it’s organized, accessible, and stocked with usable supplies. Follow these tips to keep it ready for every ride:
- Organize by priority: Put the items you’ll use most (blister pads, antiseptic wipes, pain relievers) in the top of your kit, and less frequently used items (hemostatic gauze, splint) in lower pockets.
- Waterproof everything: Store all medical supplies and small tools in a waterproof compartment container inside your pack to prevent moisture damage to sterile dressings and medications.
- Check it regularly: Inspect your kit every 3 months, before every long ride, and after any incident where supplies are used. Replace expired medications, dried-out antiseptic wipes, and used dressings immediately. Just like you’d inspect dry goods stored for long periods for spoilage, don’t wait until you need supplies to find they’re unusable.
- Customize for your ride: For short 1-hour local rides, a small pouch with basic bandages and antiseptic wipes is sufficient. For all-day backcountry trips, add extra gauze, a splint for sprains, a satellite communicator, and extra water purification tablets. If you have allergies, carry an epinephrine auto-injector and antihistamines.
Frequently Asked Questions
What essentials should a MTB first aid kit include?
At minimum, your kit should include sterile 4×4 gauze pads, adhesive bandages in multiple sizes, antiseptic wipes, ibuprofen and acetaminophen, hydrocolloid blister pads, hemostatic gauze for severe bleeding, tweezers for splinters and ticks, a small pair of scissors, adhesive tape, and an emergency whistle. Add personal medications, allergy treatments (like an epinephrine auto-injector if prescribed), and a snake bite kit if you ride in areas with venomous snakes.
How do I maintain my MTB first aid kit?
Check your kit every 3 months, before every long ride, and after any incident where supplies are used. Replace expired medications, dried-out antiseptic wipes, and used dressings immediately. Store the kit in a cool, dry place away from direct sunlight, and keep it in a waterproof bag inside your pack to prevent moisture damage. If you ride in extreme temperatures, avoid storing medications in external pockets where they can overheat or freeze.
Why is a first aid kit important for MTB riders?
Mountain biking often takes place in remote areas where emergency services are 30 minutes to 2 hours away, per US Forest Service guidance. A basic first aid kit lets you clean and dress wounds, stabilize sprains, and manage pain immediately after an injury, reducing the risk of infection, permanent damage, and ride-ending complications. For minor injuries, it lets you finish your ride safely instead of having to call for a costly rescue.
Can I customize a first aid kit for MTB trips?
Absolutely. For short, 1-hour local rides, a small pouch with basic bandages and antiseptic wipes is sufficient. For all-day backcountry trips, add extra gauze, a splint for sprains, a satellite communicator, and extra water purification tablets. If you have allergies, carry an epinephrine auto-injector and antihistamines. For rides in snake country, add a venom extractor snake bite kit (note that these are controversial, so pair it with a satellite communicator to call for help immediately after a bite). Always tailor your kit to the trail difficulty, weather, and length of your ride.
Should I carry a first aid kit on every ride, even short ones?
Yes. Even a 30-minute ride on a local trail can result in a fall, a puncture wound from a nail, or a bee sting. A small, lightweight kit adds almost no weight to your pack, and you’ll be grateful you have it if an unexpected injury occurs. Many riders keep a mini first aid pouch attached directly to their bike frame so they never forget it on their way out the door.
Final Thoughts
A well-stocked MTB first aid kit isn’t just a nice-to-have extra—it’s a critical piece of safety gear that can turn a minor injury into a quick fix, or prevent a bad situation from turning catastrophic. By tailoring your kit to the specific risks of trail riding, checking it regularly, and knowing how to use the supplies inside, you can ride with confidence knowing you’re prepared for whatever the trail throws your way.
For more tips on staying prepared on the trail, browse our full library of outdoor and everyday gear guides on the Plug Chef blog.

I’m Abby Lu, a passionate home cook who loves simplifying everyday meals. At PlugChef.com, I share product reviews and cooking guides to help you find the best tools for your kitchen.
Related posts:
 How to Thicken Watery Gravy: Easy Tips for Perfect Texture
 Everything Bagel Dip Trader Joe’s: Irresistible Snack Hack
 Store Fresh Lettuce from Garden: Ultimate Tips for Lasting Crispness
 Citric Acid As a Descaler: Ultimate Natural Cleaning Solution
 High Protein Pancakes Cottage Cheese: Ultimate Muscle-Building Recipe
 Whole Foods Water Reverse Osmosis: Ultimate Purity and Health Benefits

