
Cutting tile backer board is one of the most critical steps in any tile installation project, whether you’re updating a bathroom shower surround, installing a kitchen backsplash, or laying a new tile floor. A clean, accurate cut ensures your backer board sits flush against the subfloor or wall, eliminating gaps that can cause tiles to crack, lift, or allow water to seep behind the surface. Many DIYers assume cutting this dense, water-resistant material is complicated, but with the right tools, safety gear, and simple techniques, you can get professional-quality results without costly mistakes. This guide walks you through every step of cutting all common backer board types, from thin foam to thick cement board, plus pro tips from professional tile installers to make your project faster and easier.
What Is Tile Backer Board, and Why Cut Quality Makes or Breaks Your Tile Job
Tile backer board is a water-resistant panel installed between your subfloor or wall framing and your tile, designed to provide a stable, durable base that won’t rot or warp when exposed to moisture. Unlike drywall or plywood, it is engineered to support the weight of tile and thinset mortar without degrading over time, making it the standard choice for wet areas like bathrooms, kitchens, and laundry rooms.
Common backer board types include cement board (a mix of cement and fiberglass mesh, the most durable option for floors and showers), foam board (lightweight extruded polystyrene, ideal for wall applications where weight is a concern), and fiberglass mat board (water-resistant and easier to cut than cement board, for low-moisture areas). From 10+ years of professional tile installation experience, uneven or rough backer board cuts are one of the top 3 causes of DIY tile failure: gaps from poor cuts create space for thinset to pool unevenly, leading to cracked tiles, lippage (uneven tile height), and water damage over time. Precise cuts eliminate these risks and make tile installation faster and easier.
Pre-Cut Prep: Tools and Safety Non-Negotiables
Skipping prep is the fastest way to ruin a cut or put your health at risk. Gather the right tools for your board type, and prioritize safety gear to avoid injury from sharp edges and hazardous dust.
Essential Cutting Tools for Every Board Type
Your tool selection depends on the thickness and material of your backer board:
- For straight cuts on thin (1/4" to 1/2") foam or cement board: sharp utility knife, carbide-tipped scoring tool, T-square (for perfect right angles), and a 4-foot straight edge (for long, consistent cuts)
- For straight cuts on thick (5/8" or thicker) cement board: circular saw with a diamond or carbide-tipped fiber cement blade, jigsaw with a 10+ TPI (teeth per inch) bi-metal blade, and clamps to secure the board
- For cutouts around pipes, outlets, and fixtures: hole saw set (carbide-tipped for cement board), fine-tooth jigsaw blade, rotary tool for tight corners, and a 1/2" drill bit for starter holes
- For finishing: 80-grit sanding block or cement board rubbing stone, and a putty knife for removing burrs
Safety Gear You Can’t Skip
Cement backer board contains crystalline silica, a mineral classified as a human carcinogen by OSHA when inhaled as fine dust. Basic dust masks do not provide adequate protection—use a P100 or N95 respirator for all cutting tasks, per OSHA silica exposure guidelines. Pair this with safety glasses, cut-resistant gloves, and hearing protection if using a power saw. Prep your workspace by laying down a drop cloth, opening windows for ventilation, and keeping a HEPA shop vac on hand to capture dust as you work.
Step-by-Step Guide to Clean, Accurate Cuts
Follow these steps for straight cuts and openings that fit perfectly, every time.
Step 1: Measure, Mark, and Account for Blade Kerf
First, measure the exact space your backer board will fit into, accounting for 1/4" of thinset under floor tile or 3/8" under wall tile. Add 1/8" to your marked cut line to account for the saw blade’s kerf (the width of material the blade removes), so you don’t cut your piece too small. Use a T-square to draw a crisp, straight line with a permanent marker (it won’t rub off during cutting). Double-check all measurements before proceeding—the old adage "measure twice, cut once" is especially critical with backer board, which is more expensive to replace than drywall if you make a mistake.
Step 2: Cut Thin Backer Board (Score and Snap)
For foam board or 1/4" to 1/2" cement board, use the score-and-snap method for fast, clean cuts:
- Place the board on a flat, stable surface with the mesh/fiberglass printed side facing up (this reduces chipping on the finished surface).
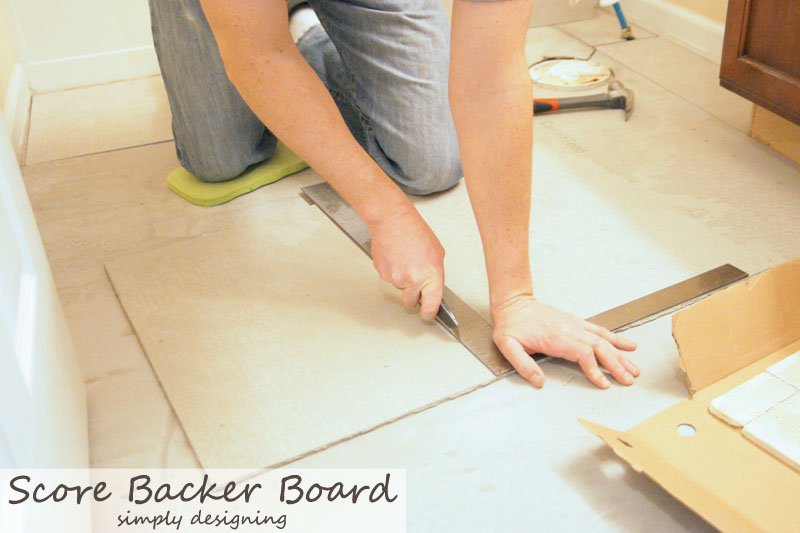
- Align your T-square with the marked line, and use a sharp utility knife or carbide scoring tool to score the board along the line, pressing hard enough to cut 1/3 to 1/2 of the way through the material. You should hear a consistent scratching sound as you score—if it feels like you’re just scratching the surface, press harder or replace your blade.
- Once scored, lift the board and gently bend it along the scored line; it will snap cleanly along the break. For thicker thin cement board, tap the back of the scored line with a hammer to help it break evenly.
 Scoring the board halfway through with a sharp utility knife creates a clean break line for thin backer board.
Image source: www.tilemountain.co.uk
Scoring the board halfway through with a sharp utility knife creates a clean break line for thin backer board.
Image source: www.tilemountain.co.uk
Step 3: Cut Thick Cement Backer Board With a Saw
For 5/8" or thicker cement board, scoring won’t create a clean enough break for professional results:
- Set your circular saw depth to 1/8" deeper than the thickness of your backer board—this prevents you from cutting into the subfloor or wall studs underneath.
- Clamp the board securely to a work surface, or place 2x4s under the board on either side of your cut line to support it and prevent sagging mid-cut.
- Turn on the saw before it touches the board, and move it slowly and steadily along your marked line—don’t force the blade, let it do the work. For curved cuts or small adjustments, a jigsaw with a fine-tooth carbide blade works well.
Step 4: Smooth Edges and Test Fit
After cutting, rough edges can cause tiles to sit unevenly or create sharp points that tear thinset mesh. Use an 80-grit sanding block or a cement board rubbing stone to smooth all cut edges, removing any burrs or splinters. Once smoothed, test fit the cut piece in its installation space: it should sit flush with the subfloor or wall, with no gaps larger than 1/8". If it’s too tight, sand the edge slightly; if it’s too loose, you’ll need to recut the piece. Only proceed with installation once the fit is perfect.
 Properly cut backer board sits flush against the wall substrate with no gaps for thinset to pool.
Image source: insulationgo.co.uk
Properly cut backer board sits flush against the wall substrate with no gaps for thinset to pool.
Image source: insulationgo.co.uk
Step 5: Cut Precise Openings for Pipes, Outlets, and Fixtures
Cutting holes for pipes, electrical outlets, and plumbing fixtures requires extra care to avoid tear-out and ensure a tight fit:
- For rectangular cutouts like electrical boxes: Mark the exact perimeter of the opening, then drill a 1/2" starter hole inside the marked area (not on the line, to avoid chipping). Use a jigsaw with a fine-tooth blade to cut along the marked lines, moving slowly for clean edges.
- For round pipes: Use a hole saw that’s 1/4" larger than the pipe’s outer diameter—this leaves room for expansion and silicone sealant to prevent water leaks.
- For tight corners where a jigsaw can’t turn, use a rotary tool with a carbide cutting bit. A common mistake is cutting openings exactly the size of the fixture, which leaves no room for sealant and leads to water damage over time.
How to Cut Backer Board Without a Saw (For Small, Simple Cuts)
If you only need to make small straight cuts on thin (1/4") foam or cement board, you can skip the saw entirely using the score-and-snap method outlined in Step 2, then smooth the edges with a sanding block. This method works well for cuts under 24 inches long, but for longer cuts or thick board, a saw will give you a much more accurate, clean edge. Avoid using a utility knife to cut thick cement board without sawing—this will create ragged, uneven edges that will telegraph through your tile and cause cracking.
Pro Tips for Flawless Cuts Every Time
These expert tips will help you avoid common pitfalls and get perfect results even on your first try:
- Use a fresh blade: Dull utility knife blades or saw blades cause chipping and rough edges. A carbide-tipped fiber cement saw blade can cut 100+ linear feet of 1/2" cement board before needing replacement, while a standard utility blade dulls after 10-20 cuts.
- Cut with the printed side up: For cement board with a printed grid or mesh on one side, cut with that side facing up to reduce chipping on the finished surface that will be visible under tile.
- Clamp long boards: For cuts longer than 4 feet, clamp a straight edge (like a 4-foot level) to the board as a guide for your saw or utility knife to avoid deviating from the line.
- Vacuum as you cut: Cement dust is fine and spreads quickly; use a shop vac with a HEPA filter to capture dust as you work, rather than blowing it around the room where it can settle on other surfaces. After cutting, clean saw blades and work surfaces with a heavy-duty surface cleaner to remove cement dust that can corrode metal edges.
- Test with a scrap piece: If you’re new to cutting backer board, cut a scrap piece first to test your measurements and blade settings before cutting your actual installation pieces—this saves you from wasting expensive material on a bad cut.
- Account for expansion: Leave a 1/8" gap between cut backer board edges and wall framing or adjacent boards, per TCNA backer board installation standards, to allow for thermal expansion and prevent buckling.
Common Mistakes to Avoid (And How to Fix Them)
Even experienced DIYers run into these issues—here’s how to avoid them:
- Skipping safety gear: Many DIYers skip a P100 mask for small cuts, but even a single cut releases enough crystalline silica to cause long-term lung damage. Fix: Keep your safety gear in a dedicated kit next to your work area so you don’t forget to put it on before starting.
- Using the wrong blade: Standard wood saw blades dull within minutes on cement board and leave rough, chipped edges. Fix: Always use a blade labeled for fiber cement, masonry, or carbide-tipped cutting; for jigsaws, choose a blade with 10+ teeth per inch for clean cuts.
- Not accounting for saw kerf: Cutting exactly on your marked line means the blade will remove 1/8" of material, leaving your piece too small. Fix: Mark your cut line 1/8" toward the waste side of your installation space, so the kerf is removed from the scrap piece, not your finished cut.
- Rushing the cut: Moving the saw too fast causes chipping and uneven edges, especially on thick cement board. Fix: Let the saw do the work—move at a steady, moderate pace, and don’t push the blade through the material.
- Not supporting the board during cutting: Unsupported boards can sag or crack mid-cut, especially when using a circular saw. Fix: Clamp the board to a work surface, or place 2x4s under the board on either side of your cut line to provide support.
- Skipping the test fit: Assuming your cut is perfect and installing the board immediately can lead to gaps that cause tiles to crack later. Fix: Always test fit the cut piece before applying thinset, and sand the edge slightly if it’s too tight.
Post-Cut Cleanup and Next Steps
Once you’ve finished cutting, clean up your workspace to avoid dust spreading to other areas of your home. First, vacuum up all cement dust with a HEPA shop vac, then wipe down all work surfaces with a damp cloth. If you have dust on nearby kitchen surfaces like countertops or range hoods, use a range hood degreaser to cut through grease that may have mixed with dust, or a bleach-based disinfectant to sanitize the area. For gritty dust on floors, use an abrasive scrubbing paste to scrub away particles without damaging finished surfaces. If you rinsed saw blades or sanding blocks in a kitchen sink, run a disposal de-gritter through your garbage disposal to flush out fine dust that could cause clogs.
Once your backer board is cut, cleaned, and test-fitted, you’re ready to install it with thin-set mortar rated for your board type. Leave a 1/8" gap between board edges and use fiberglass mesh tape on seams for extra durability before applying tile.
Summary Table: Tools and Methods for Cutting Tile Backer Board
| Backer Board Type | Thickness | Recommended Cutting Tool | Best Method | Required Safety Gear |
|---|---|---|---|---|
| Foam board (e.g. Wedi) | 1/4" to 1/2" | Sharp utility knife, T-square | Score and snap | Cut-resistant gloves, safety glasses |
| Thin cement board (e.g. 1/4" HardieBacker) | 1/4" to 1/2" | Carbide scoring tool, utility knife | Score and snap, or hammer-assisted break | Gloves, safety glasses, P100 mask |
| Thick cement board (e.g. 5/8" Durock) | 5/8" and up | Circular saw with carbide fiber cement blade, jigsaw | Saw along marked line | Gloves, safety glasses, P100 mask, hearing protection |
| Fiberglass mat backer board | 1/2" | Jigsaw with fine-tooth blade, hole saw | Saw cut, or score and snap for straight lines | Gloves, safety glasses, P100 mask |
| All board types (pipes, outlets) | All | Hole saw, jigsaw, rotary tool | Cut marked opening 1/4" to 1/2" larger than fixture | Gloves, safety glasses, P100 mask |
Final Thoughts
Cutting tile backer board correctly is a simple, low-skill task that has an outsized impact on the longevity and appearance of your tile project. Uneven cuts are one of the most common causes of DIY tile failure, leading to cracked tiles, water damage, and expensive repairs down the line. By following the steps in this guide, using the right tools and safety gear, and taking the time to measure carefully and test fit your pieces, you can avoid these pitfalls and get a flawless base for your tile. Once your backer board is cut and installed, you’ll be ready to apply thinset and tile with confidence, knowing your base is level, secure, and built to last. For more DIY home improvement tips and project guides, check out our full library of resources to make your next renovation a success.
Frequently Asked Questions
What tools do I need to cut cement backer board?
For thin (1/4" to 1/2") cement board, you only need a sharp utility knife, T-square, and safety gear. For thick (5/8"+) cement board, a circular saw with a carbide fiber cement blade or a jigsaw with a fine-tooth blade is required. For cutouts around pipes and outlets, a hole saw or rotary tool works best.
Can I cut tile backer board with a regular utility knife?
Yes, for thin foam or 1/4" cement backer board, you can use a sharp utility knife to score and snap the board. For thicker board or long straight cuts, a saw will give you a much more accurate, clean edge.
Do I need to wear a mask when cutting backer board?
Yes, absolutely. Cement backer board contains crystalline silica, which is a known human carcinogen when inhaled. A basic dust mask is not sufficient—use a P100 or N95 respirator to protect your lungs, per OSHA guidelines.
How big of a gap should I leave around cutouts for pipes and outlets?
Cut openings 1/4" to 1/2" larger than the pipe or outlet to leave room for silicone sealant, which prevents water from seeping behind the backer board and causing water damage.
Why are my backer board cuts chipping?
Chipping is usually caused by a dull blade, cutting too fast, or cutting with the mesh side of the board facing down. Use a sharp carbide-tipped blade, cut slowly, and always cut with the printed mesh side up to minimize chipping.

I’m Abby Lu, a passionate home cook who loves simplifying everyday meals. At PlugChef.com, I share product reviews and cooking guides to help you find the best tools for your kitchen.
Related posts:
 Rubber Mat for Kitchen Sink: Essential Protection Tool
 Vintage Spice Rack With Glass Bottles: Timeless Kitchen Charm
 Hard And Soft Shell Taco: Ultimate Guide to Tasty Taco Choices
 How to Microwave Steam Asparagus: Quick & Easy Perfect Results
 How to Soak Grill Grates: Easy Tips for a Sparkling Clean Grill
 What is a Dry Rub: Ultimate Guide to Flavorful BBQ Seasoning

