
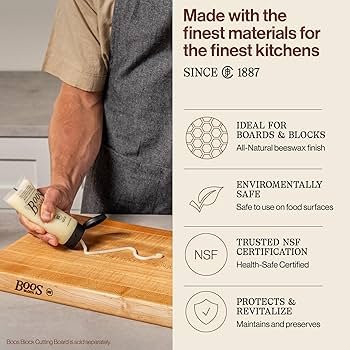
A properly sealed wooden cutting board resists stains, warping, and bacteria while staying beautiful for years. This guide gives clear, tested steps for sealing any kitchen board—end-grain or edge-grain—plus the best sealant choices, maintenance schedule, troubleshooting, and safety tips so your board performs like new.
Quick overview: why sealing matters
Sealing a cutting board does three important things:
- Repels water and food juices so the wood won’t warp, crack, or split.
- Makes cleaning and sanitizing more effective by reducing tiny grooves where bacteria hide.
- Restores and protects the wood’s appearance so it lasts longer.
For official food-safety guidance about cleaning surfaces after raw meat and poultry, follow general recommendations from the USDA on kitchen safety and cleaning practices (USDA food-safety guidance).
Which sealant should you use? Pros and cons
Choosing the right finish affects durability, food safety, and maintenance.
Food-grade mineral oil
- Pros: Safe, inexpensive, easy to apply, penetrates wood without leaving a film.
- Cons: Shorter-lasting, needs reapplication (maintenance every few weeks to months depending on use).
- Good for: Most home boards; excellent starter choice.
Beeswax/mineral oil blends (board butter)
- Pros: Adds surface protection and a subtle sheen; slows evaporation of mineral oil.
- Cons: Leaves a soft surface film; needs occasional buffing.
- Good for: Finished look and light waterproofing.
Pure food-safe plant finishes (refined tung oil, polymerized linseed marketed as food-safe)
- Pros: Harder, longer-lasting finish that penetrates and cures.
- Cons: Some products marketed to consumers are not fully food-safe; read labels carefully and choose products explicitly labeled for cutting boards or salad bowls.
- Good for: Durable finishes on serving boards, not recommended on busy prep boards unless labeled food-safe.
Avoid straight vegetable oils (olive, canola) for long-term sealing—these can go rancid and leave sticky residues. For technical tips on finishes and wood behavior, university extension resources are helpful (for example, the university extension site provides practical wood-care guidance).
For product-specific methods, you can also read detailed finishing steps in our guide to finishing a wood cutting board.
Tools and materials you’ll need
- Food-grade mineral oil (or an approved cutting-board oil)
- Optional: beeswax or a commercial board butter
- Sandpaper: 120, 220, and 320 grit (or equivalent sanding pads)
- Clean lint-free cloths or paper towels
- Soft-bristled brush for cleaning
- Mild dish soap and warm water
- A small container for oil
- Optional: plastic scraper or putty knife for removing sticky residues
If you want step-by-step advice for oiling a bamboo board specifically, see our bamboo oiling guide: bamboo board oiling.
Step-by-step: sealing a wooden cutting board (detailed)
Follow these steps for a reliable, food-safe seal.
Clean and dry
- Wash the board with warm water and mild dish soap; scrub with a brush to remove food debris.
- Rinse quickly—do not soak. Excessive water causes swelling and warping.
- Dry upright or on a rack until completely dry (several hours to overnight).
Sanitize if needed
- After raw meat contact, sanitize with a dilute bleach solution (1 tablespoon of unscented household bleach per gallon of water) or a 3% hydrogen peroxide rinse, then rinse and dry.
- For more on safe cleaning practices, consult the USDA food-safety recommendations linked earlier.
Sand the surface (if the board is new or damaged)
- Start with 120 grit only if you need to remove deep cuts or rough milling marks.
- Progress to 220 grit for smoothing, finishing with 320 grit for an even surface.
- Sand with the grain; for end-grain boards sand gently across the blocks.
- Wipe off dust with a damp cloth and let dry.
Apply the mineral oil
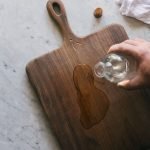
- Pour a small puddle of mineral oil onto the board or into a bowl and apply with a cloth.
- Rub the oil in using the grain, covering all surfaces (top, bottom, and edges). In practice, a single tablespoon per square foot is a useful starting amount.
- Work oil into end grain more aggressively—end grain soaks up oil quicker.
Let it soak
- Allow 15–30 minutes for the board to absorb oil. For dry or new boards, wait 1–4 hours or overnight for maximum absorption.
- If the oil is absorbed quickly, apply a second coat until the wood stops absorbing oil within 10–15 minutes.
Wipe off excess
- After absorption, wipe any surface sheen or sticky film with a clean cloth. The board should feel smooth and not tacky.
Optional wax finish
- For extra surface protection, melt beeswax with mineral oil (commercial board waxes are convenient). Apply a thin layer, let cool 15–20 minutes, then buff to a shine.
- This creates a water-resistant surface film while letting the wood breathe.
Cure time
- Mineral oil doesn’t “cure” the way film finishes do, but allow 24 hours before heavy use to ensure any surface residue has been removed and the board is fully dry.
If you want a focused walk-through of mineral oil application, review our mineral oil guide: how to oil with mineral oil.

Credit: kingsfleet.ca
End-grain vs edge-grain boards: different approach
- End-grain boards (checkerboard blocks): Absorb oil faster and benefit from more frequent oiling during the initial break-in phase. They are more knife-friendly but require more finish attention to avoid gaps between blocks.
- Edge-grain boards (long grain): Absorb more slowly; one or two coats may be enough initially. Sanding with progressively finer grits yields a smoother surface.
If you’re restoring or caring for teak boards, see the specialized tips in our teak care resource: teak board care.
How to test if your board is sealed — the water bead test
Sprinkle a few drops of water on the board:
- If the water beads, the surface has good protection.
- If it soaks in and darkens the wood, the board needs more oil.
This quick test helps set a maintenance rhythm.
Maintenance schedule (realistic)
- Light home use (daily chopping of fruits/veggies): Oil every 1–2 months.
- Heavy use (daily meat prep, commercial use): Oil every 2–4 weeks.
- Decorative or serving boards with light use: Oil every 3–6 months.
- Reapply wax topcoat as needed (when water no longer beads).
A common mistake is over-applying oil—if the board remains sticky after wiping, you used too much or didn’t buff it off.
Repairing deep cuts, stains, and odors
- Deep knife grooves: Sand the affected area with 120 → 220 grit, then re-oil.
- Stubborn stains: Sprinkle coarse salt, rub with a lemon half, then rinse and dry before oiling.
- Odors: Rub with a baking soda paste (baking soda + water), rinse, dry, then oil.
- Severe damage: Consider replacement if the cutting surface is thin, heavily warped, or holds deep grooves that harbor bacteria.
For cleaning alternatives and vinegar-based methods, consult our vinegar cleaning piece: clean with vinegar.

Credit: www.youtube.com
Food-safety and sanitizing reminders
- Never submerge wooden boards for long periods or put them in the dishwasher—both cause splitting and warping.
- After cutting raw meat or poultry, sanitize with a proper sanitizer or dilute bleach solution per common guidance (see USDA recommendations).
- Alternate boards for raw meat and ready-to-eat foods to reduce cross-contamination; see our plastic board cleaning comparison here: clean plastic cutting board.
Common mistakes to avoid
- Using cooking oils (like olive or vegetable) as sealants — they can go rancid.
- Skipping sanding on older, rough boards — oil won’t penetrate evenly without a smooth surface.
- Applying too much oil and leaving the board sticky — wipe off excess after absorption.
- Assuming a sealed board is waterproof—regular maintenance is still required.
For guidance on how many coats are typical and when to stop, see our coat-count guide: coats of mineral oil.
Frequently asked questions
How long does sealing last?
- Sealing with mineral oil is an ongoing maintenance task; expect to reapply from every few weeks to a few months depending on use.
Can I use tung oil or polyurethane?
- Tung oil (food-safe, refined forms) can provide more durable penetration but choose only products labeled food-safe. Polyurethane forms a hard film and is not recommended for surfaces that will be cut on regularly.
How many coats of oil should I apply the first time?
- Apply coats until the wood stops absorbing oil within 10–15 minutes—often 2–4 thin coats for a new or dry board.
Is sanding necessary before oiling?
- Yes, if the board is rough, stained, or has cutter marks. Sand to 220–320 grit for a smooth surface that accepts oil evenly.
How do I prevent mold under the board?
- Store boards upright to air out. Don’t let them sit damp. If mold appears, clean with a vinegar solution, scrub, rinse, dry, then sand and re-oil if needed.
If you need a focused how-to on making a wooden cutting board food-safe before sealing, see our safety guide: making a board food-safe.
Conclusion and next step
Sealing your wooden cutting board with a food-grade oil is a quick, high-impact way to extend its life and keep your kitchen safer. Start with mineral oil, follow the sanding and application steps above, and set a re-application schedule based on how often you use the board. If you cook every day, expect to re-oil more often.
Want a simple maintenance routine? Bookmark this guide or print it and keep it near your prep station for quick reference.

I’m Abby Lu, a passionate home cook who loves simplifying everyday meals. At PlugChef.com, I share product reviews and cooking guides to help you find the best tools for your kitchen.
Related posts:
 How is a Cutting Board Stabilized: Expert Tips for Ultimate Safety
 How to Clean Teak Cutting Board: Easy Steps for Lasting Shine
 How to Restore a Wooden Cutting Board: Easy Steps for Lasting Shine
 How to Easily Remove Cutting Board Stains: Expert Cleaning Tips
 How Many Coats of Mineral Oil on Cutting Board: Expert Guide
 How to Make a Wooden Cutting Board Food Safe: Easy Expert Tips

