
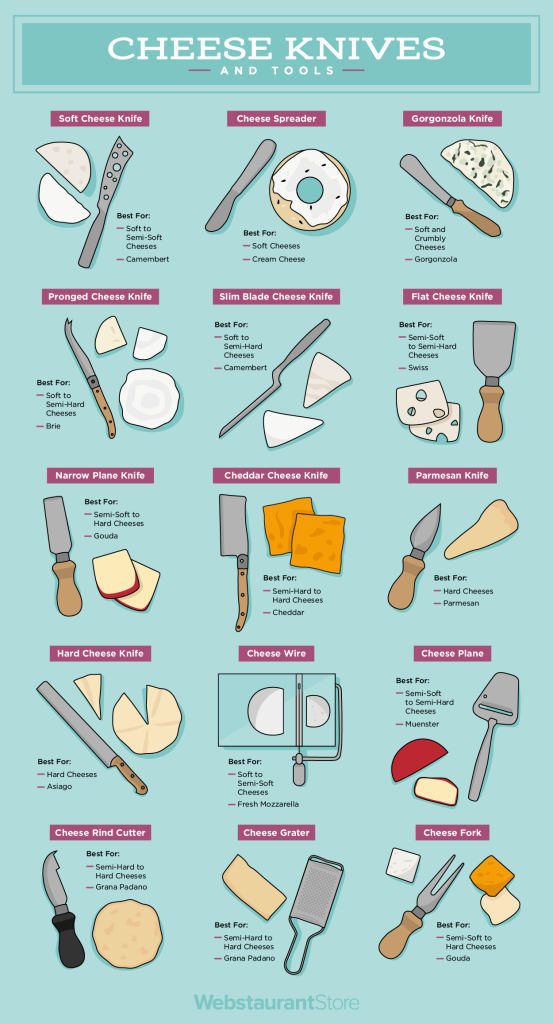
Cheese tools are small investments that transform slicing, serving, and presenting cheese from clumsy to professional. This guide teaches practical, kitchen-tested techniques for every common tool, how to match tools to cheese textures, maintenance that extends tool life, and presentation tips that make cheese boards sing. Read through the step-by-step instructions and quick-reference charts so your next platter looks—and tastes—intentional.
Essential cheese tools and what they do
Start with a compact kit that covers most cheeses. Buy one good-quality version of each rather than multiples of the same tool.
- Cheese knife set (soft, hard, and spear/pronged)
- Wire cutter / cheese harp (for very soft to semi-soft)
- Cheese plane (for semi-hard to hard slices)
- Microplane or fine grater (for aged hard cheeses)
- Box grater or coarse shredder (for melting cheeses)
- Vegetable peeler (for ribbons and shavings)
- Spreader (for soft, spreadable cheeses)
- Small serving forks/cheese markers and a board
Table: tool → main uses
| Tool | Best for |
|---|---|
| Soft cheese knife (holes or non-stick) | Brie, Camembert, chèvre — clean soft cuts |
| Wire cutter / cheese harp | Creamy cheeses, fresh goat cheese, very soft wheels |
| Cheese plane | Cheddar, Gouda, Comté — thin uniform slices |
| Hard-cheese knife / cleaver | Parmigiano-Reggiano, aged Pecorino — breaking and hacking |
| Microplane | Finely grating Parm, Pecorino, hard aged cheeses |
| Vegetable peeler | Thin ribbons for salads and garnishes |
| Spreader | Boursin, labneh, whipped ricotta |
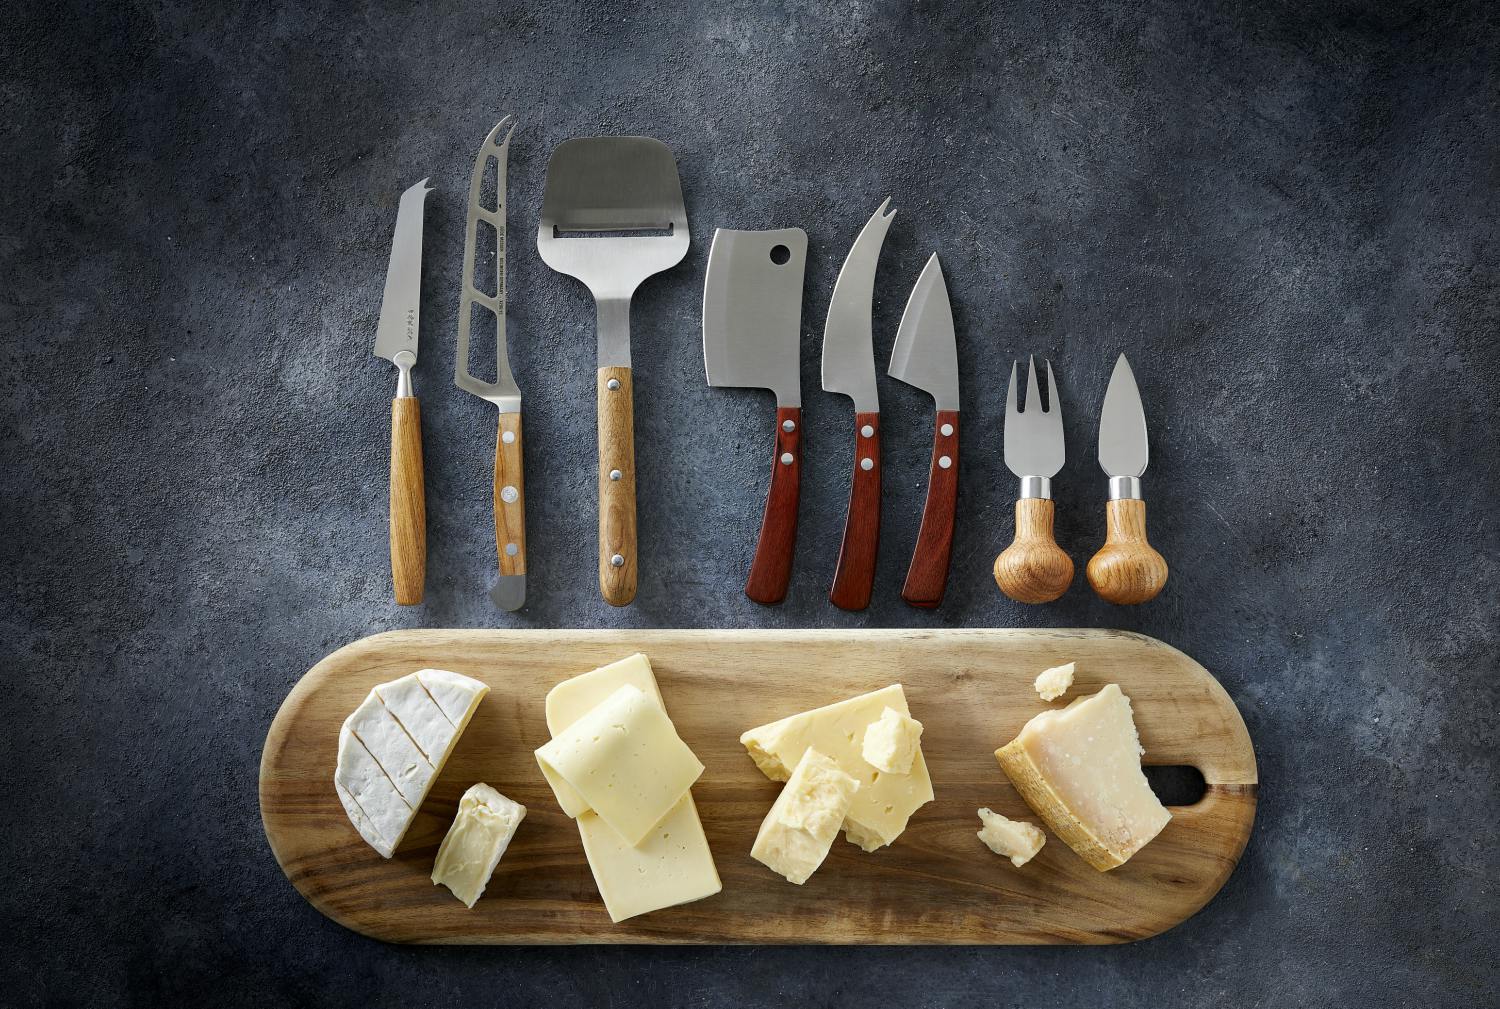
Credit: www.castellocheese.com
Common cheese knives and a soft-cheese cutter.
Practical note: In practice, a set of 5–7 tools covers casual entertaining. If space is limited, prioritize a plane, a microplane, a soft cheese knife, and a hard-cheese knife.
How to cut and serve by cheese type (step-by-step)
Different textures require different motions, angles and portioning. Below are step-by-step methods that reduce waste and preserve flavor.
Soft and bloomy-rind cheeses (Brie, Camembert, fresh chèvre)
- Tools: soft cheese knife with holes or wire cutter; spreader for rounds.
- Technique: For rounds, cut through the center to create wedges (like slicing a cake). For slices, use a wire cutter for clean edges. For very creamy cheeses, chill 10–15 minutes to firm slightly before cutting.
- Serving portion: 1–2 oz (30–60 g) per person for tasting plates.
- Common mistake: pressing down with a chef’s knife—causes squashing and greasy smear.
Fresh unripened cheeses (mozzarella, burrata)
- Tools: thin-bladed knife or long serrated knife for burrata; slotted spoon for burrata in liquid.
- Technique: For mozzarella, slice with a smooth downward motion; for burrata, gently pierce and serve immediately to keep cream center intact.
- Tip: Keep these cheeses cold up until 5–10 minutes before serving to retain structure.
Semi-soft and semi-hard cheeses (Gouda, Havarti, Raclette)
- Tools: cheese plane or slicer; vegetable peeler for ribbons.
- Technique: Use the plane at a shallow angle to produce consistent slices. For wedges, cut from the center outward for equal portions.
- Serving: Offer 2–3 thin slices per person alongside accompaniments.
Firm and hard cheeses (Aged Cheddar, Manchego, Comté)
- Tools: sturdy chef-style cheese knife, cheese plane for thin slices, microplane for grating.
- Technique: For large wedges, cut thin slices angled slightly away from the rind. For aged Parm-style cheeses, break into chunks following natural crystalline fissures rather than forcing a blade.
- Serving: Crumble or shave for stronger-flavored hard cheeses—small amounts go a long way.
Very hard aged cheeses (Parmigiano-Reggiano, Grana Padano)
- Tools: parmesan knife (stubby) or small hammer-style chisel.
- Technique: Score and break along grain lines to create shards or nuggets—avoid slicing thinly with a plane which can generate too-fine shavings.
- Flavor note: Shards concentrate flavor and texture; use sparingly as a garnish.
Grating, shaving and advanced presentation techniques
Small changes produce big visual and textural results.
- Microplane versus box grater: use a microplane for light, fluffy snow of Parm; use a box grater for thicker shreds intended to melt.
- Cheese ribbons: use a vegetable peeler on semi-hard cheeses (Gouda, Asiago) holding the cheese flat and peeling toward you. Ribbons sit beautifully on salads and carpaccios.
- Shavings and curls: a cheese plane set to mid-thickness gives dramatic curls for plating. For ultra-thin shavings, chill the cheese for 10 minutes first.
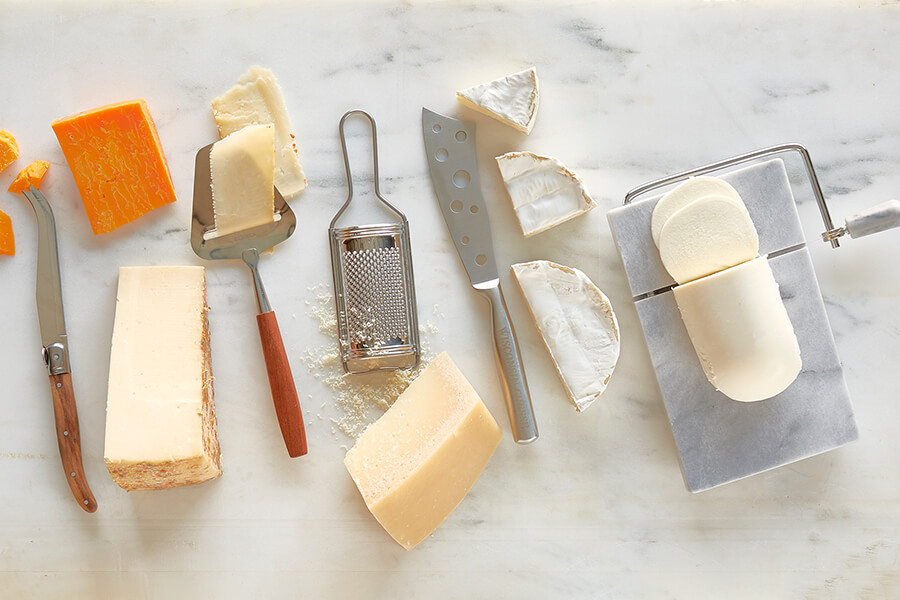
Credit: www.wisconsincheese.com
Different blade types for specific cheese textures.
Practical serving tip: When grating over hot dishes, grate at the last moment so volatile flavors are preserved and shreds don’t immediately collapse.
Knife techniques and ergonomics
Good technique protects the tool and yields tidy portions.
- Hold: Grasp the handle with a firm—never clenched—grip. Anchor the heel of the blade for controlled pushes.
- Motion: Use a single smooth stroke rather than sawing for clean cuts. For thin slices, a push-pull plane motion is more consistent than repeated stabbing.
- Prevent sticking: Use knives with holes or a non-stick coating for semi-soft cheeses; refrigerate cheese briefly if sticking persists.
- Using the fork-prong: Use the prongs at the tip of some cheese knives to pick up slices by skewering the end—this prevents hands from touching served pieces.
- Wire cutter technique: Pull the wire straight down through the cheese in one motion; don’t saw sideways.
Common mistake: twisting a knife inside cheese to free it—this raggedly tears texture and creates an uneven edge.
Caring for cheese tools: clean, sharpen, store
Tool longevity comes from proper care. Many mistakes are avoidable.
Cleaning:
- Handwash stainless steel and wooden-handled tools in warm, soapy water immediately after use. Dry thoroughly.
- Avoid prolonged soaking; never leave wooden handles submerged.
- Most fine blades and wood-handled knives should not be placed in a dishwasher; heat and detergents can warp and dull them.
Sharpening and maintenance:
- Keep planes and hard-cheese knives sharp—dull tools crush rather than slice. Hone knives weekly with a fine steel; sharpen with a stone or professional service when the edge no longer takes a clean bite.
- Oil wooden handles and boards periodically with food-safe mineral oil to prevent splitting.
- Replace worn wires on wire cutters—wires are consumable parts and breakage is normal.
Food-safety note: Follow official food-handling advice for dairy when serving vulnerable guests. For authoritative guidance on safe handling of foods, see the USDA food-safety guidance and general dairy safety resources at the FDA.
Storage, labeling and portioning for events
- Label cheeses clearly for guests—include cheese name, origin and style. Small tent cards reduce confusion.
- Portioning rule-of-thumb: plan 2–3 oz (60–85 g) per person for a tasting board, 4–6 oz (115–170 g) per person for a main-course cheese plate.
- Keep cheeses at room temperature (about 20–22°C / 68–72°F) for 20–30 minutes before serving to open flavors; return to the refrigerator after the event.
- Store leftovers wrapped in wax or parchment paper and a loose layer of plastic wrap or in a breathable container to prevent condensation and mold growth.
Troubleshooting and common mistakes (and how to fix them)
- Cheese crumbles or smears: Chill the cheese 10–15 minutes before cutting and use the correct blade.
- Knife sticking in soft cheese: use a knife with holes, or wipe the blade between cuts.
- Cheese congeals on grater: grate immediately before service, and for microplane shavings work quickly.
- Tools rusting: dry immediately and store in a dry place; use stainless steel or apply a thin film of food-grade oil if storing long-term.
- Overcutting a wheel: when working from a wheel, always work from the center outward so the rind stays with pieces and the wheel remains stable.
Presentation and pairing primer
Create contrast in flavor, texture and color:
- Pair creamy Brie with crisp apples or honey and toasted nuts.
- Serve blue cheese with sweet elements: honey, pears, or quince paste.
- Hard, nutty cheeses like Parm with dried fruit and balsamic glaze.
- Provide a small dish of neutral crackers and a stronger bread like a seeded baguette.
Board layout: place cheeses spaced apart, leave room for accompaniments, and arrange from mild to strong clockwise so guests progress naturally.
Quick checklist CTA: assemble one soft, one semi-hard, and one hard cheese, add three complementary accompaniments, and practice the cutting techniques above.

Credit: blog.tagltd.com
Natural-handled knives good for home entertaining.
FAQ
Q: Which cheese tool is the most versatile?
A: A quality cheese plane plus a microplane cover most needs: the plane for consistent slices and the microplane for fine grating. Add a soft-cheese knife for creamy cheeses.
Q: Can I put cheese knives in the dishwasher?
A: Generally no—avoid the dishwasher for wooden handles and fine-edged blades. Handwashing and immediate drying preserve the edge and handle.
Q: How do I prevent cross-flavor transfer between cheeses?
A: Use separate knives for each cheese or wipe the blade clean between cuts. Strong cheeses (blue, washed-rind) should have dedicated utensils to avoid flavor carryover.
Q: What’s the best way to serve Parmigiano-Reggiano?
A: Break it into shards or chunks along natural grain lines rather than thin slicing—this preserves texture and allows more concentrated flavor.
Conclusion
Mastering cheese tools is part craft, part food safety, and entirely rewarding—better cuts, cleaner presentation, and fuller flavor. Start with a small, high-quality kit, use the cutting techniques tailored to each cheese type, and maintain your tools so they perform reliably. Try building a three-cheese board tonight using a plane, microplane and soft-cheese knife—you’ll see an immediate upgrade in taste and presentation.
Ready to practice? Pick three cheeses, follow the cutting steps here, and label them for guests—your next gathering will feel effortlessly professional.

I’m Abby Lu, a passionate home cook who loves simplifying everyday meals. At PlugChef.com, I share product reviews and cooking guides to help you find the best tools for your kitchen.
Related posts:
 How to Make a Fruit Basket for a Gift: Easy DIY Guide
 Do You Need a Basket? Essential Guide for Air Fryers
 How to Choose Kitchen Appliances: Expert Tips Revealed
 Kitchen Cabinets With Black Stainless Steel Appliances: Modern Elegance
 White Kitchen Cabinets Stainless Steel Appliances: Timeless Elegance
 Top 10 Best Non-Toxic Cooking Utensils – Safe & Durable Choices for Healthy Homes

