
If you’ve ever stared at a pot of rock-hard dried beans after hours of stovetop simmering, or scraped mushy bean puree off the bottom of a pressure cooker, you’re not alone. Even experienced home cooks with high-end stainless steel kitchen setups struggle to get consistent results with dried beans, because cook times vary wildly based on bean age, variety, and your specific pressure cooker model. This guide delivers an accurate, tested pressure cooking dried beans chart, pro prep tips, troubleshooting for common mistakes, and storage hacks to cut your bean cook time by 70% and eliminate guesswork for good. Whether you use a stovetop or electric pressure cooker, you’ll get tender, flavorful beans every time.
Understanding Dried Beans For Pressure Cooking
Not all beans behave the same under high pressure, and small choices about variety, freshness, and prep will make or break your final texture. Taking 5 minutes to assess your beans before cooking saves hours of frustration later. For more on this, see our guide on 20 piece cast iron cookware set the ultimate.
Popular Bean Varieties & Their Pressure Cooking Traits
Some beans hold their shape perfectly for salads, while others break down into creamy perfection for soups and dips. Black beans, kidney beans, and cannellini beans hold their structure well after pressure cooking, making them ideal for side dishes and chili. Pinto beans and great northern beans break down easily, so they’re perfect for refried beans, hummus, and creamy soups. Skip very small varieties like lentils and split peas for pressure cooking entirely: they cook in 5 minutes or less and turn to mush almost instantly under pressure. Chickpeas (garbanzo beans) need the longest cook time of common dried beans, so plan ahead if you’re making hummus or roasted chickpeas.
Freshness Matters: How Old Beans Change Results
Bean age is the biggest hidden variable in pressure cooking cook time. Dried beans stored for more than 12 months have hardened, desiccated skins that take far longer to soften, even under high pressure. If your beans have been in the pantry for over a year, add 5–10 minutes to the recommended cook time, and always test a bean for tenderness before assuming they’re done. For extra peace of mind, you can boil a small handful of beans in plain water for 5 minutes before pressure cooking: if they’re still hard after boiling, they’re too old for consistent pressure cooking results. For more on this, see our guide on cooking grits in pressure cooker.
To Soak Or Not To Soak? The Truth
Soaking beans is optional, but it delivers more consistent results for most home cooks. Soaking softens bean skins, cuts cook time by 20–30%, reduces gas-causing indigestible sugars by up to 30% (per University of Minnesota Extension research Extension.umn.edu), and prevents beans from bursting during cooking. If you’re short on time, use the quick soak method: cover beans with 3 inches of water, bring to a boil on high pressure for 1 minute, turn off the heat, and let sit covered for 1 hour before draining. You can skip soaking entirely if you’re using very fresh beans (stored less than 6 months) or small varieties like lentils, but soaking is always recommended for older pantry beans.
Pressure Cooking Basics For Dried Beans
Understanding how your pressure cooker works and following basic safety rules will help you avoid common mistakes and get perfect results every time. For more on this, see our guide on smart kitchen tools for healthier cooking 2.
How Pressure Cookers Cut Bean Cook Time By 70%
A standard stovetop pressure cooker reaches 15 psi of pressure, raising the boiling point of water from 212°F to 250°F. This high heat penetrates bean skins and breaks down the pectin that makes beans tough, cutting cook time from 1–2 hours of stovetop simmering to just 10–40 minutes. The sealed environment also locks in nutrients and flavor better than prolonged boiling, so pressure-cooked beans taste richer and retain more B vitamins than stovetop-cooked beans.
Critical Safety Tips For Pressure Cooking Beans
Pressure cookers are safe when used correctly, but beans require extra caution because they expand and foam during cooking:
- Inspect the sealing ring for cracks or damage before every use; a worn ring will prevent full pressure build-up.
- Never fill the cooker above the 2/3 fill line when cooking beans, as they expand 2–3x during cooking and foam can block the steam vent.
- Use a minimum of 2 cups of water or broth per 1 cup of dried beans to create enough steam for pressure build-up.
- Never force the lid open before the pressure has fully released; wait for the locking pin to drop completely before opening.
- Keep your face and hands away from the steam vent when releasing pressure to avoid burns.
Stovetop Vs. Electric Pressure Cookers For Beans
Both types work well for cooking dried beans, but they have small differences that affect cook time and ease of use. Stovetop models heat faster, reach higher pressure levels, and are better for large batches of beans, but they require manual monitoring of pressure and heat. Electric models have preset bean programs, automatic pressure release options, and keep-warm settings, making them ideal for beginners. Note that cook times in the chart below are for high pressure (15 psi for stovetop, “High” setting for electric); stovetop cookers may cook beans 1–2 minutes faster than electric models due to higher heat output. For more on this, see our guide on smart kitchen tools for healthier cooking.
Pressure Cooking Dried Beans Chart
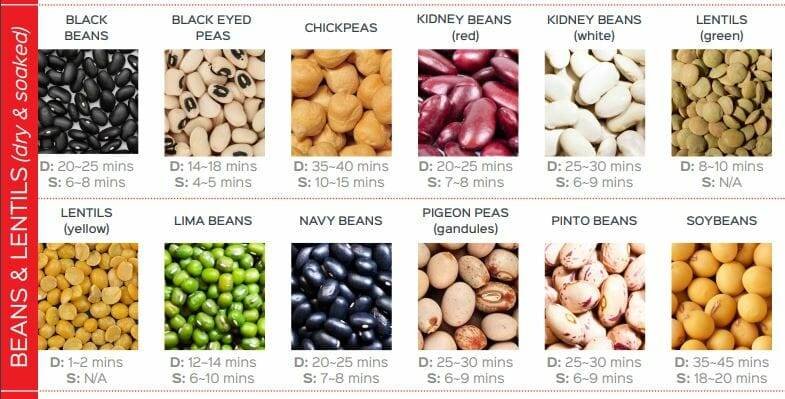
This tested chart lists cook times for the most common dried bean varieties, for both soaked and unsoaked beans cooked at high pressure. Times are adjusted for average home pressure cookers; adjust as needed for altitude or old beans.
 A quick-reference pressure cooking dried beans chart for common varieties, with soaked and unsoaked cook times at high pressure. Credit: www.amazon.com
| Bean Variety | Soaked High Pressure Cook Time (minutes) | Unsoaked High Pressure Cook Time (minutes) | Best Release Method | Texture Note |
|---|---|---|---|---|
| Black Beans | 8–10 | 20–25 | Natural or Quick | Holds shape well for salads, breaks down for dips |
| Dark Red Kidney Beans | 10–12 | 25–30 | Natural | Firm, holds shape for chili |
| Pinto Beans | 10–12 | 25–30 | Natural | Breaks down easily for refried beans |
| Great Northern Beans | 10–12 | 25–30 | Natural | Creamy texture for soups |
| Navy Beans | 10–12 | 25–30 | Natural | Mild flavor, great for baked bean recipes |
| Chickpeas (Garbanzo) | 12–15 | 35–40 | Natural | Firm for salads, soft for hummus |
| Cannellini Beans | 12–15 | 35–40 | Natural | Creamy, ideal for Italian soups |
| Large Lima Beans | 8–10 | 20–25 | Quick | Holds shape for side dishes |
| Lentils | Not recommended for pressure cooking | Not recommended for pressure cooking | N/A | Turn to mush quickly, use stovetop instead |
| Split Peas | Not recommended for pressure cooking | Not recommended for pressure cooking | N/A | Break down completely, use stovetop for soup |
All cook times are for high pressure. For altitudes above 2,000 feet, add 5% to soaked bean cook times and 10% to unsoaked bean cook times to account for lower air pressure. If cooking beans with acidic ingredients (tomatoes, vinegar, wine), add 5–10 minutes to the recommended time, as acid slows bean skin softening.
How To Adjust The Chart For Your Pressure Cooker
Every pressure cooker runs slightly differently, so use the chart as a starting point rather than a hard rule. If your stovetop cooker reaches pressure very quickly (common with newer models), subtract 1–2 minutes from the minimum cook time to avoid overcooking. If your electric cooker runs cooler than average (common with older models), add 2–3 minutes to the recommended time. For the first few batches with a new bean variety or cooker, test a bean 2 minutes before the timer ends to dial in your preferred texture. For more on this, see our guide on cooking artichokes in instant pot.
Step-By-Step Guide To Perfect Pressure-Cooked Beans
Follow these steps for consistent, tender beans every time, no guesswork required.
- Prep your beans: Rinse dried beans under cold running water, and sort out any small stones, broken beans, or debris. Soak beans if using the overnight or quick soak method outlined above, then drain.
- Add beans and liquid to the cooker: Place beans in the cooker insert, cover with a minimum of 2 inches of water or broth, and add aromatics like onion, garlic, bay leaf, or thyme if desired. Do not add salt or acidic ingredients yet, as they toughen bean skins. Add 1 tsp of oil to the liquid to reduce foaming during cooking.
- Set pressure and cook time: Lock the lid, set the cooker to high pressure, and set the timer to the recommended time from the chart. If your electric cooker has a “Bean” preset, you can use it, but adjust the time based on whether your beans are soaked.
- Release pressure: Choose your release method based on desired texture. Use natural release (let pressure drop on its own for 10–20 minutes) for creamy beans for soups, dips, or refried beans, as the gentle release prevents splitting. Use quick release (turn the valve to “Venting” carefully, keeping your face away from steam) for firmer beans for salads or side dishes to stop the cooking process immediately.
- Test, season, and serve: Open the lid, and test a bean for tenderness: it should be soft enough to mash with a fork but not falling apart. If not tender, close the lid and cook for 1–2 more minutes. Now add salt, acid (lemon juice, diced tomatoes), and any other seasonings, stir gently, and let sit 5 minutes for flavors to absorb before serving.
Common Pressure Cooking Bean Mistakes & Fixes
Even experienced cooks run into issues with pressure-cooked beans. Here are the most common problems and their fast fixes:
- Undercooked, hard beans after cooking: Almost always caused by old beans (over 12 months in the pantry), a damaged sealing ring that prevented full pressure build-up, or too short a cook time. Fix: replace the sealing ring if it’s cracked, add 5–10 minutes to the cook time, and always test a bean before assuming they’re done.
- Mushy, broken beans: Caused by overcooking, using quick release for beans meant to be creamy, or using too much water. Fix: reduce cook time by 1–2 minutes for future batches, use natural release for soft bean dishes, and stick to the 2:1 water-to-bean ratio.
- Foaming and sputtering from the vent: Caused by overfilling the cooker, too much starch from broken beans, or no oil in the cooking liquid. Fix: never fill the cooker above the 2/3 fill line for beans, add 1 tsp of oil to the cooking liquid, and clean the vent after each use to remove starch buildup.
- Beans that stay firm even after extended cooking: Almost always caused by very old beans with hardened skins, or adding salt and acidic ingredients too early in the cooking process. Fix: use beans within 12 months of purchase for best results, and add salt and acid only after cooking is complete.
- Excess gas after eating beans: Caused by not soaking beans, or not cooking them long enough to break down indigestible oligosaccharides. Fix: soak beans overnight and discard the soaking water, add 1/4 tsp of baking soda to the cooking water to further reduce gas-causing compounds, and cook beans until fully tender.
Storing & Reheating Pressure-Cooked Beans
Proper storage keeps your cooked beans fresh for days or even months, so you can meal prep once and enjoy beans all week.
Short-Term Fridge Storage
The USDA advises that cooked beans stored in the fridge at 40°F or below will stay safe to eat for up to 5 days, as long as they are kept in sealed airtight containers to lock in moisture and prevent them from absorbing strong fridge odors. Let beans cool to room temperature (no more than 2 hours) before storing to prevent condensation and bacterial growth. Discard any beans that have an off smell, slimy texture, or visible mold.
Freezing For Long-Term Use
Cooked beans freeze perfectly for up to 3 months. Portion into 1-cup freezer bags or containers, remove as much air as possible to prevent freezer burn, and label with the date and bean type. Thaw overnight in the fridge, or run sealed bags under warm water for quick thawing. Frozen beans do not need to be recooked; just reheat gently before serving.
Reheating Without Losing Texture
Reheat beans on low stovetop heat, or in the microwave at 50% power, stirring occasionally. Add a splash of water, broth, or reserved bean cooking liquid to keep them moist, and avoid boiling, which will cause them to turn mushy. Only reheat beans once to avoid spoilage.
 Follow these steps to avoid common pressure cooking bean mistakes. Credit: primarybeans.com
Frequently Asked Questions
How long do you pressure cook dried beans without soaking?
Cook times vary by variety: black beans 20–25 minutes, kidney beans 25–30 minutes, chickpeas 35–40 minutes. Always test for tenderness 2 minutes before the timer ends, as unsoaked older beans may need extra time.
Can I cook dried beans without soaking in a pressure cooker?
Yes, unsoaked beans cook 30–50% faster in a pressure cooker than on the stovetop, but expect longer cook times than soaked beans, and older unsoaked beans may still have a tough texture. Soaking is still recommended for beans stored longer than 6 months.
What is the correct water ratio for pressure cooking beans?
Use a minimum of 2 cups of water or broth per 1 cup of dried beans, or enough liquid to cover the beans by 2 inches. Never use less liquid, as this can cause the beans to burn and trigger the cooker’s safety lock.
Can I add salt or tomatoes to beans while pressure cooking?
No, salt and acidic ingredients (tomatoes, vinegar, citrus) toughen bean skins and extend cook time by 20–30%. Add these seasonings after cooking is complete, when you season the finished beans.
Why are my pressure-cooked beans still hard after cooking?
The most common causes are old beans (over 12 months in the pantry), a damaged or improperly sealed lid that prevented full pressure build-up, or too short a cook time. First check your sealing ring for cracks, then add 5 minutes of cook time and test a bean for tenderness.
Can I cook mixed beans together in a pressure cooker?
Only mix beans with similar cook times (e.g. black and kidney beans, or great northern and cannellini). Avoid mixing fast-cooking varieties like lentils with slow-cooking ones like chickpeas, as the fast-cooking beans will turn to mush before the slow ones are tender. If you must mix varieties, use the cook time for the slowest bean, and add the faster-cooking beans halfway through the cooking process.
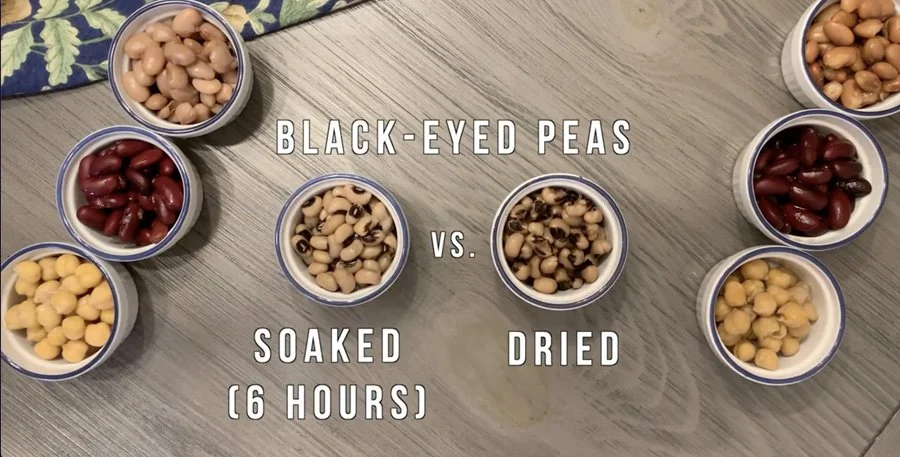 Cooked beans can be stored in the fridge for up to 5 days or frozen for 3 months. Credit: www.cookingwithanadi.com
Conclusion
Pressure cooking dried beans eliminates the hours of stovetop simmering and guesswork that makes many home cooks avoid dried beans entirely. With the accurate, tested chart above, proper prep steps, and a few simple adjustments for your cooker and bean age, you’ll get perfectly tender, flavorful beans every single time, no mushy batches or rock-hard bites required. If you’re outfitting a bold, luxe kitchen aesthetic, many stovetop pressure cookers come in finishes that pair nicely with statement appliances. For creamy blended bean dips, you can even use a hand blender directly in the pressure cooker insert after cooking to get a smooth texture without transferring hot beans. Store cooked beans in sealed airtight containers to lock in moisture and prevent them from absorbing strong fridge odors. Pair your perfectly cooked beans with fresh meal prep ingredients for quick, healthy weeknight meals.
Save this guide to your kitchen board for quick reference during meal prep, and experiment with different bean varieties to add more plant-based protein to your diet. Whether you’re making a quick weeknight chili, a creamy hummus, or a hearty bean salad, pressure-cooked beans cut your prep time in half and taste better than canned alternatives. Ready to try it? Grab a bag of dried beans and your pressure cooker tonight for a stress-free, delicious meal.

Hi, I’m Daniel Brooks—a food lover and kitchen gear enthusiast. I enjoy testing cookware, utensils, and gadgets to see what really works in everyday cooking. At PlugChef.com, I share honest reviews, comparisons, and simple guides to help you choose the best tools for a safer, smarter, and more enjoyable kitchen.
Related posts:
 Wusthof in Drawer Knife Organizer: Streamline Your Kitchen
 Best Way to Organize Kitchen: Transform Your Space
 15 X 20 Drawer Organizer: Transform Clutter Into Order
 Kitchen Drawer Organizer for Pots And Pans: Maximize Space
 Where Can I Sell My Kitchen Appliances: Top Platforms
 How Long Do Ninja Blenders Last: Discover Durability

