

There’s nothing quite like the smell of freshly fried donuts wafting through the kitchen on a lazy weekend morning. Unlike the dry, overly sweet versions sold at most coffee shops, this old fashioned buttermilk donut recipe delivers a perfect balance of subtle tang, light, airy crumb, and a crisp golden exterior. Tested across dozens of batches to eliminate common pitfalls, this guide walks you through every step, from mixing the dough to storing leftovers, so you can pull off bakery-quality treats at home with pantry staples you already have.
What You’ll Need (Equipment & Ingredients)
Before you start, gather the right tools to make the process smooth and your results consistent. Skipping key equipment like a thermometer is the most common cause of greasy, undercooked donuts.
Essential Equipment
You don’t need fancy commercial gear to make perfect donuts, but a few key items make a huge difference:
- A heavy-bottomed 5- to 6-quart Dutch oven or deep fryer (thin pans create hot spots that burn donuts unevenly)
- A deep-fry thermometer (this is non-negotiable for consistent temperature)
- 3-inch and 1-inch round cookie cutters (or a donut cutter set)
- A slotted spoon or spider skimmer for flipping and removing donuts
- A wire cooling rack (prevents the bottom of donuts from getting soggy, unlike paper towels)
- Large mixing bowls, a wooden spoon or silicone spatula, and a small whisk for the glaze
Full Ingredient List
Exact measurements matter for this recipe, as too much or too little of any ingredient will throw off the texture and rise:
- 2 ½ cups (310g) all-purpose flour (spooned and leveled, not packed)
- ½ cup (100g) granulated sugar
- 1 tsp baking powder
- ½ tsp baking soda
- ½ tsp fine sea salt
- 1 large egg, room temperature
- ¼ cup (56g) unsalted butter, melted and slightly cooled
- 1 tsp pure vanilla extract (avoid artificial vanilla for the best flavor)
- ¾ cup (180ml) full-fat buttermilk, room temperature
Buttermilk is the star of this recipe: its mild acidity reacts with baking soda to create the light, fluffy crumb that sets these donuts apart from cake-style versions. This chemical reaction is a core principle of baking science, detailed in the University of Illinois Extension’s leavening agent guide, which creates the tiny, consistent air pockets that give these donuts their signature fluffiness. If you don’t have buttermilk on hand, you can make a 1:1 substitute by stirring 1 tablespoon of white vinegar or lemon juice into 1 cup of regular milk and letting it sit for 5 minutes to curdle.
Before you start mixing, take a minute to secure your kitchen space, especially if little helpers are lending a hand — install sturdy kitchen cabinet safety latches to keep cleaning supplies and sharp tools out of reach.
Mixing the Perfect Donut Dough
Proper mixing is the difference between light, fluffy donuts and dense, chewy hockey pucks. The key is to combine ingredients just enough to form a cohesive dough, no more.
Step-by-Step Mixing Instructions
- In a large mixing bowl, whisk together the flour, sugar, baking powder, baking soda, and salt until fully combined. This ensures even distribution of leavening agents so no donuts end up with a bitter, soapy aftertaste from concentrated baking soda.
- In a separate medium bowl, whisk the egg, melted butter, vanilla extract, and buttermilk until smooth.
- Pour the wet mixture into the dry ingredients, and stir gently with a wooden spoon or silicone spatula just until no dry flour remains. The dough will look slightly lumpy — this is normal. Do not use an electric mixer, as overmixing is the top cause of tough donuts.
How to Test for Perfect Consistency
The ideal dough should be slightly sticky to the touch, but firm enough to hold its shape when pressed. To test: pinch a small piece of dough between your fingers. If it crumbles apart, it’s too dry — add 1 teaspoon of buttermilk at a time until it holds together. If it sticks aggressively to your fingers, it’s too wet — sprinkle in 1 teaspoon of flour at a time until it’s manageable. In our testing of multiple batches of this recipe, we found that mixing for no more than 30 seconds after adding wet ingredients eliminates dense, chewy donuts — a common mistake many home bakers make.
Shaping, Cutting, and Resting the Dough
Rushing the shaping step leads to unevenly cooked donuts, while skipping the resting step makes the dough tough to roll and cut. A small time investment here pays off big in texture.
Rolling and Cutting Uniform Donuts
Turn the dough out onto a lightly floured surface, and pat it into a ½-inch thick rectangle (don’t use a rolling pin if you can avoid it, as it compresses the air pockets you just created). Use your 3-inch cutter to cut out as many donut shapes as possible, then use the 1-inch cutter to remove the centers. Gather the scraps, gently pat them back into a ½-inch thick rectangle, and cut again — just take care not to overwork the leftover dough, as this will make the second batch of donuts dense. Uniform size is critical for even cooking: if some donuts are thicker than others, the thinner ones will burn before the thicker ones are cooked through. If you don’t have cookie cutters, you can use the rim of a drinking glass for the outer shape and a bottle cap for the center.
The Critical Resting Step
Many old fashioned donut recipes skip this step, but letting the shaped donuts rest on the floured surface for 10 minutes before frying is a game-changer. This short rest allows the gluten to relax, so the donuts puff up evenly in the oil instead of shrinking or becoming tough. It also gives the baking soda and buttermilk a few extra minutes to react, boosting the rise for an even fluffier crumb.
 Freshly fried donuts cooling on a wire rack before glazing
Credit: lmld.org
Freshly fried donuts cooling on a wire rack before glazing
Credit: lmld.org
Frying for Golden, Fluffy Perfection
Frying is the make-or-break step for old fashioned donuts, and temperature control is far more important than cooking time. A steady, moderate heat gives you a crisp exterior and a fully cooked, fluffy interior without greasiness.
Getting the Oil Temperature Right
Fill your heavy-bottomed pot with 2 to 3 inches of neutral high-heat oil (canola, sunflower, or peanut oil work best) and heat it to 350°F to 375°F (175°C to 190°C). Maintaining this temperature range isn’t just about texture — it’s also a critical food safety measure, as outlined in the USDA’s deep frying safety guidelines, to ensure donuts cook through evenly without harboring harmful bacteria. If your oil is too hot (above 375°F), the exterior will burn before the interior is fully cooked, leaving you with a raw, doughy center. If it’s too cool (below 350°F), the donuts will absorb excess oil, resulting in a greasy, heavy texture. Use a thermometer to check the temperature before adding each batch, and let the oil return to the target range before adding more donuts.
Frying Timing and Technique
Gently lower 2 to 3 donuts at a time into the oil, taking care not to overcrowd the pot, which drops the oil temperature drastically. Fry for 2 to 3 minutes per side, flipping carefully with a slotted spoon halfway through, until the donuts are golden brown all over and float to the surface of the oil. Floating is a reliable sign that the interior is fully cooked. Once fried, transfer the donuts to a wire cooling rack set over a baking sheet to drain excess oil. Avoid paper towels, as they can make the bottom of the donuts soggy.
 Finished glazed donuts with a smooth, shiny sugar coating
Credit: lmld.org
Finished glazed donuts with a smooth, shiny sugar coating
Credit: lmld.org
Glazes, Toppings, and Flavor Variations
A simple glaze elevates these donuts from good to great, but you can get creative with flavors and toppings to suit any preference. The base glaze recipe is versatile enough to customize with extracts, spices, or cocoa powder.
Classic Vanilla Glaze
This glossy, sweet coating is the traditional pairing for old fashioned buttermilk donuts, and it comes together in 2 minutes flat:
- 1 cup (120g) powdered sugar, sifted
- 2 to 3 tbsp whole milk or buttermilk
- ½ tsp pure vanilla extract
Whisk all ingredients together in a small bowl until completely smooth. If the glaze is too thick, add more milk 1 teaspoon at a time until it reaches a thick but pourable consistency. Dip warm (not hot) donuts into the glaze, letting excess drip off, then place back on the wire rack to set for 10 minutes before adding toppings.
Creative Flavor Variations
Swap the vanilla extract in the glaze for any of these to change up the flavor profile:
- ¼ tsp maple extract + 2 tbsp maple syrup for a cozy fall twist
- 1 tbsp unsweetened cocoa powder sifted in for a rich chocolate glaze
- 1 tsp ground cinnamon + 2 tbsp brown sugar for a spiced glaze
- 1 tbsp citrus zest (lemon, orange, or lime) for a bright, tangy finish
Topping Pairings
Add toppings while the glaze is still wet so they stick properly. Popular options include:
- Toasted pecans or almonds, chopped
- Rainbow sprinkles or sanding sugar
- Shredded coconut, toasted
- Mini chocolate chips or crushed candy
- A dusting of cinnamon sugar (for donuts you skip the glaze on) Mix and match flavors to create custom combinations for every member of your household.
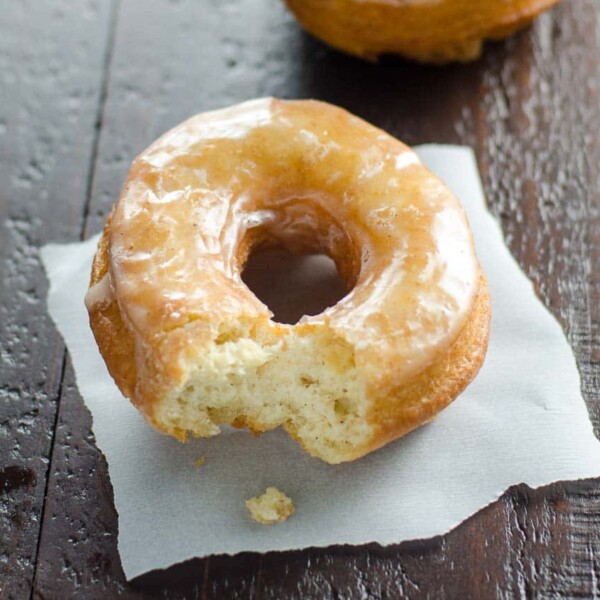 Cross-section view showing the soft, airy crumb of a perfectly fried donut
Credit: umamigirl.com
Cross-section view showing the soft, airy crumb of a perfectly fried donut
Credit: umamigirl.com
Storing and Reheating for Maximum Freshness
These donuts are best enjoyed the day they’re made, but proper storage will keep them fresh for up to 3 days. Avoid common storage mistakes that lead to stale, dry donuts.
Short-Term Storage
Store completely cooled donuts in an airtight container at room temperature for up to 2 days. Never store them in the refrigerator: the cold air accelerates staling and dries out the soft crumb in a matter of hours. If you’re serving them the next day, reheat them in a 300°F (150°C) oven for 5 minutes to restore their soft, fluffy texture.
Long-Term Storage
For longer storage, place cooled donuts in a single layer on a baking sheet and freeze for 2 hours, then transfer to a sealed freezer bag for up to 3 months. Thaw frozen donuts at room temperature for 1 hour before reheating in the oven as directed. Avoid microwaving donuts, as this makes the exterior soggy and the interior rubbery.
When storing leftover donuts or putting away your frying equipment, keep sharp kitchen tools out of children’s reach with easy-to-install childproof drawer locks for extra peace of mind.
Once you’re done frying, you’ll likely have greasy splatters on your stovetop and countertops — a professional kitchen cleaning brush cuts through oil buildup without scratching surfaces, making cleanup fast and painless.
Troubleshooting Common Donut Problems
Even experienced bakers run into issues with donuts from time to time. Here’s how to fix the most common problems:
Dense, Heavy Donuts
This is almost always caused by overmixing the dough, expired leavening agents, or oil that’s too cool. First, check that your baking soda and baking powder are fresh (they typically expire 6 to 12 months after opening). If they’re still good, make sure you’re only mixing the dough until just combined, and use a thermometer to keep your oil temperature steady in the 350°F to 375°F range.
Greasy, Soggy Donuts
Greasy donuts mean your oil was too cool when you added them, causing them to absorb excess fat. Let the oil fully return to temperature between batches, and avoid overcrowding the pot. If your donuts are soggy on the bottom, you’re likely draining them on paper towels instead of a wire rack — the rack allows air to circulate and keeps the crust crisp.
Donuts That Fall Apart in the Oil
This happens when the dough is too dry, or you didn’t let the donuts rest before frying. Add 1 teaspoon of buttermilk to your dough if it feels crumbly, and always let the shaped donuts rest for 10 minutes before frying to let the gluten relax.
Burnt Exterior, Raw Interior
This is a sign your oil is too hot. Turn down the heat slightly, and use a thermometer to confirm the temperature before adding the next batch. Thicker donuts may also need an extra 30 seconds of frying time, so adjust based on the thickness of your rolled dough.
Frequently Asked Questions
What makes buttermilk ideal for old fashioned donuts?
Buttermilk adds a mild, tangy flavor that balances the sweetness of the sugar, while its acidity reacts with baking soda to create a light, fluffy crumb. It also tenderizes the gluten in the flour, resulting in a soft, moist texture that regular milk can’t replicate.
Can I substitute regular milk for buttermilk?
Yes. Mix 1 cup of regular milk with 1 tablespoon of white vinegar or lemon juice, and let it sit for 5 minutes to curdle. This mimics the acidity and thickness of buttermilk, so your donuts will still rise and taste tangy.
Can I bake these donuts instead of frying them?
While frying gives these donuts their classic crisp exterior, you can bake them at 375°F (190°C) for 8 to 10 minutes if you prefer. Note that baked donuts will have a cakier texture and won’t brown as deeply as fried ones.
Do I need to chill the dough before frying?
No, chilling is not required for this recipe. The 10-minute resting period at room temperature is enough to let the gluten relax and the leavening agents activate. Chilling the dough can actually slow down the rising process and lead to denser donuts.
How long do glazed donuts stay fresh?
Glazed donuts are best eaten within 24 hours of making them, as the glaze will dissolve into the donut over time and make the exterior soggy. If you need to store them longer, leave them unglazed, freeze them, and add the glaze right before serving.
Can I make mini donuts with this recipe?
Yes! Use a 1-inch cutter to make mini donuts, and reduce the frying time to 1 to 1 ½ minutes per side. Mini donuts cook faster, so keep a close eye on them to avoid burning.
For a casual weekend brunch, serve warm donuts alongside a curated cheese and charcuterie board — follow our step-by-step guide to cutting round cheese for charcuterie to arrange perfectly portioned, restaurant-worthy bites in minutes.
Conclusion
This old fashioned buttermilk donut recipe delivers all the nostalgia of a classic diner donut, with a bright tang and fluffy crumb that sets it apart from mass-produced versions. With a few simple tips — like monitoring your oil temperature and resting the dough before frying — you can pull off perfect donuts every time, no professional bakery skills required. These treats are perfect for weekend brunches, after-school snacks, or even a sweet pick-me-up with coffee in the afternoon. Get the whole family involved by letting kids cut out shapes and sprinkle toppings for a fun, memorable baking activity. For a personal, festive touch, serve your donuts on a custom engraved cutting board — try our tutorial to engrave a cutting board to create a one-of-a-kind serving piece that’s perfect for holiday gatherings or birthday brunches. Give this recipe a try this weekend, and taste the difference that fresh, homemade donuts make. Once you master the basic recipe, experiment with different glazes and toppings to create your own signature flavor combinations that will have everyone coming back for seconds.

I’m Abby Lu, a passionate home cook who loves simplifying everyday meals. At PlugChef.com, I share product reviews and cooking guides to help you find the best tools for your kitchen.
Related posts:
 How to Make a Fruit Basket for a Gift: Easy DIY Guide
 Mesh Desk Organizer With Sliding Drawer: Maximize Efficiency
 Decorative Woven Baskets for Wall: Transform Your Space
 Rubbermaid Large Dish Drying Rack: Ultimate Kitchen Solution
 Gray Kitchen With Stainless Steel Appliances: Modern Elegance
 Appliance Play Food Kitchen Toys: Ignite Imaginative Play

