
There’s nothing quite like the cozy, spiced flavor of classic apple pie, but heating up your oven on a crisp fall day (or scrambling to prep a last-minute dessert for a potluck or family dinner) can feel like a hassle. This no-bake caramel apple pie delivers every bite of buttery crust, sweet-tart crisp apples, and rich, gooey caramel you love, without ever turning on your oven. It comes together in 30 minutes of active prep, chills while you handle other hosting tasks, and is kid-friendly enough for little helpers to assist with. Whether you’re planning a fall tailgate, Thanksgiving side spread, or weeknight treat, this foolproof recipe is guaranteed to disappear fast.
Why This No-Bake Caramel Apple Pie Is a Fall Essential
Fall is peak apple season, with crisp, tart varieties hitting grocery stores and farmers markets nationwide starting in late August and staying fresh through November. This recipe leans into that seasonal bounty, using firm apples that hold their shape without baking, paired with rich, homemade caramel that cuts through the tartness perfectly. Unlike traditional baked apple pie, this version doesn’t heat up your kitchen on unseasonably warm fall days, and it can be assembled up to 24 hours in advance, making it ideal for busy hosts. It’s also a great option for families with young kids, as there’s no hot oven or sharp baking sheets to worry about during prep. For a full fall spread, pair it with other easy treats from our fall recipe collection for a menu that requires minimal oven time.
Ingredients
This recipe balances sweet, tart, and buttery flavors with simple, easy-to-find ingredients. Each component is built to create the perfect texture and flavor contrast, with no unnecessary steps or hard-to-source items.
Crust Components
- 1.5 cups graham cracker crumbs (or digestive biscuits for a less sweet base)
- ½ cup unsalted butter, melted (salted butter works in a pinch, but unsalted lets you control sodium levels)
- 2 tablespoons granulated sugar
- ¼ teaspoon fine sea salt
Caramel Filling Ingredients
- 1 can (14 oz) full-fat sweetened condensed milk (low-fat versions will result in a thinner, less creamy filling)
- ½ cup dark brown sugar (light brown works, but dark adds a deeper molasses flavor that pairs better with apples)
- 4 tablespoons unsalted butter, cut into small cubes
- 1 teaspoon pure vanilla extract
- ½ cup heavy cream (minimum 36% fat content for a silky, non-grainy texture)
Apple Topping Essentials
- 3 medium firm apples (Granny Smith is the gold standard for tartness, but Honeycrisp or Pink Lady work for a sweeter profile)
- 1 tablespoon fresh lemon juice (prevents browning and adds bright acidity)
- 1 teaspoon ground cinnamon
- ¼ teaspoon ground nutmeg
- Pinch of fine sea salt (enhances the apple and caramel flavors)
Step 1: Build a Crumbly, Sturdy No-Bake Crust
The crust is the foundation of the pie, and a well-made crumb base will hold up to the weight of the filling and slice cleanly without crumbling. The process is simple, but a few small steps make a huge difference in the final result.
Choosing the Right Crust Base
Graham cracker crumbs are the classic choice for a mild, buttery sweetness, but you can swap them for digestive biscuits for a less sweet, more crumbly base, or crushed pretzel crumbs for a salty-sweet twist that cuts through the rich caramel. If using pretzels, reduce the added granulated sugar in the crust by 1 tablespoon to avoid over-sweetness. Coconut oil can replace melted butter for a vegan option, though it will add a subtle tropical note that some may not prefer for a fall dessert.
Mixing and Pressing for a Crumb-Free Base
Combine the crumbs, melted butter, sugar, and salt in a medium bowl, stirring with a fork until every crumb is evenly coated and the mixture holds together when pressed. A common mistake here is under-mixing, which leaves dry crumbs that fall apart when sliced. Press the mixture firmly into the bottom and 1 inch up the sides of a 9-inch pie dish, using the bottom of a flat measuring cup to apply even, steady pressure. Focus extra pressure on the edges to create a sturdy barrier that holds the filling in. If you prefer cleaner slices, use a springform pan instead of a standard pie dish for easy release. Once mixed, a quick scrub with a sturdy dish brush will get any stray crumbs off your counter in seconds.
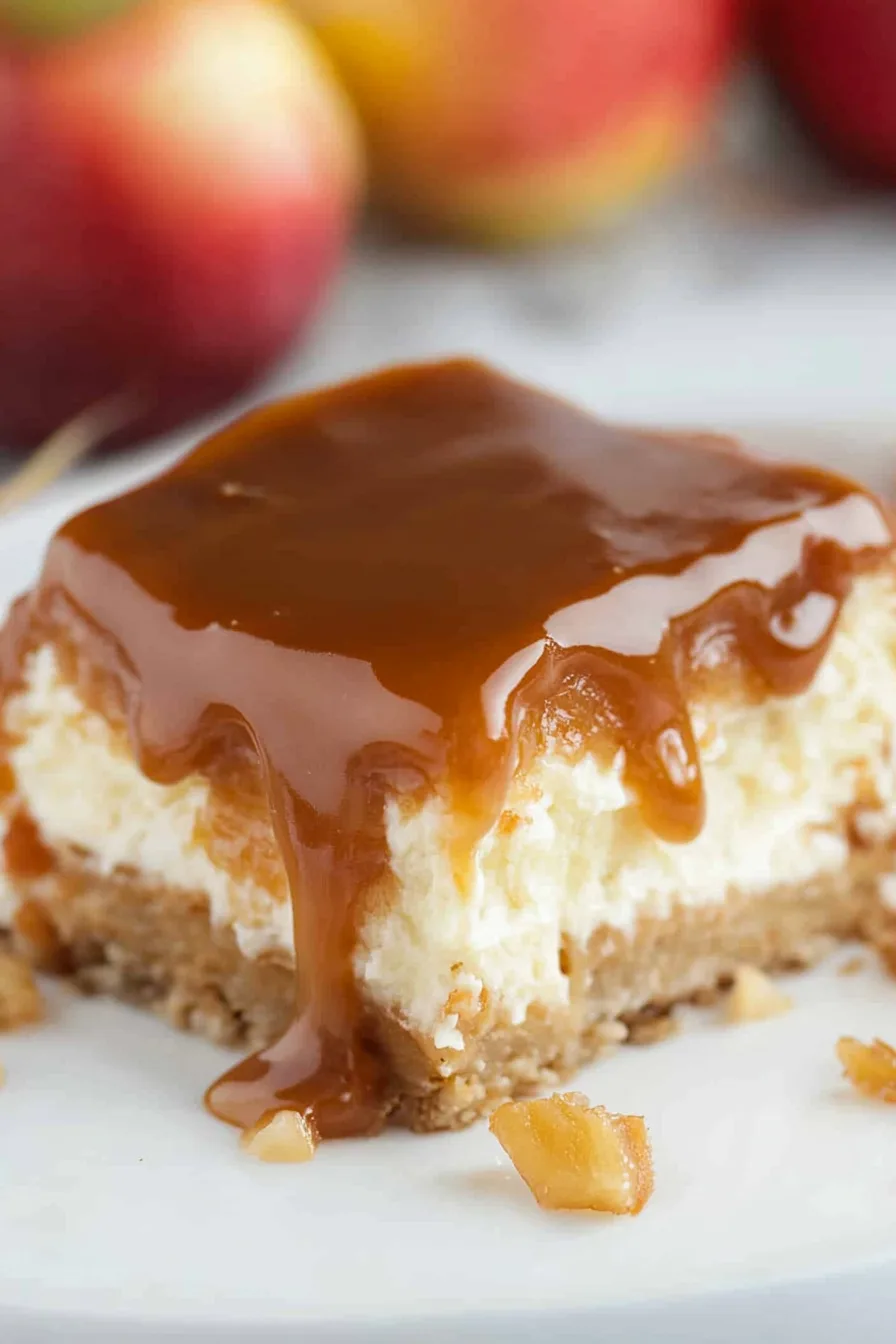
 A single slice showcases the creamy caramel layer and crisp apple topping
Credit: cookingwithcarlee.com
A single slice showcases the creamy caramel layer and crisp apple topping
Credit: cookingwithcarlee.com
Step 2: Make Foolproof Silky Caramel Filling
Homemade caramel is far easier to make than most home bakers think, and it adds a depth of flavor that store-bought versions can’t match. The key is to work slowly and avoid rushing the caramelization process.
Homemade Caramel Sauce (No Corn Syrup Required)
Add the dark brown sugar to a small saucepan over medium heat. Don’t stir at first—just swirl the pan every 30 seconds to melt the sugar evenly and prevent hot spots that cause burning. After 3-4 minutes, the sugar will turn a deep amber color, similar to a copper penny, and smell nutty and rich. Reduce heat to low, add the cubed butter 2 tablespoons at a time, stirring constantly until fully melted and combined. Slowly pour in the heavy cream in a thin, steady stream, stirring the entire time (the mixture will bubble aggressively, which is normal). Add the sweetened condensed milk and vanilla, then simmer for 2 minutes, stirring frequently, until the caramel thickens enough to coat the back of a spoon. Remove from heat and let cool completely for at least 20 minutes before using—pouring warm caramel over the apples will make the crust soggy. A common mistake when making caramel is adding cold cream too quickly, which causes the mixture to seize into lumpy, unusable clumps. To avoid this, warm the heavy cream slightly in the microwave for 10 seconds before adding it to the caramel. If you’re short on time, high-quality store-bought caramel sauce works in a pinch, but homemade caramel has a deeper, more complex flavor that balances the tart apples perfectly.
Step 3: Prep and Season Apples for Perfect Texture
The right apple prep ensures your pie has crisp, fresh apple flavor in every bite, rather than mushy, browned fruit that overpowers the caramel.
Best Apple Varieties for No-Bake Pies
Not all apples work well for no-bake desserts: you want firm, tart varieties that hold their shape when sliced and don’t release too much moisture into the filling. Current guidance from the University of Minnesota Extension recommends Granny Smith apples as the top choice for their bright tartness and crisp texture, but Honeycrisp or Pink Lady apples work great if you prefer a sweeter, juicier profile. Avoid soft, mealy varieties like Red Delicious, which will turn mushy in the chilled pie.
Slicing and Seasoning Tips
Slice apples uniformly into ⅛-inch thick pieces for even texture—thicker slices will stay crunchy, while thinner slices may turn mushy. Toss the sliced apples immediately in lemon juice to prevent enzymatic browning, then pat them dry with a paper towel to remove excess moisture (wet apples will make the crust soggy). For seasoning, toss the apples with cinnamon, nutmeg, and a pinch of salt before layering. For a warm, subtle fall kick, add a pinch of ground ginger or allspice to the mix—just avoid over-seasoning, as you want the natural apple flavor to shine through.
Step 4: Assemble and Chill for a Perfect Set
Layering the components correctly ensures every slice has the perfect balance of crust, caramel, and apple, with no sogginess or uneven flavor distribution.
Layering for Even Flavor in Every Bite
Start by spreading a thin, even layer of cooled caramel over the prepared crust—this acts as a barrier to prevent apple juices from seeping into the crumb base and making it soggy. Arrange the seasoned apple slices in a concentric circle, overlapping slightly, for a professional, polished look. Drizzle the remaining caramel evenly over the top of the apples, making sure every slice is coated. This pie pairs beautifully with a fall charcuterie board for a full spread of sweet and savory fall treats, perfect for tailgates or holiday open houses.
Final Garnishes and Chilling Time
For extra flavor and texture, top the pie with toasted pecans or walnuts, a sprinkle of flaky sea salt (which cuts the sweetness of the caramel beautifully), or an extra drizzle of caramel sauce. Cover the pie tightly with plastic wrap and chill in the refrigerator for at least 4 hours, though overnight is ideal for the flavors to meld fully and the filling to set completely. If you’re short on time, you can chill the pie in the freezer for 1 hour, but the texture will be firmer than fridge-chilled. For serving, top individual slices with a scoop of vanilla ice cream or a dollop of whipped cream for a cold, creamy contrast to the rich caramel. If you prefer a slightly softened caramel, warm individual slices in the microwave for 10 seconds before serving—just avoid heating the whole pie, as it will melt the filling.
 The flaky graham cracker crust pairs perfectly with the gooey caramel filling
Credit: birchberryco.com
The flaky graham cracker crust pairs perfectly with the gooey caramel filling
Credit: birchberryco.com
Pro Tips to Avoid Common No-Bake Pie Mistakes
Even experienced bakers run into issues with no-bake pies, but these simple fixes will ensure yours turns out perfectly every time:
- Crumbly crust that falls apart when sliced: This is almost always caused by under-pressing the crumb mixture. Press firmly with the bottom of a measuring cup for at least 30 seconds, focusing extra pressure on the edges to create a sturdy barrier.
- Grainy, lumpy caramel: This happens when sugar is stirred too early during caramelization, or when cold cream is added too quickly. Let the sugar melt completely before stirring, and pour warmed cream in a slow, steady stream while stirring constantly.
- Soggy crust: Caused by wet apples or warm caramel poured directly onto the crust. Pat apple slices dry after tossing in lemon juice, let caramel cool completely before assembling, and always add a thin caramel barrier layer on the crust first.
- Mushy apple slices: Caused by slicing apples too thick or adding extra sugar to the apple mixture. Stick to ⅛-inch thick slices, and skip adding extra brown sugar to the apples if your caramel is already sweet.
- Filling that doesn’t set: This happens if the pie isn’t chilled long enough, or if the caramel was too warm when assembled. Chill for at least 4 hours, and make sure the caramel is completely cool before adding the apples. If you’re making this pie with young helpers, install childproof cabinet locks on lower storage cabinets to keep small hands away from hot stovetops (if making caramel on the stove) and sharp utensils.
Storage and Creative Leftover Hacks
This pie keeps well for several days, and leftover slices can be transformed into entirely new desserts with minimal effort.
Proper Storage for Fresh Flavor
Store the pie covered tightly with plastic wrap or in an airtight container in the refrigerator for up to 3 days. Per FDA food safety guidelines, dairy-based no-bake desserts should not be left at room temperature for more than 2 hours to avoid bacterial growth, so only take the pie out to serve when you’re ready to eat. To freeze, wrap the whole pie tightly in plastic wrap and aluminum foil, then place it in a freezer-safe bag for up to 1 month. Thaw overnight in the fridge before serving—note that the apple texture will be slightly softer after freezing, so it’s best consumed fresh if possible. Avoid freezing pies with whipped cream or ice cream toppings, as these will become grainy when thawed. After serving, a quick scrub with all-purpose kitchen brushes will remove sticky caramel residue from your pie dish and utensils without scratching non-stick surfaces.
Creative Ways to Use Leftover Pie
If you have leftover slices, don’t let them go to waste:
- Caramel apple parfait: Layer crumbled pie pieces with whipped cream and granola in a mason jar for a quick, portable fall treat.
- Ice cream sundae topper: Crumble leftover pie over vanilla ice cream for a crunchy, caramel-y addition to your favorite sundae.
- Caramel apple milkshake: Blend 1 cup of leftover pie chunks with 1 cup of milk and a scoop of vanilla ice cream for a rich, indulgent fall milkshake.
 The full pie shows off the neat concentric apple arrangement and caramel drizzle
Credit: nodashofgluten.com
The full pie shows off the neat concentric apple arrangement and caramel drizzle
Credit: nodashofgluten.com
Frequently Asked Questions
Can I use store-bought caramel sauce instead of homemade?
Yes, high-quality store-bought caramel sauce works in a pinch for busy weeknights, but homemade caramel has a deeper, nuttier flavor that balances the tart apples far better. If using store-bought, avoid varieties with added corn syrup, which can make the filling grainy.
Can I make this pie ahead of time for a potluck or holiday gathering?
Absolutely! Assemble the pie up to 24 hours in advance, cover tightly with plastic wrap, and keep refrigerated. Add garnishes like toasted nuts or extra caramel right before serving to keep them crisp.
What’s the best apple to use for this recipe?
Granny Smith apples are the gold standard for their bright tartness and firm texture, which holds up well without baking. Honeycrisp or Pink Lady apples work great if you prefer a sweeter, juicier flavor profile. Avoid soft, mealy varieties like Red Delicious, which will turn mushy in the chilled filling.
Can I make this recipe gluten-free?
Yes! Swap graham cracker crumbs for gluten-free digestive biscuits or gluten-free cookie crumbs, and make sure your caramel sauce is gluten-free (most homemade versions are, but always check store-bought labels for hidden gluten additives like malt flavoring).
How do I know when the caramel is ready?
Cook the sugar until it turns a deep amber color, similar to the color of a copper penny. It will smell nutty and rich. If it’s light golden, it’s undercooked and will be grainy; if it turns dark brown, it’s burnt and will be bitter.
Can I add extra toppings or mix-ins?
Of course! Toasted nuts, crushed pretzels, a sprinkle of flaky sea salt, or a drizzle of chocolate sauce all pair well with the caramel apple flavor. You can also add a layer of whipped cream or cream cheese between the crust and caramel for an extra creamy twist.
Conclusion
This no-bake caramel apple pie is the ultimate fall dessert: it’s quick to assemble, requires no oven, packs all the cozy spiced flavor of traditional apple pie, and is endlessly customizable to suit your taste. It’s perfect for last-minute gatherings, weeknight treats, or make-ahead holiday desserts, and even kid-friendly enough for little helpers to assist with layering and garnishing. If you’re looking for more easy fall dessert recipes, browse our fall recipe collection for no-bake pumpkin cheesecake, apple cider donuts, and more crowd-pleasing treats that come together in no time. Cleanup after making this pie is a breeze with just a top-rated cleaning brush to wipe away any stray crumbs or sticky caramel drips.

I’m Abby Lu, a passionate home cook who loves simplifying everyday meals. At PlugChef.com, I share product reviews and cooking guides to help you find the best tools for your kitchen.
Related posts:
 Slim Can Drinks Non Alcoholic: Refreshing Choices for Every Occasion
 Peanut Butter And Chocolate Mousse: Irresistible Decadent Delight
 How to Cook Pan Squash: Easy, Delicious Recipes to Try Today
 Store Bought Cinnamon Roll Hacks: Irresistible Easy Upgrades
 Glutinous Rice And Coconut Milk: Irresistible Creamy Dessert Recipes
 How to Clean a Knife: Expert Tips for Sparkling Blades Fast

