
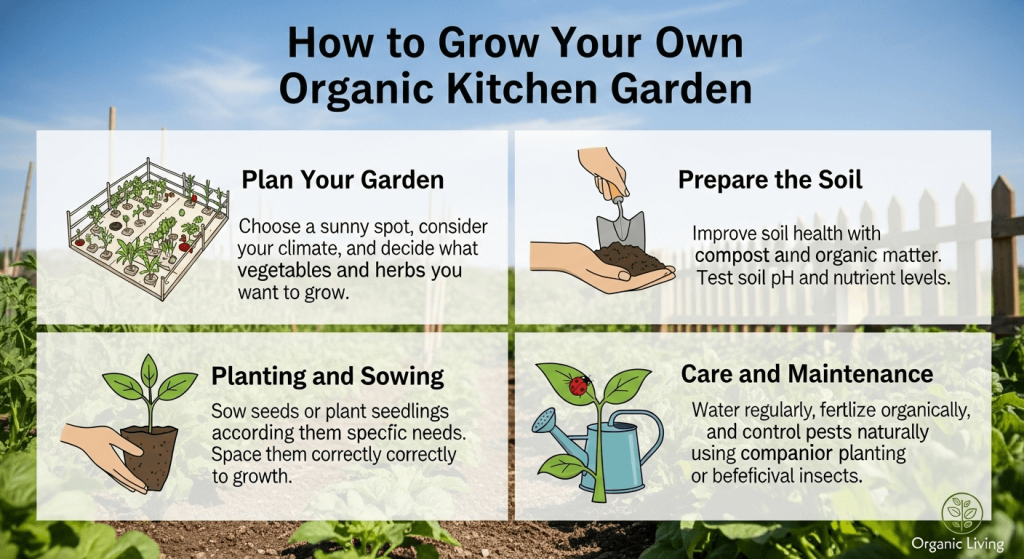
Imagine stepping outside your door and plucking sun-warmed cherry tomatoes, crisp peppery arugula, or fragrant basil for your evening meal — no grocery store run, no pesticide residue, just fresh, nutrient-dense produce you grew yourself. Growing an organic kitchen garden isn’t just a niche hobby for experienced gardeners: it’s an accessible, rewarding way to cut your grocery bill, reduce your carbon footprint, and have total control over what goes into your food. Whether you have a sprawling backyard, a small balcony, or just a sunny windowsill, this 2026 guide walks you through every step of building a thriving, chemical-free kitchen garden, with practical, tested advice for beginners and seasoned growers alike.
Assess Your Site and Space
The location you choose will make or break your garden’s productivity, so spend a few days observing your space before breaking ground.
Sunlight Requirements
Most fruiting and root vegetables (tomatoes, peppers, carrots, zucchini) require 6–8 hours of direct sunlight daily to produce a full harvest. Leafy greens and herbs like lettuce, spinach, and parsley can tolerate 4–6 hours of sun, making them ideal for partially shaded spots. A common mistake new gardeners make is overestimating how much sun their space gets: track shadow patterns throughout the day for a week before planting to identify the sunniest spots, and avoid areas blocked by trees, buildings, or fences that cast shade for most of the day. Morning sun is particularly beneficial, as it dries dew off leaves to reduce fungal disease risk, while harsh afternoon sun can scorch sensitive seedlings in hot summer months.
Space Planning
You don’t need a large yard to grow a productive kitchen garden. A 4×4 foot raised bed can yield enough lettuce, herbs, and cherry tomatoes for a family of four, while 5-gallon patio pots work perfectly for balconies and small patios. Use square foot gardening guidelines to maximize yield: plant 1 tomato or pepper per 4 square feet, 4 lettuce plants per square foot, and 16 radishes per square foot to avoid overcrowding, which leads to competition for nutrients and increased pest risk. Leave 12–18 inch pathways between beds or pots for easy access to harvest and maintain plants without compacting soil.
No Yard? No Problem: Container and Raised Bed Options
For renters or urban gardeners with no outdoor ground space, container and raised bed gardens are low-effort, portable solutions. Choose food-safe, BPA-free pots with drainage holes to prevent root rot, and use a high-quality organic potting mix instead of garden soil, which compacts in containers. Self-watering planters are a great investment for hot, dry climates, as they hold a reservoir of water at the bottom that plants can access as needed. For small spaces, vertical garden towers or hanging baskets let you grow vining crops like cherry tomatoes and cucumbers without taking up floor space. For small-space gardeners with limited outdoor space, opt for durable USA-made small appliances like compact herb choppers and mini food processors to process your harvest quickly without cluttering countertops.
 Raised beds are ideal for kitchen gardens, as they drain well and warm up faster in spring for earlier planting.
Build Healthy, Organic Soil
Healthy soil is the foundation of a productive organic kitchen garden. Unlike conventional gardening, which relies on synthetic fertilizers to feed plants directly, organic gardening focuses on feeding the soil microbiome (beneficial bacteria, fungi, and worms) that naturally nourishes plants. Skipping soil preparation is the most common cause of poor garden performance: even the highest-quality plants will struggle in depleted, compacted soil.
Test Your Soil First
Before adding any amendments, test your soil to understand its pH, nutrient levels, and texture. Most vegetables thrive in slightly acidic soil with a pH between 6.0 and 7.0; soil that is too acidic or alkaline locks up nutrients, making them unavailable to plants. For step-by-step soil testing guidance tailored to your region, the University of Minnesota Extension recommends collecting samples from 10+ spots across your garden bed, mixing them together, and sending them to a local extension lab for analysis University of Minnesota Extension soil testing resources. Most extension services provide detailed results with specific amendment recommendations for your soil type, and tests cost $15–$30, a small investment that saves you time and money on failed crops.
Amend Soil with Organic Matter
Once you have your test results, amend your soil with organic matter to improve structure, drainage, and nutrient content. Add a 2–3 inch layer of finished compost, well-rotted manure, or leaf mold to the top 6 inches of soil, tilling it in gently to avoid damaging soil structure. For clay-heavy soil that drains poorly, add coarse sand or perlite to improve aeration; for sandy soil that drains too quickly, add extra compost to retain moisture. If your soil is too acidic, add garden lime to raise pH; if it’s too alkaline, add sulfur to lower it. Always wait 2–4 weeks after amending soil before planting to let amendments integrate fully.
Long-Term Soil Health Practices
Building healthy soil is an ongoing process, not a one-time task. Add a 1–2 inch layer of compost to your garden beds every spring and fall to replenish nutrients. Plant cover crops like clover, winter rye, or hairy vetch in empty beds during the off-season: their roots prevent erosion, suppress weeds, and fix nitrogen in the soil. Avoid tilling your soil more than once a year, as tilling destroys fungal networks and soil structure; use a garden fork to gently loosen compacted soil instead.
Choose the Best Plants for Your Kitchen Garden
The plants you choose will make or break your kitchen garden’s success. The best crops for your space are ones you actually enjoy eating, that suit your local climate, and that match your available sunlight and space. Avoid the common mistake of planting too many different crops your first season: start with 3–5 high-yield, low-maintenance plants to build confidence before expanding.
Pick Crops You Actually Eat
Beginner-friendly, high-yield crops that grow well in most climates include leaf lettuce, spinach, radishes, green beans, cherry tomatoes, and zucchini. If you have limited space, opt for dwarf or compact varieties, like patio tomatoes or baby carrots, that produce full harvests in small containers. For cold climates, choose cold-hardy crops like kale, carrots, and peas that can tolerate light frost, and use row covers to extend your growing season by 4–6 weeks in spring and fall. Heirloom varieties offer superior flavor and the ability to save seeds for next year’s garden, but they are often more disease-prone than hybrid varieties, which are bred for reliability and high yields.
Herbs for Year-Round Use
Herbs are the most cost-effective, low-maintenance addition to any kitchen garden, as they produce a steady supply of fresh flavor for months on end. Start with annual culinary herbs like basil, cilantro, and parsley, which grow quickly from seed and can be harvested repeatedly throughout the growing season. For year-round fresh herbs, plant perennials like rosemary, thyme, mint, and chives, which come back every year in most climates and require minimal care. Mint is particularly hardy, but plant it in a contained pot, as it spreads aggressively in garden beds. Pair homegrown cherry tomatoes and fresh basil with aged gouda slices for a quick, no-fuss summer snack or charcuterie board spread.
Companion Planting to Boost Yields
Companion planting is the practice of growing complementary plants side by side to repel pests, improve soil health, and boost yields. For example, planting basil next to tomatoes repels aphids and hornworms, while planting carrots next to onions deters carrot flies. Marigolds planted around the edges of your garden bed repel nematodes and other soil pests, and planting nitrogen-fixing legumes like beans and peas next to heavy feeders like tomatoes and corn enriches the soil naturally. Avoid planting incompatible crops together: keep tomatoes away from potatoes, as they share the same pests and diseases, and avoid planting dill next to carrots, as it stunts carrot growth.
Planting for Success
Proper planting techniques reduce transplant shock, encourage strong root growth, and set your plants up for a full, healthy harvest.
Starting Seeds Indoors vs. Direct Sowing
Some crops perform best when started indoors 6–8 weeks before your area’s last frost date, while others grow best when sown directly in the garden. Start tomatoes, peppers, eggplants, and onions indoors to give them a long growing season, and direct-sow root vegetables like carrots, radishes, and beets, as they don’t tolerate transplanting well. Use a seed-starting mix (not garden soil) in seed trays or small pots, and place them under a grow light or on a sunny windowsill to prevent leggy, weak seedlings. Keep the soil consistently moist but not waterlogged, and thin seedlings to one strong plant per cell once they have their first set of true leaves.
Transplanting Without Shock
Transplanting seedlings to their permanent outdoor home can be stressful for plants, but a few simple steps reduce shock dramatically. Start hardening off seedlings 7–10 days before transplanting: place them outside in a shaded, sheltered spot for a few hours daily, gradually increasing their exposure to sun and wind over the week. Water seedlings thoroughly 1 hour before transplanting to hydrate their roots, and transplant on a cloudy, overcast day or in the late afternoon to avoid harsh midday sun. Dig holes twice as wide as the seedling’s root ball, gently tease out tangled roots, and plant the seedling at the same depth it was growing in its pot (tomatoes can be planted deeper, as they grow roots along their stems). Water thoroughly after planting, and use shade cloth for the first 2–3 days if the weather is hot and sunny.
Water Wisely to Conserve Resources and Prevent Disease
Overwatering is the most common cause of plant death in organic kitchen gardens, more so than underwatering. Proper watering encourages deep root growth, reduces disease risk, and conserves water — a precious resource in many regions.
Optimal Watering Schedule and Methods
Water your garden early in the morning, when temperatures are cool and wind is low, to minimize evaporation and allow plants to absorb moisture before the heat of the day. Avoid watering in the evening, as damp leaves overnight encourage fungal diseases like powdery mildew and early blight. Water deeply at the base of plants (not overhead) 2–3 times per week, rather than shallow daily watering, to encourage roots to grow deeper into the soil, making plants more drought-resistant. To check if your plants need water, stick your finger 2 inches into the soil: if it feels dry, it’s time to water. A drip irrigation system is the most efficient watering method, as it delivers water directly to plant roots and reduces evaporation by 50% compared to overhead sprinklers.
Water Conservation Tactics
For gardeners in dry or drought-prone areas, small changes to your watering routine can cut water use by 30–50% without sacrificing yield. Apply a 2–3 inch layer of organic mulch (straw, shredded leaves, or wood chips) around plants to retain soil moisture, suppress weeds, and regulate soil temperature. Collect rainwater from your roof with a 55-gallon rain barrel placed under a downspout: this free, chemical-free water is ideal for edible gardens, though avoid using water from roofs with asphalt shingles, as it can contain harmful chemicals. Fix leaky hoses and irrigation lines promptly, as a single drip per second can waste 10 gallons of water per week. For greywater reuse, use only water from sinks, showers, and washing machines that is free of harsh chemicals, bleach, or boron, and apply it directly to the soil, not to edible parts of plants.
Organic Pest and Disease Management
Organic pest management relies on prevention first, intervention only when necessary, to keep your garden balanced and chemical-free. All pest control methods for organic gardens must comply with USDA National Organic Program standards, which prohibit synthetic pesticides and encourage natural, low-impact interventions USDA organic pest management guidelines. Even small outbreaks of aphids or slugs rarely require intervention if you have a healthy, balanced garden ecosystem.
Identify Common Pests and Diseases Early
Catching pest and disease issues early is the key to easy, organic control. Common garden pests include:
- Aphids: Small, soft-bodied insects that cluster on the undersides of leaves, sucking plant sap and leaving behind sticky honeydew that attracts ants. They spread viral diseases to plants quickly if left unchecked.
- Caterpillars: The larvae of moths and butterflies, which chew large, irregular holes in leaves. Hand-pick them off plants early in the morning when they are less active.
- Slugs and snails: Leave slimy trails and chew smooth, large holes in leaves, especially in damp, shady areas. They are most active at night.
- Powdery mildew: A white, powdery fungal growth on leaves, caused by poor air circulation and overhead watering. It stunts plant growth and reduces yields if left untreated.
- Early blight: Dark, concentric spots on tomato and potato leaves, caused by a soil-borne fungus that spreads in warm, wet conditions.
Natural, Organic Control Methods
For a visual demo of mixing and applying homemade garlic pest spray, watch this short tutorial. Start with non-chemical control methods first:
- Introduce beneficial insects: Release ladybugs, lacewings, or praying mantises into your garden to feed on aphids, mites, and other harmful pests. Plant native flowers like dill, alyssum, and marigolds to attract and sustain beneficial insect populations year-round.
- Use organic-approved sprays: Mix 1 teaspoon of mild liquid soap with 1 quart of water to make an insecticidal soap for soft-bodied pests like aphids and spider mites, or mix 2 tablespoons of neem oil with 1 quart of water to repel a wide range of pests and fungal diseases. Always test sprays on a small section of the plant first to avoid leaf burn.
- Practice physical barriers: Use row covers to protect seedlings from flea beetles and cabbage worms, and surround slug-prone plants with copper tape, which gives slugs a mild electrical shock when they cross it. A common mistake new gardeners make is spraying pesticides at the first sign of a few pests: most small outbreaks resolve on their own if you have a healthy garden with beneficial insects present.
Compost to Close the Nutrient Loop
Composting is the cornerstone of organic gardening, turning kitchen scraps and yard waste into free, nutrient-rich fertilizer that improves soil health and reduces household waste. You don’t need a large yard or expensive equipment to compost: small-space options like tumblers and worm bins work perfectly for apartments and patios.
What to Compost (and What to Skip)
A healthy compost pile needs a balance of green (nitrogen-rich) and brown (carbon-rich) materials to decompose efficiently. Green materials include fruit and vegetable scraps, coffee grounds, tea bags, grass clippings, and plant trimmings. Brown materials include dried leaves, straw, small branches, shredded cardboard, and paper towels. Avoid composting meat, dairy, fatty foods, oily scraps, and pet waste, as they attract pests, slow decomposition, and can harbor harmful bacteria. Use compostable kitchen scrap bags to collect fruit and vegetable waste before adding it to your pile, cutting down on mess and odor in your kitchen.
Build and Maintain a Compost Pile
Start your compost pile with a 4–6 inch layer of coarse brown materials (small branches or straw) at the bottom to allow airflow, then alternate 2–3 inch layers of green and brown materials. Keep the pile as moist as a wrung-out sponge: if it’s too dry, add water or more green materials; if it’s too wet and smelly, add more brown materials and turn it to aerate. Turn the pile every 2–3 weeks with a pitchfork to speed up decomposition, and the pile will heat up to 130–150°F, which kills weed seeds and pathogens. Compost is ready to use when it looks dark, crumbly, and smells like earthy forest floor, usually 3–6 months after starting the pile. For small spaces, a sealed compost tumbler eliminates odor and keeps pests out, while a worm bin (vermicomposting) can process kitchen scraps in as little as 2–3 months indoors.
Maintain Your Garden Through the Season
Consistent, low-effort maintenance is all that’s needed to keep your organic kitchen garden thriving all season long. Unlike conventional gardens that require frequent chemical treatments, organic gardens become more resilient over time as your soil health improves.
Pruning and Training for Better Yields
Pruning improves air circulation, directs plant energy to fruit production, and reduces disease risk. Pinch back the top set of leaves on basil, mint, and other herbs when they are 6 inches tall to encourage bushy, prolific growth. For vining crops like tomatoes, cucumbers, and pole beans, use trellises, stakes, or cages to keep plants off the ground, which reduces pest and disease risk and makes harvesting easier. Prune tomato suckers (the small shoots growing between the main stem and branches) below the first flower cluster to direct the plant’s energy to fruit production, and remove any yellow or dead leaves from peppers and eggplants to improve air circulation. Always use clean, sharp pruning shears to avoid spreading disease between plants.
Organic Fertilizing Timelines
Even healthy soil can become depleted of nutrients over the growing season, especially for heavy-feeding crops like tomatoes, peppers, and cucumbers. Side-dress plants with a 1–2 inch layer of compost every 4–6 weeks during the growing season to replenish nutrients. For fast-growing, high-yield crops, use organic liquid fertilizers like fish emulsion or seaweed extract every 2–3 weeks: these are low-salt, gentle options that won’t burn plant roots. Avoid over-fertilizing, as excess nitrogen leads to lush leafy growth but reduced fruit production, and can burn plant roots. Always follow the instructions on organic fertilizer labels, and apply in the morning to avoid leaf burn. When prepping fresh harvests for meals, always use food-safe prep surfaces when chopping produce to avoid cross-contamination with residual cleaning chemicals or bacteria from other foods.
Harvest at Peak Flavor and Store Your Bounty
Harvesting at the right time ensures the best flavor and texture, while proper storage reduces food waste and lets you enjoy your harvest for months.
When to Harvest for Best Taste
Harvest timing varies by crop, but a few general rules apply:
- Leafy greens (lettuce, spinach, kale): Harvest outer leaves when they are 4–6 inches tall, leaving the center of the plant intact to encourage continuous growth. Harvest in the morning when leaves are crisp and full of moisture.
- Herbs: Harvest before the plant flowers, as flowering reduces leaf flavor. Pinch off the top 2–3 sets of leaves regularly to encourage bushy growth.
- Tomatoes: Harvest when fully colored and slightly soft to the touch. They will continue to ripen off the vine if picked green, but flavor is best when ripened on the plant.
- Root vegetables (carrots, radishes, beets): Harvest when they reach the size listed on the seed packet, as leaving them in the ground too long makes them woody and bitter.
- Zucchini and summer squash: Harvest when they are 6–8 inches long and the skin is easily punctured with a fingernail. Left too long, they become tough and seedy.
Short and Long-Term Storage Tips
Proper storage extends the life of your harvest by weeks or even months:
- Store tomatoes, stone fruit (peaches, plums), and melons on the counter at room temperature, never in the fridge, as cold temperatures destroy their flavor and texture.
- Store leafy greens, herbs, and berries in airtight containers lined with damp paper towels in the crisper drawer of your fridge for 1–2 weeks. Wrap herbs in damp paper towels and store in a sealed container, or place stems in a glass of water on the windowsill like cut flowers for up to 2 weeks.
- Store potatoes, onions, garlic, and winter squash in a cool, dark, well-ventilated organized pantry space to keep them crisp for up to 3 months. Never store potatoes and onions together, as onions release gases that cause potatoes to sprout.
- Preserve excess harvest by freezing, dehydrating, or canning: freeze herbs in ice cube trays covered with olive oil for easy use in cooking, dehydrate herbs and tomatoes for long-term storage, or can salsa, pickles, and tomato sauce to enjoy your harvest all winter.
 Harvesting outer leaves of lettuce regularly encourages the plant to produce more growth for weeks.
Frequently Asked Questions
How do I start an organic garden for beginners?
Start small: a 4×4 foot raised bed or a few 5-gallon patio pots are perfect for first-time gardeners. Choose 3–5 high-yield, beginner-friendly crops (like lettuce, radishes, and basil) that you eat regularly, test your soil, and add a 2–3 inch layer of compost before planting. Stick to a consistent watering schedule, and don’t stress about small pest outbreaks — most organic issues resolve on their own with minimal intervention.
What is organic kitchen gardening?
Organic kitchen gardening is the practice of growing edible plants (vegetables, herbs, fruits) without synthetic fertilizers, pesticides, or genetically modified organisms (GMOs). It relies on natural methods like composting, crop rotation, companion planting, and beneficial insects to maintain soil health and control pests, resulting in chemical-free, nutrient-dense produce for home cooking. Unlike conventional gardening, organic practices prioritize long-term soil health and environmental sustainability over short-term yield boosts.
What is the easiest crop to grow organically?
Radishes are the easiest crop for new organic gardeners: they mature in just 21–28 days, tolerate partial shade, and are rarely bothered by pests. Other beginner-friendly options include leaf lettuce, green beans, and basil, all of which have low maintenance requirements and high yields even in small spaces. These crops also grow quickly enough to provide a harvest within the first month of planting, which is encouraging for new growers.
What is the difference between a kitchen garden and a vegetable garden?
A kitchen garden is a small, intensive garden (often 100 square feet or less) located close to the house, focused on growing high-value, frequently used crops like herbs, salad greens, and cherry tomatoes for daily cooking. A traditional vegetable garden is larger, often focused on bulk crops like potatoes, corn, or squash for preserving, canning, or sharing. Many home gardeners start with a small kitchen garden and expand to a larger vegetable plot as they gain experience.
Final Tips for Long-Term Success
Growing an organic kitchen garden is one of the most rewarding investments you can make in your health, your budget, and your connection to your food. You don’t need a large yard, years of experience, or expensive equipment to get started — a single pot of basil on a windowsill or a small raised bed in a sunny corner of your yard is enough to grow fresh, pesticide-free produce for your kitchen. The steps outlined above — from testing your soil to harvesting at peak ripeness — are designed to work for first-time gardeners and experienced growers alike, using low-impact, organic methods that support your local ecosystem. Start small this season, experiment with a few new crops, and you’ll be enjoying the taste of homegrown produce within weeks. For step-by-step guides to prepping your harvest for meals, storing produce correctly, and keeping your prep surfaces food-safe, explore our full library of kitchen guides to make the most of your garden’s bounty.

I’m Abby Lu, a passionate home cook who loves simplifying everyday meals. At PlugChef.com, I share product reviews and cooking guides to help you find the best tools for your kitchen.
Related posts:
 Eco-Friendly Kitchen Ideas to Reduce Waste and Save Energy
 How to Get Rid of Oils from Kitchen Counter Organically: Eco-Friendly Tips
 Best Eco-Friendly Kitchen Cookware for Healthy Cooking
 How to Cut PCB Circuit Board: Easy Steps for Precise Results
 How Do You Make a Butcher Block Cutting Board: Easy DIY Guide
 Top 10 Best Non-Toxic Cooking Utensils – Safe & Durable Choices for Healthy Homes

