
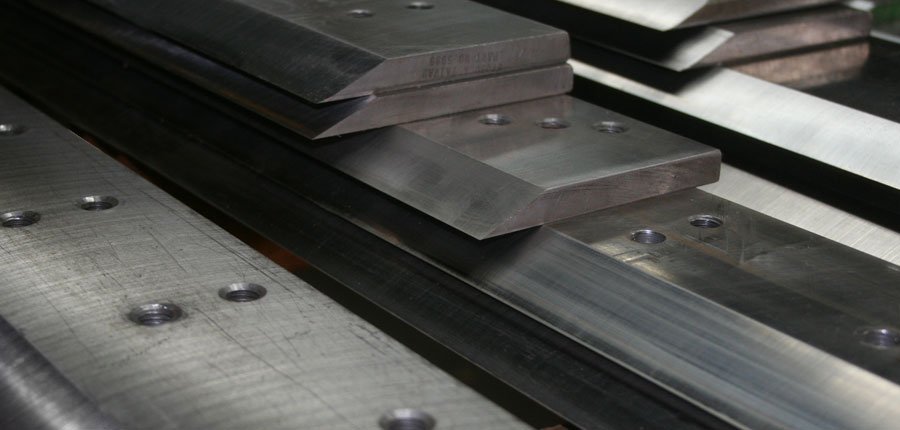
A sharp paper cutter blade makes the difference between crisp, professional cuts and ragged, wasteful edges. This guide gives clear, practical steps to restore and maintain the edge on guillotine- and rotary-style paper cutting blades used on board cutters and desktop trimmers. You’ll learn the right tools, safe setup, proven sharpening methods (manual and powered), testing techniques, maintenance schedules, and fixes for common problems — all written from hands-on experience and current safety guidance.
Quick overview: what you’ll learn
- Essential tools and abrasives to use (and avoid).
- A step-by-step manual sharpening routine that preserves blade geometry.
- How to use a strop, diamond rod, and an electric sharpener safely.
- Reliable sharpness tests and a simple maintenance schedule.
- Troubleshooting for chips, burrs, and misalignment.
Blade anatomy and why angle matters
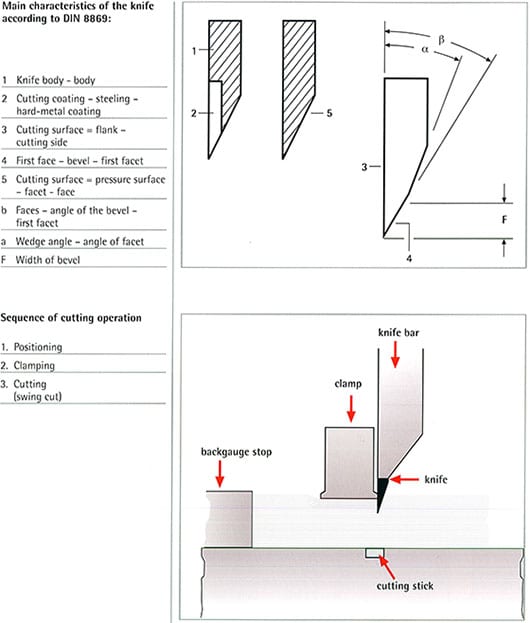
Understanding the blade’s edge geometry is the first step. Paper cutting blades are typically:
- Single-beveled or double-beveled steel edges.
- Ground to a relatively obtuse angle (often 20–30° per side) to resist chipping when cutting stacks.
- Hardened to keep an edge but can chip if struck or sharpened too aggressively.
In practice, sharpening should restore a consistent bevel along the full length without thinning the blade excessively — thinning shortens life. If you want to review sectional details, see the blade cross-section diagram on the manufacturer page (helpful for recognizing bevels): blade section diagram.
 Credit: www.papercutters.com
Tools & abrasives — what to buy and why
Choose tools that match blade steel and frequency of sharpening.
Essential tools
- Whetstones (waterstone) — 1000–6000 grit range: for restoring and polishing.
- Diamond stones or diamond plate — durable, fast metal removal for harder steels.
- Leather strop (with or without stropping compound) — final polish and burr removal.
- Small diamond rod or ceramic rod — for touch-ups and removing small nicks.
- Soft vise or padded clamps to secure the blade while working.
- Cut-resistant gloves and eye protection.
Comparisons and when to use each
- Waterstones: best for controlled grinding and fine polishing. Soak/flatten per manufacturer instructions.
- Diamond stones: fastest, long-lived, good for frequent use or very hard steels.
- Electric sharpeners: fast but remove more metal and risk changing the blade angle; use only if designed for the cutter blade type.
Safety note: always use appropriate PPE and secure the blade before sharpening — OSHA guidance on hand tool safety is a useful reference for workplace precautions (OSHA).
Preparing the cutter and workspace
A correct setup makes sharpening faster and safer.
- Clear a stable, well-lit bench and lay down an oil- or water-resistant mat.
- Remove the blade from the cutter following the manufacturer’s instructions. Keep screws and small parts in a labeled container.
- Clean the edge with isopropyl alcohol or a mild degreaser to remove surface paper dust and glue. Dry thoroughly.
- Inspect the entire edge under good light or a loupe: look for nicks, burrs, or worn sections. Photograph if you want to track wear over time.
Safety checklist (2026 guidance)
- Wear cut-resistant gloves and eye protection.
- Clamp the blade in a padded vise or use a soft-jawed clamp to avoid deforming the steel.
- Avoid working faster than you can control; do not rush.
Manual sharpening: step-by-step (recommended for most users)
Manual sharpening gives the best control over angle and material removal.
Restore geometry (if edge is very damaged)
- Use a coarse diamond plate (around 300–400 grit) only when reshaping or removing a large chip. Work slowly and check frequently.
Main sharpening routine (stone + strop)
- Secure blade flat in a soft-jawed vise so the bevel faces upward at a comfortable height.
- Choose your stone: start with a medium grit (1000) if edge is moderately dull; use 3000–6000 for polishing. Keep waterstones wet per manufacturer instructions.
- Hold the blade at the existing bevel angle (common target: 20–25° per side for many cutters). If unsure, match the current bevel rather than guessing. In practice, preserving the original angle prevents cutting performance loss.
- With light, even pressure, push the blade across the stone in a sweeping motion along the entire edge. Move from heel to tip so every section receives the same number of strokes.
- Suggested count: 8–12 full-length strokes per side per pass.
- Alternate sides every pass until a consistent, even edge develops. For a final polish, use a finer grit or a strop.
- Remove any burr by stropping: drag the blade spine-first along a leather strop (opposite direction of cutting) for 15–30 passes per side. Add a thin stropping compound for faster polish.
Practical tips
- Keep a log of strokes per session — it helps build muscle memory and consistency.
- If you create a new flat spot when repairing a chip, blend the adjacent bevels gradually to avoid creating an inconsistent edge.
Using an electric sharpener — safe approach
Electric sharpeners are acceptable when designed for the blade profile and used conservatively.
How to use
- Confirm the sharpener is intended for your blade type (manufacturer compatibility).
- Run the blade once through the coarse stage, then one or two passes through the fine stage.
- Check angle and flatness frequently; stop as soon as the blade passes the paper test.
Trade-offs
- Pros: fast and repeatable.
- Cons: removes more metal, risks overheating, and may change bevel geometry. Use sparingly for quick refreshes rather than full restoration.
 Credit: www.youtube.com
Testing sharpness — reliable methods
Always confirm before remounting.
Paper test (best for cutters)
- Hold a clean sheet of standard copy paper and slice with the blade. A sharp blade cuts through smoothly with little downward force and a clean edge. If it snags or tears, sharpen more.
Tomato/skin test (sensitive test)
- Using a ripe tomato or single-ply paper towel, a truly sharp edge will slice the skin cleanly with minimal pressure.
Visual and tactile checks
- Under a bright light and magnifier, the edge should be uniform and free of shiny flats or nicks.
- Run a finger lightly (perpendicular) across the back of the blade away from the edge — you should not feel a raised burr after stropping.
Reassembly and alignment
- Remove protective clamps and wipe the blade clean of stone residue. Apply a light coat of rust-preventative oil on non-cutting surfaces.
- Reinstall the blade per the manufacturer torque specs: hand-tighten then torque to spec if recommended. Incorrect torque leads to misalignment and uneven cuts.
- Perform a test cut with a scrap stack to confirm alignment and cutting quality. If cuts are skewed, check blade seating/holder for wear or debris.
Maintenance schedule (practical plan)
- Daily: wipe blade after use to remove paper dust.
- Weekly (light use): quick strop or 5–10 passes on a fine rod.
- Monthly (moderate use): 8–12 strokes per side on a 1000–3000 grit stone + strop.
- Quarterly or as-needed: full edge restoration with a diamond plate if chips appear.
In practice, frequency depends on volume and material — heavier stock and adhesives wear edges faster.
Troubleshooting common problems
Chips or large nicks
- Minor chips: remove with a coarse diamond plate, then re-establish the bevel and polish. Work slowly to avoid removing excess material.
- Deep chips: depending on blade value, replacement may be more cost-effective than removing significant material to reshape.
Persistent burrs after sharpening
- If a burr remains after stropping, increase the number of strop passes or use a slightly coarser finishing stone for a few light passes before stropping again.
Uneven cuts after sharpening
- Check blade seating and holder alignment. Reinstall and re-torque to spec. If the blade has an asymmetric bevel due to over-sharpening one side, restore symmetry on the stone.
Blade overheating (electric sharpening)
- Overheating can temper the steel, making it softer. If you smell burning or see bluing, stop immediately and consider professional sharpening or replacement.

FAQ — short, practical answers
How sharp should a paper cutter blade be?
- Sharp enough to slice cleanly through your typical material stack with minimal downward force. For safety and longevity, don’t aim for a razor-thin kitchen knife profile — paper cutters need a robust bevel.
Can I sharpen a rotary trimmer blade the same way?
- Rotary blades are thin and often carbide-coated. Use manufacturer-recommended methods; many rotary blades are best replaced rather than reshaped. When in doubt, consult the cutter maker’s guidance.
How do I know when to replace the blade?
- Replace if: multiple deep chips exist, edge thinning has shortened blade life significantly, or repeated sharpening no longer yields a clean cut. Replacement is cheaper than repeatedly removing large amounts of metal.
Is it safe to use household oil on the stone or blade?
- Use lubricants recommended for your abrasive: water for waterstones; light honing oil for oil stones. Always follow stone manufacturer instructions.
Where can I find official safety information?
- For workplace PPE and hand-tool safety practices, refer to the Occupational Safety and Health Administration guidance at OSHA. For broader DIY and sharpening basics, university extension sites provide practical overviews (for example, the University of Minnesota Extension at https://extension.umn.edu).
Final checklist before you finish
- Edge cleaned, sharpened, and stropped.
- Blade reinstalled and torqued to spec.
- Test cuts pass the paper and product-specific tests.
- Log the maintenance date and method for future reference.
Conclusion Sharpening a paper cutting board blade is a repeatable skill: set up safely, match angles, remove metal only as needed, and finish with a strop for a burr-free edge. Regular light maintenance extends blade life and keeps cuts clean. If you follow the step-by-step routine above and use the testing methods, your next stacks of cuts will be consistently sharper and more professional.
Ready to sharpen? Follow the manual stone routine described and test with the paper test — your next 50 cuts will be noticeably cleaner.

I’m Abby Lu, a passionate home cook who loves simplifying everyday meals. At PlugChef.com, I share product reviews and cooking guides to help you find the best tools for your kitchen.
Related posts:
 How to Make a Fruit Basket for a Gift: Easy DIY Guide
 Do You Need a Basket? Essential Guide for Air Fryers
 How to Choose Kitchen Appliances: Expert Tips Revealed
 Kitchen Cabinets With Black Stainless Steel Appliances: Modern Elegance
 White Kitchen Cabinets Stainless Steel Appliances: Timeless Elegance
 Top 10 Best Non-Toxic Cooking Utensils – Safe & Durable Choices for Healthy Homes

