

A messy pile of measuring cups slows you down and can throw a recipe off track. Good storage keeps cups accessible, protects markings, and reduces cross-contamination. This guide lays out practical, tested solutions for every kitchen size and material type, plus simple maintenance you can start today.

Credit: www.fromhousetohome.com
Core principles for storing measuring cups
Before picking a container or hook, follow three basic rules that make every storage system work:
- Visibility: store cups where you can see the sizes at a glance. That saves time and reduces measuring mistakes.
- Protection: keep fragile materials (glass, printed plastic markings) from heavy objects and abrasive surfaces.
- Accessibility: place frequently used cups within reach of your main prep area (near bowls, mixer, or baking supplies).
In practice, a common mistake is tucking cups into a busy utensil drawer with forks and spatulas. They get scratched, markings wear off, and you waste time untangling them. Instead, designate a slot, hook, or small bin. If you bake most weekends, keeping cups on the cabinet shelf above mixing bowls is often ideal.
For cleaning and food-safety guidance related to utensils and preventing cross-contamination, refer to general kitchen hygiene resources from the Centers for Disease Control and Prevention and the U.S. Department of Agriculture. These sites explain why thorough washing and drying are important before storage.
Choose storage by material and use
Different materials need different care and storage setups. Match your storage choice to material and frequency of use.
- Stainless steel: durable and magnetic-friendly. Store by hanging on hooks or a magnetic strip. Dry thoroughly to avoid occasional rust at seams.
- Aluminum: lightweight but can oxidize; keep dry and avoid acidic residues. Store in a dry drawer or bin.
- Plastic: comfortable and cheap, but markings can fade. Store away from abrasive items and excessive heat; nested storage is space-efficient.
- Glass/ceramic: heavy and fragile. Keep on a low shelf with padding or in dedicated compartments.
- Wooden-handled cups: avoid prolonged moisture and store in ventilated areas to prevent swelling or mildew.
If you rely on accuracy for baking, avoid stacking printed plastic cups under heavy items — the pressure can deform rims and change true volume slightly over time. For professional-level consistency, weigh ingredients where possible, but when using cups, preserve the measuring edge by storing cups flat or nested carefully.
Drawer storage: step-by-step setup
Drawers are the most common option and work well when organized.
- Empty and sort: remove everything from the drawer and sort measuring cups by set, material, and frequency of use.
- Measure space: note drawer width and depth to choose organizers that fit.
- Choose a system:
- Adjustable dividers: flexible for mixed tool sizes.
- Small bins or trays: group a nesting set per bin.
- Foam cutouts or molded trays: custom fit and prevent shifting.
- Arrange for visibility: place largest cups at the back (for shallow drawers) or lay them side-by-side with handles aligned so markings show.
- Label sections if you share the kitchen.
A practical tip: add a thin non-slip liner so cups don’t slide when you open the drawer. For deep drawers, use a shallow top tray (tiered organization) so frequently used cups remain at the top layer.
Credit: www.target.com
Example of a nesting set stored in a drawer tray.
Hanging, pegboards, and door-mounted racks
Hanging solutions put cups in plain sight and free up drawer space.
- Hooks: screw-in or adhesive hooks inside cabinet doors or under shelves work well for metal or plastic cups with looped handles.
- Pegboards: offer flexible spacing and room for other tools (spatulas, whisks). Pegboards are great in dedicated baking stations.
- Door racks: slim racks with pegs attach to cabinet doors and keep cups hidden but reachable.
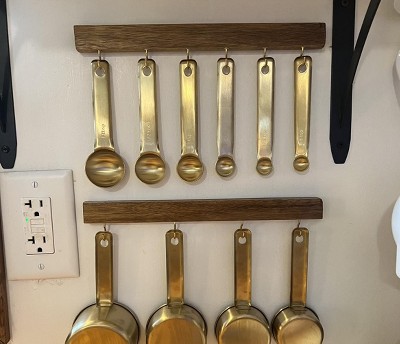
How to hang without drilling: use strong adhesive hooks rated for kitchen use or over-the-door organizers. One practical observation: metal cups are easiest to hang; if a cup is plastic or has a smooth handle, add a small keyring or carabiner to the handle so it stays on the hook. When hanging on open rails, alternate cup sizes so they don’t nest and get stuck together.

Credit: www.aol.com
Hanging metal measuring cups on hooks for easy access.
Magnetic strips and creative vertical systems
If most of your cups are stainless steel, magnetic storage is sleek and space-saving. Attach a magnetic strip inside a cabinet door or on a backsplash. Ensure the strip is rated to hold the cumulative weight.
Other vertical ideas:
- Mug tree repurposed for cups.
- Wall-mounted rails with S-hooks.
- Floating shelf with edge lip to prevent sliding.
Trade-offs: magnetic strips look tidy but exclude non-magnetic cups; pegboards are flexible but require wall space and installation.
Protecting accuracy and markings
Measuring-cup accuracy depends on shape and condition. To keep measurements reliable:
- Inspect rims and edges periodically for dents, warps, or chips that can change net volume.
- Avoid abrasive scrubbers on printed markings — these fade fast. Use warm water and gentle detergent.
- For plastic cups, never leave them near direct heat (oven, hot stovetop) which can warp dimensions.
- Replace cups with faded markings or distorted rims; a worn 1-cup can be the difference between success and a dense cake.
If you track baking consistency, mark replacement dates with a small label on a storage bin so you know how long a set has been in service.
Cleaning, drying, and food-safety tips
Wash measuring cups immediately after use for sticky substances (honey, syrups, peanut butter). Hot soapy water typically suffices; run dishwasher-safe metal and plastic cups through a regular cycle, but check manufacturer guidance for temperature limits.
Drying tips:
- Towel-dry metal cups to prevent water spots and seam corrosion.
- Air-dry plastic and glass upside down on a rack; ensure full drying before storing to avoid trapped moisture and mildew.
For guidance on preventing cross-contamination and food-safety practices in the kitchen, see the resources available from the CDC and general food-safety recommendations from the USDA.
A practical maintenance routine: quick rinse after each use, full wash at the end of a cooking session, and a monthly inspection for damage or residue buildup.
Small kitchens and travel-friendly solutions
In tight spaces, maximize vertical and multi-use storage:
- Keep a compact travel set (nested 1/4, 1/3, 1/2, 1 cup) clipped together on a carabiner and hung inside a cabinet door.
- Use a slim magnetic strip on the side of the refrigerator or metal cabinet.
- Store cups inside a labeled clear container or stackable bin that fits on a pantry shelf.
For camping or travel, soft pouches with elastic loops protect cups and keep them together. In practice, a common efficiency trick is to reserve one set for everyday use and a backup set for special recipes to avoid constantly moving cups between storage spots.
Troubleshooting common problems
- Stuck nested cups: slide a plastic straw or silicone spatula between cups and twist gently. Avoid prying with metal tools that can scratch.
- Rust on metal seams: dry thoroughly after washing and, if light rust appears, clean with baking soda paste, rinse, and dry. Persistent rust means replacement is safer.
- Faded printed markings: consider replacing the set or labeling handles with a durable adhesive label showing sizes.
- Bulky sets with odd fractional cups: store rarely-used specialty cups separately in a labeled bin to prevent clutter.
Buying and organizer checklist
When choosing new measuring cups or storage gear, check:
- Material durability (stainless vs. plated metal vs. plastic).
- Clear, engraved markings (ink fades; engraving lasts).
- Flat, thin measuring edges for accurate leveling.
- Magnetic compatibility if using strips.
- Organizer dimensions that match your drawer/cabinet.
If you already have a system but clutter persists, try simplifying: keep only one full set in the main prep area and move extras to a low-access zone.
Frequently Asked Questions
Q: Where is the best single place to store measuring cups?
- A dedicated drawer with dividers or a small bin near your mixing area is best for daily use. Hanging inside a cabinet door is good if counter or drawer space is limited.
Q: Can I leave measuring cups on display?
- Yes—displaying cups (hung or on open shelves) makes them accessible and can be decorative. Ensure they’re secure and out of reach of curious children.
Q: How often should I replace measuring cups?
- Replace when edges warp, markings become unreadable, or rust/corrosion appears. For heavy-use sets, expect to replace plastic sets more often than stainless steel.
Q: Should measuring cups be nested together?
- Nested sets save space and are fine when detached easily. If nesting causes scratching or deformation, store them side-by-side in a tray or use separators.
Conclusion
Well-chosen storage keeps measuring cups accurate, accessible, and long-lasting. Match storage to material and kitchen workflow: a drawer tray for everyday sets, hooks or magnetic strips for quick access, and a protected shelf for fragile or specialty cups. Maintain a simple cleaning and inspection routine, and label or separate rarely-used pieces to reduce clutter.
Try one storage change this weekend—move your most-used cups to a handy, visible spot and notice how much smoother your next recipe goes.

Hi, I’m Daniel Brooks—a food lover and kitchen gear enthusiast. I enjoy testing cookware, utensils, and gadgets to see what really works in everyday cooking. At PlugChef.com, I share honest reviews, comparisons, and simple guides to help you choose the best tools for a safer, smarter, and more enjoyable kitchen.
Related posts:
 How to Make a Fruit Basket for a Gift: Easy DIY Guide
 Do You Need a Basket? Essential Guide for Air Fryers
 What Blenders Do Tropical Smoothie Use: Expert Insights
Stainless Steel Vs White Kitchen Appliances: Ultimate Showdown
What Blenders Do Tropical Smoothie Use: Expert Insights
Stainless Steel Vs White Kitchen Appliances: Ultimate Showdown
 Kitchen Appliances for Wedding Registry: Must-Have Essentials
 Top 10 Best Non-Toxic Cooking Utensils – Safe & Durable Choices for Healthy Homes

